IH8MUD Newb (1 Viewer)

This site may earn a commission from merchant affiliate
links, including eBay, Amazon, Skimlinks, and others.

drool......................................................................................................................................................................................................................................................................................................................................................................................................................................................................................................................................................................................................................................................................................... ok im done.

You should do a writeup of the install.
 
nice...x300 on that engine bay too. you still need to post up some pics of the rest of the rig. sure wish i had waited and bought a texas rig after moving down here...:doh:
 
Last edited:
Christmas in October

It has been a dreadfully long time but it finally arrived......the RODNEY SPECIAL! :D

Overall, Rodney has been excellent to do business with and I am pleased with the quality of work he has provided - I have yet to verify performance but I have much faith.

Dealing with customs, brokers and what not got a bit irritating this past week but all in all no major snags or issues - the usual missing paperwork here, no invoice there, please refax this and I thought we emailed you that - none of which had to do with Rodney/Wholesale Automatics.

Even the manner in which the product was packaged sent a clear message to me... Rodney takes pride in his work and his customers. And to bridge the cultural divide... they packed about 20 lbs of Australian newspaper clippings in the crate. I have tons of worldly reading at my fingertips!;)

Anyway... if this sounds like a Wholesale Automatics commercial so be it. I hope to have everything installed within the next week (knuckle rebuild/bearings, temp gauge/external cooler and A440F installed) and I will report in with the verdict.


WoooHooo!
Box.JPG
Rodney Special.JPG
Output Shaft.JPG
 
Betty Nice!!! Can't wait to hear how she drives with the new tranny!
 
Man you should be a proud new owner of a bad *ss ride!!
 
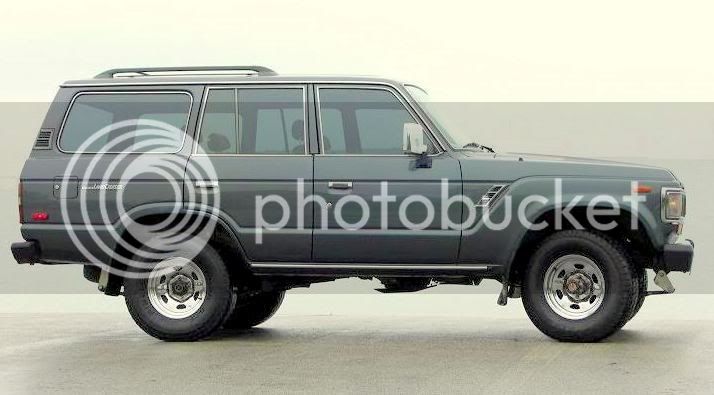
Thought I would post an updated photo of my ride... and yes, it is a wimp compared to the amazing beasts on here but I am slowly coming along. I am going to pound my own drum for a minute.

Repairs/Add-Ons
Rebuilt Fr Axle
Rebuilt Knuckles
Rebuilt Transfer Case
Rebuilt Transmission/Extreme Valve Body
Transmission Cooler
Replaced all belts/wires/plugs/etc (OEM)
Wheel Ornaments:flipoff2:
A/C Conversion (R134a)
Sony XPlode/Infinity Speakers
33x10.5 BFG MT
Yakima Roof Rack - 63" bars
Financial Counseling :doh:
62-Sunset.jpg
 
HOLY *&%^$&$&@&$* that is fawking CLEAN!!!! and 5K? man....
as to the round lights, you can change over the core support etc. and be good to go.

now go get it dirty!
oh, and welcome:flipoff2: (officially)

2x...HOLY TOLEDO!@#$%^&*%$... mama taught him how to clean his room...I agree, there are some demonic forces at work here....too kleeennn

now, get it foookin dirty dude!!! :grinpimp::flipoff2::steer:
 
It's not 'built' enough to get it too dirty yet... suspension is the next item on the list (HFS). Even when it is built, I doubt I will have the brass ones to beat it up too badly.

I did take it out to get 'dirty' today but as usual... I was the only one 'off road'.
Mud PuddleII.jpg
P62.jpg
 
Last edited:
Left Rear leaf is obviously cracked...
D62.jpg
OSnap.jpg
 
Glad that rig went to you and not to them other members that pull the whole cabin out and replace it with a roll cage.... too clean for that .... and If you don't get it scraped or rolled, I wont laugh... just glad your keeping it clean....
 
Very nice 62! It will be nicer with the round eyes. ;)

Just noticing the shackles are greasable and appear to be anti-inversion so some suspension work has been done. Maybe I missed that you did it but with cracked springs I would guess not.

I've been reminded that was was clean when I got it but not that clean. Not so much any more but IMHO it's more fun to wheel a 62 than polish it. :D
 
BG_TX - If you want more time before the HFS, as a temp fix to the break, I've got my old springs sitting in the garage. I'm headed your direction in the next couple weeks and can drop it off.

Let me know - you're welcome to them if wanted.
 
Thanks Gas-A-Lot... I want to keep the rig as 'original' in appearance as possible but still capable of some mild off-roading. Most of the mods I plan on adding can easily be removed if I ever need to take it back to near stock condition.

FR4x4 - you are correct, the shackles were added by the previous owner. I am replacing the current shackles with HFS greasable barbell shackles when I tackle the suspension.

Bridges - excellent offer! I really appreciate the gesture but I think if I am going to replace one pack I might as well do them all. I was going to put off the suspension replacement until fall due to the Texas heat but it won't wait that long. I assume it will be installed within the next month providing my buddy (heap owner) is willing to sweat off 30-40 lbs helping me with the job.

I had to re-wire my passenger door speaker this past weekend (pulled a wire loose when cleaning the AC components), literally a 30-40 minute job with zero hard labor involved and by the time I was done it looked like a water hose had been turned on me from sweat. Texas is tooooo stinkin' hot!

Who has an air-conditioned garage? haha:p
 
Suspension Installation - HFS Springs/Anti-Inversion Shackles

Call it a shameless self-promotion, call it an addiction... I am raising my introductory post from the dead. I finally got around to purchasing the lift and as originally planned I went with HFS.

HFS.jpg


I committed the cardinal sin of lift installation... I forgot to take full vehicle measurements prior to installation. We put the front of the wagon up on stands Friday evening and started eye balling everything and talking through it. Before I knew it the front end was disassembled. Front end removal was very easy... I expected the bushings would be a nightmare after reading horror stories of hammering and torching. Only 2 caused me grief but with a couple wacks from Moses (BFH) and a pipe they were out.
Shacklesremoved.jpg


:princess: made quick work of removing the shocks...
Shockremoval.jpg


HFS spring on the bottom, OEM on top...
FrSpring.jpg


The front end removal took about an hour, in between a couple of beers and chit-chat. Then the 1st trouble spot... mounting the new shackles turned out to be very tough. We tried several methods and the shackle was too tight to slide over the bushing without chewing it up as it slid. We used a lot of grease, floor jacks to push it up, etc with no luck. We decided to call it a night, hang out with the :princess: and sleep on it.

Saturday we got started about 10a and attempted to mount the shackle. Same problems as the previous night... the next option was tapering the open ends of the 'H' to reduce friction and allow it to slide without tearing/rolling the bushing (suggested by a member and thanks!). I decided against it, the shackles we took off were anti-inversion shackles and they are easy to mount since they can be seperated. I'm not bashing the HFS shackles, they are beefy and look great but the anti-inversion are beefy and easy to remove/install. I sided with ease of use...

Next problem, U-bolt skid plate installation. I had read these can be a pain when bolting up to the spring pack but we had no problems.
UboltSkidPlate.jpg


We encountered an issue when we started mounting the shocks. The lower shock mount on the skid plate was in an odd location and hit the spring behind it and put the shock at an odd angle.
SkidPlateShockAngle.jpg


Here is the lower mount location, even without the spring clips the shock would hit the spring pack.
SkidPlateMount.jpg


Maybe it was user error but I put the OEM seat back on, I think the OEM is built better anyway. The skid plate shock mount is welded onto the lip of the plate and I can see how that could be busted in some rough situations.

Front is done... on to the rear! The rear was very easy with no major issues. Spring comparison, HFS on the bottom and OEM on the top.
RearSprings.jpg


After the rear it was time to replace the steering stabilizer... should have done it when the front end was off, oh well. I beat on it for a bit with Moses and it wouldn't budge. Gear pullers had it out within minutes.
GearPuller.jpg


Fully installed and greased by about 6p... test drive and torqued by 7p. We measured the rear wheel well before installation and the lift provided 3" total lift (35" prior/38" after). I plan on putting shims in to correct the pinion angle (it is off), extended brakelines (never know when full rear flex is needed) and rear sway bar extensions.

Here is the progression of the wagon so far...

Not long after purchase...
31" ATs, Extended Shackles (1.5" fr/2" rr)
FJ62Purchase.jpg

33" MTs, Extended Shackles (1.5" fr/2" rr)
FJ62Shackle.jpg

33" MTs, 3" HFS Spring Lift, Extended Shackles (1.5" fr/2" rr)
FJ62Lifted.jpg


bg_tx-albums-1989-fj62-spring-shackle-lift-picture6536-3-hfs-springs-extended-anti-inversion-shackles-1-2-2.jpg


:beer::cheers:
 
Last edited:
That 62 is beautiful. Only 5k? A guy down the street from me was trying to sell his 62 for 5 with tranny issues and quite a bit of rust.
 

Users who are viewing this thread

Back
Top Bottom