How To Remove 80 Series Door Pannel (1 Viewer)

This site may earn a commission from merchant affiliate
links, including eBay, Amazon, Skimlinks, and others.

Ugly Dwarf

SILVER Star
Joined
Apr 13, 2012
Threads
22
Messages
199
Location
East Bay - San Francisco Bay Area
I was doing some work on my new cruiser yesterday afternoon, and I wanted to take a closer look at the driver side master window switch that had been acting up since I picked up the truck last weekend.

That siad, I of course ASSuMEd I needed to take the door panel off to get at the switch. I'll note this is not true, and you can get to the window / lock switches without removing anything else. After popping out the plastic screw / pin thing-a-ma-bobs that go around the outside edge of the door, I could tell it was still hanging up on some sort of securing devices in the middle.

It was not obvious to me where these might be located or how to get at them, so I started searching here. I found a few people who had written suggestions on where to look and some pictures of removing the 100 series pannels, and was able to figure it out from there, but I thought I'd post up the 80 series pix in case someone else needed them.

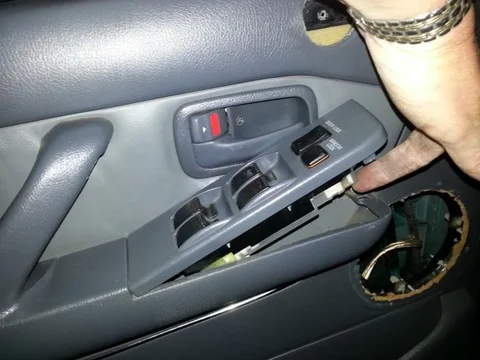
If you need to get at the window / lock switches, you can just pry up on the front of it, then lift it out. You'll need to disconnect a plug at the back of it to remove it completely.

Remove Window Switch.jpg

To remove the door pannel, you'll need to go through additional steps as well.

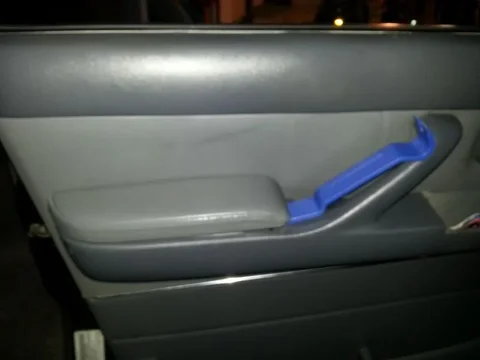
Remove the arm rest.

Remove Arm Rest.jpg

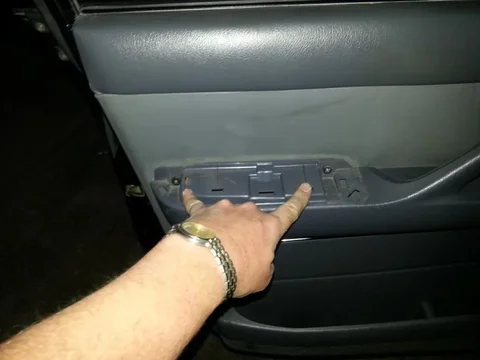
Arm Rest Removed.jpg

I only seem to be able to attach three pix per post, so I'll continue this in a minute

Remove Window Switch.jpg


Remove Arm Rest.jpg


Arm Rest Removed.jpg
 
Last edited:
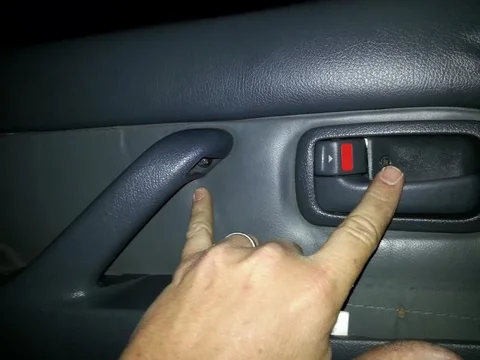
Once you remove the arm rest and window / lock switch, you need to remove some screws.

Arm Rest Screws.jpg

Grab Handle and Door Handle Screws.jpg

Here is a picture of the tools I used and some parts removed. I didn't get a pic of it in place, but note the black triangular plastic piece that clips in on the inside of the door on the opposite side of the driver side mirror. I got it off by prying (gently) on the top corner, then it pivots out at the bottom (if that makes sense).

Tools used and parts removed.jpg

Next, I'll post some pix of the door pannel removed (front and back) and door with the pannel off.

Arm Rest Screws.jpg


Grab Handle and Door Handle Screws.jpg


Tools used and parts removed.jpg
 
Once you've got the screws removed, you can go around the edge of the door pannels and pop out the plastic plastic screw / clip thing-a-ma-bobs where they attach to the door. I used the $6 Harbor Freight door trip kit, but in a pinch you can use a pair of puty knives (though I find I'm much more likely to break things using puty knives).

This pic should give you an idea of where the tabs are located.

Back of Door Panel.jpg

Once you've removed the screws, popped out the tabs, and removed all the other items, you can simply pull out on the door pannel (just a little) from about mid way down and lift up. Use a little side to side wiggling to get it free from the top.

I don't know if you can do this with the window up, but I expect it's MUCH easier if the window is all the way down.

Not sure if this one is needed, but here is the front of the door pannel with everything removed.

Front of door panel.jpg

Here is the door with the pannel removed, so you can see where the black triangular piece would fit up in the top right corner of the picture. Sorry for the blurry picture. I took these last night as I was finishing up and apparently the flash didn't go off.

Door with pannel removed.jpg

Reinstall happens in the reverse order, though I think I got all the screws started before I started popping the edges of the pannel back in.

Let me know if I missed something or if you have questions.

Door with pannel removed.jpg


Back of Door Panel.jpg


Front of door panel.jpg
 
That is part of the door lock / security system.
 
Nice write up! Having followed the instruction, I have just popped mine out and replaced the driver side window run. :popcorn:
 
Nice writeup indeed. I just did this last weekend to replace my door speakers with Polk DB651 speakers. I didn't do the slim series as I read they weren't much different on the back side. I surface mounted them with spacers like was shown in other posts on 'mud.

Those plastic tools are awesome aren't they? I bought a set a while back and they made it all very easy. I also got a metal tool that worked well too. I was impressed that none of the clips got broken.

The corner up by the mirror was busted up on both of my doors. It doesn't show when it's together, but for some reason it was broken into several pieces.
 
Thanks for posting this I'm going to get my speaker out and replace the foam ring around the speaker . I found this on line and was going to give it a try . Lexus Kits.
 
This was so helpful - thanks very much for posting. My window stopped going up and down, and this helped me get to the mechanism to get the wheel back on the track. :cheers:
 

Users who are viewing this thread

Back
Top Bottom