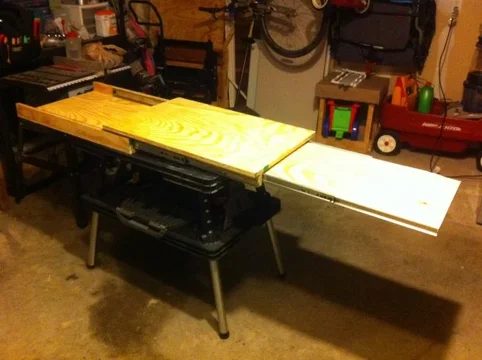
Homebrew fridge/stove slide combo

This site may earn a commission from merchant affiliate
links, including eBay, Amazon, Skimlinks, and others.

FYI - Does NOT look like OP secured it to his vehicle. Just looks like it is sitting there.

If done in that manner, you could get a couple Rubber tiles and secure them to the bottom so it does not slide around on any surface. Would make putting in and taking out a pain.

Could also put a few strips of "VELCRO" just the "hook" side so it grabs the interior carpet.
 
If anybody looks at this thread and decides to use the tail gate as a support I would strongly suggest they inspect the tailgate support cables. The design is such that water can be trapped in the rubber sleeve and cause the cables to rust through. Since the actual cables are concealed you won't know until they fail that there is a problem.

We all know that the cable will fail at the worst possible time, like mid way through a two week trip. :mad:
 
^ Yes.
One side broke while we were on a trip. Not a big deal because we don't depend on the tailgate as a work surface or support.
 
I copied the OP's design (albeit with far inferior carpentry skills) and used u-bolts wrapped around two of the 3rd row seat mounts to hold the thing in place. I removed those seats so pushed the slide as far to the passenger side as possible and was able to grab the right-most seat mount. Seems to be held firmly in ace with just those two attach points.

Bought slides from the local big box hardware store. Chose the strongest they had, 100 pounds, knowing the drawer would be supported by the tailgate. Those seem to work too, but could be longer.

A few more details and pics are here:

https://forum.ih8mud.com/100-series-cruisers/609679-what-have-you-done-your-100-series-week-65.html
 
Yikes! I've been off the forum for a few months and I guess I don't get emails about PMs... Sorry guys. I secured it to the 3rd row mounts using super heavy duty zip ties. I get em free from the SO; we use em as cuffs. I just drilled two holes strategically placed on the bottom of the slide over each 3rd row mount and zip em down. If I need to use the other seat I just cut the zip tie and out it comes.

The slides were sourced from Home Depot.
 
Well i kind of copied this.... actually i just did the fridge slide and not the stove slide.

I ended up sourcing the slides from my old boss who works for a large bank in NC and does all their computer servers. Every time they buy a new server, it comes with a "rail kit". Most of the servers are replacing existing servers so they just toss the rail kits so he gave me a couple.

I ended up using one flat board as the base and drilled 4 holes in it. I then went to lowes and purchased four bolts with the same thread pitch as the rear seat latches on the floor; removed the latches and then ran the bolts with washer down into the existing holes. Been that way for a few months, over 6,000 miles of driving AND drove the Rubicon trail and some Moab trails that the fridge held up to. So i'm happy.

Also, i LOVE LOVE LOVE my engel fridge!!
 
I ended up sourcing the slides from my old boss who works for a large bank in NC and does all their computer servers. Every time they buy a new server, it comes with a "rail kit". Most of the servers are replacing existing servers so they just toss the rail kits so he gave me a couple.

can you get more;) someday i'll do a slide...being short,it's hard for me to get into the rig to look in the fridge. i should've checked it out in rubicon. should've bought an engel too, but my waeco was $250. someday it will work right. :rolleyes: to hold it down, i'm using turnbuckles with the "s" hooks from broken bungie cords. works great and you can adjust tension.
 
iggy i just tossed 3 sets of rails into the trash cause they were just taking up space. I will ask for a few more sets and send you a set in the mail.
 
I'm glad I saw this thread today. Since I'm still ballin' on a budget, I'm going to have to build a cheap slide. I was thinking about doing something a little different and having the top slide piece go completely over the base. And the just keeping a spare piece of wood that would go in the void.

Someone gave me a Coleman stove the other day and I have no idea what to do with it, so I am going to seriously consider stealing this idea! I like how you were able to keep your 3rd row seats installed. I am planning on having to take out my left side seat.

Update: After laying out the copy of your great design, I think I am going to basically repeat your design and keep the table for the stove but not the permanent space for it. I have a feeling the fridge will be utilized often by my wife who isn't 6'+ like me and I don't want to make it higher for the occasional use of the stove.
 
Last edited:
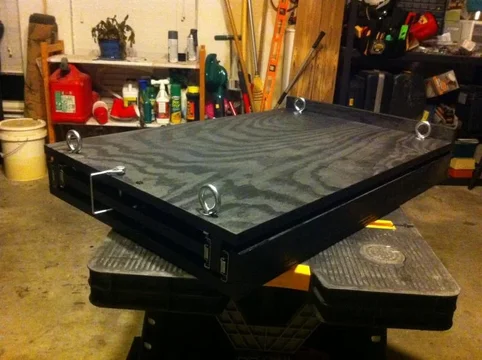
I started building my fridge slide today for my Edgestar 63 quart and was able to complete the build, just need to find the hardware to bolt it to the floor and take it apart (just the slides) to prime and paint it. I used 3/4" sanded plywood (about a half sheet), and I regret that I did. It chips easily if you are drilling near an edge and the piece I bought had a large bow all the way across. Lesson learned, buy quality flat plywood.

The unit is 30"x20" and is probably less than 6" tall and weighs 40lbs. For the slides, I used 22", 100lb slides from lowes ($19 per set). Probably overkill for the shelf, but they didn't have anything else in 22".

I wanted to make it as low profile as possible and in doing that I didn't think about clearance for the bottom side of the top anchors. You can see in the picture on post #36 where I had planned to put the anchor, where the hole in the corner is. So I was left with the choice of making the fridge slide walls taller, using lag eye bolts, or moving the anchors in and over the shelf (which I did as it was the easiest). I used fender washers on the bottom of the eye bolts and positioned them right on the edge. After I installed the eye bolt anchors, the fridge fit perfectly between them (unplanned). Looking at it now, I don't think making the slide unit any taller would be a real option. The Edgestar fridge is pretty tall and it is maxed out on clearance when the slide is extended and the fridge door is opened.

The bottom of the unit just barely covers the front third row seat anchor. So I plan to use a J-bolt on that one and a U-bolt on the rear third row seat anchor. In hind sight, I should have made the unit about 2" longer so I could use a U-bolt on both (and the fridge wouldn't be so tight on top).

I used a square linch pin to secure the shelf to the fridge slide and I found it doubles as a nice handle. I drilled a hole through the unit on the all the way to left side and used an Allen wrench like a pin until I find something better. I did install a vertical back wall on the unit to act as an additional stop. The lowes slides, the stop tabs will bend from the weight of everything pushing against it over and over, so a back is a must.

My only other concern is securing the slides. Since I used 3/4" sanded ply, it's hard to get a lot of bite with screws. I may just bolt through in places if there is enough clearance. It's a cheap build and I realize its not perfect and won't last forever. Sorry in advance for the multiple posts, I couldn't post more than one picture per post on my ipad.
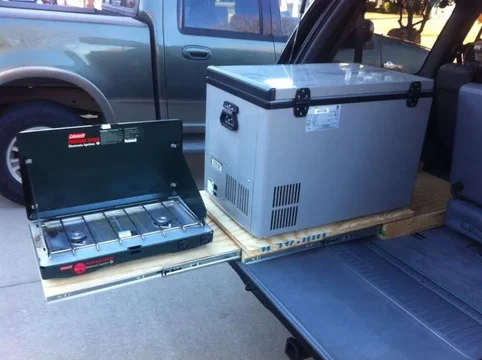
image.webp

image.webp
 
Last edited:
Great thread! I've had an idea like this floating around in my head for a while. Nice to see someone who has already made it work. I love the stove idea too! :thumbsup:
 
Nice slides. Time to start drafting up some plans for myself!
 
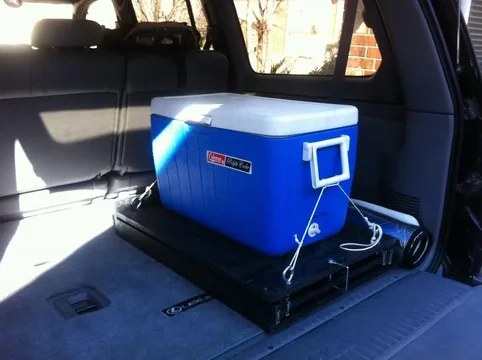
Here is the fridge slide installed. Unfortunately I had to send back my fridge for repair so no fridge installed picture. Mom moved recently and was cleaning out her house and found the blue coleman cooler we took all over the country in the back of a station wagon towing a popup in the 80s! 6 people lived out of that rig. Now I have a LX wagon, fridge (and slide), and Jayco popup for my family of 4.

image.webp

image.webp
 

Users who are viewing this thread

Back
Top Bottom