
If you're going to weld it, steel plugs.
You can Braze Brass to cast iron but it's tricky. Gotta have skilz
You can Braze Brass to cast iron but it's tricky. Gotta have skilz
Follow along with the video below to see how to install our site as a web app on your home screen.
Note: This feature may not be available in some browsers.
This site may earn a commission from merchant affiliate
links, including eBay, Amazon, Skimlinks, and others.

How and where does one cut this? Do I have to remove it and put it back in?You only need one gasket, the second gasket between plate and intake is in case the Alum intake cracks cuz then you'll get an intake leak at that spot. But the main reason for installing that plate is to prevent the Intake from cracking, so ...
It was over 10 years ago, now, but I do remember there being some kind of fitment issue with the two aftermarket gaskets.
If you're worried, use thin smear of the the HIGH temp red Permatex. The copper stuff.
Did you cut or remove or lock open the exhaust flap?
How and where does one cut this? Do I have to remove it and put it back in?
Thanks dude!
Dan
I used two gaskets because I had a crack in my intake. One between block off plate and intake to seal that, then second gasket between exhaust manifold and block off plate to seal exhaust. I also completely removed heat riser plate assembly. I had a pretty sizable leak coming out from hole closest to firewall.Is it just assumed in all of this that the heat riser deflector has been removed? I currently have a leak coming out of, either the gaskets between the exhaust and intake or it's leaking out the heat riser hole on the side. Soon to find out. But while I'm in there I want to know if I should be planning to remove the heat riser and replace it with the block off plate being discussed.
And @LandoNick I read this whole thread and didn't come away with a straight answer to your question. 1 gasket or 2? Seems equally divided.
Thanks for the response. Your solution/s are what I've inferred from this and a couple other sources.. It feels like the leak is coming from the same place, the heat riser hole on the firewall side. Did you ever get the tap and plug to work? That seems to be the preferred solution, just wondering if yours ever stayed in place, and if so what you did differently?I used two gaskets because I had a crack in my intake. One between block off plate and intake to seal that, then second gasket between exhaust manifold and block off plate to seal exhaust. I also completely removed heat riser plate assembly. I had a pretty sizable leak coming out from hole closest to firewall.
So if you have a crack in your intake ( causing vacuum leak) you need two gaskets if your intake is fine then one gasket should be fine. That’s my take on this.
Mine was also leaking on the firewall side so I completely removed the deflector flap & shaft, and used one gasket since the intake was fine. I asked the machine shop to plug the holes while they had it.Is it just assumed in all of this that the heat riser deflector has been removed? I currently have a leak coming out of, either the gaskets between the exhaust and intake or it's leaking out the heat riser hole on the side. Soon to find out. But while I'm in there I want to know if I should be planning to remove the heat riser and replace it with the block off plate being discussed.
And @LandoNick I read this whole thread and didn't come away with a straight answer to your question. 1 gasket or 2? Seems equally divided.
So my solution was less elegant and a little more hillbilly than getting the hole tapped and adding a plug. I didn’t need to get the intake and exhaust manifolds machined so I did this. If you look close you can see bolt and nut holding a 1/4 inch thick piece of flat bar I drilled a 1/2 inch hole in that. When the exhaust manifold was off 60 I got a 1/2 Stainless steel bolt and used that to hold flat bar against manifold. If I remember correctly the inside has a recessed hole so I found stainless steel washers to fill recess to eliminate as much possibility for leak. After tightening down I put a small booger weld on flat bar next to nut to keep from loosening. Hasn’t leaked since and has been about a year. Maybe not the correct solution but worked with what I had at the time.Thanks for the response. Your solution/s are what I've inferred from this and a couple other sources.. It feels like the leak is coming from the same place, the heat riser hole on the firewall side. Did you ever get the tap and plug to work? That seems to be the preferred solution, just wondering if yours ever stayed in place, and if so what you did differently?
Whoa! Love it! Interesting solution. I might have added a piece of gasket material in between but it sure looks like it's working! And beautiful manifold! Love the colors. Makes it look so clean! Thanks again for sharing. I'll have mine off next week and I'm hoping it's just the heat riser hole and not cracked anywhere.So my solution was less elegant and a little more hillbilly than getting the hole tapped and adding a plug. I didn’t need to get the intake and exhaust manifolds machined so I did this. If you look close you can see bolt and nut holding a 1/4 inch thick piece of flat bar I drilled a 1/2 inch hole in that. When the exhaust manifold was off 60 I got a 1/2 Stainless steel bolt and used that to hold flat bar against manifold. If I remember correctly the inside has a recessed hole so I found stainless steel washers to fill recess to eliminate as much possibility for leak. After tightening down I put a small booger weld on flat bar next to nut to keep from loosening. Hasn’t leaked since and has been about a year. Maybe not the correct solution but worked with what I had at the time.
Hope all this made since.
View attachment 3562748
Also, I'm jealous of the smog delete. California makes it challenging to own a 60. 1 mile of vacuum hoses.Whoa! Love it! Interesting solution. I might have added a piece of gasket material in between but it sure looks like it's working! And beautiful manifold! Love the colors. Makes it look so clean! Thanks again for sharing. I'll have mine off next week and I'm hoping it's just the heat riser hole and not cracked anywhere.
I did think of that, adding a small piece of gasket but it didn’t occur to me till after having it all back together. It’s so quiet compared to before I wasn’t going to mess with it again.Whoa! Love it! Interesting solution. I might have added a piece of gasket material in between but it sure looks like it's working! And beautiful manifold! Love the colors. Makes it look so clean! Thanks again for sharing. I'll have mine off next week and I'm hoping it's just the heat riser hole and not cracked anywhere.
I don’t miss living in California ( spent a couple years in San Diego). It is nice living somewhere that has no emission inspection and traffic. When I got my 60 took it to BMV and all they did was ask to see insurance and verify Vin #. That simple.Also, I'm jealous of the smog delete. California makes it challenging to own a 60. 1 mile of vacuum hoses.
I'm fixing this flange leak right now. How does that fat steel gasket fit in the mix?!This is absolutely @Seth S and @Spike Strip area of intense experience from a life long oppressive regime out in the CA. Emissions packagedestination market region
.
Both have helped me tackle and then update the related OEM japan spec. Special Service parts now a staple main stay from
The NON-USA far-away …
1/75 -1987 FJ40 / FJ60 Exhaust Down PIPE Repair Kit #1 OEM TOYOTA Genuine Parts FJ60 2F Engine Updated / Upgraded Exhaust Manifold to Front Down Pipe Gasket and Special Unique Hardware TORX Studs and Locking Flange Nuts - VintageTEqParts.com
OEM TOYOTA Genuine Parts FJ60 2F Engine Updated / Upgraded Exhaust Manifold to Front Down Pipe Gasket and Special Unique...vintageteqparts.com

VintageTeqParts.com Home Page – VintageTEqParts.com
VintageTeqParts.com YourOnline land cruiser parts Specialty Store Vintage Toyota parts Land Cruiser Tool Engine Power train Chassis Body Electrical Locks Keys Locksmith Service Specializing In Vintage TOYOTA ONLY .....vintageteqparts.com
As @Spike Strip puts it often , he is using modern materials with a purist based mindset approach philosophy….
I'm fixing this flange leak right now. How does that fat steel gasket fit in the mix?!
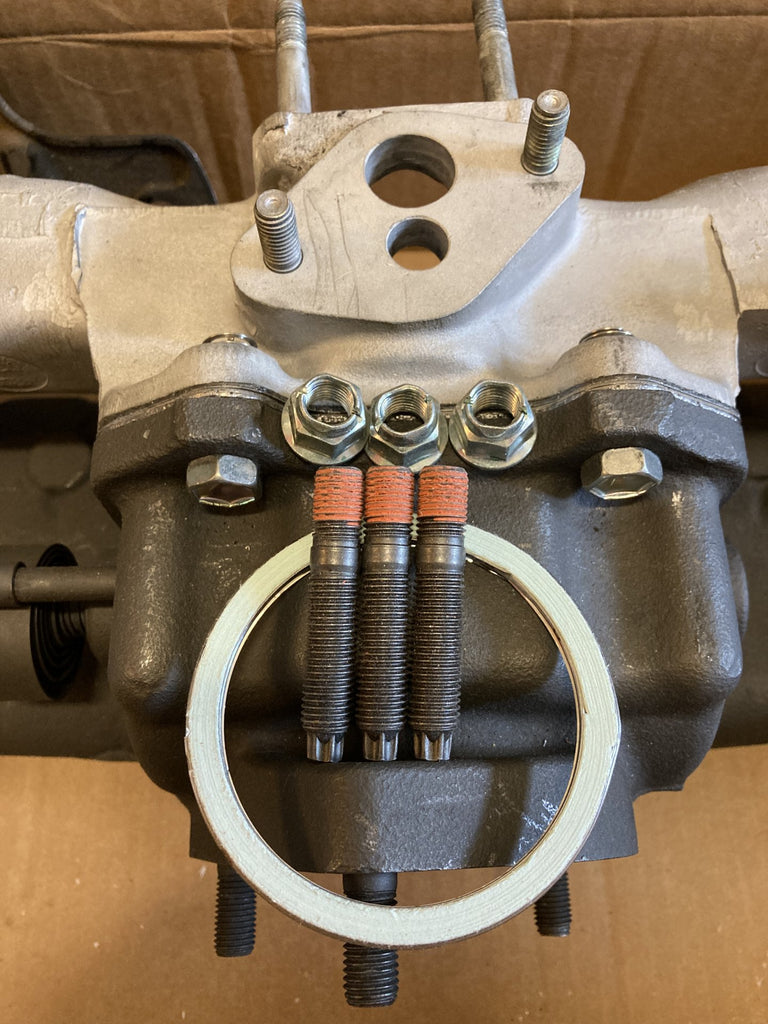
Ahhh, a replacement... Okay, that makes perfect sense, thanks for the explanation. I was trying to visualize how it fit in between the existing flange and the manifold as a solution for a leak. I have the donut gasket. Thanks.Not sure what you're asking here, but if you're referring to the thing with the three-holes in it, that's an upgraded replacement Stainless Steel flange for the one that's welded to the top of the downpipe, that bolts to the underside of the exhaust manifold.
View attachment 3564119
I'm fixing this flange leak right now. How does that fat steel gasket fit in the mix?!
Ahhh, a replacement... Okay, that makes perfect sense, thanks for the explanation. I was trying to visualize how it fit in between the existing flange and the manifold as a solution for a leak. I have the donut gasket. Thanks.
Not sure what you're asking here, but if you're referring to the thing with the three-holes in it, that's an upgraded replacement Stainless Steel flange for the one that's welded to the top of the downpipe, that bolts to the underside of the exhaust manifold.
View attachment 3564119
So my solution was less elegant and a little more hillbilly than getting the hole tapped and adding a plug. I didn’t need to get the intake and exhaust manifolds machined so I did this. If you look close you can see bolt and nut holding a 1/4 inch thick piece of flat bar I drilled a 1/2 inch hole in that. When the exhaust manifold was off 60 I got a 1/2 Stainless steel bolt and used that to hold flat bar against manifold. If I remember correctly the inside has a recessed hole so I found stainless steel washers to fill recess to eliminate as much possibility for leak. After tightening down I put a small booger weld on flat bar next to nut to keep from loosening. Hasn’t leaked since and has been about a year. Maybe not the correct solution but worked with what I had at the time.
Hope all this made since.
View attachment 3562748

Last question on this topic and a wrap up!. What type of steel and what gauge/thickness has everyone used for the riser block plate?