First FJ60 Build - 1983 Land Crusier

This site may earn a commission from merchant affiliate
links, including eBay, Amazon, Skimlinks, and others.

So I was able to install the drive shaft last night and I was wrong about the shaft bottoming out. When the land cruiser is on the ground and the drive shaft installed I have about 1/4 to 1/2 inch of travel before it will bottom out. Another thing I know that others have posted about having vibrations once their land cruiser is lifted. I used to have vibrations until I talked to my buddy Joey who gave me some awesome advise.

When installing the drive shaft make sure that you align the shaft ends. The u-joint on the slip yoke and the u-joint on the shaft needs to be aligned if not they can bind just a little causing low speed and high speed vibrations.

I was able to align the slip yoke with the u-joint end and now my vibrations have went away and drives awesome. I have not taken it on the highway yet but have had the land cruiser to about 50 mph with no vibrations.

Here is an awesome article:
http://www.4crawler.com/4x4/CheapTricks/Driveline-101.shtml#Measurements

Pic of my drive shaft:
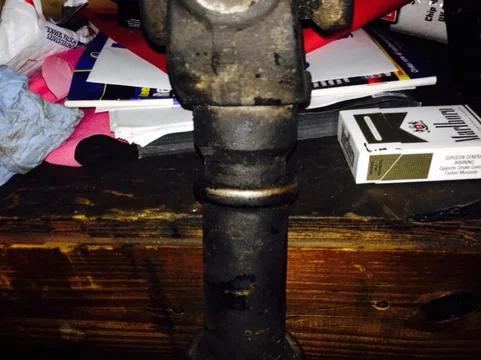

image-3404060596.webp

image-3404060596.webp
 
Everyone I was able to fix my crabbing issue by moving the passenger side rear front leaf spring hanger forward about 3/8". Took it for a test drive riding great now. Just need to align the front end and we should be all et.


image-1279452058.webp


image-3727481974.webp


image-3469513146.webp


image-3434237687.webp


image-1802765480.webp


image-1156009804.webp


image-663533543.webp

image-1279452058.webp


image-3727481974.webp


image-3469513146.webp


image-3434237687.webp


image-1802765480.webp


image-3629927422.webp


image-1156009804.webp


image-663533543.webp
 
Hey everyone so I have been driving the fj a bunch lately and now I am getting a interesting noise coming from the back driver side wheel. Sounds like bump/rattle when under load and sometimes not under load. I can not hear it on the passenger side. Not sure what is going on. I was able to take the wheel off and the brake drum and found that my new wheel cylinder is leaking just a tad, that god for warranties. I was able to pull the axel out thinking it could be the bearings. The bearing seems fine but not sure what the tolerances are to be on them between the axel. From this point on I know I am going to have ago shorten the rear drive shaft about an inch and then replace the rear outer bearings and seals. The noise or rattle happens really fast not sure what it is.

Over all I am think about dropping the money and going with a h55 5 speed.
1. What does everyone think of them, are they worth the money?
2. Is first gear better for off reading?
3. Where is the best place to buy one?

Thank you everyone for help in the past.

I hope everyone has a great and safe weekend.
 
OK so I was able to get my drive shaft shorten and replaced my rear bearing again, everything seems to be working great now. I am wanted to start working on the floor and do the Herculiner, hopefully in the next couple weeks. I will post some pics of the progress.
 
So I haven't posted in a lil bit. I was able to do some driving and everything seems to be working great.

Cirena and I was able to get the floor coated with herculiner. Turned out really nice.

ImageUploadedByIH8MUD Forum1399045292.304045.webp
ImageUploadedByIH8MUD Forum1399045313.520446.webp
ImageUploadedByIH8MUD Forum1399045328.486060.webp
 
Thanks, I was able to use raptor liner for the frame which worked awesome and is still holding up very well. I will let you know once I have pounded on it for a couple weeks.

As far as the application it went very smooth. The only thing I will say is, if you get this stuff on you. You better wash it off right then. Make sure you where some rubber gloves and old clothes when applying.

The roller that comes with the kit works well, they give you two of them. One for the first coat and then another one for the second coat. The kit also includes a paint brush to get into any corners or crevices that you may have.

Over all at the moment I am very happy.
looks good man! good work!
 
Thanks, I was able to use raptor liner for the frame which worked awesome and is still holding up very well. I will let you know once I have pounded on it for a couple weeks.

As far as the application it went very smooth. The only thing I will say is, if you get this stuff on you. You better wash it off right then. Make sure you where some rubber gloves and old clothes when applying.

The roller that comes with the kit works well, they give you two of them. One for the first coat and then another one for the second coat. The kit also includes a paint brush to get into any corners or crevices that you may have.

Over all at the moment I am very happy.


Good to know Andy, keep up the good work bro.

J
 
The herculiner is holing up very well. I was able to make some rubber mats from 3/4 inch horse stall mats. This stuff is serious.

Here is a link:
http://www.tractorsupply.com/webapp...ory_rn=&top_category=&urlLangId=&cm_vc=-10005

I was able to cut it out and make a complete mat for the back, middle and floor mats for the front. This stuff will sound deaden anything. Very happy with it. I will get some pics up later.

Was able to driver the 60 to work today. 60 mile round trip, running like a top! :)

ImageUploadedByIH8MUD Forum1399984771.214468.webp
 
OK, so since I where I live it is 90 to 100 with lots of humidity I decided to hook the A/C back up in the 60.
Here was the plan.
1. Find all the parts for the A/C and make sure everything was there.
2. Clean and blow out all the hoses, connections and check everything.
3. Sort through my buddies A/C O-Ring stash which consist of about 30 or 40 different shapes and sizes, and located the correct ones or ones that I think would work.
4. Install all the parts
5. Use my buddies A/C Vacuum pump
6. Test for leaks
7. Recharge the system
8. Hope and pray that it gets cold

So the other night to remove the grill and lights from the front and start the install. I was able to check the A/C Pump add the Ester oil, and check the hoses. I then started to install all the components. Got all the belts installed and was ready to Vac the system.

Today after work I was able to stop by my buddies house and pickup the vac. Was able hook it up and let the Vac suck the moister out of the system for about 2 hours. I then turned the pump off and waiting for about 1 hour to see if the pressure, which was down to about -30, would rise back up which would indicate a leak somewhere. And to my surprise, from what I can tell so far, no leak! :)

I was then able to use R134a and recharge the system. I decided to go with one small can first just in case something went wrong. As you know those cans are not cheap. Once the system had some charge on it the system is now blowing cold :).

I still need another can but I am going to make sure the system is not going to leak down maybe over a week or so. Then I will go out and get another.
 
Loving the build. When doing aircon, should the dryer be replaced with a new one? Mine doesnt have aircon at all and i have to install it all from scratch from a donor car.

Gare, thank you for checking out the build! :)

I would diffidently recommend replacing parts if you can get them at a good price. When i decided to do the A/C I was 50 50, either it was going to work or something was going to go wrong. So I wanted to reuse most of the parts I could.

From what I found Rockauto.com has the best prices.

Here are the parts I would replace:
This would be for my 1983 FJ60 - not sure about your year and model.

A/C Expansion Valve Related Parts - GPD Part # 3411239 - $9.09
A/C Receiver Drier / AccumulatorRelated Parts - GPD Part # 1411450 - $6.21
A/C Evaporator CoreRelated Parts - GPD Part # 4711267 - $56.79
A/C System O-Rings, Seals, & Gasket Kits Related Parts - GPD Part # 1321285 {#MT2582} - $5.05

Of course you would need the compressor and other components to make everything work if your LC did not come with A/C.

RockAuto.com has a lot of parts for the LC at a good price.
 
I was able to go out there this morning after letting everything sit over night and check the gauges. From what I can tell nothing has leaked down yet. I hope this is a good sign of things to some. I know I had issues in the past with other vehicles leaking down over a week or so. We will see.
 
Sounds like the AC is good to go to me Andy. I only waited an hour on the leakdown in Marley and never had a problem. You're gonna appreciate that cool air in East Texas, I know I did.

J

Reevesci, thanks.

I really hope it works out. I live in Jax, FL. Not really too much the heat to me but the humidity is insane.

Cant wait to test it out.

Have you had any issues with the system taking a long time to cool the cab since the cab is big?
 

Users who are viewing this thread

Back
Top Bottom