
Navigation
Install the app
How to install the app on iOS
Follow along with the video below to see how to install our site as a web app on your home screen.
Note: This feature may not be available in some browsers.
More options
Style variation
You are using an out of date browser. It may not display this or other websites correctly.
You should upgrade or use an alternative browser.
You should upgrade or use an alternative browser.
dmaddox's 1981 BJ42 restoration and information thread!
- Thread starter dmaddox
- Start date
This site may earn a commission from merchant affiliate
links, including eBay, Amazon, Skimlinks, and others.
I believe Kevin ( AwlTEQ) also makes vacuum tanks, looks like a great project vehicle the body was way better than mine.
Brian
Brian
Anyway - I also need to do some research on this vacuum tank or whatever it was that was bolted to the left frame rail. Anyone have a photo of that, or how it works, etc..?
Thanks!
There will be a vacuum pump on the back of the alternator, make sure the splines are good, I have had a few slip on me, I only got diesel 60's and they got a smaller vaccume tank on the fire wall (not the monster, in comparison, the 42's have), so no picture, it will be connected to the pump and to the brake booster, someone should have pics, hth's
nice truck
Jim
I'm not familiar where is the EDIC relay in 42 .. but in my HJ60 it's in the pass side kick panel and you could read in it EDIC relay ..
Certanly looks like one of those pictured ..
Certanly looks like one of those pictured ..
- Thread starter
- #26
Thanks bro! I can't wait to get out there - just a few weeks before the visit.
I will check around for this EDIC relay. I hope it is still under there. I downloaded the 3B user manual from the forum sticky post, so whoever put that up there - thank you!
Did Toyota have a body/chassis or whatever guide for this year/cruiser? I have the one for the FJ40 cruiser, does it contain BJ stuff too? I'll check tonight as well.
There are (just off the top of my head) two really difficult times for me to sit at work. 1. When I get a new cruiser and 2. when I see UPS/FedEx delivered loot to my door.
I am having a hard day at work.....can't wait for the weekend to hit.
Got your pm - enjoyed your last build immensly!
VERY cool plans you have for this rig - thanks for RE-storing cuz they ain't making them anymore")
As metioned above, I make a stainless reproduction of the rust prone vacuum tank and a reproduction mounting bracket (in steel). My tank is the same size, shape, inputs, outputs and drains as the original. The only difference is the ends of the original were stamped and had an oval rib whereas mine are flat. IMO this is pretty minor given I doubt the original is available and you'd be lucky to find one that is not rusted through. I also powder coat the tank gloss black to further look like the OEM.
My mounting bracket (your torched off remnants are visible in post two, pic two) is also very close to the original. The difference being there is a stamped in gusset to control fore and aft vibration (when mounted) on the OEM but mine is a welded in gusset done to mimic the OEM look.
I currently am out of stock and will be making more to fill a couple of orders on both of these parts presently.
The frame stand-offs for the 3B motor mounts are also parts that I do. Again, out of stock currently - Rufus took the last ones - so I am presently planning to do a run of those as well.
I hope this didn't sound like an advertisment. Check out the links in my sig for my "for sale threads" - there are prices in them.
Kevin
VERY cool plans you have for this rig - thanks for RE-storing cuz they ain't making them anymore
As metioned above, I make a stainless reproduction of the rust prone vacuum tank and a reproduction mounting bracket (in steel). My tank is the same size, shape, inputs, outputs and drains as the original. The only difference is the ends of the original were stamped and had an oval rib whereas mine are flat. IMO this is pretty minor given I doubt the original is available and you'd be lucky to find one that is not rusted through. I also powder coat the tank gloss black to further look like the OEM.
My mounting bracket (your torched off remnants are visible in post two, pic two) is also very close to the original. The difference being there is a stamped in gusset to control fore and aft vibration (when mounted) on the OEM but mine is a welded in gusset done to mimic the OEM look.
I currently am out of stock and will be making more to fill a couple of orders on both of these parts presently.
The frame stand-offs for the 3B motor mounts are also parts that I do. Again, out of stock currently - Rufus took the last ones - so I am presently planning to do a run of those as well.
I hope this didn't sound like an advertisment. Check out the links in my sig for my "for sale threads" - there are prices in them.
Kevin
Did Toyota have a body/chassis or whatever guide for this year/cruiser? I have the one for the FJ40 cruiser, does it contain BJ stuff too? I'll check tonight as well.
QUOTE]
Yes, same manual for both FJ and BJ chassis. The 3B engine has its own. The tranny/ transfers are in the chassis manual. All are available online in PDF format here ----> Downloads Index - Page: 1
Last edited:
Hi Dallas.
This may help you with figuring out your vacuum reservoir piping/setup:

The reservoir is used to store vacuum so that you will still have "vacuum assisted brakes" even should your engine stall etc.
PS. 44743 is the suction connection on your alternator-mounted vacuum pump and 44730J is just a union mounted on your fender/guard.
I hope your "3B engine" and "BJ42 body" body components will match as far as being all 24V. (Perhaps I've missed something in reading all the posts and you've already confirmed this?) There are both 12V and 24V 3B engines of course.
And on RHD BJ4# cruisers the EDIC is hidden alongside the glovebox:

(So this may be a good place to check on your LHD cruiser too.)
And I too think the plate on the side of your transmission case suggests it is not original to your BJ42 and that you are likely to need to source another input shaft (or perhaps another complete transmission) to match your 3B bellhousing/clutch.


This may help you with figuring out your vacuum reservoir piping/setup:
The reservoir is used to store vacuum so that you will still have "vacuum assisted brakes" even should your engine stall etc.
PS. 44743 is the suction connection on your alternator-mounted vacuum pump and 44730J is just a union mounted on your fender/guard.
I hope your "3B engine" and "BJ42 body" body components will match as far as being all 24V. (Perhaps I've missed something in reading all the posts and you've already confirmed this?) There are both 12V and 24V 3B engines of course.
And on RHD BJ4# cruisers the EDIC is hidden alongside the glovebox:
(So this may be a good place to check on your LHD cruiser too.)
And I too think the plate on the side of your transmission case suggests it is not original to your BJ42 and that you are likely to need to source another input shaft (or perhaps another complete transmission) to match your 3B bellhousing/clutch.
BTW Dallas .... I love your aim to get Mack back to its unmolested former glory 
I'm not sure if that glow switch on your dash is original. If it is, I guess it was used to provide extra glow (to smooth out a rough idle once the engine was started for instance). ....... Because I think your main glow control should have been achieved by turning your key backwards (prior to cranking it over).
Do you have the 24V glow controller on the LH side of your steering wheel (above your left knee)? Cos that could be very difficult to source if you don't.
(I'm assuming your rig was "manual glow with glow controller" ... which would be normal for a 1981 I think.)
He's a photo showing the spline details on my BJ40 gearbox input shaft ..... My guess is that the 3B fitted to a BJ42 has the same spline count...
- Thread starter
- #31
LostMarbles - thanks my man!!! That diagram is a huge help.
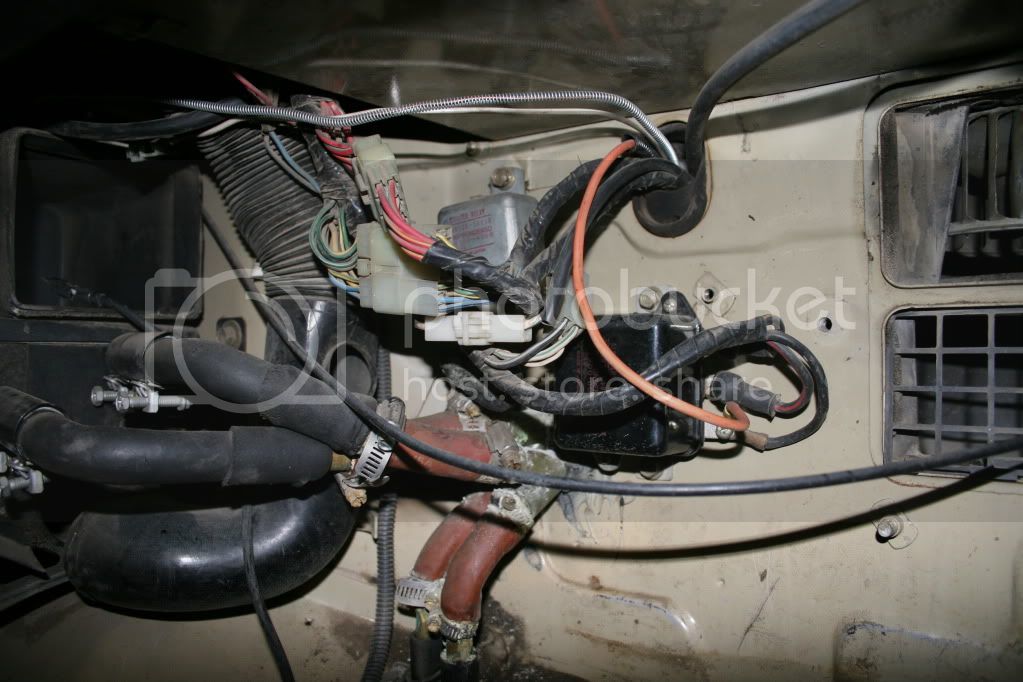
Up underneath the right kick panel, right behind the dash I followed a group of wires that went to this FUEL CONTROL RELAY. Is that what you guys are referring to?
Sorry the picture is bad, there was no way my camera would fit up in there, so I used my cell phone and a flash light to wedge up in there.
-dallas
LostMarbles - thanks my man!!! That diagram is a huge help.
Up underneath the right kick panel, right behind the dash I followed a group of wires that went to this FUEL CONTROL RELAY. Is that what you guys are referring to?
Sorry the picture is bad, there was no way my camera would fit up in there, so I used my cell phone and a flash light to wedge up in there.
-dallas
Yep that's it alright Dallas. (Sorry for suggesting you search in the wrong place then.
 )
)Toyota changed their terminology at some point. I think in the early days they called them "EDIC relays" and then later started calling them "Fuel Control Relays". But they are one-in-the-same.
BTW ... What's that thick orange wire coming off your "Glow Relay" in post #21. (Looks like it could be "PO-added" to me.) At least I think it is your glow relay! (I would uplift your photo and add an arrow to show what I'm talking about but I can't seem to do that ...probably because of where your photos are hosted.)

- Thread starter
- #33
That IS my glow relay. I know there is a lot of crazy stuff going on here, but in short - that thick orange wire is going to my starter. Yeah...I don't know. The thing won't even turn over let alone start, it just clicks when I turn the key.
As far as the left hand of my steering wheel, the only thing I see out of the norm is a small speaker looking thing - which I have no idea what it is. I don't see anything else.
Photo:

As far as the left hand of my steering wheel, the only thing I see out of the norm is a small speaker looking thing - which I have no idea what it is. I don't see anything else.
Photo:
That IS my glow relay. I know there is a lot of crazy stuff going on here, but in short - that thick orange wire is going to my starter. Yeah...I don't know. The thing won't even turn over let alone start, it just clicks when I turn the key.
As far as the left hand of my steering wheel, the only thing I see out of the norm is a small speaker looking thing - which I have no idea what it is. I don't see anything else.
Photo:
Whew! That speaker-type thing is indeed your glow controller Dallas. They can be very hard to come by ... so you are lucky your PO didn't sell it off when they pulled out the original 3B.
So I can conclude that you definitely have a "manual glow system with glow controller" whereby you turn your key backwards and hold it there (against spring pressure) for 20 seconds prior to cranking (whenever your engine is cold).
You will need to make sure your new engine has 20.5V plugs before you ever attempt to glow it (otherwise you'll destroy that valuable controller).
This is the glow/start wiring on my 12V BJ40:

Your 24V BJ42 will be slightly different but nevertheless this diagram will give you an idea of how it all works. (I had drawn up a 24V version but dumped it because I was unable to verify whether I had it 100% correct.)
There is a coil of wire behind that mesh screen in your glow controller that glows in unison with your glow plugs to tell you when they are nice and hot.
I have an earlier version where the element is more visible than yours:
The first pic shows it glowing:


That thick orange wire and where it goes is cause for concern to me. ..... I doubt the PO was very clued up (electrically ... as well as in other areas of expertise) and you may well need to identify all areas of "hacked wiring" as a priority. It would be so easy to damage electrical stuff that you may find difficult to replace (assuming the PO hasn't already done the damage for you).
Last edited:
- Thread starter
- #35
How cool is this? Lostmarbles.....thanks a ton. I can't wait to dig into this. That little glow controller/indicator thing is a little piece of why I think this rig is going to be a blast to restore.
Now....where to start.....ha ha ha.
Now....where to start.....ha ha ha.
- Thread starter
- #36
So as a follow up, has anyone seen this "glow on" switch and know what it does? The square hole behind it looks oem and the paint is not tampered with (indicating a cut-out or P.O. hack job). It looks very stock-like.
I am interested in learning about this switch...thoughts?

I am interested in learning about this switch...thoughts?
Its stock for cold countries. What do you need to know??
- Thread starter
- #38
How does it work, what was the technique?
If you could turn your key backwards and heat the coils prior to starting, why a manual button to turn the glow plugs on? Was it just to assistin warm-up and starting? It's not a button that turns on, you have to hold it down (you likely knew this already).
I guess I am just curious with the science behind it. Sorry if it was a stupid question.
How does it work, what was the technique?
If you could turn your key backwards and heat the coils prior to starting, why a manual button to turn the glow plugs on? Was it just to assistin warm-up and starting? It's not a button that turns on, you have to hold it down (you likely knew this already).
I guess I am just curious with the science behind it. Sorry if it was a stupid question.
I believe it is effectively a "momentary switch" positioned between "M" and "G" on your ignition switch Dallas. (See my wiring schematic.)
So it enables you to "hit the glowplugs" once again after your engine has started.
This may be desirable under extremely cold conditions just to allow your engine to idle smoothly until the block/coolant (which may be sub-zero Centigrade for instance) warms up enough for the engine to fire continuously/smoothly on all cylinders.
I am not familiar with seeing this because my country doesn't really get that cold and most of our 40-series cruisers are 12V and without this feature.
He he he... I bet Drew/Amaurer to the draw with my reply.......
How does it work, what was the technique?
If you could turn your key backwards and heat the coils prior to starting, why a manual button to turn the glow plugs on? Was it just to assistin warm-up and starting? It's not a button that turns on, you have to hold it down (you likely knew this already).
I guess I am just curious with the science behind it. Sorry if it was a stupid question.
Not a stupid question. Its for smoothing out the idle once the truck is running. Its the OEM equivalent of what people here call a "Wilson switch".
On a super cold day this "afterglow" function can REALLY help with the smoke and shaking.