DIY Coolant Valley Leak Repair (1 Viewer)

This site may earn a commission from merchant affiliate
links, including eBay, Amazon, Skimlinks, and others.

Joined
Feb 21, 2020
Threads
10
Messages
550
Location
Colorado Springs
The coolant valley plate leak is a potential issue that arises on the GX460 platform (and other 4.6 L V8 1UR-FE engine equipped Toyota's and Lexus's) as the mileage gets to around 100K. A key sign that your GX suffers from this issue is a low coolant condition and coolant running down the backside of your engine and down the transmission bell housing. If you crawl under the GX behind either of the front wheels and look up at the transmission bell housing, you can see evidence of pink/red coolant leaking.

The dealership typically charges about $1,500 for the repair. About $200 for parts and charge 6-8 hours of labor. You can DIY the repair for about $110 as a bare minimum, a bit more depending on other items you might want to replace while the engine bay is opened up. I personally replaced the leaking gasket, manifold gasket, a couple EGR cooler line gaskets, PCV valve, water pump, thermostat and radiator (for about $500, OE gaskets, FIPG, PCV valve, water pump and thermostat from MyLParts.com and Denso radiator and Toyota SuperLongLifeCoolant from Amazon). Other's may want to consider the tensioner pulley, serpentine belt and upper/lower radiator hoses.

It isn't an overly difficult job, but is time consuming (the first time) and there's a few steps that can be considered frustrating, especially if you're not used to DIYing things of this nature. It is, at the end of the day, just removing nuts and bolts, disconnecting coolant and air lines and sensors, cleaning up a gasket mating surface, reapplying the FIPG (Form In Place Gasket) and reassembling everything, some with torque specs in mind and refilling the coolant. None of these individual steps are hard, there's just lots of them, some brittle plastic parts involved and some details that need patience.

I didn't plan to write up this DIY, but I took enough pictures and did the job twice, so I felt I had a good grasp of the job and wanted to share the information the best I can with the GX crowd as I have a feeling more of us will eventually be faced with this repair and may not love the idea of $150/hr labor to fix it.

Bare minimum parts needed for repair:

00295-00103 Qty 1 - Form In Place Gasket (FIPG) Some say to use 08826-00100 aka ThreeBond 1282B, but I couldn't find it easily and my research shows dealerships using the 00103 for this repair.
96761-35035 Qty 2 - Engine Coolant Pipe O-Rings
17171-0S030 Qty 2 - Intake Manifold Gaskets
25685-38010 Qty 1 - EGR Cooler Outlet Gasket
25629-38010 Qty 1 - EGR Cooler Inlet Gasket
00272-SLLC2 Qty 2 - Toyota SuperLongLifeCoolant 50/50 mix (Though three gallons is probably more realistic, I used ever bit of 2 gallons and could use a touch more for top off or any spills).

Optional but advised (due to cheapness):

12204-38010 Qty 1 - PCV Valve (I've had these clog up on other higher mileage vehicles, for $7 and where it lives in the engine, I saw value in replacing it while in there)

Tools needed:

- E8 size female torx socket
- Basic wrenches, 10-12-13-14 MM wrenches and sockets (of both shallow and deep depth) 19MM wrench (or crescent wrench that size) if replacing the PCV valve.
- 3/8" (and 1/4" if you have already) ratchet and various length extensions
- Various pliers (small, slip joint, angled, needle nose)
- Torque wrench capable of 7-35 ft lbs range
- Pry bar (about medium sized is best, though a screwdriver will work fine)
- Flat blade screw driver/plastic rivet removal tool
- Brake cleaner or equivalent for cleaning gasket surface area
- Plastic razor blades or equivalent for cleaning gasket surface area
- Rags and tape (for scrubbing areas and taping off intake inlets and other tubes)
- Magnetic grabber (magnet on a stick, very...very helpful for those hard to reach spots)
- Funnel (for refilling coolant)
- Portable work light (not a must, but helpful in the dark corners)
- Shop-vac capable of liquid (or be prepared to use a lot of rags to soak up coolant in the pan/valley areas, maybe even a siphon or turkey baster in a pinch)
- Access to compressed air is helpful, for blowing out debris and coolant from misc areas in the valley

As a general disclaimer: I'm not writing this DIY in complete minuet detail. My intentions are to display what the job entails and help shine a light on some of the basic steps taken when I performed this repair. I'll likely miss a few little steps, forget to point out a bolt or clip to remove, etc but I'm assuming the average person taking on this repair can overcome a simple missing detail. This is an attempt to show most general steps, though I'll be as thorough as memory and pictures allow me to be. Don't rely on my guide solely, use the factory repair manual, other threads and common sense to make sure you can perform each task correctly. Feel free to ask questions to any steps that aren't clear and I'll try to elaborate more where needed.


To start, you'll need to let the vehicle cool down, disconnect the battery and remove the main plastic engine cover. Then remove the air intake tube and associated lines between the air box and throttle body. It will make disassembly and reassembly of this section of intake tube easier if you remove the air box top cover.

IMG_6060.jpg


On top of the intake manifold, remove the bolt holding multiple air hoses on (place bolt back in empty hole for storage) and disconnect the single hose closest to the firewall and tuck it away to the passenger side of the engine. The remaining two hoses and T connection will rotate to the driver side to be tucked away.


IMG_6058.jpg


Starting at the top of this picture, remove two 10MM bolts and the engine beauty cover bracket.

Center of the intake manifold, passenger side, unclip the EGR valve assembly and remove three (3) 12MM bolts holding the main assembly on, then follow the metal lines towards the front of the engine and remove four (4) 10MM nuts where the EGR lines run into the intake and under the intake manifold.

Center of the intake manifold, drivers side, unclip the Purge Valve and VSV connections and unhook the small purge line, also remove the small purge line from it's support clip to the right of the main connection so it can be moved out of the way.

Bottom right corner of the intake manifold, unclip the Manifold Pressure sensor and follow the wiring down to where it's secured on a bracket closer to the radiator and remove that clip as well.

Disconnect the Throttle Body electrical connection and remove the two (2) 10MM bolts holding the Secondary Air Pump hose bracket to the throttle body. I broke this tube in two places by the end of the job, mine was very brittle. Follow the air hose to the driver side valve cover and disconnect the hose clamp at that junction.


IMG_6056.jpg


With that out of the way, we can see two additional tubes we need to disconnect. The PCV valve connection on the bottom right corner of the intake manifold and a coolant line under the bottom center neck of the manifold. **IF YOU DON'T WANT COOLANT ON YOUR SERPENTINE BELT, DO SOMETHING TO AVOID IT WHEN DISCONNECTING THIS LINE**


IMG_6052.jpg


Now to an area that I struggled with for a long while, disconnecting the main engine wiring harness and crossover fuel line from the backside of the intake manifold.

Here are the three (3) connections on the back of the manifold you need to undo somehow. One (1) 10MM bolt through the fuel line supporting bracket and two (2) L bracket connections to mounts on the main wiring harness loom. Backside of the intake manifold, that would be butted up against the fire wall.

IMG_5992.jpg
 
Last edited:
The main wiring harness and fuel crossover line that the three (3) connections mate to.

IMG_6020.jpg


As you can see, I successfully disconnected the driverside L bracket from the wire harness, removed the 10MM bolt from the fuel line crossover and completely broke off the passenger side wire harness cover and L bracket mount. There's very limited room between the intake manifold and the firewall and getting a hand back there, let alone a pry tool to easy work off these connections is a difficult task. Do what you can, hopefully the pictures give you something to aim at. I wasn't able (and didn't care to) try to reconnect any of these mounts when the intake manifold went back on, which made doing the job the second time about 1 hour faster for me personally.

Once you're able to remove these points, The last step before removing the intake manifold is to remove the ten (10) 10MM bolts that mount it to the engine block. Five (5) per side, the front two (one on each side) are nuts and the remaining eight (8) are bolts of the same length.

IMG_5978.jpg


The back passenger side corner bolt is the trickiest, a shallow 10MM socket on an appropriate length extension will allow you to snake it in there if you come at it from the side instead of trying to insert the socket straight down on the bolt. There's a rigid metal EGR line in the way that won't allow the socket to slide straight down, but will allow room for the width of an extension. Technically you could go at the bolt with a phillips head screwdriver, but I didn't like that idea.


IMG_6055.jpg


Remove the intake manifold, it might take a bit of pressure to release, but be careful removing it out of the engine bay to ensure no damage to it or neighboring brittle plastic parts. Set the manifold aside.

Now's a great time to take some tape and tape off any holes you wouldn't want junk falling into, primarily the air intake ports. It's good practice to take a light and peer into the intake ports just to insure nothing (dirt, debris, leafs, plastic, foam, etc) has already fallen into them.

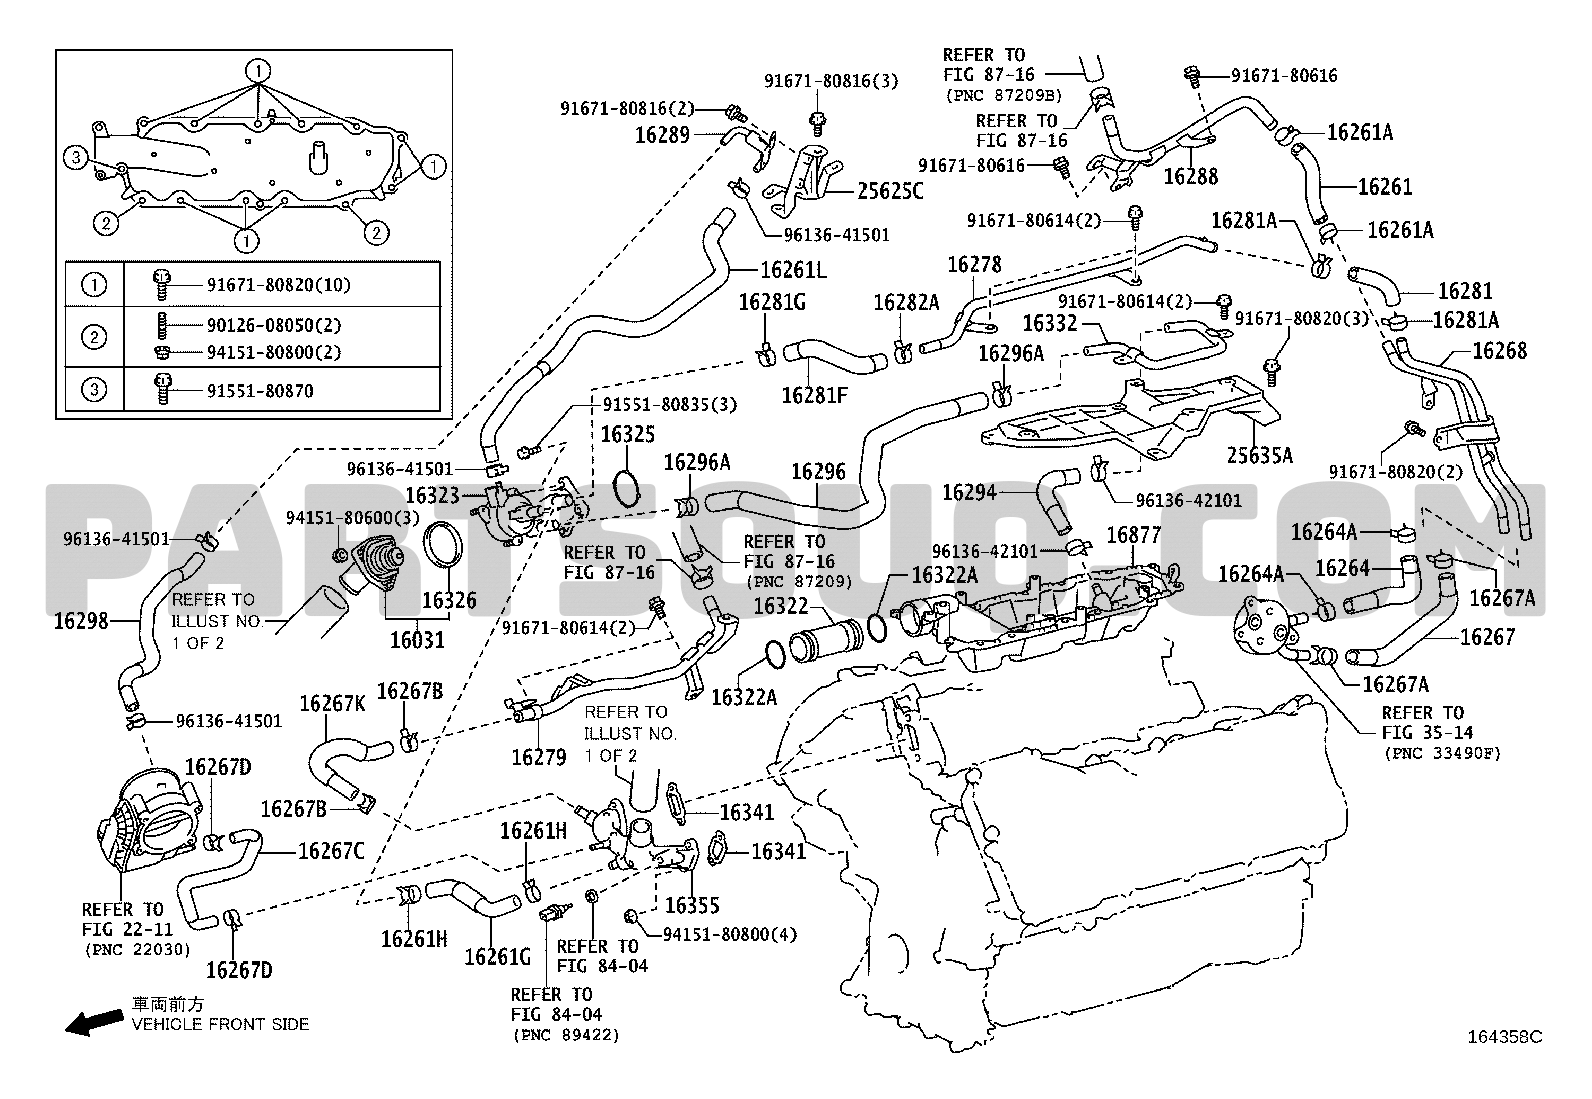
Next, you need to remove several coolant and air lines connected to the EGR Cooler and water bypass line.

Starting closest to the firewall, top right corner of the valley, there's two 10MM bolts on the backside of the EGR outlet.

There's a 12MM bolt just beyond the top of the EGR cooler, and four (4) other 10-12 MM bolts down the body of the cooler and water bypass line that hugs the passenger side of the valley. The firewall side connection of the coolant bypass line can stay connected and it can flex out of the way to the passenger side, once the radiator side is disconnected and the mounting brackets freed.

Then there's three (3) coolant lines needing disconnected, two on the EGR Coolers passenger side (short one can be left to droop in place, longer one can be moved to the driver side of the engine bay soon) and one on the bypass line towards the front of the engine, almost obscured by the coolant transfer tube right above the water pump. Also remove the two chunks of sound deadening foam around the PCV tube in the bottom right corner, they're not connected, just wedged in there.


IMG_6051.jpg


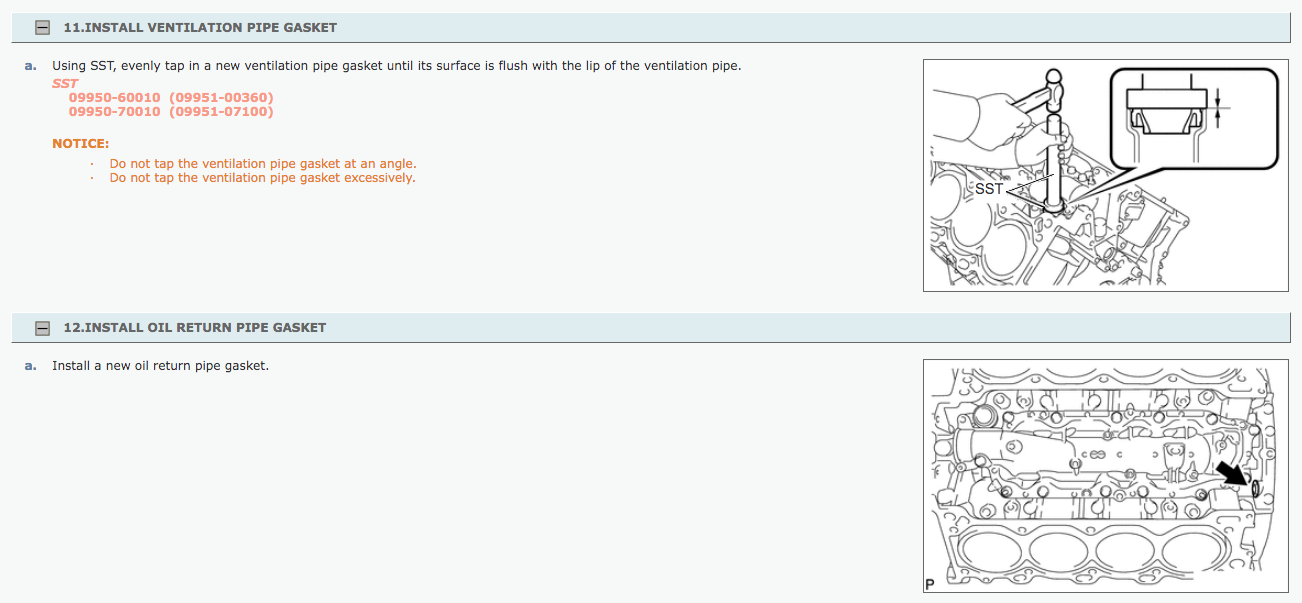
Next you'll need to remove the PCV housing. KEEP IN MIND, the rear (firewall side) of the housing has a plastic nipple protruding horizontally into a connection and the front passenger corner has a nipple going straigt down into the engine, so once you remove the bolts holding it down, you'll want to LIFT the FRONT before SLIDING the whole unit towards the front of the vehicle to remove it entirely.

Starting at the top of the picture, there's a RED comment bubble where the nipple connects to a tube. Then one (1) 10MM bolt on the firewall side of the PCV housing bracket.

Three remaining 10-12MM bolts down on the front side of the housing. Note the other RED comment bubble that highlights where the straight down nipple connection is.

IMG_6006.jpg
 
Last edited:
Lift the front edge of the PCV housing up and slide it towards radiator to completely remove. Now's is a good time to swap out the old PCV valve if you bought one. I beleive it was a 19MM wrench, just unscrew old valve and replace with new. No need to crank down on it when reinstalling, the seal isn't made by tightening. Transfer PCV air tube to new valve.

EGR Cooler removed (left) and PCV Housing removed (Right) with PCV Valve indicated by arrow.

IMG_6030.jpg


Next up is removing the one (1) 10MM bolt holding down the main knock sensors plug connector, disconnecting the three (3) retention clips holding the knock sensor wiring to the valley plate (all mine broke, very brittle, didn't worry about it on reassembly) and finally, remove the four (4) 12MM bolts holding the knock sensors in place.

**Be cautious with the knock sensors. Take one off at a time and place them in a secure spot for later. The advice I read from a Toyota tech was "if you drop one, just go ahead and replace it." They're also over $200 each, so just be a little extra diligent with them.**

With the wiring harness disconnected at the sensors and clips, move the wiring towards the fire wall and out of the way. I didn't disconnect this main knock sensor plug connector as I figured it's location would make it super brittle and I didn't want to worry about it not plugging back together right, so I just moved it all out of the way, there's enough slack.

I left the short coolant hose connected to the valley plate, it comes in handy as a make shift handle when reassembling (noted by comment bubble).

IMG_6039.jpg


Now you're down to the valley plate. Good job!

From top of picture, moving down, remove the one (1) 10MM bolt that secures the PCV tubing to the valley plate.

Then remove thirteen (13) 12MM bolts/nuts from around the cover. There are 11 bolts and 2 nuts. The 2 nuts are mounted to 2 alignment pins in the block.

IMG_6037.jpg


The two threaded guide pins for the valley plate are identified below, one by a yellow comment bubble and one by a yellow arrow. We want to leave the comment bubble one in place, this will greatly aid in aligning the valley plate when reinstalling it so you don't smear the FIPG all around to align the bolt holes. The other one will unscrew counter clockwise (lefty loosey, as normal) using the E8 female torx socket.

Other threads suggested removing the one guide pin as it can get in the way a bit when installing the plate back on the coolant pipe. I'm not sure if this would be the case, very possible, but I removed mine.


**If you're in a nice garage environment and want to avoid spilled coolant all over, now is the time to drain the engine block of coolant or grab a pan and get ready for a good amount of coolant to come out (a gallon-ish I think). I simply grabbed a pan as I didn't want to bother draining the engine block**

Now you're ready to break the old FIPG seal loose and remove the valley plate. There are several pry points available, noted by white asterisks, just work your way around and pry the plate up enough to break the seal. At this point, coolant will be draining quite a bit out of the valley and wil run down the back of the motor, down the sides of your transmission and IN MY EXPERIENCE, off the BACK of the transmission skid plate.

With the seal broken and the valley plate loose, you'll need to pull it towards the firewall to disconnect the coolant transfer tube. This tube disconnects from the valley plate AND engine block and needs removed completely.

IMG_60372.jpg


Now you need to clean the gasket mating surfaces on the block and the valley plate as well as remove any junk in the general area of the valley pan. I personally left the coolant in the pan for this step, which potentially was one of my issues that caused the repair to fail immediately when done reassembling everything you just took off.

Nothing to note specifically in this pic, just what you'll see after removing the valley plate and the coolant has drained away. Get to cleaning.

IMG_5999.jpg
 
Last edited:
Clean the surface where the gasket will be laid very well. I used plastic razors to scrap what I could off, then non-clorinated brake cleaner and a microfiber rag to scrub, then back at the stubborn stuff with the plastic razor blades and kept repeating (2-4 times in spots) until it was what I considered very clean.

TAKE CARE NOT TO MARK, MAUL, SCRATCH or otherwise cause deformation to any of the gasket surface. Use only items softer than aluminum to clean these areas and be careful when placing the valley plate on a work bench.

Here's what the bottom side of my valley plate looked like when it came out.

IMG_6002.jpg


Here's it cleaned up completely. There's still some black looking marks around where the gasket ran, but in reality, it's cleaned appropriately and won't come off. This black outline is a good indication of where the new FIPG material will need to be layed down as well. If it needs to be said, the new FIPG will need to be on the inside edge of the bolt holes to properly contain the coolant once reinstalled.


IMG_6031.jpg


I don't have a better picture of the coolant transfer tube, that runs between the valley plate and block, but here it is. This is the piece that needs two new o-rings installed on it before installation. This is also the piece that cause my immediate bad leak upon "completing" the repair the first time. Remove the old seals and clean the pipe up.

IMG_6026.jpg


Using a shop vac, rags, turkey baster, remove the remaining coolant in the valley pan and go over everthing one more time to ensure all debris is removed and all surfaces are ready for new sealant. It's your last chance to do it right so you won't have to do it again.

It should look something like this (or better than this, pic might've been before I went over everything one last time).

IMG_6027.jpg


Before reinstalling the valley plate with new FIPG, you want to install the coolant transfer pipe into the block. To do this, properly lube up the new o-rings on the pipe and the lube up the hole the pipe is inserting into. I used coolant as a lubricant here, but others say there's coolant friendly lubricants that would do the trick as well, maybe even better. You'll have to research them or make your own decision here.

**This step is one of the most important steps to get right, IMO. The new o-rings can easily kink, roll or come out of their groves and the issue might not be easily visible. If you reassemble it with an issue here (like I did), you'll only really know once you fill the system back up with coolant and it leaks like crazy, That'll mean tearing everything back down and starting over as the valley pan has to come off to reposition these o-rings. You cannot test them my adding coolant at this step either, it'll leak out many other areas that are currently disconnected. You might be able to plug all those alternative paths and try, but I didn't and can't speak to that option.**

Here was my nice surprise when one of my o-rings kinked and I didn't notice. I buttoned up the repair and was refilling the entire system with coolant only to hear it pouring out on the garage floor nearly as fast as I poured it.

IMG_6021.jpg


Don't be like me, take some extra time to get it installed correctly and save yourself hours of doing the job twice and $40-50 of spilled coolant.
 
Last edited:
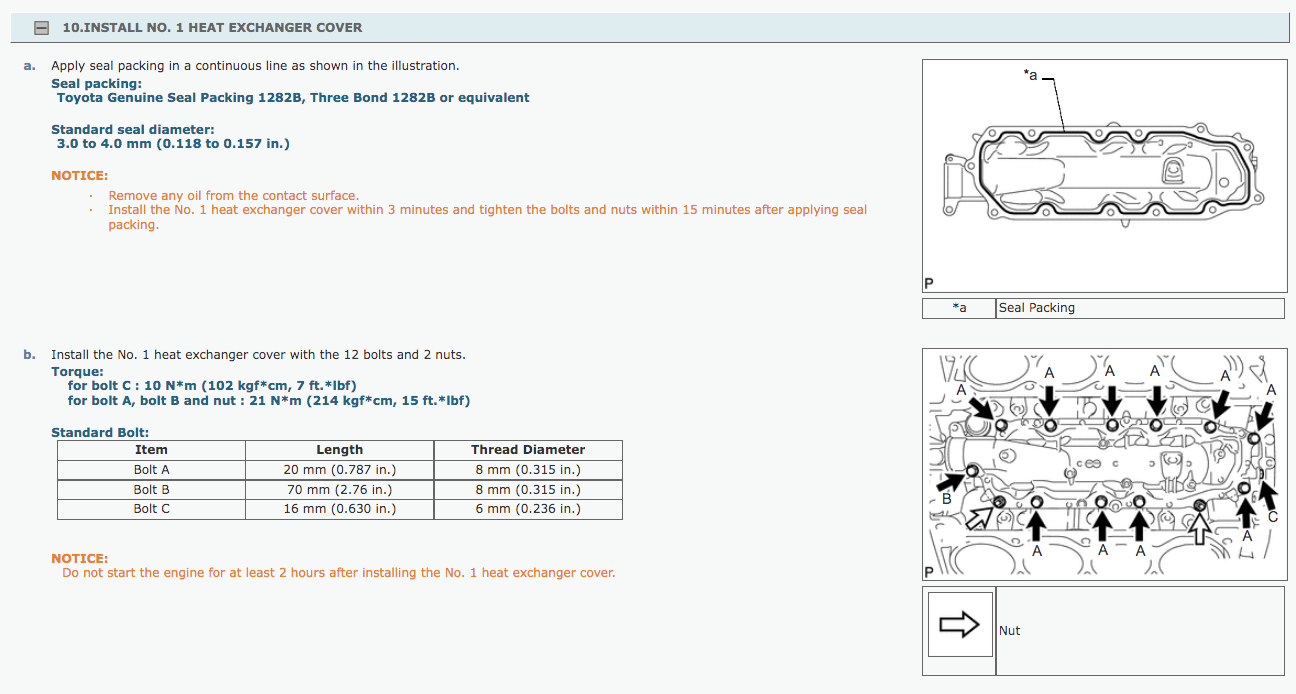
So, once the coolant transfer tube is lubed up and inserted into the block carefully, making sure there's no kinks, rolls, etc of the o-ring, you're ready to prepare the valley plate with a 3-4 MM bead of FIPG.

**The FIPG has a setup time of 15 minutes (per my container, past reports I saw said 3-5 minutes). This means you need to be ready to install the valley plate back to the block within minutes of applying the bead, then reinstall the plate mounting bolts and torque down the plate all in that 15 minutes**

Now's a great time to take a bathroom break, organize the tools you'll need for the next steps, collect the bolts, nuts and threaded guide pin you removed, all appropriate sockets (12MM, E8 female torx) and setup your torque wrench.

The valley plate mounting bolts are torqued to 15 ft lbs. Don't over torque and squish the sealant out.

The first time I reinstalled the valley plate, I put the new FIPG sealer on the block as I feared it being on the plate itself would make it easier to mess up the bead when I installed it. The second time installing the valley plate, after the immediate leak, I put the FIPG on the valley plate itself and now can recommend this method 100%. The valley plate has a better guide for where to lay the bead of sealant and is easier to work with while it's out of the engine bay.

Installation method is going to be:

- Lay bead of 3-4MM this FIPG on clean valley plate surface
- Work valley plate onto pre-mounted coolant transfer tube, making sure to mind the o-ring and ensure it slides on smoothly and doesn't roll/kink/pinch
- Set valley plate into position on the engine block, using the coolant transfer tube to align the front (radiator side) and using the single threaded alignment pin to align the backside correctly.
- Once down in place, swiftly install all thirteen bolts back into place and just barely tighten them down (15 ft lbs isn't a lot, so don't go too far here)
- reinstall the removed threaded locating pin until it's snug in the block, then install the 12MM nut on it.
- torque down the valley plate cover bolts in a uniform and multi-step pattern. Keep in mind, you'll probably want to make the 15 ft lb final torque pass twice as the one you started on will now be a little loose once you've worked around all the others.

The FIPG sealer needs several hours to cure before coming in contact with coolant. I believe my container said a few hours, but most recommend overnight/24 hours if it's an option.

Here's my valley plate with FIPG sealant laid down in a 3-4 MM continuous bead.

IMG_6033.jpg


Reinstalling threaded locating pin.

IMG_6034.jpg


Once the valley plate was in place and the bolts all snugged down lightly, I used the center-out and stepped-up method for torquing the plate down. Something like:

Driver side middle bolt to 8 ft lbs - Passenger side middle bolt to 8 ft lbs
Driver side one bolt back from middle - passenger side one bolt forward from middle
Driver side one bolt forward from middle - passenger side one bolt back from middle
Driver side two bolts back from middle - passenger side two bolts forward from middle

ETC all the way around the plate. Then repeat while upping the torque to the full 15 ft lbs on the second round.

With the valley pan plate in place and ready to cure, I quite for the night. You could start reassembly, but enough bolts to the plate that I simply didn't want to risk shifting it around on the non-yet cured sealant.

IMG_6036.jpg
 
Last edited:
Once the appropriate time for curing has past, you'r ready to start reassembling everything. It's all just reverse order, so read the thread backwards if you're concerning about forgetting a step or can remember if there was another connector that needed put back.

A few items to do while reassembling though:

- I installed two new gaskets on the EGR Cooler. They're cheap and easy to match up to existing ones.
- I installed the new PCV Valve
- I installed new intake manifold gaskets

IMG_6008.jpg


IMG_6009.jpg


IMG_6004.jpg


IMG_6010.jpg
 
Last edited:
As you work through reassembling everything, just take your time and make sure each step is complete before moving on. Make sure everything is reconnected, all plugs are plugged in, all bolts are present and tight and all hose clamps are on fully.

I only used the torque wrench on two items during reinstall:

- Valley Plate (15 ft lbs)
- Intake Manifold (15 ft lbs)

The EGR cooler connections are 7 ft lbs if you want to be precise. I've been wrenching on my stuff for about 20 years now and I've developed a feel for what certain sized bolts/nuts need for tightness. Bolt's in the 10-14MM range and in the use they are here, holding brackets on and such, generally just need to be good and snug, not loose and not torqued all to hell. The German saying for this torque amount is "gutentight". It's a thing.

When everything is back together, you're ready to fill with coolant and bleed the cooling system. I've really liked this funnel setup I bought a few years ago. It comes with multiple radiator cap sizes, connector pieces and specifically it holds excess coolant better than a standard funnel and has a plunger in it to be able to plug the bottom of the funnel and not just spill all the excess coolant over the engine bay if your radiator fills up when there's still coolant in the funnel.

IMG_6062.jpg


Amazon product ASIN B01A2CQSU6

I think that covers the repair in the best detail I can muster up right now. It's a lot to read, I'm not always the best at composing basic clear directions, so if you're facing this repair and have any questions, need clarification, etc feel free to just ask.

Also, I see a fair bit of typos in the thread, many I can no longer edit. I don’t believe any of them create any confusion with what I intended to communicate, they’re just distracting. Tried cranking this DIY out quick though and that’s the kinda proof reading quality you get from me in a hurry.

Jake
 
Last edited:
One important step I failed to mentioned is in preparing to put the valley plate back on with the new sealant.

Before you do this, take compressed air (or a shop vac or something) and blow all the coolant out of the valley plate mounting holes. It HAS collected in there and if you leave it there when you reinstall the valley plate, it’ll rise out of the bolt holes when you tighten down the mounting bolts and contaminate the fresh FIPG.
 
Couple more notes to add concerning issues after wrapping up the repair.

When all done, I started it up and had traction control, multi-terrain and ABS lights on and a bad belt squeal and faint bearing noise. I had read someone else mention the lights coming on, and to disconnect the battery again and short the positive cable to ground (or negative) for a few seconds and it'd fix it, which it did.

I wondered if the faint bearing noise was the new water pump unit being bad out of the box and after talking to Matthew at MyLParts.com, he quickly sent me an official Lexus dealership parts receipt to take to my local dealership to prove purchase and warranty status on it.

Dealership checked it over and said the belt squealing and coolant soaked pulleys were the only real issues they found and suggested cleaning it all up and replacing the serpentine belt. They did both and also installed that new secondary air injection tube (?) I broke during the repair. Guess I should've drained the coolant out of the block before the repair, but I was being lazy. Good news is there's no bearing noise since.

Also since the repair, a few times I've noticed a slight rough idle (being about 480 RPMs sometimes) and three times now it has failed to start when I try to start it. This happened twice Tuesday (before having the broken intake tube replaced Wednesday/Thursday) so I wrote it off as issues due to that air/vacuum leak. That was until it happened again today. Rough idle on the way home from work and a long hard crank with an eventual hard start when I went to run errands a hour after returning home from work.

Here's what I've found out about it so far. Apparently it's a common enough condition after a long period of the battery being disconnected, a couple forums had membors who noted it with their Toyota/Lexus after battery swaps and such. Essentially the ECU forgets any tuning changes it's stored and it takes a little bit to relearn again. I saw some suggest driving 20 miles after such a power interruption or as much as a few weeks. I've driven about 15 miles since and am not sure if the dealer disconnected the battery during their repairs.

Obviously, the ideal that the ECU has to relearn some tuning tweaks to make my GX idle smooth means I'm probably due for some maintenance items (maybe MAF sensor cleaning, new spark plugs, potentially O2 sensors) so that's something I'll look into soon. I know the spark plug swap is going to lead to new oil rings and a valve cover gasket job, so I've been intentionally putting that off, what you haven't confirmed yet can't hurt you, right? For now, I plan to keep driving it and just ensure it stops being an issue over a bit of use/time.
 
I just did this repair on my Sequoia. Took me about 6 hours. What a pain lol.

Only thing that I thought was a bit weird was I ordered a tube of 00295-00103 and it was gray instead of black. Very weird. Usually the tubes I get are black. Oh well
Looked pretty much exactly like Hondabond to me but idk. Going to fill it up with coolant tomorrow just so I can give the FIPG a chance to cure and then hopefully it will start and not leak anymore. I'm hearing ~16hrs for it to cure so I will wait. I put a small bead of it on my work bench at the same time so I can see when that gets rubberized.

Thanks for the pictures. It was a good guide. A bit different on the Sequoia 5.7L but it was about 90% similar.

EDIT: After 12hrs of drying overnight, the gray FPIG was a bit soft but not tacky at all. I filled up the truck with 3 gallons of SLLC and drove it, all seems good. I'm thinking maybe a couple heat cycles will dry it up good.

Another edit: After nearly a month, the fix is holding up. No more mysterious coolant loss.

Another edit: It started leaking again after maybe 6 months. I did the whole job again with Permatex UltraBlack. No problems at all even a year later with about 20k miles on it. Don't use the grey FIPG!!
 
Last edited:
This is a great write-up and extremely informative for this issue.

Unfortunately, I noticed coolant leaking down onto my transmission skid plate behind the front wheels, so I'm fairly sure I have the valley plate leak. ~135k miles. My dealer quoted me $2800 for the repair as they claim the front timing cover has to be removed... seems like they're jerking my chain. I don't have time to DIY this right now, so it looks like I'll be running down quotes from independent shops today.

Bummer, but you’re right to think they’re wrong about the timing cover. There’s zero reason it’d need to come off, wouldn’t make a difference in the steps whatsoever.

Good luck!
 
Last edited:

@jmanscotch - Hows it going ? Any update since the Jan 2021 ? I have been a bit out of the forums due to us having to move but back in business, also the oil in spark plug tubes is back yey! hahah hows everything going with your rig ?​


@jmanscotch - Hows it going ? Any update since the Jan 2021 ? I have been a bit out of the forums due to us having to move but back in business, also the oil in spark plug tubes is back yey! hahah hows everything going with your rig ?​


That's frustrating man, but I feel your pain. The new Denso radiator I put in is leaking transmission fluid out of the inlet connection, so I have to do that job over within a year (going to pay the dealership $1,000 to do it this time).

Since, I've realized my lower control arm bushings are shot, so spending another $1,000 in parts to DIY that.

So my first 1.5 year ownership has required about $5,500-$6,000 in maintenance/repairs (mostly parts cost, some shop labor, not all were exactly needed but were what I choose to do):

- Entire cooling system (radiator, WP, thermostat, and valley pan repair)
- Coolant temp sensor
- Fuel injectors, twice
- MAF sensor
- Fuel pump and regulator
- Control arms, ball joints, tie rod ends, sway bar/misc bushings

Right now, I refuse to touch my spark plugs and find out they're covered in oil....I just refuse to look...

Other then that, the coolant valley repair seems to be going strong and the long cranking issue was solved.
Interesting,

How did you realize the bushings are shot?
Also why is the repair so expensive to DIY ?
 
Interesting,

How did you realize the bushings are shot?
Also why is the repair so expensive to DIY ?

Tire wear (cupping) initially hinted to some suspension/alignment issue. Recently, steering wheel shake at 55-60 MPH had me looking closer and noticing cracked and dry rotted bushings. Everything else looks notably better/tight so process of elimination.

Genuine LCAs are $616 a pair
Tie rod ends $91
Four (4) sway bar bushings $64
Alignment cams and bolts $~150
Total Chaos reinforced alignment cam gussets $145
Alignment after $75

I opted to go for the Total Chaos reinforcement gussets since my Tacoma has an issue where alignment was easily knocked out of whack due to the weak factory tabs bending and allowing the cams to rotate. These are beef, but require welding them together and grinding off the factory ones.

D98C7A31-D7A4-459E-B062-51E5BA8FB41F.jpeg


I also might find my alignment cams aren’t seized in the LCA bushings and can reuse them, saving $150 (minus return fees) for the new ones.
 

Users who are viewing this thread

Back
Top Bottom