Modernizing my 02 LX has been a blast over the past couple months I've had it. I have my backup camera displaying on the nav screen (thank you Naviks) and iPod integration installed (thank you USA SPEC), so naturally Bluetooth hands free calling was next. The USA SPEC BT35-TOY seemed like the logical choice for me after much research, especially after I saw @Texas993 's write up.
The BT35 is probably not the superior product on the market for these rigs, but it does what I need, that being when someone calls, it will interrupt whatever source you are using on the head unit and automatically switch to the Bluetooth source (CD). This way I don't miss possible important phone calls while my stereo volume is up or if I don't feel the phone vibrate. The audio quality of phone calls is also very good. Better than the factory Bluetooth in my old 2007 QX56 and better than my old 2007 L322 Rover. I've been told the quality of my voice through the supplied microphone is also quite good.
USA SPEC BT35-TOY ($150): http://www.crutchfield.com/p_581BT35TOY/USA-Spec-Toyota-Bluetooth-Interface.html?tp=68488
USA SPEC Toyota Adapter ($25): http://www.crutchfield.com/p_581CASTLC/USA-SPEC-Toyota-Adapter.html?tp=125
I AM NOT A CERTIFIED AUTO MECHANIC, TECHNICIAN, OR ELECTRICAL EXPERT. PROCEED AT YOUR OWN RISK.
Preparation
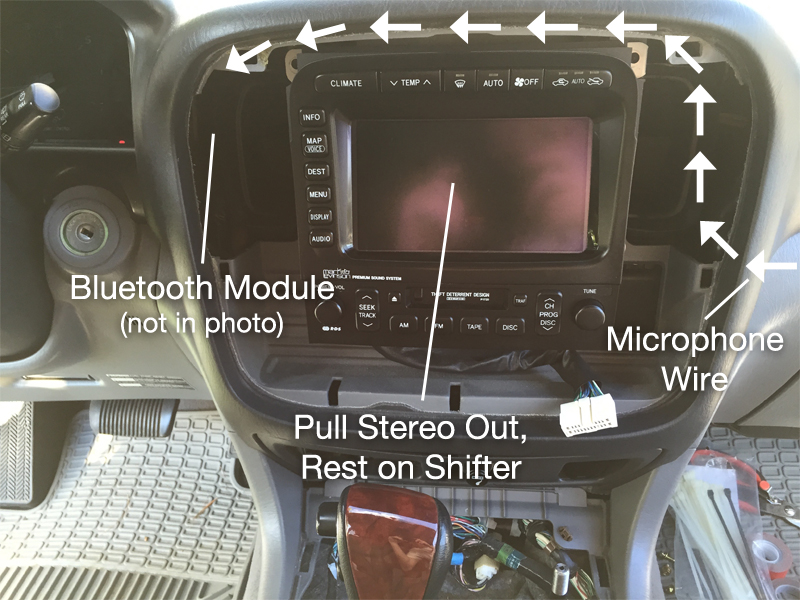
1) Remove the wood trim bezel that surrounds the head unit. I put a rag over a flathead screwdriver. Try and pry the bezel from the four points highlighted with arrows in the photo. That’s where the retaining clips hold it in. Mine was stubborn, but not too hard.
2) In order to fully remove the trim, I believe there is a wiring harness you’ll also need to disconnect from it that supplies wiring for some other buttons like the power antenna and ext. thermometer.
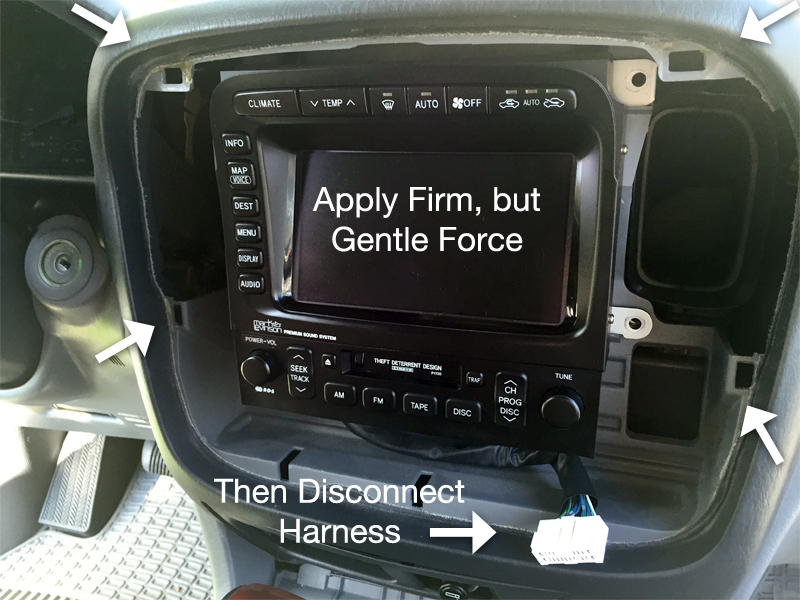
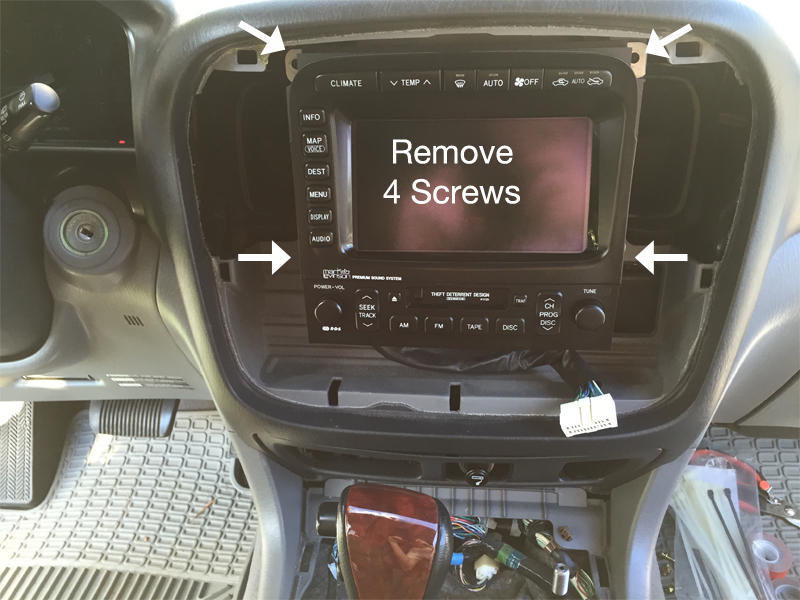
3) Remove the four phillips head screws indicated by the arrows and slowly pull the head unit out. I placed a cloth on my shift knob and was able to balance/rest the head unit on that due to the tension of the wiring harnesses (that we won’t be messing with here).
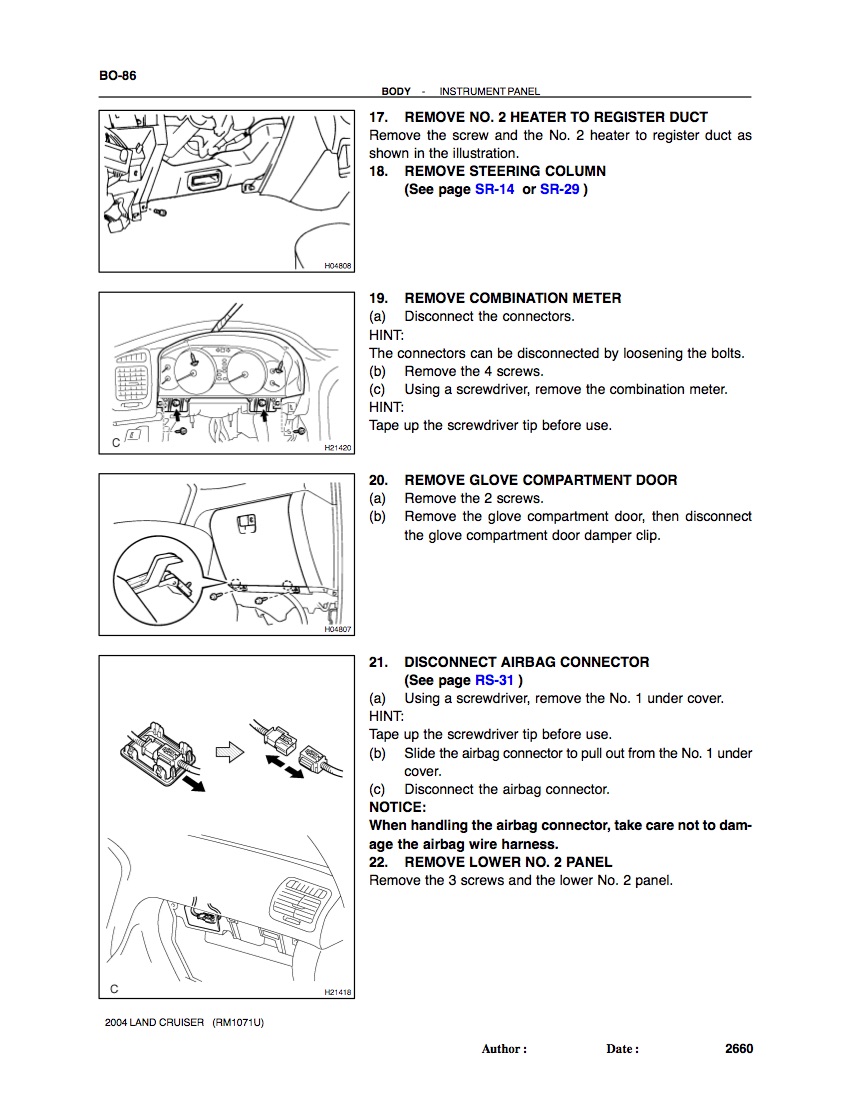
4) Remove the glove box, first by unscrewing the two screws at the bottom, then by disconnecting the glovebox damper clip, which should allow you to drop it all the way to the floor.
Bluetooth Module Install
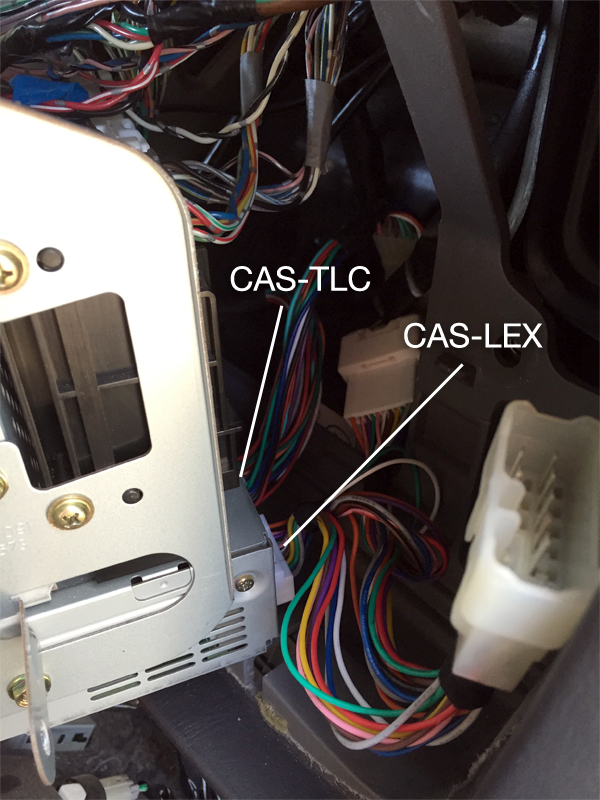
1) Remove the factory wiring harness on the right side (if you’re looking at the rear of the head unit) and replace it with the CAS-TLC adapter as shown in the photo. Then, plug the CAS-TY35 cable into its corresponding opening of the CAS-TLC adapter, followed by plugging factory harness into the other corresponding opening.
2) Decide where you want to place/mount the Bluetooth Module. I placed mine in between the driver-side center hvac register and the dash/gauges. There’s plenty of room back there to be able to run the cables and microphone wire. Not to mention it’s a relatively easy location to access if I need to for some reason down the road.
3) Run the CAS-TY35 Cable, from where it’s connected to the CAS-TLC harness behind the head unit, up and over the hvac register to where your Bluetooth module rests.
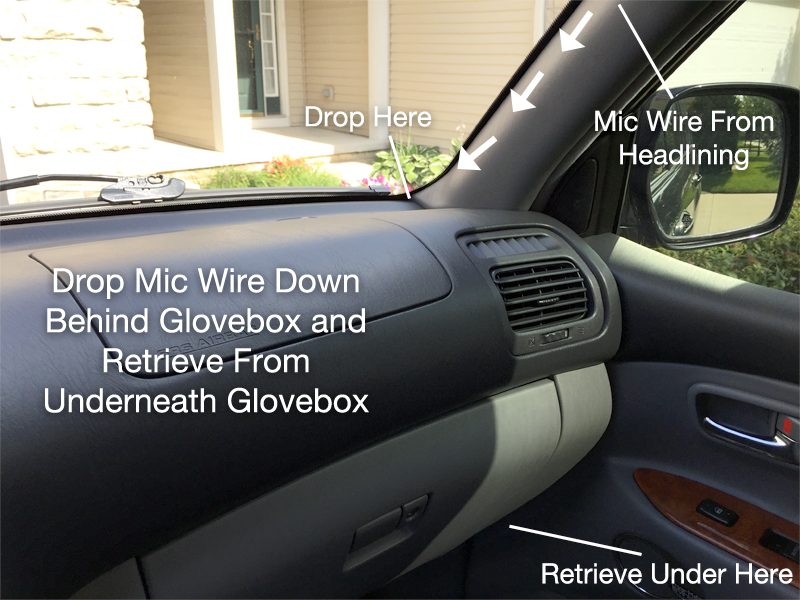
4) Decide where you want to mount the microphone. I took the suggestion from the instruction manual and mounted mine on the overhead console, running the microphone wire along the headliner to the passenger side, down the A-pillar and behind the glove box.
5) To remove the overhead console, remove the screw from the sunglasses holder and then pop the trim at each of the four corners (as shown in the photo).
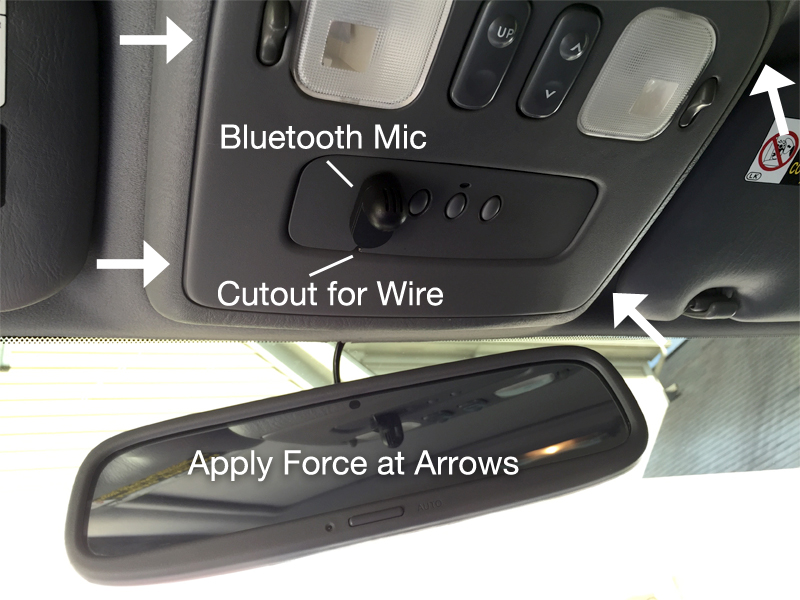
6) Remove the smaller piece of trim that surrounds the Homelink buttons and drill a small hole on the side closest to the front of the vehicle. This will allow you to mount the microphone next to the Homelink buttons and let cord rest naturally without being taught.
7) Mount the microphone to the trim that surrounds the Homelink buttons using the double sided tape that comes pre-adhered to the bottom of the microphone. Be sure the spot on the plastic trim is clean and dry before adhering the microphone.
8) With the microphone now mounted, before reinstalling the Homelink trim, run the microphone wire up through the empty Homelink trim space, through the overhead console, up next to where the wire is for the rearview mirror. You can then squeeze the wire through that space. Pull out all the slack of the wire and re-install your overhead console.
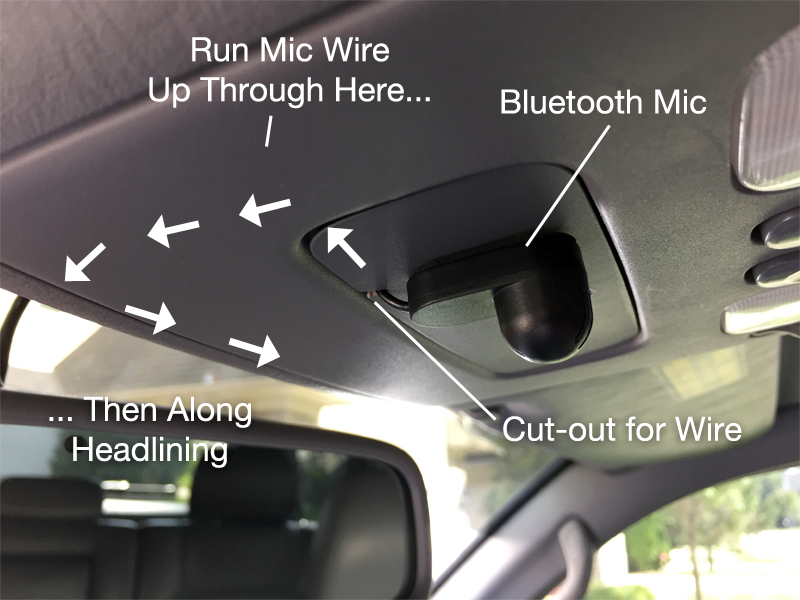
9) Run the microphone wire along the headliner to the passenger-side A-pillar. You’ll want to slightly pull the headliner down so you can tuck the wire into the headliner as you run it toward the A-pillar. Then, run the wire down the A-pillar. In case you find that the wire is not staying tucked up under the headliner or into the A-pillar, wrap little pieces of electrical tape around the mic wire to create little barrels. This way, it’s easier to stuff the wire in, while at the same time wedging it in.
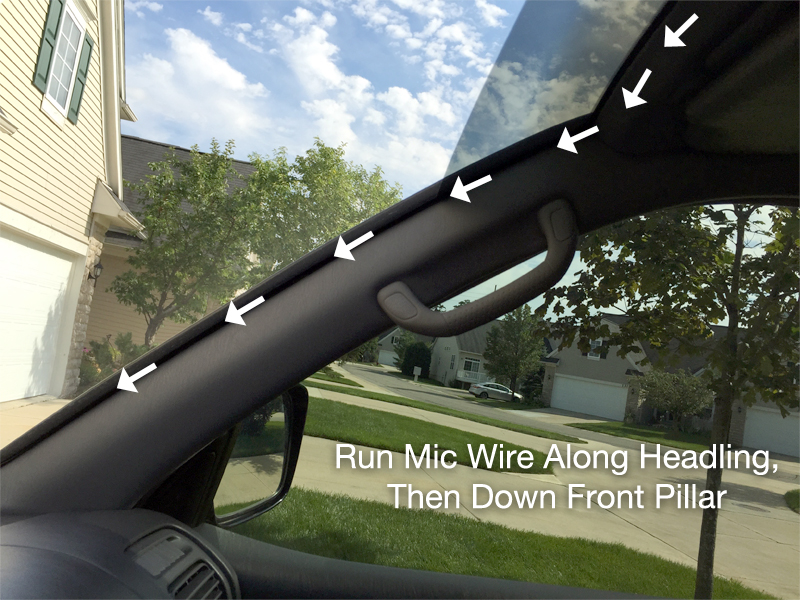
10) Drop the mic wire down between the A-pillar and the dashboard, somewhere in the area where the dashboard, A-pillar, and windshield meet. With the glovebox removed you should be able to push the wire down from above far enough to reach up and grab it. You may need a flashlight to be able to see the mic wire since it’s black.
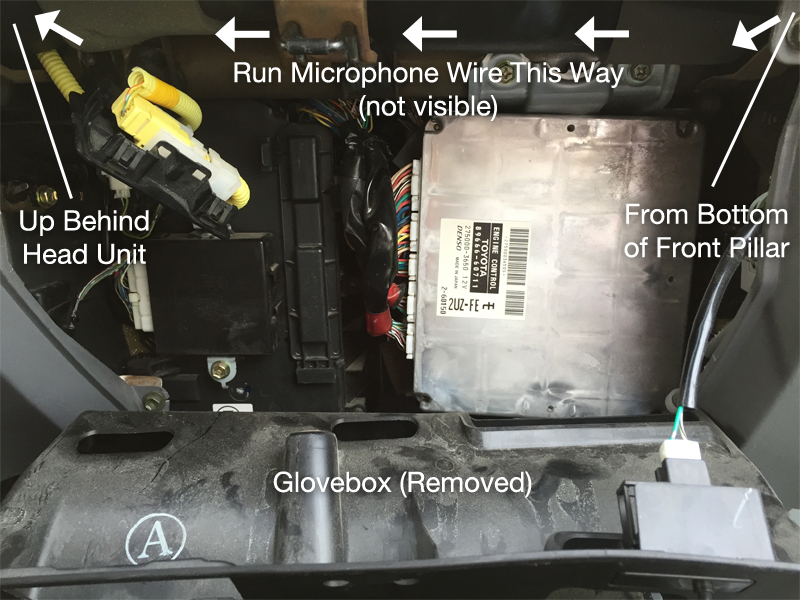
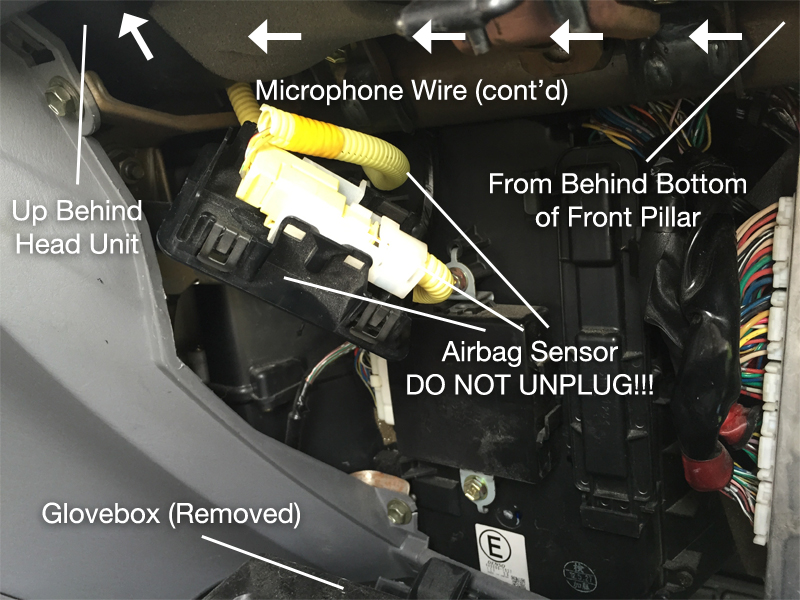
11) Now run the mic wire back toward the head unit, essentially in the space directly behind and above where the glovebox would be. For instance, behind or along the trim that the glovebox striker is in front of. There seems to be plenty of space back there. Right where the left side of the glovebox space ends, you should be able to rough the mic wire up and over the head unit and its harnesses (so as not to create to much tension for the wiring behind the head unit or for the mic wire itself).
12) Connect the 3.5mm jack end of the mic wire to the Bluetooth module.
13) IMPORTANT — DIP Switch setting on Bluetooth module. Per the instructions that came with the Bluetooth module, set the DIP switches accordingly. I honestly can’t remember how I set mine, I should have written it down, but be sure to test the unit before you go any further to make sure it works as it’s supposed to so you don’t have to tear the front apart again. The Bluetooth system should function when you change the audio source to CD (you may have to press CD twice, as you’re adding an input to the CD input, especially if you also have iPod integration like me).
14) Once you get the Bluetooth module to operate normally, fasten it in place to your liking so it doesn’t rattle while driving. I zip-tied mine using what felt and looked like metal structural supports for the dashboard.
The BT35 is probably not the superior product on the market for these rigs, but it does what I need, that being when someone calls, it will interrupt whatever source you are using on the head unit and automatically switch to the Bluetooth source (CD). This way I don't miss possible important phone calls while my stereo volume is up or if I don't feel the phone vibrate. The audio quality of phone calls is also very good. Better than the factory Bluetooth in my old 2007 QX56 and better than my old 2007 L322 Rover. I've been told the quality of my voice through the supplied microphone is also quite good.
USA SPEC BT35-TOY ($150): http://www.crutchfield.com/p_581BT35TOY/USA-Spec-Toyota-Bluetooth-Interface.html?tp=68488
USA SPEC Toyota Adapter ($25): http://www.crutchfield.com/p_581CASTLC/USA-SPEC-Toyota-Adapter.html?tp=125
I AM NOT A CERTIFIED AUTO MECHANIC, TECHNICIAN, OR ELECTRICAL EXPERT. PROCEED AT YOUR OWN RISK.
Preparation
1) Remove the wood trim bezel that surrounds the head unit. I put a rag over a flathead screwdriver. Try and pry the bezel from the four points highlighted with arrows in the photo. That’s where the retaining clips hold it in. Mine was stubborn, but not too hard.
2) In order to fully remove the trim, I believe there is a wiring harness you’ll also need to disconnect from it that supplies wiring for some other buttons like the power antenna and ext. thermometer.
3) Remove the four phillips head screws indicated by the arrows and slowly pull the head unit out. I placed a cloth on my shift knob and was able to balance/rest the head unit on that due to the tension of the wiring harnesses (that we won’t be messing with here).
4) Remove the glove box, first by unscrewing the two screws at the bottom, then by disconnecting the glovebox damper clip, which should allow you to drop it all the way to the floor.
Bluetooth Module Install
1) Remove the factory wiring harness on the right side (if you’re looking at the rear of the head unit) and replace it with the CAS-TLC adapter as shown in the photo. Then, plug the CAS-TY35 cable into its corresponding opening of the CAS-TLC adapter, followed by plugging factory harness into the other corresponding opening.
2) Decide where you want to place/mount the Bluetooth Module. I placed mine in between the driver-side center hvac register and the dash/gauges. There’s plenty of room back there to be able to run the cables and microphone wire. Not to mention it’s a relatively easy location to access if I need to for some reason down the road.
3) Run the CAS-TY35 Cable, from where it’s connected to the CAS-TLC harness behind the head unit, up and over the hvac register to where your Bluetooth module rests.
4) Decide where you want to mount the microphone. I took the suggestion from the instruction manual and mounted mine on the overhead console, running the microphone wire along the headliner to the passenger side, down the A-pillar and behind the glove box.
5) To remove the overhead console, remove the screw from the sunglasses holder and then pop the trim at each of the four corners (as shown in the photo).
6) Remove the smaller piece of trim that surrounds the Homelink buttons and drill a small hole on the side closest to the front of the vehicle. This will allow you to mount the microphone next to the Homelink buttons and let cord rest naturally without being taught.
7) Mount the microphone to the trim that surrounds the Homelink buttons using the double sided tape that comes pre-adhered to the bottom of the microphone. Be sure the spot on the plastic trim is clean and dry before adhering the microphone.
8) With the microphone now mounted, before reinstalling the Homelink trim, run the microphone wire up through the empty Homelink trim space, through the overhead console, up next to where the wire is for the rearview mirror. You can then squeeze the wire through that space. Pull out all the slack of the wire and re-install your overhead console.
9) Run the microphone wire along the headliner to the passenger-side A-pillar. You’ll want to slightly pull the headliner down so you can tuck the wire into the headliner as you run it toward the A-pillar. Then, run the wire down the A-pillar. In case you find that the wire is not staying tucked up under the headliner or into the A-pillar, wrap little pieces of electrical tape around the mic wire to create little barrels. This way, it’s easier to stuff the wire in, while at the same time wedging it in.
10) Drop the mic wire down between the A-pillar and the dashboard, somewhere in the area where the dashboard, A-pillar, and windshield meet. With the glovebox removed you should be able to push the wire down from above far enough to reach up and grab it. You may need a flashlight to be able to see the mic wire since it’s black.
11) Now run the mic wire back toward the head unit, essentially in the space directly behind and above where the glovebox would be. For instance, behind or along the trim that the glovebox striker is in front of. There seems to be plenty of space back there. Right where the left side of the glovebox space ends, you should be able to rough the mic wire up and over the head unit and its harnesses (so as not to create to much tension for the wiring behind the head unit or for the mic wire itself).
12) Connect the 3.5mm jack end of the mic wire to the Bluetooth module.
13) IMPORTANT — DIP Switch setting on Bluetooth module. Per the instructions that came with the Bluetooth module, set the DIP switches accordingly. I honestly can’t remember how I set mine, I should have written it down, but be sure to test the unit before you go any further to make sure it works as it’s supposed to so you don’t have to tear the front apart again. The Bluetooth system should function when you change the audio source to CD (you may have to press CD twice, as you’re adding an input to the CD input, especially if you also have iPod integration like me).
14) Once you get the Bluetooth module to operate normally, fasten it in place to your liking so it doesn’t rattle while driving. I zip-tied mine using what felt and looked like metal structural supports for the dashboard.
 Mother's Day present.


 ) can watch DVDs while vehicle is in motion.