Cradle Adapters for Bendpak XPR10A-LP

This site may earn a commission from merchant affiliate
links, including eBay, Amazon, Skimlinks, and others.

Joined
Apr 15, 2012
Threads
35
Messages
954
Location
Tucson, Az
I purchased a 10K some time in September knowing that I would be raising low profile cars.
I went with the Low Pro arms (LP) for this reason. haven taken the Camaro to a buddies shop who works on imports, we had to place a floor jack under my car to get the arms in place. I said note to self, when the time comes for the purchase, I would NOT be doing this!

Well the lift went up with no issues other than running out of beer (after install). I soon raised the low profile cars using the round disks provided. These work well with una-body but I did not trust those flat disks on the 1/2 ton truck or the 2500 HD duramax, let alone my 40 (daily driver).

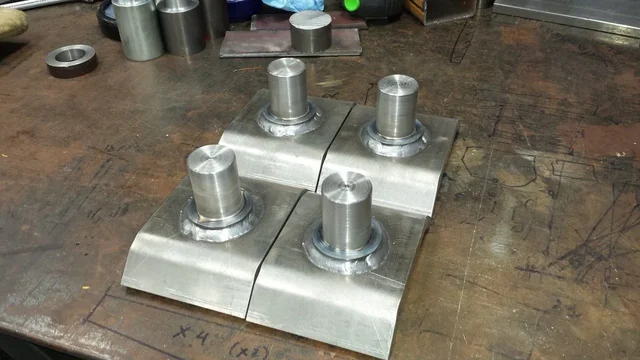
Pulled some measurements from all framed rigs and designed some cradles I like to share.

Materials; 3/8" X 4" cold rolled flat bar (24")
2" solid round cold rolled (12")

Equipment used; Ellis 1800 bandsaw (cut all stock)
Scothman 51T iron worker (Break attachment)
14"X40" lathe (turned pins)
Miller 350P (wire speed 475 ipm pulse)
I did not get photos of the lathe work or breaking the bar. I had not considered posting until prior to welding.

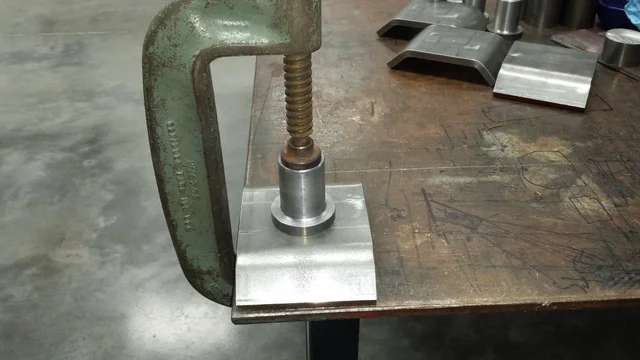
I set up a single C clamp and worked around the clamp burning in a single pass eliminating tacking. 20141231_113842.jpg
20141231_114110.jpg 20141231_120010.jpg
20141231_113842.jpg
20141231_114110.jpg
20141231_120010.jpg
 
I machined a 3/8" shoulder on the pins to mate with a machine surface on the lift and allow a smooth swivel. The foot of the weld came close but enough relief was accomplished with no clean up required.
20141231_121053.jpg
20141231_121110.jpg
 
The last step was to glue some 3/16" neoprene to the inside of the cradles. No photo taken while working with glue.
In this photo, I rigged all four on to the press for curing of the contact cement.
20141231_125537.jpg
 
The base plate seen in the last photo is a sine plate I use on the milling machines for special applications. Most of the holes are threaded for securing your part. I needed a larger flat base for the curing set up (its hardened and ground).
 
I am green with envy right now :/

My 350p shows up Wed & I got the Alumapro A (25') gun too.

Total overkill for a home shop, but I don't hit the bars much, so it all evens out.

I might ask for a kit of those feet if you have more round stock to turn, my lift is a similar design arms for swapping pads (Launch Tech)
 
Your gonna love your new machine! My 350P came with a roughneck whip/torch that is rated for maximum amps, that said it is very robust and

heavy. Working with fixtures/jigs all makes it counter productive (for me) so I keep a M-25 15' whip on my 350. The roughneck goes back on

when I need to weld on 1/2" and up for more than ten minutes. The M-25 is nimble compared to the roughneck and good for 250 amps.


Bendpak sell a set of these for around $200. They use 1/4" stock and break the sides at 90*. I wanted a little more "beef" and less than 90*, so

fabricating them was a no brainer. Material cost $44.00 (I already had the neoprene). As for turning the pins, I would be happy to, but I would

check your local machine shop for pricing due to shipping. I can provide measurements I used. I'm also working on a "40 adapter" extension that will

drop in place on the front (short) arms of the lift.

Post a photo of your new machine when you get it.

Peace.
 
We got to use the new adapters yesterday on a 56 ford. The frame is much higher than the running boards so with 6" spacers and the cradle adapters

my friend was able to walk under his truck for the first time.
20150111_102453.jpg
20150111_102510.jpg
 
The front arms on the lift model I went with are shorter than a standard lift. This created a problem for the 40 as the frame is so narrow than the

other framed rigs I own. In addition to the cradles, I came up with arm extensions that drop in to place. I knew from experience that a tight tolerance

would result in a hassle when placing/removing. I decided to machine the pin .010 under and compensate for the sag by breaking a slight upward

angle. Under a load the arm extensions are level with the rear arms but can be easily removed when not needed.

Material used for extensions; 1/2" x 4" CR flat bar.
pins and collars 2" CR round bar.

I inspected the front arms to ensure the sleeves where "bomb proof" as the added leverage would result in torsional load when adaptors are in use.

I raised the 40 just off the ground and inspected/measured all points. Pleased with the results the 40 went up with no issues. The welding machine

was set at 475 ipm ensuring penetration. I will clean up and soften the corners prior to painting.
20150116_141315.jpg
20150116_145143.jpg
 

Users who are viewing this thread

Back
Top Bottom