Navigation
Install the app
How to install the app on iOS
Follow along with the video below to see how to install our site as a web app on your home screen.
Note: This feature may not be available in some browsers.
More options
Style variation
You are using an out of date browser. It may not display this or other websites correctly.
You should upgrade or use an alternative browser.
You should upgrade or use an alternative browser.
CopperState 80series project
- Thread starter Social Casualty
- Start date
This site may earn a commission from merchant affiliate
links, including eBay, Amazon, Skimlinks, and others.
More options
Who Replied?- Thread starter
- #42
It has been some time since my last update, Sorry
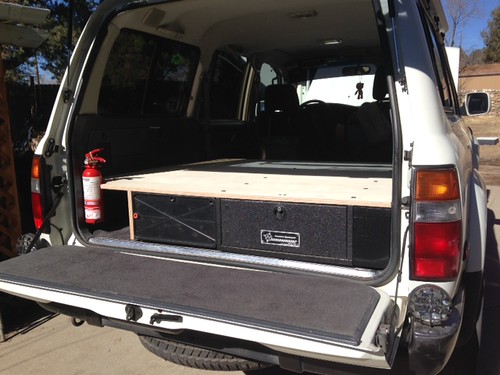
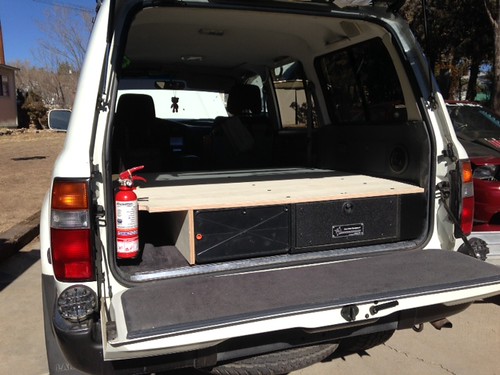
The most recent project that I am working on is the Sleeping platform that includes a 54" pull out storage box a 27 gallon fresh water tank and Logistic Aluminum tie down tracks. The basics are complete on the rear section just have a couple hours left of finishing work and mounting of the tie rails then the front storage box/platform construction begins.
More to come soon
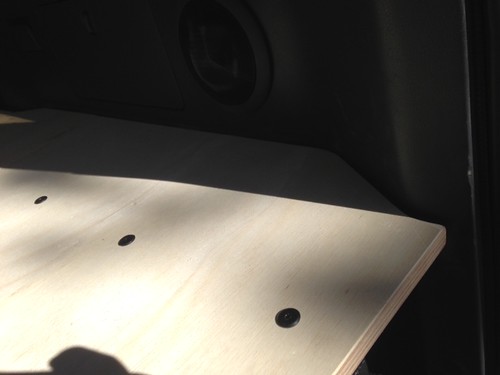
.75" sanded ply for the base floor and right suport
http://farm9.staticflickr.com/8186/8385085289_444751b18c.jpg
http://farm9.staticflickr.com/8368/8385085013_69c443095b.jpg
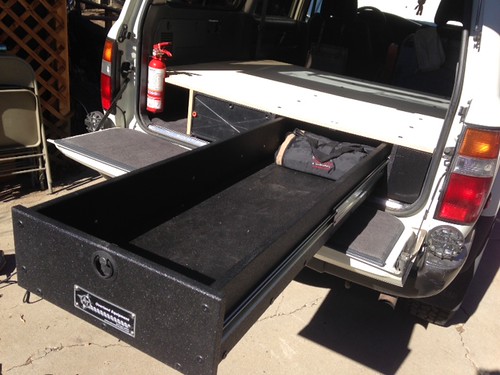
54" heavy duty pull out box with plenty of storage space
http://farm9.staticflickr.com/8468/8386168896_7eb7d01ee7.jpg
Right side cover held in tight by small Earth magnets
http://farm9.staticflickr.com/8495/8386168692_2946066426.jpg
Cut out for easy removal or the Fire Extinguisher with tail either closed or open.
http://farm9.staticflickr.com/8495/8386168588_6593a70aac.jpg
Cut to shape
http://farm9.staticflickr.com/8048/8386168498_4d71e56612.jpg
The most recent project that I am working on is the Sleeping platform that includes a 54" pull out storage box a 27 gallon fresh water tank and Logistic Aluminum tie down tracks. The basics are complete on the rear section just have a couple hours left of finishing work and mounting of the tie rails then the front storage box/platform construction begins.
More to come soon
.75" sanded ply for the base floor and right suport
http://farm9.staticflickr.com/8186/8385085289_444751b18c.jpg
http://farm9.staticflickr.com/8368/8385085013_69c443095b.jpg
54" heavy duty pull out box with plenty of storage space
http://farm9.staticflickr.com/8468/8386168896_7eb7d01ee7.jpg
Right side cover held in tight by small Earth magnets
http://farm9.staticflickr.com/8495/8386168692_2946066426.jpg

Cut out for easy removal or the Fire Extinguisher with tail either closed or open.
http://farm9.staticflickr.com/8495/8386168588_6593a70aac.jpg

Cut to shape
http://farm9.staticflickr.com/8048/8386168498_4d71e56612.jpg
Bomar
SILVER Star
Great looking rig!!
Nice truck! I really like the direction you're going with it. Should serve you well for many miles. 
Nice bunch of mods.
Question on you rear platform. Is there a seam in the top somewhere? When I was building mine a while back, I couldn't get it cut to fit in one piece.
Question on you rear platform. Is there a seam in the top somewhere? When I was building mine a while back, I couldn't get it cut to fit in one piece.
- Thread starter
- #46
Thanks,
Yes the seam runs across the vehicle (drivers to passenger) at the halfway point of the storage box at 27". each piece is approximatly 27" x 59" with the 59" length trimmed to contour the interior panels
Cheers
Yes the seam runs across the vehicle (drivers to passenger) at the halfway point of the storage box at 27". each piece is approximatly 27" x 59" with the 59" length trimmed to contour the interior panels
Cheers
Nice bunch of mods.
Question on you rear platform. Is there a seam in the top somewhere? When I was building mine a while back, I couldn't get it cut to fit in one piece.
- Thread starter
- #47
Coated the platform with a rubberized coating his weekend as well as installing the water tank fill neck. The coating turned out a little on the glossy side but hopefully should scuff up and loose that glare.


- Thread starter
- #48
Installed a Kaymar rear bumper with swing outs this past weekend the installation was simple and went together in just a couple hours. First we removed the oe bumper side caps, mud flaps along with the aluminum top plate and the bumper's left and right under structure so all that was left was the fame (pic). From there the mud flaps were reinstalled then the bar was lifted into place and bolted down. Then both swing outs installed by placing them over the spindles then dropping in the top barring, flat washer and tightening the castle nut followed by a cotter pin and dust cap. Wiring was quick and easy as well since the harness was equipped with plugs that tapped into the existing oe harness located right side rear area of the spare tyre.


Rear bar complete including rear flood light mounted center of the spare tyre and license plate/light

Rear bar complete including rear flood light mounted center of the spare tyre and license plate/light
Very nice build and write up! Any major trips planned for it?
- Thread starter
- #50
Thanks, it's turned out to be a longer process then originally laid out. As for any major trips, at this point my hands are tide do to major medical reasons and can not hit the back country for any time periods longer then 5 or 6 days. So we're pretty much keeping things local, but wife and I are hoping that by Mid 2014 my condition improves so we can take a trip to Baja for a couple weeks.
Thanks, it's turned out to be a longer process then originally laid out. As for any major trips, at this point my hands are tide do to major medical reasons and can not hit the back country for any time periods longer then 5 or 6 days. So we're pretty much keeping things local, but wife and I are hoping that by Mid 2014 my condition improves so we can take a trip to Baja for a couple weeks.
Nice, baja is a definite to-do for me with the FJ also. Also AZ has some great options for hitting the trail that will keep things interesting. Hope things work out as planned for you and your fam.
- Thread starter
- #52
Updated dash with winch control and compressor switches.

murf
Lifer
I hope you feel better soon and can get out as much as you want.
Nice rig
Nice rig
- Joined
- Jul 23, 2008
- Threads
- 69
- Messages
- 922
- Location
- OC, CA, USA, EARTH SECTOR-28
- Website
- www.tdubclub.com
WOW!!! Your 80 is looking sweet!!!
Quick question for you [maybe], where did you get those mil-spec boxes on the roof rack from?
Are they easily available?
Quick question for you [maybe], where did you get those mil-spec boxes on the roof rack from?
Are they easily available?
- Thread starter
- #55
WOW!!! Your 80 is looking sweet!!!
Quick question for you [maybe], where did you get those mil-spec boxes on the roof rack from?
Are they easily available?
Thanks RW,
The medical boxes are available at:
http://ammocanman.com/index.php?main_page=product_info&cPath=53&products_id=396
http://www.colemans.com/ammocan.htm
and ebay at times. The 7" high boxes are a lot more difficult to find in stock but they do come along time to time.
- Thread starter
- #56
Picked up a couple small LED work/flood lamps for the Landcruiser last week and found some extra time to mount them this morning. Simple install mounting them with rubber isolated steel loop rings to the roof rack. I also came across a lightly used Camping Lab RTT and had a couple friends help me get it mounted up on the rack. Only fall back is the storage chests on the rack were removed so I'm now looking into constructing a loft shelf to house the extras if necessary.
Drive's side LED mounting

Passenger side LED mounting under the awning

Camping Lab roof top tent

Drive's side LED mounting
Passenger side LED mounting under the awning
Camping Lab roof top tent
- Thread starter
- #57
I hope you feel better soon and can get out as much as you want.
Nice rig
Thanks MURF!
- Thread starter
- #58
Picked up a used Pelican 1720 from a friend the other day so I decided to put together a simple roof mounted solar charging system to help maintain battery health.
Started with a Pelican 1720 case then mounted a 15 watt aluminum framed solar panel to the top lid of the case using 6mm button head bolts, .5" nylon spacers, flat washers and nylock nuts. On the inside I installed a solar charging regulator as well as a Deka ETX16L and two marine sockets so we could plug in accessories right into the case's sides without having to open the front bonnet or a door to access power. Once it was completed the entire unit was mounted to the roof rack with U bolts, plates and nylock nuts. I tested the output once all was said and done in good sun light but not direct light and was putting out 14.2 watts.
I may add some dividers to protect/separate the battery side from items that may be stored up top.
What does the plate stand for?
7Y0005...hmmm?
Enjoying the build!!
7Y0005...hmmm?
Enjoying the build!!
- Thread starter
- #60
Pbr, my plate number represents a change in my life/career years back. Thanks

Last edited:
Similar threads
- Replies
- 11
- Views
- 1K
Users who are viewing this thread
Total: 1 (members: 0, guests: 1)