Bigwapiti's 2011 Tundra build...'Big Nambe'

This site may earn a commission from merchant affiliate
links, including eBay, Amazon, Skimlinks, and others.

That picture there from "Back to the Future" starting me with my addictions to toyota 4x4's. The 86 xtra was my first toyota and have owned toyota 4x4 ever since...

My family has owned Toyotas all of our life with the exception of one Honda Accord. I am curious to see how many teens were 'affected' when that garage door opened to see that rig...

Regards,

BWJ
 
Expedition One (EXO) bumper is on...

All,
I just got my truck back from Atomic Fabworks. They installed the Expedition One front bumper with all the goods that go with it. Got the bumper back from RML powdercoating 2 weeks ago. Here is the 'pile' of goodies that needed to be installed. The guys at Atomic were great to work with, and they dove right in...


I chose to go with powdercoating this time as opposed to Ameraguard lining. I think that this powdercoating is more robust as opposed to the PC that I got from my previous Armorology bumper. I'll see how it lasts...Anyways, onto the install...The disassembly of my OEM bumper was quite an eye opener to me - IT IS A TIN CAN. All it seemed to be was a few 10mm bolts (4x) and a bunch of plastic clips...not good. I was able to sell the OEM bumpers / mirrors / grille to an auto parts salvage yard with one phone call. The proceeds of which almost covered the cost of the rear EXO bumper...woot woot!


The Expedition One (EXO) bumper is very stout. The frame mounting bracket and re-inforcements are well engineered. We were all impressed as to how beefy this unit truly is. Compared to the OEM bumper, there is no comparison. If I were to hit a deer with my rig, I have no doubt that I will remain a few links above said deer, literally, on the food chain. Here is the solenoid pack mounted and ready to go.


Dream almost realized...


Overall, Atomic was excellent in the install and wiring. I am grateful to have such a fully functional installer / fabricator in close proximity. More pics later.

Regards,

BWJ
 
^^^ That looks great!!! I'm excited for you as your whole rigs seems like a great setup! I also can't believe you got so much for your OEM products, I was only able to get a $100 for almost all of the OEM stuff we removed! Grrrr.... ;)

-Daniel
 
^^^ That looks great!!! I'm excited for you as your whole rigs seems like a great setup! I also can't believe you got so much for your OEM products, I was only able to get a $100 for almost all of the OEM stuff we removed! Grrrr.... ;)

-Daniel

I'm thinking that the OEM bumper is so fragile, there is a market for them. Seriously, I'm relieved that EXO front / rear bumpers are going on the rig.

Thanks for the complement!

Regards,

BWJ
 
2" shackles installed...

All,

Along with getting the EXO front bumper put on, I also had 2" shackles put on as well. Originally, I upgraded to Deaver-add-a-leaf springs instead of 1" blocks due to my cargo needs. After all was said and done, I sat level driving daily and 'sagged' when I towed the Sherpa II.


I considered airbags, however, shackles seemed to be a solution with fewer headaches (moving parts) down the road. Anyway, I was able to acquire these from a fabricator on the Tundra boards. He is out of Utah, and these are beefy to say the least. Here is a pictorial chronology of my rear suspension dilemma / solution...

Stock


Toytec Ultimate 3/1 ~ used a Deaver-add-a-leaf instead of 1" block...


Coach's 2" shackles installed


More eye candy...


Ride is noticeably better than before. I have a rake now when I drive, and level / slightly raked when I tow. I may change this up over time, however, it seems to work for right now...

Regards,

BWJ
 
Very nice yet again! When we did our Tundra we went with blocks and airbags, but I like your choices way better (like you said, less to break)! Side question: what trailer is that exactly and where did you get it? Thanks!

-Daniel

EDIT: Found it, thanks!
 
Trailer information...

Adventure Copan,

My trailer is an Outlander Trailer - Sherpa II model. Robert Shepherd is the owner / builder. I highly recommend him and the Outlander line of trailers. I have yet to have any issues with it, and I would purchase from him again without question.

http://outlandertrailers.us/OT/Home.html

Regards,

BWJ
 
All,

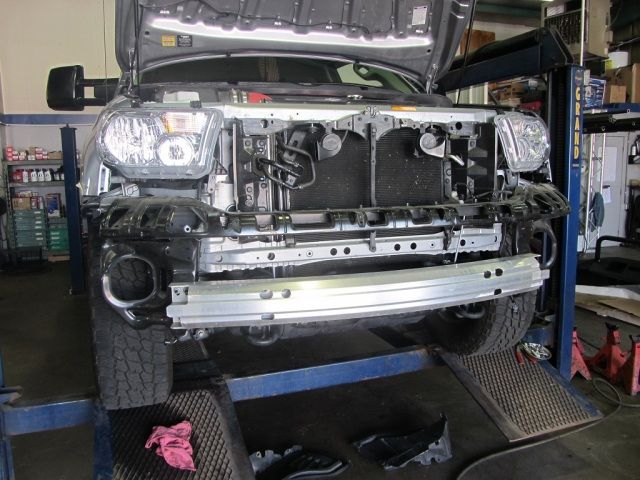
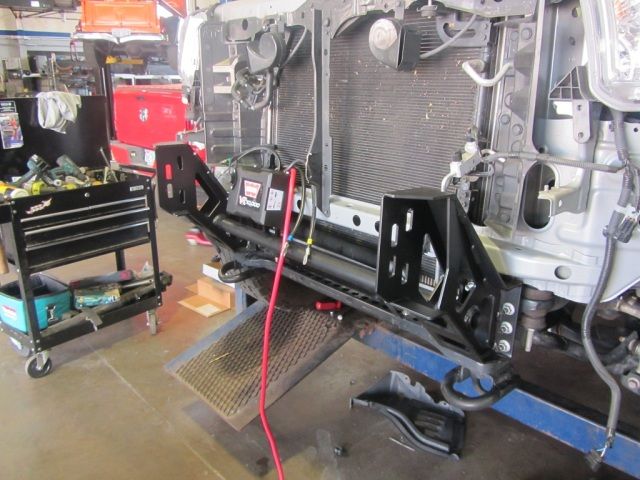
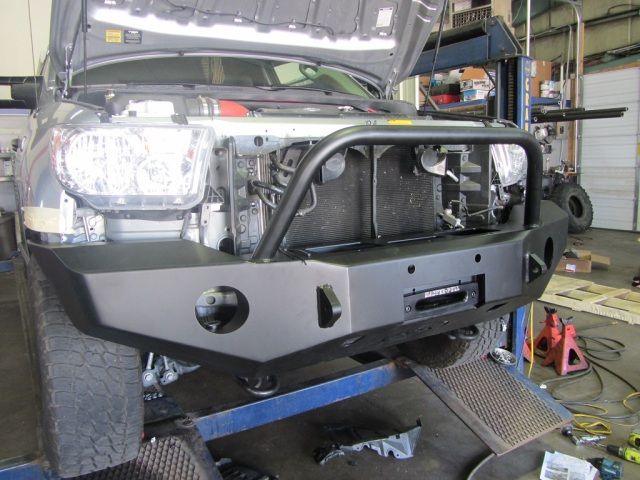
Well it's been about 1 week since I had my EXO front bumper on. I am glad the front is on. Again, Atomic Fabworks did an INCREDIBLE job installing / wiring / and fabricating to make this dream a realization. EXO is currently developing a rear tire carrier for the Tundra. I may go with this as an option...
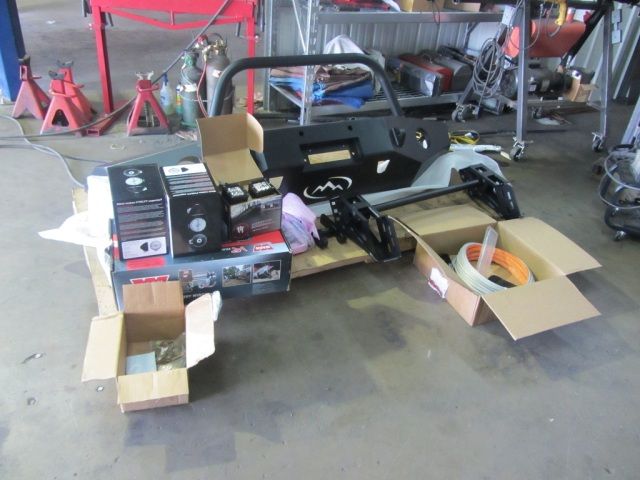
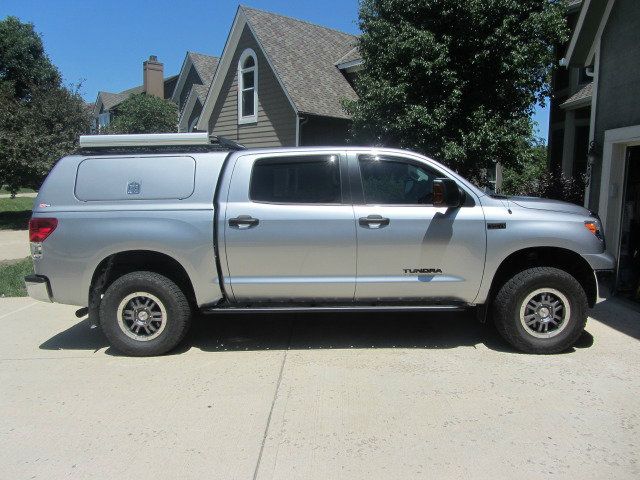
Initially, I purchased an IBS dual battery system from Sierra Expeditions. This system is elegant in its design, and It's has been bullet proof so far. As you know, I decided to mount the auxillary battery in the bed cabinet system. I also purchased a Blue Sea systems 12 fuse block and 100 amp resetable circuit breaker.

Note: Atomic Fabworks did the electrical wiring and I am going to meet with Steve to go over the wiring schematics / specifics soon. I am not familiar with electrical wiring, so please don't ask me questions about the ins and outs of the wiring...

IMG_0527.jpg


IMG_0526.jpg

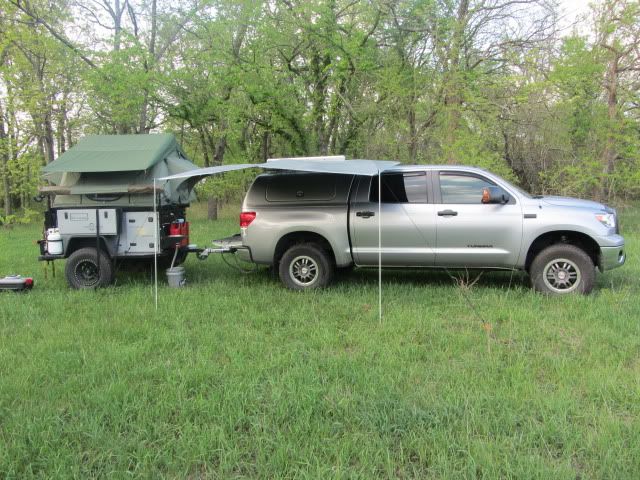
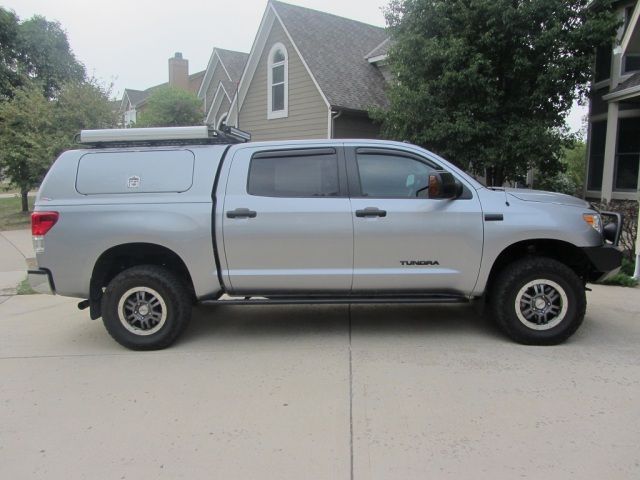
The LED lights are all wired to the auxillary while the winch and FRYLYTS are wired to the main. My lighting 'grouppo' consists of 2 FYRLYTs / 2 Rigid industries Dually D2s as fogs / a 40" Rigid LED light bar overhead on the Bajarack / and a Dually D2 diffused lens as a back up light. The light output on these lights are INSANE, however, they are different - Halogen vs. LED. I will post a comparison / night shot post soon...

IMG_0482.jpg


IMG_0484.jpg


IMG_0487.jpg


IMG_0502.jpg


IMG_0496.jpg


IMG_0494.jpg

I decided to go with switches from OTRATTW. They laser cut all of their switches and they are crisp and clean. I had them mounted to a removable plate that fit into the console. The switch turns on when the interior lights are on, and the small LED indicating bar lights up when the switch is activated. I'm still working on the passenger eject button as to what to do when activated...

IMG_0520.jpg


IMG_0518.jpg

There is also a Warn VR 10,000 winch with 3/8" MasterPull Superline Winchline and a Winch Stop Thimble. In case you are wondering, this is a hockey puck that I bored out. Cheap mod = $ 1.60...

IMG_0503.jpg


IMG_0499.jpg

For security, I decided to use several different nuts and bolts. It's a shame that we have to spend anytime with this, however, it is a cruel, fallen world that we live in...I went with two different sized pin-in-torx screws and two different kinds of tamper resistant nuts. McMaster Carr sells these at a reasonable price. Cheaper that other retailers...

IMG_0541.jpg


IMG_0529.jpg


IMG_0531.jpg

It is a combination of these nuts and bolts that will hopefully slow the thieves down and require too much time and effort. Overall, I am pleased with how the EXO front bumper with accessories turned out. I am currently waiting for Expedition One to put the finishing touches on my rear bumper with tire carrier...
Nights pics will come shortly...Stay tuned.

Regards,

BWJ
 
Got any part numbers for them tamper resistance nuts... Im going to put them on my roof rack and RTT.

Thanks

MANUCHAO,

Here you go! I could not use the spanner nuts because the diameter of the nuts were too big...So I had to buy the tri-groove nuts. I also had the spanner nuts re-sized to accomodate the M10 bolts of the FYRLYTs. They seemed soft and pretty easy to re-thread...Maybe too soft?...

http://www.mcmaster.com/#tamper-resistant-nuts/=j39iaf

Get 'em on!

Regards,

BWJ
 
Night shots at night...

All,

Here is my attempt at some night shots for the lights. Please note that these shots are 'dimmer' due to the limitations of my camera at night. I tried to 'standardize' the shots the best that I could. I took these earlier this year. The grass is about knee high in places and the treeline is about 150 yards away...

Driver

IMG_0586.jpg


Overhead

IMG_0582.jpg


Driver with headlights only

IMG_0589.jpg


Overhead with headlights only

IMG_0594.jpg


Driver with headlights + Rigid Industries Dually D2 fogs

IMG_0596.jpg


Overhead with headlights + Rigid Industries Dually D2 fogs

IMG_0601.jpg


Driver with headlights + Dually D2 fogs + Fyrlyts

IMG_0602.jpg


Overhead with headlights + Dually D2 fogs + Fyrlyts

IMG_0607.jpg


Driver with headlights + Dually D2 fogs + Fyrlyts + Rigid Industries 40" light bar
**You might be able to see the reflective nature of the LED light on this shot. We had a campfire close by and the wind blew some of the smoke into the beam of the light bar (1 o'clock position from the tree). I could not see the smoke from the headlights or Fyrlyts...


IMG_0609.jpg


Overhead with headlights + Dually D2 fogs + Fyrlyts + Rigid Industries 40" light bar.
**I have reflection on my roof, however, this is not an issue to me at all. I do lose a little light from the position of the light bar, however, I believe this to be minimal, and I don't have to deal with glare on the hood...


IMG_0619.jpg


Outside the driver's door

IMG_0614.jpg

My impressions so far...

1) The combination of halogen (headlight / Fyrlyt) and LED (Dually D2 fogs / 40" light bar) needs some getting used to. The halogen lights seem to 'penetrate' more into the trees and surroundings while the LED light seems to be more diffused as the objects get further away. I believe that either light technology will be suitable, you just have to get used to them...

2) LED light is more reflective. I believe this to be from the temperature of the light itself. When driving through rain, I could see the drops clearly and the direction that they are coming from. In a downpour, this may hinder visibility. Having said that, this issue can be minimized by the use of the clip on filters that Rigid offers. It is significantly better with the amber filters on. I have not tried the blue filters at this time though.

3) Fyrlyts are bright as well. I had these set on the 'flood' setting. These lights put out some heat, you can feel the heat standing 8-10 feet away. One issue with the Fyrlyt is that there is a small leak on one of them. Fyrlyt has addressed this issue and is sending me 2 pair of seals from a new manufacturer.

I am blessed to be able to have both technologies on my rig. I will never be in want for more lighting.

Regards,

BWJ
 
Atomic Fabworks fire extinguisher mount is on...

All,

In the relentless quest for efficiency, I now present to you the Atomic Fabworks fire extinguisher mount...Previously, I had my DD fire extinguishers attached with a combination of the factory mount + a Quikfist. Not anymore, Atomic has these little babies available. The design is simple and elegant. During a panic situation, I believe this will afford a quicker response than fiddling with the previous mounting system. Here is the scoop:

This bracket comes in two seperate pieces that pivot around a bolt on the bottom and is held in place with a t-handle pull pin on top. There are several slots / holes located along the bracket itself for plenty of mounting options.

IMG_0561.jpg


IMG_0559.jpg


IMG_0563.jpg


I chose to mount the fire extinguisher with hose clamps, and I bolted the mount to my cabinet system.

IMG_0547.jpg


IMG_0549.jpg


IMG_0553.jpg


IMG_0558.jpg


All it takes is a quick pull of the T-handle and you are ready to go. I have two mounts, one in the truck and one on the Sherpa II. Enjoy!

Regards,

BWJ
 
Last edited:
Very nice all around! We have a mount similar to that one and they are a great design.

-Daniel
 
Overhead camp light / locator project is done...

All,

I have completed another project for my camping armamentaria. I noticed a couple of times this year, I was in need of additional overhead lighting. Since I have the IBS dual battery system, I dove right in. I was able to acquire a lockable 12 plug / adapter from Marinco, and I had Atomic Fabworks install the plug in the passenger side cabinet. I went with a pair of Rigid Industries Dually D2s (diffused lens), as well as a 6' LED lighted whip for a camp locator. I have daytime pics only at this time. I'll post up some night pics when I get a chance. Onto the pics...

The basic setup is as follows: I went with a 4' / 8' retractable painter's pole. The base and mounting bracket were fabbed up at Atomic. The adjustable pole is 'locked' in with wire pin fasteners at the base and the light mounting bar. The whole system is able to break down significantly. The base can be 'driven over' for stability, however, I chose to mount this on the roof rack.

IMG_0636.jpg


IMG_0645.jpg

The coil cord was quite a problem since I could not locate exactly what I needed. I did not want to splice several short 'cobbled' sections together, rather, I was looking for a coil that was one piece. Cable science to the rescue. I ordered a 5 foot coiled cable that could stretch out to 30 feet if needed. The NCV182 is a 2 conductor / 18 gauge coil that can accomodate up to 300 volts if need be. Cable science offers this in any lenght that you need. Fabrication took 4 business days and it was shipped following completion. The coil is high quality. The rubberized coating appears very durable, and I am looing forward to many years of service. I recommend Cable Science highly.

IMG_0642.jpg

As mentioned earlier, the lights are Rigid Industries Dually D2s in a diffused pattern, and the whip is from Tribal Whips. Both lights are able to be unplugged when needed, and they are quite bright to say the least.

IMG_0639.jpg

I mounted the base on the Bajarack to gain as much height as possible. The total height of the Duallys are about 20 feet + the length of the whip. I have tied the pole with some heavy duty bungee straps, and they are hooked to the corners of the Bajarack.

IMG_0658.jpg


Untitled.jpg

I'm working on becoming more proficient at setup and teardown. I'll post night pics when I am able to. Enjoy!

Regards,

BWJ
 
Last edited:
Freaking Awesome!!!! I'm hoping your cool with me totaling ripping this idea off! :D I've been racking my brain forever on what to do for camp lighting and couldn't figure it out. Very sweet setup!

-Daniel
 
No problem...

THANKS! Daniel, you are welcome! Please post up pics when you can...

Regards,

BWJ
 
Last edited:
I live in Nambe, so am curious how you picked the name of your rig.
 
I live in Nambe, so am curious how you picked the name of your rig.

Great question. I'm originally from Albuquerque. I have great memories of the Land of Enchantment. Growing up, my mother had several Nambe platters / utensils. According to Wikipedia, 'the alloy has the luster of silver and the solidity of iron'...

I didn't want to go with some cheesy NM name for the rig...'Big ~ Yucca / Red / Green / Burrito / Blue corn / etc...Mouth watering as I type this...

Regards,

BWJ
 
An apropos choice. I have several Nambe pieces and it is amazing how they polish up every time. Nice build and rig name!
 
Back
Top Bottom