Builds A few mods from 7-25-06 (1 Viewer)

This site may earn a commission from merchant affiliate
links, including eBay, Amazon, Skimlinks, and others.

Survival kit added 11-30-2007

The contents of my M-Packs does not really constitute a mod to the rig, but I feel it is a requirement to have in the rig if there was a disaster that would keep me at work or somewhere else where I could not get home such as an Earthquake or another terrorist attack.

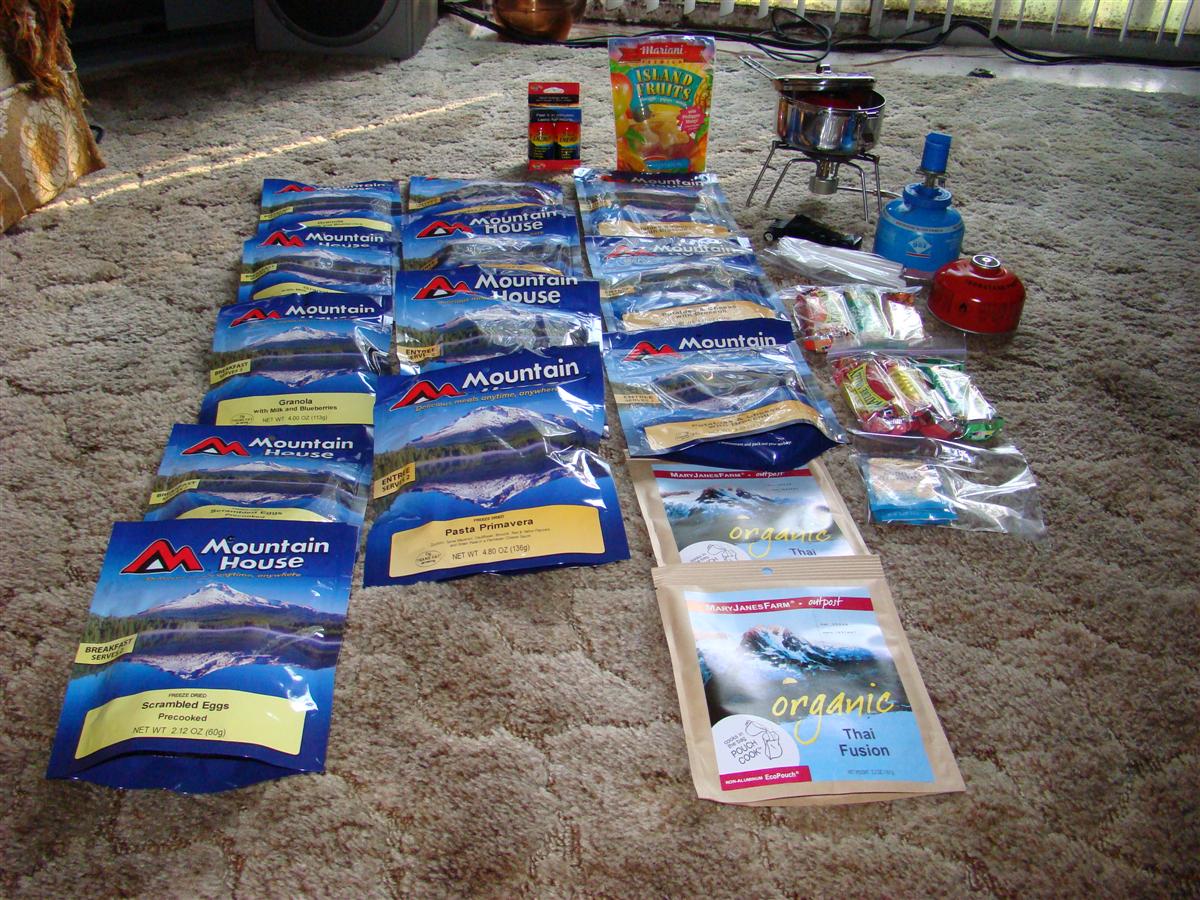
I thought I was going to be able to get all of the contents as see in the first picture into one of the bigger packs on the door, but nope, so I had to use two.
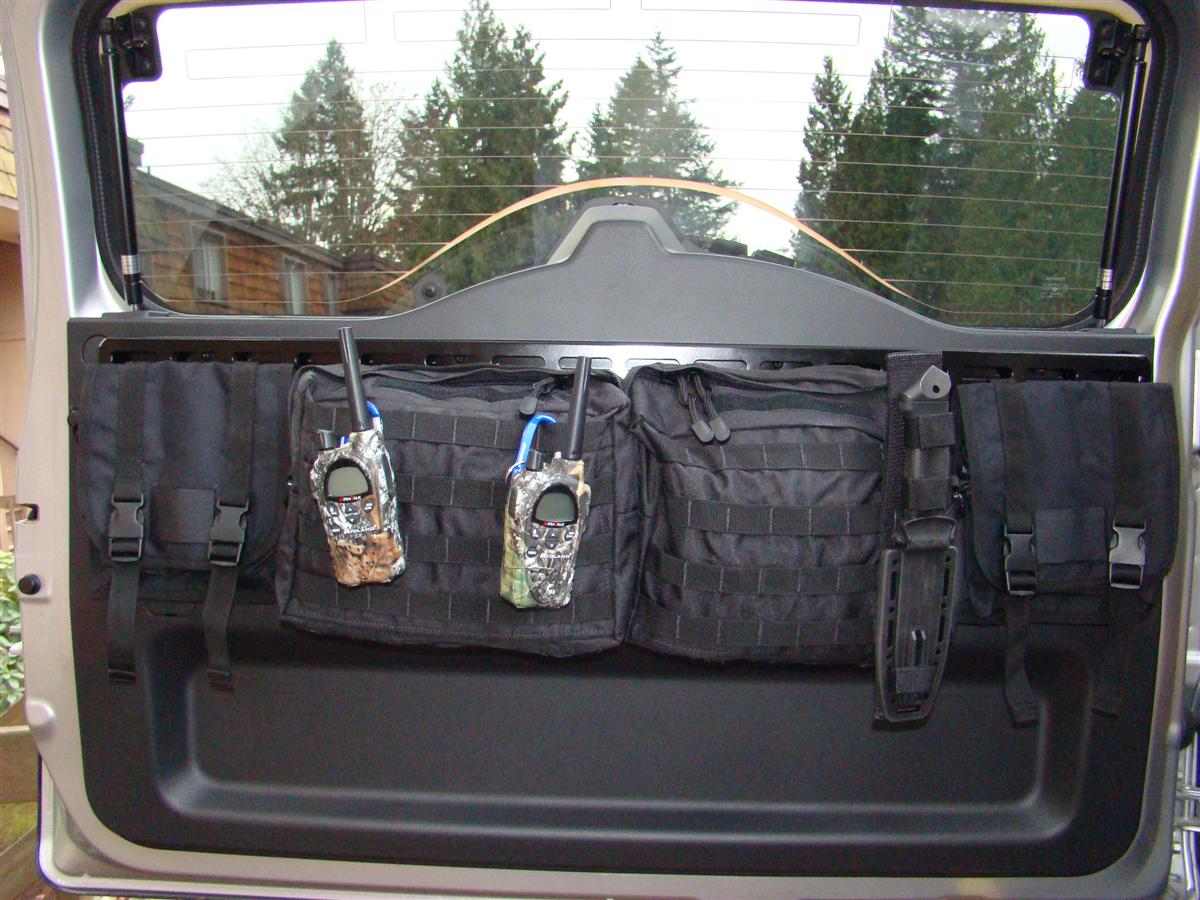
The pack with the two-way radios has the cooking pot and stove, and a few other things, and the other pack has all of the Mountain House freeze dried food and some dehydrated fruit in it.

Also seen on one of the packs is the Gerber LMF II Infantry Black survival knife I just picked up.
It has a built in sharpener in the scabbard, and the end of the handle can be used as a hammer, and the point on the end of the handle is one of those window smashers just like the Life Hammer in case you need to break out one of your rigs windows.
http://www.gerberstore.com/index.php?xpage=itempage&xid=757

In the first picture below is a Camping Gaz stove with cartridge, an MSR cooking pot, the granola bars in the baggies fit into the pot for storage.
Emergen-C packets of vitamin C that boost your immune system, one twin pack of 5 Hour Energy Drinks, dehydrated fruit, a small blow torch for lighting the stove, or setting on fire a terrorists beard, and plenty of freeze dried food with breakfast and dinner entrees.

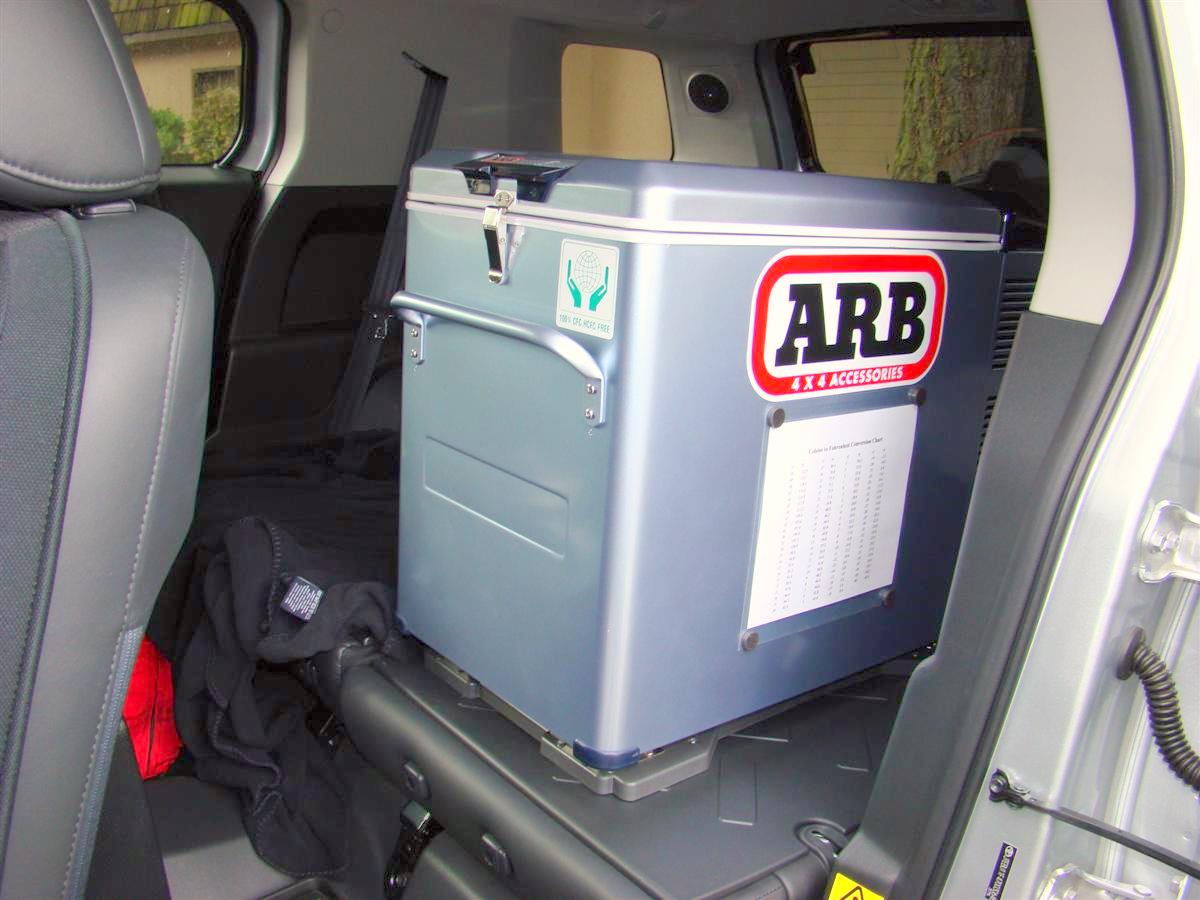
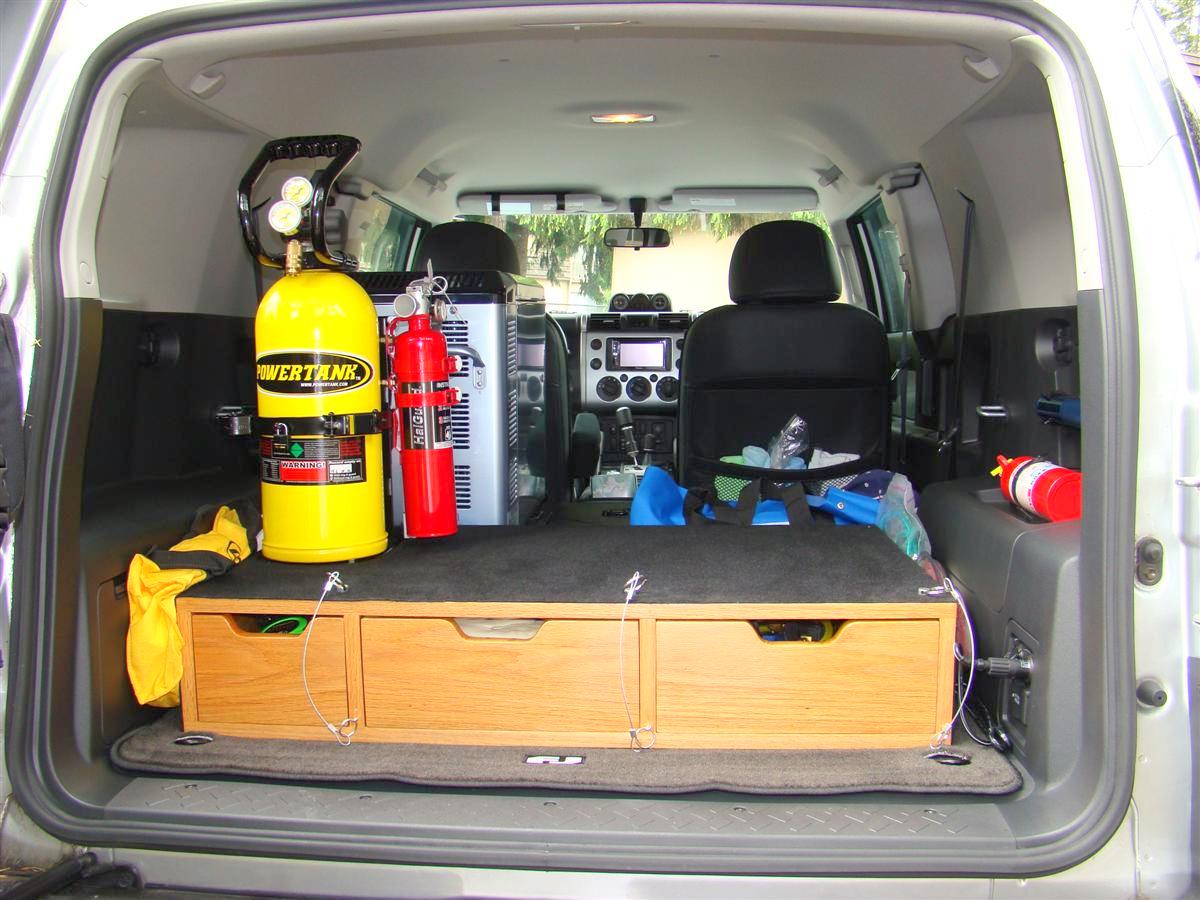
Not shown between the rear seats and the cargobox are two six packs of bottle water.
That will be used for reconstituting the food after it is brought to a boil on the stove, and for drinking water.

Work even tells us we should have a survival pack in our vehicles, as if we were stuck at work for some reason, the cafeterias would run out of fresh food awfully fast.
I have about three days of food there.

 
I got some MT MTZ 33/12.5/17 on my FJ cruiser, and it has been lifted 3" but the tires rub the UCA. I have heard that if I buy these Total Caous UCAs then I should be fine, what do you think??
 
Maggiolina AirLand Roof Top Tent installed 3-21-2008

Nice rig you have there dude!
Thanks Cali!

Spring has sprung, thus a new year of mods having been dormant over this past winter.

There is a constant joke on a few FJ Cruiser forums that goes around in threads asking "Can you sleep in it."
Of course you can, member LandCruiserSteve (a moderator over on fjcruiserforums.com) has proven that by building a nice bed system in the back of his rig that accommodates him very well.

With the way I have my rig setup in the back, that will not work out for me.

I have been looking at roof top tents as of late, and finally settled on a fiberglass one made in Italy like Wayne has.
Many thanks to Wayne (member KD7NAC_07FJ) for helping me make a selection on this model, it is the same one he has on his FJ Cruiser, the medium model.

Wayne used Yakima Lowrider clamps on the stock FJ rack, and then 58" crossbars held in place via the Lowriders.
The AirLand mounts to the crossbars.

I went to the shop Friday the 21st of March to get it installed, and they recommend I use four crossbars instead of two to distribute the weight, as that is the way they have been doing them.

I just got done opening it up for the first time since I left the shop after the install, and I am really impressed with the quality of the AirLand unit.

It cranks up just like a tent trailer (I have owned two of them in the past) after undoing two latches up front, and one latch back aft.

After cranking it up you can grab the aluminum ladder from inside and extend it.
It is fully adjustable to accommodate any vehicle.

Once I had the ladder up I climbed inside and took out the three pillow it came with and put the flannel pillow cases on that I bought.
For the medium AirLand tent, full size sheets are a perfect fit.
The bottom sheet is a fitted one, with the top sheet being the normal tuck in type.
I still need to pick up a warm down comforter, and the size that will fit will be a twin as to not have to much over the sides.

Getting up and down the ladder for me was not that difficult at all.
Now when exiting the tent and coming down backwards, you want to use caution since you can not see the rungs, you feel for them with your feet.
If I can do it, anyone can.

After getting the sheets on and the pillows in place, I climbed up inside for a few pictures of the interior, then I laid out like I was going to sleep in it.
There is plenty of room, and my feet do not even touch the ends of the tent wall.
I am about 5'10", and I did not feel cramped at all.
There is plenty of room for a second person too, and possibly a child if you have one.
It would be better with just two people though.

And not once did it feel rickety to me.
It was very stable, and a very cool feeling being up in the air like that.
I have a feeling I am going to sleep very well in this tent.
The best thing of all is being able to pull into a site whether in a regular campground, or when you are out 4wheeling, Overlanding/exploring, and just whip out the hand crank and crank up the tent and have your bed all setup in less than one minute.
This is the real advantage to a unit like this.

Here are a few pictures of the AirLand.


Links:
Maggiolina AirLand tent
Autohome's main site in Italy
Lowrider clamps
58" crossbars
Rack n Road Bellevue, WA. store
Full size flannel sheets
The comforter I may get if they get it back in stock

The Rack n Road store I visited (official reseller of these for WA. state as seen on AutoHome's website) has a team of top notch installers/manager working there.
Evan (store manager) and Colin were the two installers who installed it.

Shortly before I left too YotaTech member nickr9287 showed up, he also works for the Bellevue store and is an installer.

If looking for a system like this or any Yakima or Thule type of gear for your rig around our area, give these guy's a call.
Great team to work with.

Probably around sometime in May I will have some camping pictures from up at Greenwater with the tent all setup in the outdoors, and some other new camping gear I have been hoarding up on for a good time out in the woods.

With this I think my rig is nearing completion.
Still have to settle on a rear bumper, there are still a few in works.
The selection is getting bigger all the time.
 
Last edited:
Camping Labs Awning installed 5-16-2008

I had two different type of awnings on my last tent trailer I had, and they are nice for shade to sit under, or to get out of the rain.

Saw this brand mentioned in a few threads on a few Toyota forums, so I decided to give it a try.

It also came with two nice camping chairs, but I am not enclosing pictures of those since those are not a mod to the rig.
You can view the chairs at the website.
They are very nice

Owner Fernando was a great guy to work with, and also made me some custom mounts to attach to the awning so it would attach to my Yakima crossbars.
You can see how the mount attaches to the two channels on the rear of the awning, and also how it attaches to the crossbars in the first two pictures below.

Setup is a little easier than take down, same as with my tent.
But one person can do this easily.
It is also free standing since it has two supporting horizontal tubes, but you will want to use the enclosed stakes to stake down the white rope loops you see at the bottoms of the vertical tubes, and also

attach the two rope guy lines to the white rope loops at the top of the vertical tubes and stake them out.
This will be better for any wind that will kick up.
But I had it setup with a light hot breeze outside for around 20 minutes a bit ago, and it was very stable.


I am also enclosing a video that shows just how fast you can deploy the Maggiolina AirLand roof top tent.
It is easy, in fact too easy.

YouTube - Setting up the Maggiolina roof top tent

Links:
Camping Lab
 
Did I mention how cool this tent is?

These things have been used for years on various expeditions and hold up extremely well. Not to mention the fact that they are the fastest and easiest to deploy.
 
ARB fridge relocated 5-31-2008

Thanks Eric, I really dig it.

OK, some of you may have read that I have mentioned my neighbor here before who is a weatherman for the FAA.
Most of the time he is right about the weather.

He told me it was going to rain today, the day I wanted to spend about five to six hours detailing my rig.
The local news stations said no rain today, it is coming tonight.
Well, it started raining here about 9 am just after I finished up my ARB fridge relocation project.

I was just finishing up with the mandatory snapshots and was going to vacuum out the rig and wipe the interior down of dust when it started in raining.

Anyways, below are some pictures of the fridge move.
I like it a lot better where it is now.
I can access the lid to load/unload grub, and actually see what is in there.
I still can not raise the lid all the way up to the ceiling, but I can raise it far enough to see very well inside.
There is a guy on IH8MUDs forum who has put together all the hardware for the hinge relocation kit to make the lid lift up from either side instead of from the end, and after I order that from him, I will be able to raise the lid all the way up and let it stay open.

Here is a comparison when it was mounted in the rear.


The first two pics show the seat back cover in place and then removed.
Picture three shows the Engel Slide Loc screwed down to the plastic cover.
I had to move the plate around some so it would avoid the D ring and raised hump it resides in so the plate would sit flush.
Pictures four five and six show the fridge mounted to the Slide Loc.

I drilled small pilot holes into the plastic, and after tightening the screws down, they do not contact the metal underneath.
If I was worried about needing more strength, I can get longer screws and drill the holes deeper and into the sheet metal underneath.
I also used two extra screws this time instead of four like I did when it was mounted on top of the cargo box.

This will give me more room to load my camping gear now.
For the long stuff like the Cabela's picnic table and Camp Kitchen, I will load them in from the rear door and shove it towards the passenger seat.
This should speed up the loading process quite a bit.

The best part though is being able to access my fridge much easier and see what is inside of it.

If you do not mind giving up your rear drivers side seat, this is a good way to mount your fridge.
I can still put up the passenger side rear seat with the fridge in place.
I may even put the bottom seat cushion back in too for the rear passenger side, as it is currently out right now.
But the drivers side will stay this way indefinitely.


Last edited:
Thanks fortysix, almost done with it.

A few things left:
1. A ham setup to go along with the CB I have already.
2. Rear lower control arms when I end up choosing a good vendor to go with.
3. A rear bumper, same reason as above.
4. Down the road a "Chaser" type of off road trailer to put the tent on and take it off of my roof for better handling.
 
ARB Fridge Rehinged 9-26-2008

First I had the fridge on top of the cargobox, then I moved it to behind the drivers seat as seen above in a previous update.

It is much easier to get to the contents of the fridge now, but I still could not lift the lid up all the way, and I had to hold it open with one hand.

On my trip to Mt. Rainier in August, it was a PITA to have to hold the lid open with one hand, and move the contents with the other hand.

Awhile back I came upon a thread on IH8MUDs forum about relocating the hinges so the lid will open from the side.
The creator of the thread ended up putting together a kit so one does not have to hunt around for the parts.

The kit arrived today, and I could not wait to dig in on another project.
Total time was around a half hour or so.

While the instructions do not call for drilling a pilot hole for the self tapping screws supplied, I did drill a small 7/64th pilot hole.
I was careful to not drill into far.

I first put the hinge in place, and I went back in 1.5" from each end of the fridge to center the hinges.
I marked one hole with a felt pen, then drilled it.
I then put the hinge in place and used the 18v drill to put in the new screw.
Once it was in and tight, I then drilled one hole at a time and repeated with the self tapping screws.
So in other words, I did not drill all four pilot holes at once.

Once the hinges were in place, I then took out the top screws I had just put in and took the lid all the way off.

You then have to remove the stock hardware from the lid and the fridge for the stock hinges.
Once you have done that, you reuse the stock bolts (these are not screws) to fill in the holes.

I put the lid back on again and put back in the upper screws for the new hinges.
I then snapped close the stock latch, and all is very tight.
I did not opt to install the new clasp/lock supplied in Kevin's kit, as the stock hinge worked out fine in its original position.
Plus I will not have to modify the thermal bag by cutting a hole in it for a new clasp/lock.

Picture one below shows me holding the lid open with the fridge in the rig.
The lid hits the ceiling and will not raise up all the way.

Picture two shows the hinge on with three screws in place and a pilot hole ready for the fourth screw.

Picture three shows the new hinges in place and the lid open.
Note that the lid stays open too.
It has an adjustment screw you tighten to cause friction in the hinge, thus allowing the lid to stay open in any position.
Way cool man ;)

Picture four shows the new hinges in place and the lid off ready for me to take off its hardware and the fridges hardware for the stock hinges.

Picture five shows the fridge back in its native environment, and the lid open as if I was going to access it for grub.
The lid clears the ceiling just fine too.

This retrofit will make an ARB or Engel fridge that more enjoyable to access the interior of it.

This kit gets the two thumbs award
bigok.gif


Click here for the instructions and to order the kit.

The thread on IH8MUD that started it all.
 
Last edited:
TwoZone Basket Set For ARB Fridge 10-21-2008

Thanks Kevin, and yet another mod for the fridge.

I am like a kid on Christmas morning.
As soon as UPS dropped off my package from Expedition Exchange, I tore into it and got out the camera.

First off I really dig my ARB fridge/freezer.
No ice to mess with, low battery draw, and you can pack enough food for a week or more into it.

When I took my vacation to Mt. Rainier in August of 2008 I ate really good :D
Problem is you still have to move around a lot of the grub as it is just one big deep carnivorous well that swallows whatever you can throw at it.

One problem I solved keeping the lid open on the fridge by itself, and not having the lid hit the roof of the FJ was solved in a prior post in my buildup thread.
So once again the fridge is undergoing another mod, it is being transformed into a basket case...

I saw a thread on Expedition Portal that led me to the TwoZone Basket Set sold by Sierra Expeditions.
They are two different sized baskets that hook onto the stock basket in an ARB or Engel 42 qt fridge.
Here is a little info from Sierra's website:
The TwoZone Suspended Basket Set is compatible with most ARB, Engel, Norcold, and Waeco fridge/freezers.

The larger basket measures 11.5" from suspension tab to tab, and the basket is 10.4 wide, 9.5" long and 4" deep.

The smaller basket measures 11.5" from suspension tab to tab, and the basket is 10.4 wide, 5" long and 4" deep.
This will allow you to pack your vegetables and fruits on top without the worry of them getting bruised and turned into mush by heavier items that may bump up against them.

You can also load up a basket with your snacks, eggs, dip, whatever you do not want buried.
Below the two baskets you still have room to store stuff you might want to keep a little colder such as meats, frozen burritos, milk, orange juice, whatever beverages you are into ;)

So if you are looking for a great solution to keeping your trail/overlanding grub well organized, look no further, these baskets are a great addition to your fridge.

Here are a few pictures showing the size on my laptop for comparison, and some out in the fridge loaded up.
You can easily access the food below by taking out one basket.


TwoZone Basket Set sold by Sierra Expeditions
 
Phase One & Two HAM Radio Install 11-15-2008

This HAM radio setup will be taken in steps as it is very labor intensive, and I am taking my time on it also, as I am still working on my license.

I have all the gear on tap, and here is what I have.
Yaesu 857D HF/VHF/UHF mobile transceiver
YSK-857 Separation Kit to remote mount the faceplate of the radio
Diamond GLP58 mounting group to mount an antenna to the ARB front bumper
Diamond NR770HA 2 meter and 440 MHz (70 cm) mobile antenna (Will be getting an all band Yaesu ATAS-120a antenna in the future)
Valor VS4 Big Mouth mobile extension speaker (Got two, going to replace my present one for my CB radio)
Diamond MX62M duplexer (Allows two antennas or one ATAS-120a antenna to be used with the 857Ds two antenna connection on the radio)
And various small parts such as fuses and RG58U coax

I installed the antenna back on 10-29-2008, here are some pictures of the install.
This antenna is only for 2 meter and the 70 centimeter bands, hence why I will switch out later to the Yaesu ATAS-120a antenna.

I had to pick up some step drills from Harbor Freight to drill out the antenna hole on the ARB bumper, as the Diamond mounts stud is bigger than a CB antenna stud.
You pop out the plastic cap on the bumper by tapping it from below with a hammer.

Installed the Diamond mount and screwed the antenna to the base.
I still have to have the coax soldered at both ends for the antenna mount and the plug that goes to the back of the radio.
That will come another day.

The antenna is very stealth.
The Yaesu ATAS-120a antenna I will get later however is not so stealth.


Installed the remote faceplate of the radio today.
I used an existing mount in the rig which was for an iPod, cell phone, or GPS.
IH8MUD Forums - View Single Post - A few mods from 7-25-06

I took off the grip pod part of it, and much to my delight, the Yaesu faceplate kits holes line up perfectly with the holes in the Panavice mount.
I can even move it around for different configurations, and the holes still align up.

Picture one shows the Panavice mount only with the grip pod off of it.
Picture two shows the Yaesu remote faceplate mount bolted to the Panavice mount.
Picture three shows the Yaesu 857D faceplate mounted to the remote mount.
It is a perfect reach for me to reach out to adjust the radio.


The next phase will bet getting the the two external speakers mounted, and hopefully taking out the passenger seat to install the radio underneath of it and get the power hooked up to it, and the cables from the remote faceplate ran down to the radio.
 
BajaRack's FJ ladder installed 2-28-2009

Actually I installed it a few weeks back, but both brackets were not the correct ones, and new ones arrived to those of us who bought the first five ladders.
The new parts arrived 2-27-2009.

Saw the ladder mentioned over on FJ Cruiser forums website.
Very nice looking ladder, and this will allow me to undo the rear latch to my Autohome Maggiolina AirLand roof top tent much easier than jumping up on a rear tire.
Plus the ladder looks cool too :D

When the ladder was installed a few weeks prior to this buildup entry, the bottom clamp would not work, and they redesigned both the top and bottom clamps like the original one for their FJ Cruiser.

Installing it is pretty straight forward.
Below are some pictures of the install and finished product.

Tools needed:
13 mm Gear wrench and open end wrench on one end for the top bracket.
14 mm Gear wrench and open end wrench for the bottom bracket.
Assortment of Allen wrenches.

Pictures one through four show the ladder by itself, the new clamps, and the top and bottom clamps installed.


Pictures five through eight show the reason why my rig is filthy during the winter, two old growth fir trees I park under, ladder installed without spare tire, top of the ladder crooked after spare tire is on, and a shot with ladder and tire on.


Pictures nine through eleven show another ladder shot with the rear door closed, spare tire clearance, and a shot of the top bracket again.


If you have a bigger than stock size spare tire, you must pull the tire off the mount.
That top bracket is indeed on straight and flush with the door.
It appears the ladder became crooked though apparently after tightening up the spare tire.
I could hear the ladder creaking some as I tightened down the three lugnuts to the spare tire.
I can not figure out how it is crooked though, as the bolts are not bent, everything appears normal.
I am not going to fret over it though, the ladder is strong and secure.
I climbed up on it and even stood on the spare tire to examine the nice garden I have growing up on top of my tent.

I should have snagged a picture of that.
That will be cleaned off when warmer weather gets here and I break out my rigwashing supplies.

Links:
BajaRack
The FJ Cruiser ladder
 
Update on the ladder.
It appears the two holes at the top of the ladder are out of alignment, thus causing the way it looks when you look at the top bracket.

Sergio owner of BajaRack's is sending out a replacement ladder to me to fix this.
 
Corey, after looking at your hinge mod on your fridge..... I know that is the only thing that annoys me about my ARB fridge is the hinge... Nervous to drill into the side of the fringe though.
 
Piece of cake to drill, I did it right in my puny living room :D
All that is behind there is the insulation foam.
I did not drill very far, and the screws are self tapping, so all they need is a small hole to get started.

It is so much nicer now having the lid open up all the way, and staying in any position you put it at.
 
BajaRack's FJ ladder installed 3-21-2009 (Part II)

OK, there was definitely something wrong with my first ladder as the holes drilled on top of the ladder where not aligned correctly.
Plus my bottom bracket kept popping off and also knocking off the doors shock that holds it in the open position.

Ladder number two arrived Friday the 20th of March, and I dug into it this morning.
I hope this is the last time I have to take off my spare tire now for the ladder.

The new ladders upper part has the holes drilled correctly, and there is a new surprise, the bottom bracket has been totally redesigned with a hook that ties the bottom bracket and the bottom ladder together to keep them both tight and to prevent the bottom bracket from popping off the door.

I have not had time to take it fir a road test yet to see if any flex pops off the doors shock again, but I will know by Sunday when I go grocery shopping.

Onto the new installation.

Tools needed:
13 mm Gear wrench and open end wrench on one end for the top bracket.
14 mm Gear wrench and open end wrench for the bottom bracket.
Assortment of Allen wrenches.

Pictures one and two show the ladder fresh out of the box and the brackets.
Note the new bolt that ties in the bottom bracket and the bottom of the ladder flange.

Picture three shows the new and improved ear above the wrench that now lets you get a ratchet wrench on.
Before for just that bolt I had to use the open end of the wrench.

Picture four shows the bottom bracket and the new bolt that ties it and the ladder together.


Picture five shows a different angle of the bottom bracket bolt.
Picture six shows where I lined up my top bracket in relation to the top of the door.
Picture seven shows indeed the holes are aligned correctly, not out of alignment like my first ladder was.
Picture eight shows the bottom bracket from the inside view with it tightened down.


Picture nine shows an outside view of the bottom bracket and ladder now tied in with that new bolt flange system that was revised for the new ladder I received.
Picture ten a view of the ladder in place without the spare tire.
Picture eleven shows the clearance with the spare tire on.
It is barely up against the 285x70x17 tire.
Picture twelve shows the spare tire back in place.


Overall it seems to fit better than the old ladder since it has the holes drilled correctly on top, and with the newly designed bottom bracket holding the ladder and it more securely together.

Links:
BajaRack
The FJ Cruiser ladder
 

Users who are viewing this thread

Back
Top Bottom