Builds A few mods from 7-25-06 (2 Viewers)

This site may earn a commission from merchant affiliate
links, including eBay, Amazon, Skimlinks, and others.

Double Shot mods Installed 3-1-2014

I can run airtools no problem with my CO2 Powertank, but the ARB compressor did not have the reserve capacity to run airtools.
For filling up tires though, the ARB compressor rocks, and I do not waste any CO2 like with the Powertank.

But I wanted to try running a few tools with the ARB compressor, so I bought the ARB one gallon tank from Wil at Sierra Expeditions.
Just installed it today along with a fitting and 10" hose from ARB that goes from the compressor outlet to the new tank.

It can run the drill OK, but it is still not as fast as the CO2 tank.
The new tank will also help out for filling tires, as the compressor will not have to run as long when pulling the trigger on the tire inflator.

Ideally the air hose connection should be on the the bottom of the tank and not the top like I installed it, but unfortunately the hoses quick disconnect would interfere with the shelf there below the MPAC side rack.

Here are a few pics from the installation.

9.jpg


10.jpg


Here is a video taken with my GoPro Hero 2 camera.

http://www.youtube.com/watch?v=xTtnPCtddyY

Links:

ARB Aluminum Air Tank 1 Gal (4L) from Sierra Expeditions

But wait, there is more...

Since I had to remove the fire extinguisher from the MPAC Side Rack that was next to the air compressor, I relocated it to the MPAC rear rack/table.
It should work out great in that location.

4.jpg


Would have been three mods today, but the item below got help up by bad weather in Fargo, ND via train, and not it is sitting in Spokane.
It is due to land on Monday, so I will get this installed the following weekend.

MP-X Seat Back MOLLE Panel COMBO
 
Toyo Open Country M/T Tires, Body Mount Chop May-June 2016

Tires 5-27-2016, and body mount chop 6-3-2016.
Two major mods two Fridays in a roll, and while I am on a roll, getting another major mod done next Friday.
See a pattern here :D

It has been a while since my beast has been pampered, it has been like a spa vacation week for it.

Was at Les Schwab Tires last Friday to get a tire rotation and re-balance, and we noticed my Dick Cepek Mountaincats were cupped some on the inside.
Rest of the tread looked OK for 60K+ miles on them, but I said lets go with some new shoes.

I have had my eyes on the Toyo Open Country M/Ts for awhile, so that is what I went with.
The tech mentioned these are going to be very quiet, not noisy like my Cepeks.
The way they make the tread pattern makes them very quiet.
So quiet I can now be serenaded by my Magnaflow muffler, it never sounded better.

Same size as the Cepeks, 285x70x17, but they are a little more aggressive, and the aggressiveness continues down the side of the tire.
They are also higher ply than the old tires.

Have had them on for a week now at almost up to 70 MPH, and the rig does not shake at all, very smooth for an aggressive mud tire.
I like these so much better than the old set.

Only one picture, and yes, my wheels are dirty, in fact the whole rig needs to be scrubbed on the outside, it is a mess from winter still and parking under an old growth fir tree at home, and another three at work.

1.jpg


For the past year my left front tire started rubbing by the mudflap that covers the infamous Toyota body mount that the FJ Cruisers and Tacomas share.
My Old Man Emu front springs that go over the coilovers must be settling a bit.
So the left tire has been grinding away in that area when I turn sharp like when backing up, and if I turned real sharp, it would bind on the metal of the body mount, not good.
And with these new tires being more meaty, it came in contact even more.

I did a search on FJ Cruiser Forums website for a shop that I had visited many years ago after getting my FJ (can you believe it, the rig will be ten years old next month!) and found the thread with the shops name.
They are only a mile or so North of my Toyota dealership, and I called them on Tuesday to get the body mount chop done today at 8 am.

Very great shop that has been in business same location for twenty years.
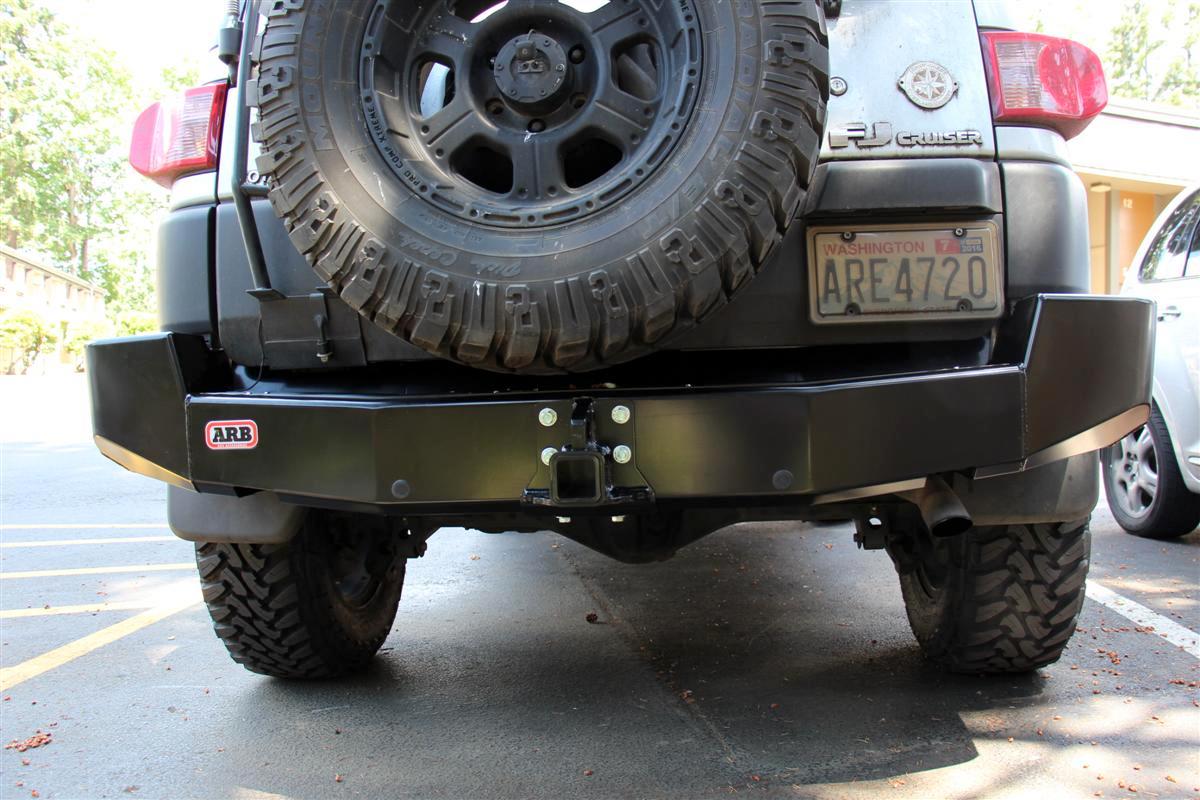
We talked rear bumpers too, and next Friday morning I am getting the ARB rear bumper installed along with a hitch since they cannot use my Toyota again.

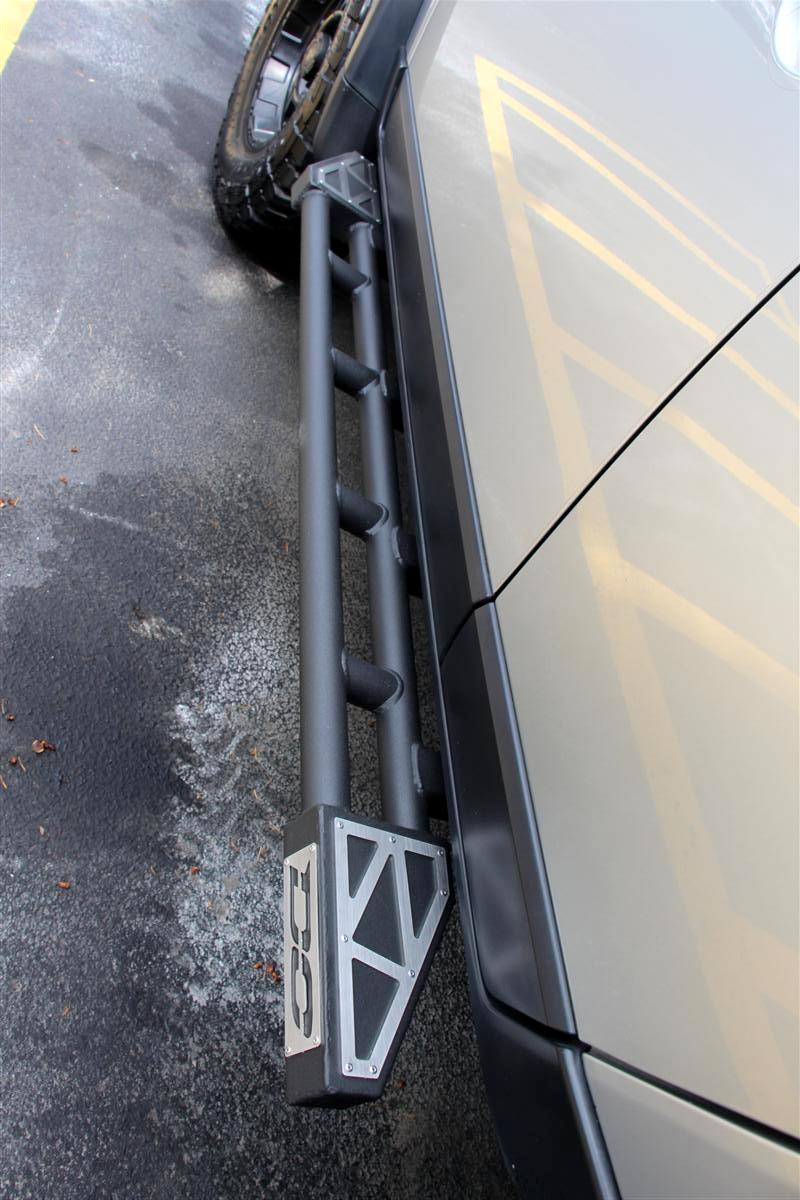
Here are some pics of the body mount and chop.

1.jpg


Before the chop, you can see how the rear of the left front tire made a hole in the flap part that covers the long body mount "nose" that sticks out.

2.jpg


Here is the passenger side with the mount cut off and a cover plate put on to cover the hole.
Also the tech trims the mudflap back some.

3.jpg


You cannot see the new cover here, as the stock flap is still on since he cannot trim it with it being all messed up from the tire.
My dealership did not have any in stock or they would have put one on today and trimmed it like the passenger side one.
It will look much better next week when they put it on, and I will update my build thread here with the new rear bumper too.

The noise is gone now on the left side finally!
The right side never rubbed, as the left side was closer to the rear of the tire on account of the way they align it during an alignment.

Links:

Toyo Open Country M/Ts

Auburn Car Repair & OffRoad
 
ARB Rear Bumper Installed 6-10-2016

Phase III of a major mod, three Fridays in a row.
After visiting with John at Auburn Car Repair & Off-Road last Friday when I got my body mount chop done, I decided to go for the ARB rear bumper.
Also with ARB right down the road from John's shop, there was no waiting for the bumper to be built from another maker.

The only thing I did not like about the ARB bumper was the silver colored plate that sits on top, so John outsourced it to a local powder coater to do it up in ARB black.
I do not understand why ARB would not have had the top plate in black to more match their front bumpers which are all black.

Also he got in my drivers side front mudflap so the body mount chop is also now complete.
It is a joy not hearing the rear of the tire hitting the body mount, or as it has been for the past week, hitting the ripped mudflap that they left in place to give me some protection from road debris hitting the drivers side of the rig.

Also ordered was the optional ARB hitch receiver which also includes a D ring on top for attaching a recovery or winch line to it.
No need for a hitch mounted shackle like I use to run, but I did add it back in for the last picture just for kicks.

Also John drove in an orange 4 door Wrangler today with some 7" ARB Hi Intensity LED lamps which I am seriously thinking of having him get for me and install there.
I still have a factory Toyota lamp switch I ordered long time ago to do a bumper driving light installation, but I will let them wire it up this time.
Last time I wired up a set of lights it was for the ARB foglamps in my front bumper, and that was near a decade ago.

Time for some pictures.

1.jpg


The backup camera had to be relocated, and we felt the best spot was to onto the spares wheel cap.
The old location was much lower on the face of the stock bumper, and this gives a much broader field of view.
Please excuse the bird doo doo on the wheel :D
I park under a tree at home and work, and I guess my rig is open territory to an outdoor bathroom for them.

2.jpg


Full shot of the new bumper with hitch.
Kind of hard to see the D ring on the upper part, I guess I should have taken a side angle shot too.

3.jpg


Showing the top plate powder coated in black.
That gap on the side where part of the plastic wraparound is suppose to be there for body/bumper compression.

4.jpg


Close-up of the hitch/D ring combo.
Also note the stock backup sensors are fitted into the bumper as well.

5.jpg


Showing the old receiver mount and shackle I have used in the past.
I may leave it on.

Links:

FJ Cruiser ARB rear bumper part # ARB 5620010
Note that the picture from the first FJ Cruiser sent to Australia long ago shows an all silver bumper still.
It does come in black now like mine.
FJ Cruiser ARB rear hitch part # 5720020

And looking ahead to Phase IV, hear are the lamps I am thinking of getting.
One will be a flood, the other a pencil beam.
John says this setup works great.

ARB Intensity LED Driving Lights
The 7" ones are listed further down the page, and I would also get the clear covers to go onto them.

Good video there too.


Feels great to be back into doing a few mods again.
I thought the rear bumper was going to be the last, but after seeing those LED lights in person, I am going to get them.
Overland Journal did a review on these in the 2016 Gear edition on page 31.
 
The 7" ARB Intensity LED lights and wiring harness are at John's shop, and the installation will take place July the 5th.
Will have pics up of them that day, and probably a video a few days later on a totally dark stretch of road between the Auburn and Kent border on my way into work.

These are totally not street legal, will come in handy when there is no traffic, and for early runs to the mountains.
Nothing like parking at the top of FS Road 72 in Greenwater and watching the sun come up with Mount Rainier in your face.
The sun shining on the mountain before the sun is fully illuminated is mind blowing.
 
Maxtrax Installed 6-19-2016

I bought these back on September 9th 2013, and now just getting around to installing them :D
It is covering my backup camera now though that is installed on my spare tires wheel cap.
Oh well, do not really use the camera anyways, but I may end up trying to relocate that down the road.

There are instructions that come with the spare tire mount, but they are a bit vague, and I had to do it a little differently than what they detail, as well as the instructions online.
But they are on there good, and I will check it tomorrow morning when I get to work and then again when I get home to see if they loosened up any.

Links:
Maxtrax Australia
Sierra Expeditions
Maxtrax Rear Wheel Harness
Rear Wheel Harness Instructions

This was not my first color of choice, but Sierra back when I ordered them did not have the orange or the green which I would have preferred.
I do have to admit they look cool with that new sexy ARB rear bumper :D

1.jpg


2.jpg
 
Doh!

I had the top hooks in the middle handles, and they needed to be in the top handles.
Problem rectified at work today.
I could have sworn the instructions said to use the middle handles, but I goofed :D

Now in the correct handles, and this will secure them maybe a little better, not really sure if it makes that much of a difference, but best to do it the way they say.

The spare tire mount for the Maxtrax is rock solid, they are not going anywhere.
Speaking of that, I best throw a cable lock through them and a hole in the wheel, or these may end up walking during the middle of the night.

3.jpg
 
ARB Intensity Lights Installed 7-5-2106

I ran two sets of Hella 500s on my old '91 4Runner, but never got around to getting some decent off road lighting for the FJ until I saw John owner of Auburn Car Repair & Offroad when I went in awhile back for my body mount chop as my tires were rubbing against it.
The Hellas never impressed me that much, but they were older technology.
Enter the high quality LED lighting of today, and these ARB lights are very bright and high quality.

These are not built in Australia like most of ARB products, but built in the USA by Rigid.
ARB partnered up with Rigid Lighting to make these awesome lights.
Here is a video from ARB, and there are many other on YouTube of these lights.


On with some pics, and if I get time I will try and shoot a video of my own showing how bright these puppies are.

1.jpg


Light switch lights up green when the ignition key is on

2.jpg


Light switch lights up amber when the ARB lights are turned on

3.jpg


Lamps off, boy those are big, and they make a 9" lens version too

4.jpg


ARBs on, headlights off

5.jpg


ARBs and low beams on

6.jpg


ARBs and high beams on

7.jpg


I pulled my Hi-Lift jack from its Four Trek's mounts on the bumper to give the tech more room to work, and after putting it back on, it does not cover the new lights at all

I brought a few extra switches with me, but after mulling it over I decided to go with the stock switch.
Also instead of having the switch installed down in the switch cluster on the console, I also decided to have the switch where it is to be able to get to it faster.
John the owner of the shop has his wired so they only come on with the high beams, but I wanted mine wired up so they could come on anytime the ignition switch was energized.
This way too I cannot leave them on accidentally when I turn the key off.

They aimed them for me too at the shop.
Drivers side is a spot, and the passenger side s the flood.
Tomorrow morning at zero dark thirty I will be able to test them out on a long stretch of road on my way into work that has no street lighting.
That is if there is no oncoming traffic.

The pics do not do these justice, as they are blinding to look at.

Links:
ARB Intensity 7" LED Driving Lights - Flood Beam (AR21F)
ARB Intensity 7" LED Driving Lights -Spot Beam (AR21S)
ARB Intensity LED Wire Loom (3500520)
Auburn Car Repair & Offroad
 
Last edited:
Warn 90287 Wireless Remote Installed 7-9-2016

I really cannot call this an installation, as there is no installation like my old Ramsey wireless winch controller.
I use to run a Ramsey Wireless winch setup on the FJ, but over last weekend I ruined it.
I unspooled my winch line to inspect it, and when I put it back on the spool, the cord that has the plug on it you plug into the Warns controller box got caught on the winchline and ripped it in two.
I could have fixed it, but this was older tech, and I saw in my online search that Warn had out a very simple setup with zero installation.
The Ramsey unit required mounting the receiver underneath the hood, hooking up an antenna, and then running the cable with the plug down to the winches controller box.

With the new Warn unit you just plug the receiver into the control box like you would a wired controller, then use the included remote control.
It does not get much simpler than that.
It also comes with a tether that clips to the receiver, and you take the end with the carabiner and attach it to the winches control box cap that goes over the plug to keep the elements out of the contacts.
This way you can leave it on while wheeling and not loose it.

When I was at the off road shop last Tuesday getting the ARB Intensity LED lights installed, John the owner also has this new Warn Wireless Remote for his Jeeps, and he likes the wireless unit a lot.

Here is a video showing the simplicity of it I found on YouTube.


A few pics:

1.jpg


Pull the cap off of the control box, insert wireless receiver, hook carabiner to pulled cap, and you are setup for wireless

2.jpg


It comes with a nice holster you can Velcro of use a rotating clip to screw to a surface, but I think I am going to leave it in the tray on my center console as that is where I had the Ramsey one


Here is a short video of it.


Links:
Warn 90287 Wireless Remote
Got mine from Amazon, Warn 90287 Wireless Remote
 
Hi-Lift Jack Moved 7-17-2016

For years my Hi-Lift jack has been angled down with the Fourtrek mounts.
I have to admit the business end of the jack was covering my drivers side headlight some, but not so much that I could not see to drive.

Since having my new ARB Intensity LED lights installed, them and the Hi-Lift was in the way of me getting my hand into the hole on the ARB bumper to access the engage/free spool lever on the Warn XD 9000 winch.
Never had this problem before with just the Hi-Lift there, only after the LED lights were added.

So this morning I took off the Hi-Lift and loosened one end of the Fourtrek mounts (1/4" allen wrench) and angled the knobs pointing to the sky.

Both headlights are now wide open with no jack obscuring any of their light, plus I can now get my right hand into the hole to access the lever on the winch.
This is something I should have done a long time ago, and I am looking forward to seeing if the headlight output has increased with the Hi-Lift out of the way.

One day I may go for some brighter headlights either with a bulb exchange, or the whole lens.
I looked at some of those Halo things online last week, and all I see is terrible reviews of them, and bulbs and wiring harnesses burning out.
No thanks, unless there is a good set of those on the market that are trouble free.

Links:

Fourtek's
Luke is a great guy to work with, have bought numerous mounts from him over the years.
I already had these of course, but if anyone is looking at getting some, I am providing the link.

A few pictures from today

1.jpg


Hi-Lift in its old position, angled down


2.jpg


With the gray bar on the Hi-Lift out of the way, I can now get my hand behind the ARB Intensity LED light to access the lever on the winch, and you can see both headlights with no obstructions


3.jpg


I notice the Hi-Lift more from inside the FJ, but not enough to cause any visibility issues
 
John's a great guy and his crew at Auburn Car Repair and 4x4 do great work. A buddy of mine has those lights and they do put out a lot of light and they look great on your truck.
 
Yes he is, glad I found his shop after seeing members on a few forums that got the body mount chop done long ago.
I had actually visited his shop around four or five years ago asking about the mod, but did not get around to it until after getting my new Toyo's awhile back.

He has the customer waiting room done now finally, it was in various stages the three times I was there.

Thanks, I think they really perk up the front of my bumper :D
I start work in the wee hours of the morning, so I get to use them on the way into work as long as there is no opposing traffic.

I have a few more major mods happening over the next few weeks.
New Masterpull 5/16" x 75' Superline with no hook, I am putting the Factor 55 Prolink on it.
Putting less line on the drum, and I also got the Masterpull 20' extension Superline in case I need more length.
Also my Demello Dominatorz sliders shipped yesterday, will probably see them on Monday, and maybe install them two weekends from now.
 
Demello Dominatorz Sliders Installed 7-22-2016
Ordered on June the 22nd, and they arrived on July the 22nd.


My current set of sliders have been on the rig since I bought my FJ in July of 2006.
The powder coating is chipped off quite a bit, and it was time for an update.

I checked out Demello's site, and I liked what I saw when I checked out the Dominatorz.
These came with all new hardware, the bolts take a 13 mm socket of ratchet wrench.
I actually used both.

They were packed quite well too as you can see in the first picture below.
I would say it took me a good hour or more to get all the plastic wrap off, then the cardboard, then even more plastic wrap :D

Piece of cake to install, but a lot heavier than my old ones.
Balanced them on my stomach, and used my knees to lift them up so I could align the holes.

Link:
DEMELLO OFF-ROAD DOMINATORZ

A few pictures, and after I wash my rig hopefully tomorrow, I am going to get some better pics to add to my thread here.

1.jpg


For some reason that picture reminds of of those Star Wars Walkers

2.jpg


3.jpg


Also bought a new winchline to replace an old one, and I will update the thread here once it is installed.

1.jpg


Masterpull 8mm (5/16") Superline Winch Line - 21,700 lbs, 75'
8mm (5/16") Superline Winch Extension - 21,700 lbs, 25'
ProLink Thimble
HitchLink 2.0
Channellock 927 8-Inch Retaining Ring Plier
The snap ring pliers are required to secure the titanium pin into the ProLink that goes on the winchline
Jack Cover for the Hi-Lift to cover just the moving parts near the base

2.jpg
 
Added a few more pics from Saturday of the new Demello sliders.
Please excuse the mess on the ground, that is Ajax powder from scrubbing my tires in the morning when I gave the rig a bath in my parking spot.

I am still sore from installing these on Friday, and in addition to balancing them on my stomach, I used my knees and lower legs to hold them up while aligning up the bolt holes.
Back of my calves are sore too, gettin' too old for crawling under the rig :D

4.jpg


5.jpg


6.jpg


7.jpg
 
New Recovery Stuff Installed 7-29/30-2016

I took off work a little early yesterday to stop by John's shop, Auburn Car Repair & Offroad.
I bought a Factor 55 1.0 Hawse fairlead earlier in the week, and I knew there were going to be complications with it for having an ARB bumper (they fit others with no modifications I hear) with it not fitting without modifying it first.

The tech there pulled off my roller fairlead, and the space then to put on the Factor 55 one would not allow it to go in.
Some aluminum on each side of the fairlead would need to be shaved some.
Also the lip on the bumper behind where the Hawse sits was up to high, and this would cause the synthetic line rubbing over it and getting worn.
That needed to be ground down as well, and then touched up with some paint.

Today I installed my new Masterpull 75' Superline synthetic winchline.
I also have a 25' Superline extension line if ever needed.
The Factor 55 ProLink is very cool as you can take it off of the winchline without having to weave a synthetic winchline onto a thimble or a hook.
Simply use a snap-ring pliers, and the titanium pin come out, and you remove the small thimble end on the winchline.
This makes it easy too if I ever want to switch to the FlatLink thimble.
Same as the bigger ProLink, but it folds flat against the fairlead instead of protruding like Rudolph's nose.

Links:
8mm (5/16") Superline 75' Winch Line - 21,700 lbs
8mm (5/16") Superline 25' Winch Extension with Cobra Sling Hook - 21,700 lbs
ProLink With Titanium Pin & Rubber Guard Safety Thimble
Factor 55 1.0 Hawse Fairlead

A few pictures:

3.jpg


Very cool attachment point to fasten the winchline to the Warn XD9000s drum
Compare it to the other one on my old line.

4.jpg


Fairlead with no winchline loaded onto to the spool

5.jpg


New line attached to side of drum

6.jpg


Line installed, and ProLink thimble attached

7.jpg


And with shackle with rust already forming in the little side hole on the pin
They have only been on the rig for a few weeks too.

8.jpg


Masterpull 25' extension with its orange hook around shackle
Note the red coloring of the curved part of the shackle.
That is not paint, that is the reflection of the anodized finish of the ProLink thimble on the black shackle.

9.jpg


Another way to hook the extension to the shackle by using the heavy loop end on it, leaving the hook end to attach to a tree saver


10.jpg


I like the look of the new Factor 55 Hawse 1.0 fairlead

I was telling John the owner at the shop Jeeps have it made, the Hawse on his Jeep and others at his shop with ARB bumpers required no modifications to them.
He took back the president of ARB's Jeep, and came back with another AB employees to do some work on it while I was there too.
ARB USA headquarters is just down the street from his shop.
 
Hi-Lift Lock - Versatile Lock - 1/2" Bolt Lock Installed 8-1-2016

For years I have had my Hi-Lift installed on my ARB bumper using Luke's Fourtrek mounts.
Very nice product, but anyone can come up to them and unscrew the huge wingnut and be off with your Hi-Lift.
So far that has not happened to me as where I live it pretty much is alive 24/7 with someone one walking their dog, or just going for a walk.

But after buying a jackcover from Jackcovers.com, I saw on their site a lock that might work.
I got a hold of Luke at Fourtrek's and asked him for the bolt size used on his mounts, and it is 1/2" x 13 threds per pitch.
I got a hold of Adam at jackcovers.com, and his locks will work with that perfectly.

I now have extra security in case of sticky fingers wanting to pawn my Hi-Lift for meth :D

By the way, Adam is a member on fjcruiserforums.com I found out from him.
Great guy to work with.
You only really need one lock too, and they are not keyed the same, so if you do order two, you will have to carry two keys with you.

Links:

Hi-Lift Lock - Versatile Lock - 1/2" Bolt Lock
Fourtrek Hi-Lift Mounts
11" Jackcover (have not got it installed yet)

A few pictures:

1.jpg


Stock knobs/wingnuts

2.jpg


Full view

3.jpg


New lock

I do have one of his jack covers too for the Hi-Lift, but I need to move my jack some to expose more of the mounting holes so I can get the cover on.
That will happen probably over the upcoming weekend.
 

Users who are viewing this thread

Back
Top Bottom