So finally got around to replacing the amp and running the RCA's and all that Jazz... Took me a good 4 hours to button everything up but in the end it is SOOO worth it. I can now actually feel the base in my feet when listening to music, still have a bit of a static buzz but nothing quite like what I had before with the stock amp on the JOYING headunit. Thinking I may run a dedicated 12v hot and ground but on the fence about doing that.
The replacement wasn't overly hard just time consumptive to get everything wired properly for the wires that you have to join from each connector (S6 & S7) and then which ones from S6 are the ones that are needed to utilize the stock speaker wiring. Since I don't plan to push huge wattage out the system I figured this would be just fine, and from what
@suprarx7nut was saying, the stock wiring should handle up to about 50w per channel. I left the stock connectors there for the stock amp and just cut out what I needed, no worrying about depin/repin of anything. Then just stuffed the stock connectors in the open space. I will get back in there to clean up the wiring another time when I get some shorter RCAs and build a plate to mount the amp securely. But for now she ain't going nowhere..
And now... for pictors...
 Untitled
 by
Greg Fisicaro, on Flickr
Yes I completely removed the passenger seat. Not hard, not heavy, not overly awkward so why not.
Old N'Busted... New Hotness... (amp works fine, just made me think of Men In Black II)
 Untitled
 by
Greg Fisicaro, on Flickr
 Untitled
 by
Greg Fisicaro, on Flickr
Everything out and cutting wires now... Used the
guide from TLCFAQs to handle this...
 Untitled
 by
Greg Fisicaro, on Flickr
 Untitled
 by
Greg Fisicaro, on Flickr
Testing out her new home.
 Untitled
 by
Greg Fisicaro, on Flickr
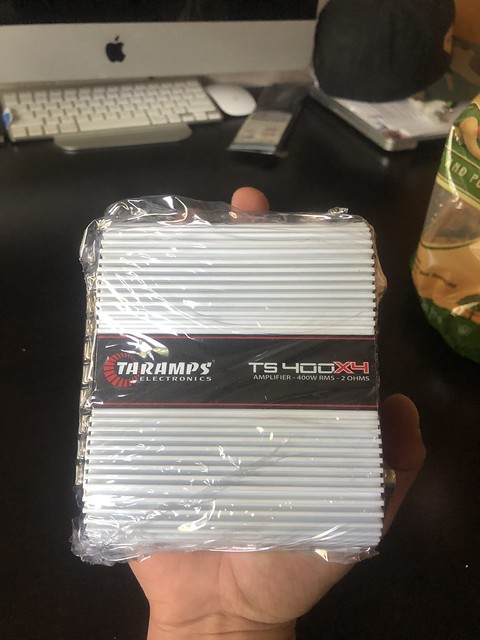
Bit of wiring getting connected. The weird thing with the TARAMPS 400x4 is that in 4ohm mode you the speakers for each set of channels (1 &2, 3&4) share a similar ground. Little odd but she sounds great. Red ends are (+) and then put black shrink tube over the (-).
 Untitled
 by
Greg Fisicaro, on Flickr
Getting there...
Found that there is a body plug that is in the passenger footwell. Ran the power for the amp along the cables that were there in the sill under the carpet and then out through that plug. Good location for me as it is a few inches from the fender skirt which I then routed into the engine bay.
 Untitled
 by
Greg Fisicaro, on Flickr
 Untitled
 by
Greg Fisicaro, on Flickr
 Untitled
 by
Greg Fisicaro, on Flickr
From there I ran it across the top of the firewall and over to my makeshift little fuse block holder I made out of some leftover Kydex.
Untitled by
Greg Fisicaro, on Flickr
 Untitled
 by
Greg Fisicaro, on Flickr
Just about final assemble here.. I was testing to make sure everything worked. Oddly enough the TARAMPS has three settings per channel; LPF, HPF or FULL and then each set has a "level" adjuster. At first I thought this filtered based on what you set each channel set to, but ended up freaking out when I didn't have any sound. Randomly decided to turn the level up on one of them while I was sitting there trying to think what I had messed up, apparently in FULL mode it is more of a "volume" type setting, that or setting it to ZERO filters out everything but the lowest settings. Both are turned up now and working perfectly.
 Untitled
 by
Greg Fisicaro, on Flickr
I didn't take a pic of the final RCA routing because I ended up only needing about 6ft of RCA cable and had bought 12ft'rs... SO... I have lots of excess cable. I did find a good tutorial on making your own high-quality RCAs for cheap so I may go that direction when I decide to change things up. For routing I pulled the center console apart and routed them down the trans tunnel and then have them pop out the side of the center console in line with the amp and feed under the rail of the passenger chair kinda where that scratch on the plastic is. Works perfectly.
If anyone wants a working stock AMP and Headunit (basic CD and Tape unit) hit me up via PM.

 Untitled
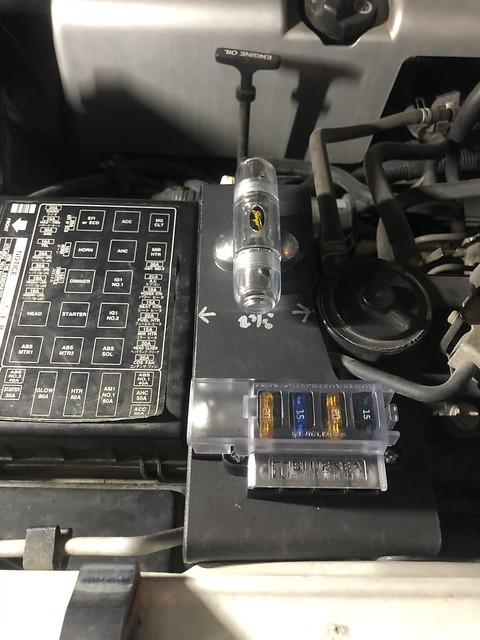 Untitled
 Untitled
 Untitled
 Untitled
 Untitled
 Untitled
 Untitled
 Untitled
 Untitled
 Untitled
 Untitled
 Untitled