Builds 60 guy does a 100 series LC... (3 Viewers)

This site may earn a commission from merchant affiliate
links, including eBay, Amazon, Skimlinks, and others.

Alright so crawling under truck yesterday looking at the AHC related stuff to see if I could potentially repurpose the wiring I noticed this...
Untitled by Greg Fisicaro, on Flickr

Time for new rack or just new TREs?
 
You can unclamp and move that boot to check the inner tie rods or check for fluid in the boot. However, without removing it it looks like the rack is leaking just by saturation of the boot.

Alright so crawling under truck yesterday looking at the AHC related stuff to see if I could potentially repurpose the wiring I noticed this...
Untitled by Greg Fisicaro, on Flickr

Time for new rack or just new TREs?
 
Since I purchased the truck in December I have been running an iOttie phone mount attached to the dash to hold my phone while driving. This was the exact same setup that I had in BeBe and it works quite well. Only gripe is that it is on the dash so if I need to put up a shade, put something on the dash or whatever, it is in the way.

Since @BenCC likes to make and engineer all kinds of mounts, when I found he and @suprarx7nut were making a RAM ball mount adapter for the blank spot on the passenger side of the dash, well I was in as soon as they were live! Ordered Friday and got it yesterday afternoon and installed last night. I purchased some other RAM adapter pieces that I will be changing out (6" extension arm and X-Grip mount) as I just don't really like the way they work, nothing to do with Ben's stuff in the slightest. Quick little jaunt up my local fire road from my house to overlook Carson to "test" it out and was impressed with how well it held and general positioning.

Untitled by Greg Fisicaro, on Flickr

Next on the agenda for "stuff" is getting axles to finish out everything for the front end rebuild and stereo stuff (FINALLY!!).
Stereo stuff is becoming more and more "apparent" as the tape deck bluetooth adapter like to figure out what volume it feels like playing at any given time. That coupled with the battery life being only a couple days of normal DD and constantly having to turn it off/on anytime I want to use it has just kinda pushed me over the edge.
 
Something I have been wanting to do for a bit was swap out the cigarette lighter for a USB adapter, so last weekend I ordered a Blue Sea USB charging port.
Took me a bit to figure out how things came apart and thanks to the manuals, found that you have to put the vehicle in N or D, pull e-brake then center console part has to come out first before you can remove the lower fascia with the ash tray and everything. That part ended up being fairly easy, it was figuring out how to get the damn cigarette lighter part out in one piece that was a bit of a bitch. Basically has to come out in multiple pieces as you remove the inner metal, then one inner piece then the outer piece and then it all kinda just slides out.

The USB charger was a slight bit larger than the holes in the fascia so dremel came out and did a little massaging to make the holes bigger (that's what she said) and it was a perfect fit! After that was getting things wired up and it was good to go! Good thing I actually tested the connection prior to putting everything back together as at first, like normal, I had connections backwards (LOL).
Untitled by Greg Fisicaro, on Flickr
 
Well obviously Alita has other ideas in mind. Factory head unit has been doing odd things occasionally for last few weeks. Not sure why but volume is all over the place, literally can get in and it will be blaring but knob mark is at a quarter of the way, then stop, shut her off and 15 minutes later get in and suddenly the stereo is SUPER quiet. Wife even commented on it last weekend while we were grocery shopping. The bluetooth cassette adapter I have only serves to exacerbate the issues.

This afternoon while driving back from lunch she decided to spit the cassette out for no reason. Then when I got back to work I had to hit the eject button 3 times to get her to eject the cassette. So yeah, time for a new head unit. Already have my mind set on the JOYING Auto 7" unit similar to my old one in BeBe, so that will be ordered tonight along with relevant backup/reverse camera AND the harness for the truck they recommend. Have chatted with them before and should be about $350 shipped which ain't too bad. :oops::confused:o_O

So looks like next major project will be headunit install and amp bypass to accommodate for static feedback some have experienced. Looking at doing the TLCFAQ bypass to keep it simple.
 
LOL... Alita definitely ain't havin' this old factory unit. On the way to our monthly LC Club meeting, which was held all of 20 minutes from my house she spit the cassette out 4 times, then 3 more on the way home... Should be interesting until the new headunit gets here.
 
So after installing the M2V2 phone mount I realized I didn't like the X-Grip holder or the straight 6" extension arm.
Went online and purchased a double arm extension piece that was about the same length. So far, much MUCH better placement of the phone. The X-Grip is slightly better with this, but still just cumbersome to use, so when the Quad Lock mounting system comes that I purchased, the X-Grip will be going back.
Old mount setup with the 6" arm extension
Untitled by Greg Fisicaro, on Flickr

New mount setup with double arm extension
Untitled by Greg Fisicaro, on Flickr

Also took the time to replace the idler pulley and tensionor bearing. I had a slight whirring coming from somewhere there so figured I would replace both seeing as the Serpentine belt still looks pretty decent and newish.
Untitled by Greg Fisicaro, on Flickr

Then I noticed this.... PCV leak?
Untitled by Greg Fisicaro, on Flickr
 
Welcome to the cloth 100 club and it looks like you've made some good progress. There's a few of us out here. Does yours have a sunroof?
Yup has a sunroof and it works too. Actually another member in my club has one with cloth seats as well.
 
Well this happened after replacing the idler and tensioner.....


New fan clutch will be here today. Now to figure out if I can get it out without having to detach everything. Also got shipping update from JOYING that my headunit is on the way!! YEAH. Factory one decided to spit the cassette out a couple times while my bro and I were running to get food when we were up at the family cabin this weekend.
 
Got the new AISIN FCT-021 from Amazon this afternoon and went ahead and replaced. Really the job seemed more difficult than it really was, bit of fennegaling and whatnot to get the clutch and fan assembly out as one piece without taking the radiator hoses off, but it did come out pretty easily. T-stat hose can move out of the way and then pulling up on the fan shroud with a bit of muscle gave enough room for it to come out. Serpentine belt off did help a bit.
Untitled by Greg Fisicaro, on Flickr

Going back in was reverse of everything, probably all in took me just about 2hrs. The serpentine belt probably could have been left on, but really the S-shaped 12mm wrench that I previously used for my FJ60 for the doors was clutch!! DEFINITELY need a LONG 12mm wrench, two would be awesome to hold the clutch while you replace and tighten the nuts on the clutch.
 
Aaaaannnndddd.... she is back to being quiet!!! Man I didn't realize how much I missed that. That constant engagement of the fan clutch was ridiculously loud! So now on to the regularly scheduled programming. New headunit has shipped so it should be here in another week or so.
 
New "fun" purchase today... After I was running around last night testing out the new fan clutch, I was bitching to myself about the poor light output of my "high-end" Philips Nighthawk halogen bulbs. After getting home, randomly came across a video on some ditch lights. Then fell into the YT blackhole and came across Diode Dynamics brand, which I had heard great things about the brand.

Happened to jump on their site this morning to find that they are a USA Built/Assembled company, yadda yadda. Anyways, as I was looking through their vehicle selector I notice they have a specific STREET LEGAL version of their LED and HID bulbs. Curious I start reading and sure enough their information states that they build their bulbs (LED or HID) to exacting HALOGEN bulb standards, so they are legit compatible with reflector housings!

So seeing as they are running a 20% off coupon (USA20) code for Memorial Day, and today being my 7yr. anniversary with my agency I decided to TREAT YO SELF!
Diode Dynamics SL1 Low Beam setup coming specifically engineered for 1998-2007 Toyota Land Cruiser, and best of all 100% Satisfaction Guarantee w/ free 30-day return policy. So with the coupon code, looking at $135 to my door. Considering I paid $65 for my Nighthawks, I figure if I don't like these for whatever reason I can return in 30-days and go back to my Nighthawks. Unfortunately, their High Beams are on back-order almost purchased those as well but don't do a whole lot of night driving that requires the High Beams. Maybe in the fall/winter I will upgrade to those.
 
All kinds of shipping updates today!!!
Joying head unit will be here Monday.
Diode Dynamics will be here Friday
Then was on Crutchfield as I had gotten a newsletter item about their Memorial Day sales ending. Ended up that Morel speakers were on sale, so after some previous discussion with @suprarx7nut I took a chance and ended up getting the Morel Maximo 6 which will be here on Tuesday.

Also ended up ordering another door lock actuator motor for the front passenger door as well as the door lock sensor for the front doors. Those will be a back-up plan for it the sensors do end up being the problem. Figured it would be the ONE TIME that I do really need them that they decide to fail and go NLA. Sooo I will have those in a bin for safe keeping for later.

Also, since I was taking apart the center console earlier in the week to install the USB charging port where the cig lighter was, I took the cupholders out and sent them off to @BenCC to see if we can come up with something. Tired of the stock, crappy ones in these early year trucks.

So hopefully next weekend will be filled with some stereo install stuff and new low beam headlights!!!! Figured since it was officially my 7yr. anniversary with my agency that I could splurge a bit on some "fun" stuff, gonna have to buckle down soon and get the axles handled soon.
 
Got a surprise yesterday evening when I came home real quick. Friday was laying new sod in the front yard and family from out of state showed up so has been a bit hectic with the back and forth to where they are staying (30 mins away at other SILs house). But figured out that my sprinklers were quite working properly so I had to run home in the evening to turn them on and feed the dogs quick. Found that my JOYING headunit had been delivered a couple days early!

So this week will be the process of getting her into the truck, just have to have time set aside to mess with it for a few hours.
7" touchscreen android unit with their AHD (1080p supposedly) backup camera
Untitled by Greg Fisicaro, on Flickr

And their "new" Toyota universal wiring harness. The system already comes with a generic pigtail harness on its on, plus I ordered the Metra 70-8112 harness as well from Amazon to give it a shot. Figured I would cover all my bases just in case, worst case scenario I return the Metra harness.
Untitled by Greg Fisicaro, on Flickr
 
Yesterday evening I got the JOYING unit installed after getting the Metra 70-8112 adapter. While I had the "universal" adapter that I purchased from JOYING, after closer inspection I could not find a connector that had the necessary plugs for the system, thus needing the Metra. That one worked just fine and was pretty much a plug and play. I first connected all the wires bare just to make sure that I had power, antenna, etc. but as has been found you have to splice the two amp+ wires from the stock harness into the system to be able to get the amp to see a power signal and turn on. I didn't really have the time to go through the process of the amp bypass but will likely do that in the future as I do have the ground feedback loop happening (slight hiss that is constant and can be heard at lower levels).

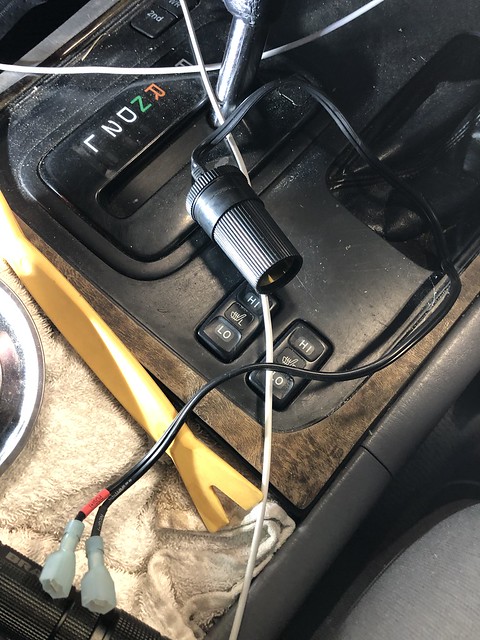
When I removed the factory head unit I found out that apparently someone else had been back there. Found what looked like two different cigarette adapter style plugs plugged into the stock harness ground and power. They had at some point just been stuff behind the unit so not sure what happened or what they had been used for, and why two?!
Untitled by Greg Fisicaro, on Flickr

After removing those and the head unit I got to wiring up the Metra harness after some messing around with the "universal" harness from JOYING. Luckily, their head units come with a pigtail harness and other "ISO" harness, of which I just used the standard pigtail one and soldered it to the Metra.
Untitled by Greg Fisicaro, on Flickr

After that was a little test fitting which the surround needed some clearancing to allow the faceplate to protrude without hitting the back side of the fascia. This was a bit of trial and error, but after about an hour of back and forth I finally got it to fit nicely.
Untitled by Greg Fisicaro, on Flickr

Right now I have the system button illumination set to time delay, so it comes on in the evening on its own. I am not sure where to pull illumination from and still have to go through to wire everything for the backup camera, sub, etc. once I get to that point. May try to work on the backup camera this weekend, depends on what it going on. Would like to bypass the amp so I can get rid of the hiss but not a huge deal breaker right now, nor overly annoying. Thing is that I have a set of Morel Maximo 6 components coming for the front doors today (YEAH!!) so going to get those installed when I get the chance and try to figure out wiring for the reverse camera.

Since the reverse camera has a brake wire that triggers the camera turn on at the stereo, can anyone help with where they may have pulled that that has done a reverse camera install? Also, the illumination?
 
Then I also got the Diode Dynamics SL1 low beam headlights yesterday as well. Since those were a pretty straight forward install, aside from trial and error of the bulb alignment, I got those handled. And all I can say is WOW, that is a significant difference.
Untitled by Greg Fisicaro, on Flickr

So here is the stock Halogen bulbs, These were pricey Philips Nighthawk bulbs, not bad but not great...
Untitled by Greg Fisicaro, on Flickr

Like I said, install was pretty much plug n play. The bulbs have a small collar that you can remove and rotate slightly to allow for proper alignment of the LEDs like the placement of the stock halogen filament. Diode Dynamics has a video on how to do this, but literally all it is is removal of the o-ring, small screw removal (super small like eyeglasses small) then pulling the collar and rotating one way or another. So a bit of trial and error to figure out where it needs to go, but for me it was just one tooth on each both in either direction to get it to align properly. Plug is actually marked with "+" and "-" so you can plug in properly. I got lucky the first time and figured that the Red with Blue stripe was the positive.
Untitled by Greg Fisicaro, on Flickr

Here is the difference once I had gotten the passenger bulb aligned properly... drivers is the halogen Nighthawk.
Untitled by Greg Fisicaro, on Flickr
From the front. The LED definitely has a much cooler color to it.


And here is final product once all was said and done. No high beams, just fogs on underneath.
Untitled by Greg Fisicaro, on Flickr

All-in-all I was quite impressed with how quickly and easily they installed, will likely do the high beams in the future but don't do a whole lot of night driving so yeah, not a priority at the moment. Maybe this fall when it is not as light out quite so late. The one thing that was a bit of a gripe is that their stock o-ring was SUPER tight, to the point where I could not get the bulbs mounted. I did see on their video on how to adjust the alignment that this may be an issue with some vehicles, so it may be necessary to use the o-ring off your existing bulbs. Did that and now has a nice snug, but not super tight fit.
 

Users who are viewing this thread

Back
Top Bottom