4+PLUS Tire/Cooler Carrier Install- FJ40 (2 Viewers)

This site may earn a commission from merchant affiliate
links, including eBay, Amazon, Skimlinks, and others.

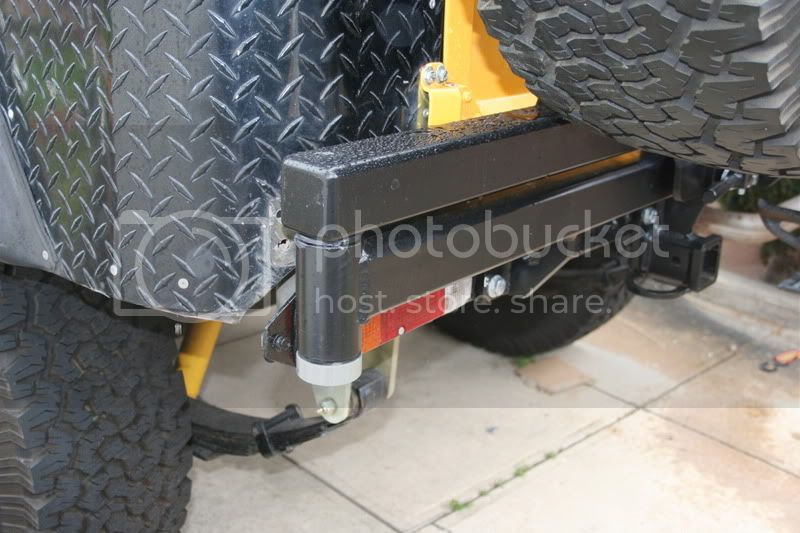
Here's what mine looks like 4+ years later. Some of the rust along the edges started within the first year. FWIW I have done no touch ups, etc. I like the Rust Bullet idea. The biggest issue for me is that the powder coat comes off in small sheets. Harder to stay on top of that. I don't think it's worth re-powder coating before install unless you're looking for a trailer queen...

These are the worst areas. Most everything else looks pretty good. The main supports have been fine but if you do decide to paint/powdercoat I would say the basket (since it's seperate) and maybe prepping and painting the hitch weld area.


:meh:


.
photo 1.JPG
photo 2.JPG
 
Here are some pics of mine recently installed. Great thread, I don't know what they are thinking sending these out without any instructions. Well built, heavy duty and fits great... the only thing I am not crazy about is the latch, having to end up with two pieces in my hand while I am unloading stuff from the back seems odd.

IMG_8279-1.jpg


IMG_8259-1.jpg


Latch

IMG_8273-1.jpg


opening latch.

IMG_8276-1.jpg


latch removed. Ready to open swing arm.

IMG_8277-1.jpg


Cooler Rack

IMG_8275.jpg


Swing out hinge

IMG_8272.jpg
 
Just got mine yesterday and mocked it up today. Great thread, very helpful. I do have a question though....

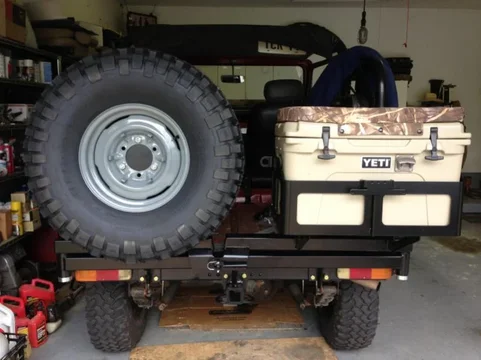
I spoke with Dave and others and ended up ordering the flat stock style cooler basket. The tubing style would not fit my old faithful 45 qt Yeti. The flat stock style basket has a little more clearance inside and my cooler fits like a glove.


image-2937412761.jpg

I had these parts left over. I know the bolts are for the hi-lift and this other piece probably is as well. Here is a pic of the bracket.


image-4159163235.jpg

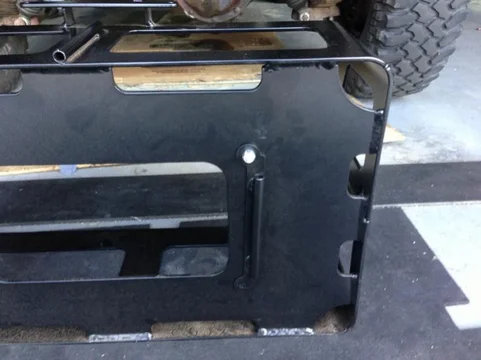
Here is the side of basket


image-3304940140.jpg

Has anyone else installed this setup? Your help would be appreciated.

Sent from my iPhone using IH8MUD
image-2937412761.jpg
image-4159163235.jpg
image-3304940140.jpg
 
The bracket with the tube, mounts under the basket, is a conduit for the license plate wire.

Ok. Thanks! That makes sense. I can see that now.

Like this...


image-2892796203.jpg


Sent from my iPhone using IH8MUD
image-2892796203.jpg
 
I'm installing one of these on my '77.

The 4 outermost holes (2 on each end) are right next to the captured nuts that held on the bumperettes. After drilling, it won't be possible to get a nut onto the new bolt because the captured nut would be in the way.

What have folks done to deal with those captured nuts? Knocked them off? Or do they (mostly) come off when drilling the new holes?
 
Here's what mine looks like 4+ years later. Some of the rust along the edges started within the first year. FWIW I have done no touch ups, etc. I like the Rust Bullet idea. The biggest issue for me is that the powder coat comes off in small sheets. Harder to stay on top of that. I don't think it's worth re-powder coating before install unless you're looking for a trailer queen...

These are the worst areas. Most everything else looks pretty good. The main supports have been fine but if you do decide to paint/powdercoat I would say the basket (since it's seperate) and maybe prepping and painting the hitch weld area.


:meh:


.

One of the biggest causes for powder coat flaking off is surface prep. I don't have one of these to look at, but all of the "outdoor" fabrication projects I build that end up powder coated, I have sand blasted first.
There is also many quality differences in the powder used.
Nice looking unit overall tho:cheers:
 
I'm installing one of these on my '77.

The 4 outermost holes (2 on each end) are right next to the captured nuts that held on the bumperettes. After drilling, it won't be possible to get a nut onto the new bolt because the captured nut would be in the way.

What have folks done to deal with those captured nuts? Knocked them off? Or do they (mostly) come off when drilling the new holes?

Probably doesn't help you much, but my bumperettes and captured nuts were long gone before I got my truck, so it was drill the holes and bolt it up. Actually, I had to make some plate spacers to account for a welded rear crossmember repair by a previous owner. Good luck on your install.
 
I'm installing one of these on my '77.

The 4 outermost holes (2 on each end) are right next to the captured nuts that held on the bumperettes. After drilling, it won't be possible to get a nut onto the new bolt because the captured nut would be in the way.

What have folks done to deal with those captured nuts? Knocked them off? Or do they (mostly) come off when drilling the new holes?

By the time you drill out the holes to 1/2 inch, there isn't much left of the captured nuts. I just knocked off what was left with a cold chisel.
 
Thanks, Cruiserdrew. Kinda what I figured, and good to hear it from someone who's been there.
 
Or put a bolt back in the threads not screwed all the way in and smack it with a hammer. Given ya can get ur mitts on the backside

Sent from my SAMSUNG-SGH-I537 using IH8MUD
 
I just wanted to give an update on my tire carrier and give Dave a well deserved acknowledgement for great customer service....


It's been nearly 7 years since I first installed my tire carrier and it's remained nearly indestructible in that time and I've been very happy with the longevity and functionality. It was previously mentioned that the powder coating could have been better, but the overall condition did not change much after some initial small flaking. After years of exposure near the beach I had planned on eventually re-powder coating the entire setup and decided to follow through with my plans after recently welding up a Metal Tech cage. I took the opportunity to batch powder coat to get a better price and was very happy with the results.

About a week later I left the rear latch undone and backed into my driveway resulting in the basket side swinging out and catching my fence gate and ripping it to shreds. The tire carrier fared well considering, but did not come out unscathed. A small dent to the side of the basket, some white paint on the main swing out, a dented rear quarter panel and unfortunately a bent basket mount...

IMG_4398.jpg


IMG_4399.jpg


This gives me the excuse to finally have the OEM fuel door installed for my aux tank...

IMG_4401.jpg


I knew fabricating a new mount would be time consuming so I reached out to Dave who made sure I was able to get a new mount to weld on my swing out. A quick trip to my buddies shop and the old mount was plasma cut off and new piece added...


IMG_4584.jpg


IMG_4589.jpg


There were a couple minor differences in the replacement mount to note:

1. The former mount had 6 holes to mount the basket and the new one has four. Four is plenty and I can drill the two center holes in the new mount if I want. It lined up perfectly with the basket.

2. The basket now sits about 1-1.5 inches away from the rear door hinge whereas before it was maybe 1/4 inch away. And although I never had an issue of flexing into the hinge, it was a nice unexpected improvement without creating significant departure angle issues.


IMG_4592.jpg


Now I just need to take this back to the powder coating company and get the basket side swing out re-coated.


It's always a pleasure to do business with people who stand by their well designed products and offer great customer service. Thank you Dave!


:beer:
 
Confirmation of the rack I will be ordering. I spoke to Dave as well and he answered all my questions. Now, which basket ? Love the round basket shape, but need to carry a 45qt Yeti....
 
45 qt Yeti won't fit in the tube basket but it fits nicely in the flat stock basket. Go to my 40 build thread (link in signature) and look somewhere around the last few pages (**edit** post #102 and 103). I ordered one of Dave's bumpers and I am very pleased with the flat stock basket and my Yeti.

*edit again* hell, just look up higher on this page. I posted pics to this thread. I just forgot that I did
 
Last edited:
Placing my order now..... Do I order the Tube or Plate basket..... UGHHH!
 
I ordered the flat stock one so I could fit the biggest cooler, but I also asked Dave to make me a custom single jerry can holder that bolts to it for daily driving. Dave is very accommodating!
 
The Tube Basket just looks so much nicer.... so while I will not be able to carry as many beers, I'll just carry BETTER BEERS! Guiness? Brilliant !

Thanks @SSCR I'll have to ask Dave about a Jerry can option. I've seen spare tire tiire mounted can carriers, but I dont know. Plus, I've still gotta have room for a Mtn bike rack back there also...
 
Copenhagen or others that might know,
I really like the tube style basket better. Anyone know the dimensions? I would like to be able to carry my Yeti 50qt which is actually about 1 3/4" more narrow on the front/back (side where the Yeti decal is), but 1 1/4" wider on the side of the coolers (where the handles are) than the 45qt that fits great in your plate style basket. I was trying to figure out if that would fit in the tube style or if I would have to order the plate style (and if it would even fit in the plate style due to its width). Actual dimensions of the Yeti 50qt base are 22 3/4" x 14 3/4". Thanks to anyone who might could help.

Wilson

45 qt Yeti won't fit in the tube basket but it fits nicely in the flat stock basket. Go to my 40 build thread (link in signature) and look somewhere around the last few pages (**edit** post #102 and 103). I ordered one of Dave's bumpers and I am very pleased with the flat stock basket and my Yeti.

*edit again* hell, just look up higher on this page. I posted pics to this thread. I just forgot that I did
 

Users who are viewing this thread

Back
Top Bottom