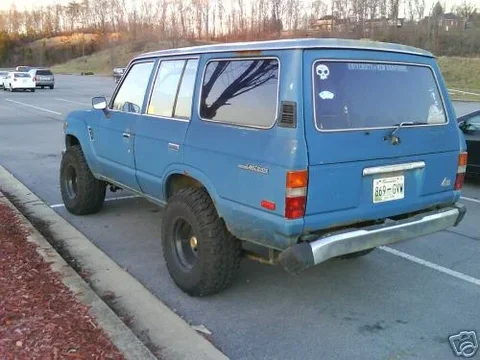
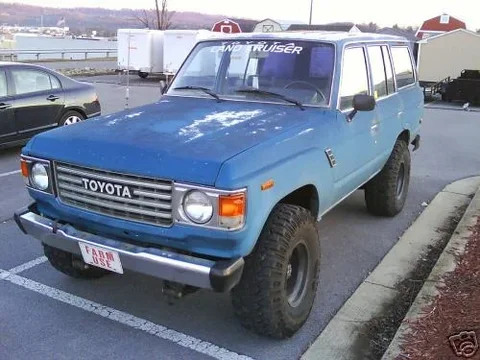
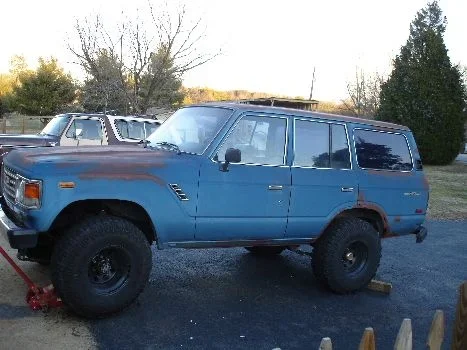
hello, i am new here, i submitted a couple of questions earlier last week and have been amazed at the info and enthusiasm. just some info I leve in central virginia and purchased a 1983 fj60 193,000 miles, last week and am planning on fixing all the problem areas and adding some extras. I intend on following the process with pictures and hopefully some insight from everyone. i just got my camera working again and will post pics tonight. I have already sanded all surface rust, especially on the roof, found no penetrating pin holes, exposed all the problem areas that need to be cut out and coated with primer for the time being. Steel is on the way for a new rear bumper and side steps, just got all the front end rebuild parts from manafre yesterday. frame is solid, but it seems every seal and gasket is leaking. engine runs strong and clutch was just replaced, has a three inch lift already installed (shackles and ada leaf by rough country) 33x12.50 ss trexus on black steel rims. primary goal is getting truck able to pass VA inspection. will post pics tonight of before and after rustoleum.
Navigation
Install the app
How to install the app on iOS
Follow along with the video below to see how to install our site as a web app on your home screen.
Note: This feature may not be available in some browsers.
More options
Style variation
You are using an out of date browser. It may not display this or other websites correctly.
You should upgrade or use an alternative browser.
You should upgrade or use an alternative browser.
1983 fj60 build up
- Thread starter cfdlighthouse
- Start date
This site may earn a commission from merchant affiliate
links, including eBay, Amazon, Skimlinks, and others.
More options
Who Replied?Looking forward to your buildup. Buy a "silver star" so you can
have the bandwidth to post pics!
have the bandwidth to post pics!
- Thread starter
- #3
how do i do that. i saw the description in FAQ but no info on cost or how to purchase.
Thanks
Dan
Thanks
Dan
zuluzeugma
SILVER Star
if you're confused, PM woody or any other admin or search in the Help section. Very self explanitory... Good luck with the build-up
- Thread starter
- #5
- Thread starter
- #6
silver star
figured out the silver star subscription was looking in the wrong area. made the purchase according to the FAQ the rights should go into effect in the morning so more pics will follow.
Thanks
Dan
figured out the silver star subscription was looking in the wrong area. made the purchase according to the FAQ the rights should go into effect in the morning so more pics will follow.
Thanks
Dan
sterling
SILVER Star
Was that the 60 on ebay? Saw it, seems the owner posted it twice and it sold on the second try for a good price.
Congrats!
Keep us posted on the progress
Welcome to da mudd
Congrats!
Keep us posted on the progress
Welcome to da mudd

What's up with the front plate "FARM USE". Is that what it was used for?
- Thread starter
- #9
ebay
yes it was on ebay. the first winner defaulted on payment and i was second in line. As to the farm use, i am not sure. it was a daily driver and was registered in tenn with plates so the farm use thing was unclear. the underside and frame is clean no mud or mud caking in those hard to clean areas so it does not appear to have been abused in that area. surprising little rust scale on the frame, door hinges were tight and all door drip edges are in great shape, all floor boards are original and rust free, not bad for a 25 year old vehicle, even the normal rust through areas rear fender above wheel, rear quaters, lower tailgate drip edge are in decent shape as compared to others i have seen, only bad areas were that the entire roof had surface and some penetrating rust and only one unexpected spot about twelve inches long under the drivers rear roof rail above the rear side window. i was pleased with the find and just had to sand some additional areas of surface rust due to a bad second paint job. will post the rustoleum pics tomorrow.
thanks
Dan
- Thread starter
- #10
- Thread starter
- #11
front knuckle rebuild
Got all my parts in for the front end and took advantage of the warm weather yesterday in virginia 75 degrees. Project took me 6.5 hrs for both sides working alone. replaced birfiled on drivers side, all seals, wheel bearings, knuckle bearings, rotors, studs, calipers, brake pads, brake lines. i don't know if the pics show it well, but the drivers side upper knuckle bearing was gone, the bearings and bearing cage had fallen into the knuckle causing damage to the birfield. the upper race was almost destroyed from the constant impact of the inner bearing race. the upper knuckle plate was okay. I will say a huge thanks to those who have posted similar threads from the tool selection and birfield removal, i did not own any brass drifts and went and bought some for the project and without them the project would not have gone as smooth and would have most likely incurred damage to the various studs that needed pounding.
i will reinforce the needed tools
brass drifts
3lb hammer
bearing packer
a set of quality bearing race and seal drivers
air impact tools
lots of parts cleaner
10mm brake line wrench
snap ring pliers
metric sockets 10mm, 12mm, 14mm and 17mm
torque wrenches inch and foot lbs
hub socket
lots of towels, zip lock bags, and patience
rear brakes are next and my steel is finnaly here for my rear bumper build.
- Thread starter
- #12
pics
I keep trying to upload pics and i can't. the message shows upload error in manage attachmnet upper field. the files are within the required size limitations. i can't even upload pics i have already uploaded. i sent pics to my work computer to see if it was my computer but am having the same problems here to. any thoughts?
I keep trying to upload pics and i can't. the message shows upload error in manage attachmnet upper field. the files are within the required size limitations. i can't even upload pics i have already uploaded. i sent pics to my work computer to see if it was my computer but am having the same problems here to. any thoughts?
Was that on ebay? It looks familiar.
I had the same issue at one point and had a limitation of one image at a time - not sure of the cause and haven't seen the same problem since, but you might try that.
- Thread starter
- #15
pics
landcruisin60 - yes it was on ebay.
bridges -tried the one at a time too and still same issue.
Thanks for the reply
landcruisin60 - yes it was on ebay.
bridges -tried the one at a time too and still same issue.
Thanks for the reply
- Thread starter
- #16
knuckle pics
attachments are working again


attachments are working again
- Thread starter
- #17
pics
more pics


more pics
- Thread starter
- #18
ome lift
just bought an ome heavy front/ medium rear lift kit, shocks, bushings, ubolts, and stabilizer w/anti inversion should be here by the end of next week or so. i am on the fence about the greasable frame pins though. figured i could get them later if were a definite need. any thoughts?
just bought an ome heavy front/ medium rear lift kit, shocks, bushings, ubolts, and stabilizer w/anti inversion should be here by the end of next week or so. i am on the fence about the greasable frame pins though. figured i could get them later if were a definite need. any thoughts?
If you use poly bushings (which I believe all OME kits come with) then you need to keep them well greased. You have 2 options, install greasable hardware (shackles & spring pins) or take the springs back off and regrease the bushings periodically. I'd go for the greasable spring pins, sounds like a whole lot less work.
- Thread starter
- #20
steel
i got my steel for the rear bumper and sliders all laid out and got the rear bumper height set the old bumper tabs and rivots ground off the frame. i had to do some minor surgery on the rear cross member where it rusted against the factory bumper. Cut the main 5x3 tubing to length, cut the 2x3 tubing which will serve as mounting structure to go inside the frame rails, cut the 2x3 tubing to length for the rear quarter slides. hopefully will get the rear quarter cut tomorrow night and begin welding everything.
landcruisin60 - thanks i am not interested in taking the springs off and don't want sqeak squeak squeak all the time so greasable shackles and pins it is.
Thanks
Last edited:
Similar threads
Users who are viewing this thread
Total: 1 (members: 0, guests: 1)


