1978 LPB Teardown and Rebuild

This site may earn a commission from merchant affiliate
links, including eBay, Amazon, Skimlinks, and others.

Electric is fine too. I'm just all set up for air. One thing to watch might be the speed though. This air one I have is not terribly fast with regard to belt speed even at full tilt. Reminds me of Crushers comment of slower speed being better. Perhaps counter-inuitive but the unit removes material at a decent rate without heat build up. Faster than the 2" for sure. I have a catalog at work for Dynabrade and could look up the speed of this unit for you to compare tomorrow.

Please do look up and post info on the Dynabarde. I too had heard they are the brand to buy. I should have bought one of these long ago, would have made my life easier. I hear they work great for cleaning up welds. How long do the belts last? Do the tear up easily?
 
I'll look it up for you. The belts last quite a while and they are only about a dollar each.

EDIT - here is a link for you http://www.dynabrade.com/dyn10/content.php?page=myind#metalworking

model 40320

it says 20,000 rpm but it must be geared down or maybe just that speed over an 18" belt is slower cuz the belt is not super fast at full throttle - but it is fast enough and works quite well.

Dynabrade tools are all I buy at work. DA sanders, inline sanders and belt sanders. This belt sander is new - the last one went 5 years daily use and was never oiled ( even though the guys are supposed to - we have very good air though)
 
Last edited:
I swear I took pictures yesterday of the front mounts welded on but I can't find them on my camera.

The epoxy primer did indeed fair better after a few days to cure. It still burns away but over a smaller area and to a lesser degree.

This is the only photo I can find before I flipped it over.
IMG_0733.webp
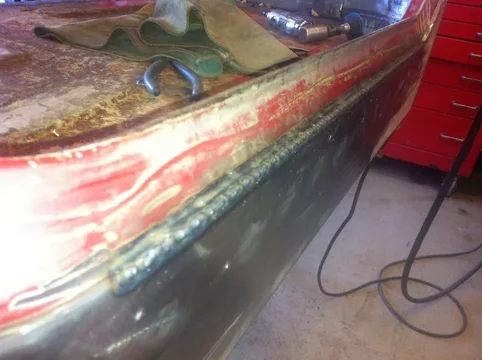
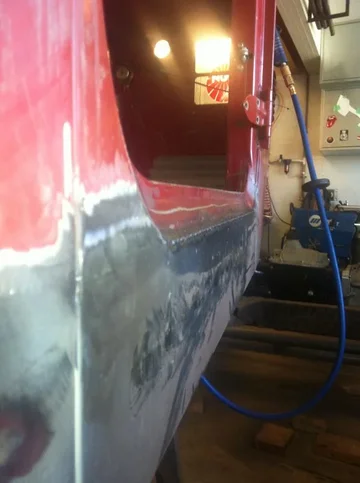
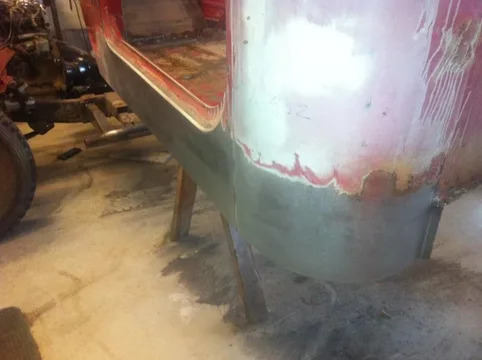
Today I finished the welding on the rockers
IMG_0734.webp

IMG_0736.webp
IMG_0733.webp
IMG_0734.webp
IMG_0736.webp
 
cleaned up
IMG_0737.webp

IMG_0738.webp

IMG_0739.webp
IMG_0737.webp
IMG_0738.webp
IMG_0739.webp
 
IMG_0740.webp

IMG_0741.webp
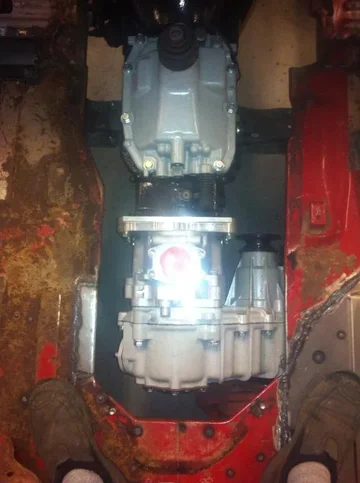
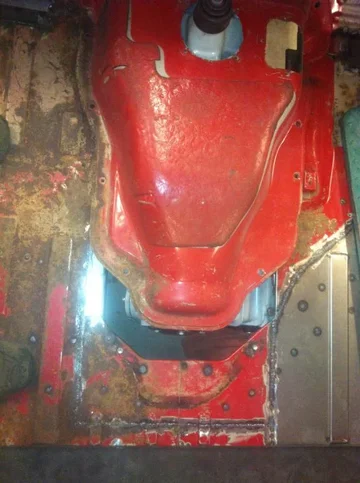
floor looks good - I didn't have enough time to adjust and check the tub placement to just the right spot - I just set it in place.
IMG_0742.webp
IMG_0740.webp
IMG_0741.webp
IMG_0742.webp
 
I'll have to extend the cover obviously. I plan to just cut it across the middle and add in 7" of material.

IMG_0746.webp

Back on the frame for fabricating everything inside the cab - cage, seats, dash etc.
IMG_0748.webp

BUT

This thread - :hhmm: - or at least all work on my truck will now be on hold until I finish my obligations to my bed build.


PAUSE.webp
IMG_0746.webp
IMG_0748.webp
PAUSE.webp
 
I'll look it up for you. The belts last quite a while and they are only about a dollar each.

EDIT - here is a link for you http://www.dynabrade.com/dyn10/content.php?page=myind#metalworking

model 40320

it says 20,000 rpm but it must be geared down or maybe just that speed over an 18" belt is slower cuz the belt is not super fast at full throttle - but it is fast enough and works quite well.

Dynabrade tools are all I buy at work. DA sanders, inline sanders and belt sanders. This belt sander is new - the last one went 5 years daily use and was never oiled ( even though the guys are supposed to - we have very good air though)

Thanks for the follow-up on this Kevin, much appreciated. I noticed on the website they list a model (40381) that they call Slow Speed - " ... ensures longer belt life when working on titanium and other exotic materials ..." that might be too slow?

Very nice work on the rockers!
 
Just tack, tack, tack

Even at the proper setting for the thickness of metal, the MIG welder is too much and will burn right through if you try to weld a continuous bead. I could play with the settings and find a lower heat level that might work but tacking is working for me.

Let's define a tack: A tack is-> point the wire where you want it and pull the trigger long enough to make a dot about 1/4" in diameter. This dot should be enough to fuse the back side of the material together and even leave a bit of a "bubble" of metal on the backside. That is when you know you have penetrated through the material fully.

I tack the patch in enough to hold it where I want it. Then I go around the patch with evenly spaced tacks. Then go around again and tack half way between the previous round of tacks. And around again half way between until you close the gaps. It really doesn't take long before you can't see the joint anymore. I take a wire brush and clean up all the soot and usually find a few spots that need a re-hit.

Merb, you've just got a lot of welding to do. :D

For panel flatness I have a 2x4x6" block of steel that I put behind the panel and a good body hammer to tap it as flat as I can. I try to address the warp when I see it rather than keep grinding and making it worse.

Another point I just thought of:

Welding makes warpage. No two ways about it. Molten metal will cool and as it does so it will shrink. If you take a sheet of perfectly flat 3/4" thick steel and run a proper bead across the middle, that bead will shrink and cause the sheet to bend. The bigger the bead (think more molten metal) the more shrinkage when it cools and the more warpage in the workpiece. By extension, the smaller the bead (think less molten metal) the less it will shrink and the less warpage will result.

There is also a cumulative effect. If you weld just a little and let it cool it will shrink a set amount, call it "x". If you weld twice as long you would think you would get shrinkage of 2x right?

Nope. The heat has had more time to spread and the workpiece has actually grown in that time by thermal expansion. So now you are welding a workpiece that is pre-stretched. So when it cools back to ambient temps it will shrink by a factor of 2x+p where p stands for pre-stretched. Now, p is a very small amount and is hardly noticed on thicker material because of the inherent strength of thicker material. But in thin sheet such as found in a car body, even these tanks we work on, it is more pronounced.
Therefore, a 1/4" tack, even repeated many times, will warp less than a continuous bead because the preheat/ prestetched effect is kept to a minimum as you allow the tack to cool when moving about the patch.

That's todays lesson. Tomorrow I want you to review chapters 3 and 4 and write as essay on the differences between 2%Thoriated and 2% Ceriated tungsten during GTAW on aluminum. Specifically the effect it has on starting an arc.

:rolleyes:

Really, I am not a welder! :D
 
Bead blasted, phosphate washed, epoxy primered - this was done last Saturday and I will weld them in place on Tuesday to see if the epoxy primer welds better when cured.

I've looked back through the thread for a Brand name on that gray epoxy primer? Are you just mixing small batches as you go? I was thinking of using a brush on the down-under/hidden areas where the cosmetics are not important.

Is the phosphate wash something you buy in bulk or is there a brand name, etc.?

And nice job on the welding thesis - professor :grinpimp:
 
Just tack, tack, tack

Even at the proper setting for the thickness of metal, the MIG welder is too much and will burn right through if you try to weld a continuous bead. I could play with the settings and find a lower heat level that might work but tacking is working for me.

Let's define a tack: A tack is-> point the wire where you want it and pull the trigger long enough to make a dot about 1/4" in diameter. This dot should be enough to fuse the back side of the material together and even leave a bit of a "bubble" of metal on the backside. That is when you know you have penetrated through the material fully.

I tack the patch in enough to hold it where I want it. Then I go around the patch with evenly spaced tacks. Then go around again and tack half way between the previous round of tacks. And around again half way between until you close the gaps. It really doesn't take long before you can't see the joint anymore. I take a wire brush and clean up all the soot and usually find a few spots that need a re-hit.

Merb, you've just got a lot of welding to do. :D

For panel flatness I have a 2x4x6" block of steel that I put behind the panel and a good body hammer to tap it as flat as I can. I try to address the warp when I see it rather than keep grinding and making it worse.

Another point I just thought of:

Welding makes warpage. No two ways about it. Molten metal will cool and as it does so it will shrink. If you take a sheet of perfectly flat 3/4" thick steel and run a proper bead across the middle, that bead will shrink and cause the sheet to bend. The bigger the bead (think more molten metal) the more shrinkage when it cools and the more warpage in the workpiece. By extension, the smaller the bead (think less molten metal) the less it will shrink and the less warpage will result.

There is also a cumulative effect. If you weld just a little and let it cool it will shrink a set amount, call it "x". If you weld twice as long you would think you would get shrinkage of 2x right?

Nope. The heat has had more time to spread and the workpiece has actually grown in that time by thermal expansion. So now you are welding a workpiece that is pre-stretched. So when it cools back to ambient temps it will shrink by a factor of 2x+p where p stands for pre-stretched. Now, p is a very small amount and is hardly noticed on thicker material because of the inherent strength of thicker material. But in thin sheet such as found in a car body, even these tanks we work on, it is more pronounced.
Therefore, a 1/4" tack, even repeated many times, will warp less than a continuous bead because the preheat/ prestetched effect is kept to a minimum as you allow the tack to cool when moving about the patch.

That's todays lesson. Tomorrow I want you to review chapters 3 and 4 and write as essay on the differences between 2%Thoriated and 2% Ceriated tungsten during GTAW on aluminum. Specifically the effect it has on starting an arc.

:rolleyes:

Really, I am not a welder! :D

The other thing I have learned from watching old schooler's do this is if you can hammer and dolly each tack weld "crush the weld" you force the stretched steel back into position and the warp age is less. The problem with that scenario is you cannot always get behind your weld seams or at least not enough to really work it. Have you tried TIG welding any panels yet? Does that produce less heat so therefore less warp age? Looking forward to tomorrow night.
 
I've looked back through the thread for a Brand name on that gray epoxy primer? Are you just mixing small batches as you go? I was thinking of using a brush on the down-under/hidden areas where the cosmetics are not important.

Is the phosphate wash something you buy in bulk or is there a brand name, etc.?

And nice job on the welding thesis - professor :grinpimp:

I can check the brand for you tonight - yes, just mixing like a half cup at a time - just enough to fill my small gun. The pot life is fairly long. If you mix it really thin you could brush it at the overlap seams and let it "wick" in between a bit. Then you could perhaps mix some normally and brush in tough spots.

Phosphate can be bought in bulk but I just have a 1 litre bottle of the POR15 product - - metal ready? - that's all that is, is phosphate.
 
Ever tried the flapper discs for the 4 1/2 inch grinder? Never tried the disc you use before, might give it a try.

I have a little snap on mini air angle grinder that is pretty awsome..

Rob

Yes, I use the flapper disc at times. I use an 80 grit disc. Only trouble is I find it can put quite a bit of heat into the thin sheet quickly. Also, if you have a raised bump, like a weld, that you are trying to grind away the flapper disc will grind both the bump and also before and after the bump. I think its because the flaps "give" a bit and envelope the bump as they go by and this causes the disc to remove material on either side of the bump. Just my experience.

We use them quite a bit at work dressing the welded corners of an electrical enclosure for instance. I find they work much better than the 5" sanding discs I showed earlier because they feather the surface better. We bought 1000 of them last spring to get a free grinder and we've used them all up a month ago.

Mini angle grinders like the CP875 or your Snap-on one are the staple of our grinding at work. They're just so versatile and you can put different discs on them = very handy.
 
The other thing I have learned from watching old schooler's do this is if you can hammer and dolly each tack weld "crush the weld" you force the stretched steel back into position and the warp age is less. The problem with that scenario is you cannot always get behind your weld seams or at least not enough to really work it. Have you tried TIG welding any panels yet? Does that produce less heat so therefore less warp age? Looking forward to tomorrow night.

Access behind is also tough when you just can't reach around the panel. Using a helper is a pain cuz they are never in just the right spot with the dolly.

The other issue with smacking each tack is just the time. I would do it in a critical area like the middle of a large flatish panel but in small areas with stiffening ribs around I just do it after grinding and get it as smooth as I can. I anticipate having to skim coat the patch areas with filler and blocking it down.
 
I agree with the time thing. I get very impatient and tend to weld up stuff too fast. I have tried to use compressed air to cool as I go, but who knows. I also have some cooling gel that I spray around a weld spot when it is very critical to minimize warpage. Seems to work well. The heat is confined and does not seem to spread past the gel. Then I just wipe it off after the last weld.
 
Yes, my welding supplier sales rep was telling me about the cooling gel. I haven't tried it though.
 
I enjoy this thread so much its not even funny. I have a question about all your panel replacement and spot welding. Now i have never done any type of work like what your doing ... ever... so this question is for my education. You are using a sander/grinder to flatten down all your spot welds to make it all smooth. What about the backside of all your spot welds? I know most ... if not all of them won't be seen but are you suppost to grind those as well and take the same steps as you do on an outside panel... as far as making them all real smooth, then prep work, primer, sanding, painting, buffing...stuff like that. Is the backside of all your panels suppost to be the same quality as the side that is seen by all?
 

Users who are viewing this thread

Back
Top Bottom