1978 LPB Teardown and Rebuild

This site may earn a commission from merchant affiliate
links, including eBay, Amazon, Skimlinks, and others.

Don't you need a filler neck somewhere on that tank :)

Make sure you pressure test it before final mounting :)

A+ work as always!!
 
Don't you need a filler neck somewhere on that tank :)

Make sure you pressure test it before final mounting :)

A+ work as always!!


FILLER! :doh:


;)
 
Kevin,

Yes, the forward top-loader for the 40 series is worth every cent. The underground 5 speeds are pretty good too, I reckon. My first 5 speed was from up your way out of a mine BJ42. I re-built it, put an H input shaft on it (the B input shaft is quite a bit longer and fine-splined), and put it in Patches (I've since replaced it with a new 5 speed, but my old one belongs to a friend now, and is still good). The 5th gear did not even look like it had been used when I re-built the box.

What will you do for a parking brake once you put the 5 speed in? On the newer (81-84) full floaters, you can bolt the 60 series backing plates on, weld the hand brake tabs on, and have the brake at the rear. I am not sure if the same is true of the pre-81 full floaters.

On Patches I put the transfer case unit on from my old split case 4 speed, but yours is different (being a non-split case). I personally prefer the rear axle handbrake, but I don't live with all the salt you guys do, and I understand many up North prefer the transfer case unit.

What are you doing for power steering- 60 series? If your engine re-build is anything like the rest of your work, that should be one nice engine when you are done.

Cheers,

Josh
 
The fifth gear was sometimes locked out and the operators couldn't select it. Something about being far underground and high rates of speed not mixing well I'd say.

I've heard some say they prefer the park brake on the transfer case because it's further from where the rubber meets the mud so to speak. I may still be doing a rear disc conversion and so could potentially incorporate a brake in that setup. I am not hung-up on either system so will likely take the solution that presents itself when the time comes.

Power steering is sorted. With the factory pump on my motor and a bracket from Hilltop Cruisers I will be bolting a mini truck box in the factory holes on my frame rail then using my stock links from the pitman arm on. With my planned mix of DD, easy cross country expeditions with the odd weekend trail ride it should suffice.

I'd like to sneak a York compressor on there somewhere as well, but with the dual battery brackets, turbo and intercooler piping it may be a bit tight.
 
60/40 seats with headrests

G'day Kevin,

Didn't want to hijack Jason's thread. Here are what the 60/40 with headrests look like. These are from an LX, but they also make them in grey vinyl. jsaltlick had a set out of a troopy, but he may have sold them.

Cheers,

Josh
 
pressed the wrong bloody send button, sorry.

Josh
FJ40 LX front seat.webp
 
That looks like it'll work. They're LC, thin enough, have headrests and will take 3 sets of belts. I assume I could find them in LHD also. Is the driver seat fairly comfy? My old 81 mini P/U had seats from a Honda Civic SI. Sport buckets with lots of side bolstering made for lots of support - very comfy. I'd sure like to be able to squeeze a third body in when I had to, but I also want driver comfort as a priority in a DD. I need to do some seat research to see if I can find other Toyota seat options - I beleive Toy seats will have the best chance of fitting the limited dimensions of the cab (plus they are Toyota :D). My dear old mother had a Tercel 4wd wagon years ago - that thing had comfy buckets...:hhmm:

Obviously I haven't come to a firm decision yet :frown:.

Crazy thought - how about the 60 part of the 60/40 and a single bucket fot the driver:confused:
 
Kevin, if you don`t need 3 seats,
would think about two recaros,
Recaro%20Expert%20M%20dim%20abp.jpg

I have a recaro in my BJ43 (driver site) since more than 25 years,
best what you can do.
Cheers
Peter
 
I don't need three seats. I just have two kids that fight over any perceived advantage like only one going with dad in the truck. Although... they have come to accept only one can go on the motorcycle with me.

I suppose I need to decide just what exactly I will be using the truck for. 95% will be daily commute 65Km round trip, in which case two buckets would be fine. Actual off road mileage will honestly be like 5% or just a couple jaunts a month in the summer.

I wonder if it's too late to make a quad cab :hhmm:


No, but I'll stick to the plan. I can always do that to the next one. :D
 
I had a LHD version in my HJ75 in Panama, but I don't specifically recall them being in the 40 series, but I would think they would have been in the 40 and 47s. Surely Marv could get them. RHD may work for you though, as my 60% side is just as comfy as the 40% side. I have seen a few rigs here with the 60% seat in place, and some cushy bucket in place of the 40% side... I wouldn't recommend that look though.:doh:

I have 95 4 Runner SR5 seats in Patches, and they are the most comfortable seats I've ever had. They are fairly thick, though, so I doubt they would be good for a pickup unless you were about 5'2".

Josh
 
Hey, just wanted to compliment you on your work. I have only just found this thread and am very impressed by the build. I'm an Industrial Designer here in Australia (although I don't do much product design at the moment) so I can totally appreciate your manufacturing job and the Landcruiser hobby!
Cheers,
Henry.
 
Been out of town and off project for several days. Going to get back on track Saturday with the bed from scratch. I should be done the bed for my customer by next Wed and then I can do my own bed. I am thinking now that I will both rebuild the existing bed (for resale) and build a new one for my truck. If you haven't seen my bed build thread the link is in my sig.
 
about friggin time

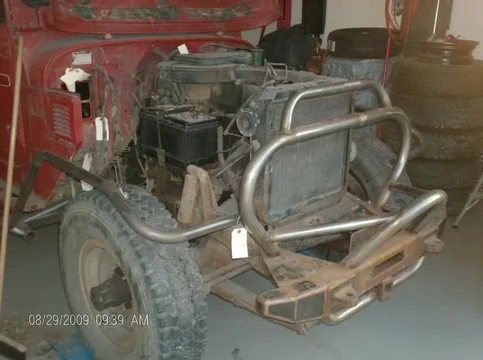
So I figured I had ignored my 45 long enough. I got bored on Saturday and started cleaning the garage and found myself starting a chronological "to do" list for the 45. Next thing I new I had removed the front clip in preparation of dry fitting the new fenders I will be getting in a couple of weeks. I want to fit the front clip nice and straight so I can finish fabbing the front brush guards and tie them into the bumper and sliders.

I took my time and did the bag and tag for all bolts and parts removed. Also tagged every wire that was disconnected. This 2F/4spd will be going into my brothers '71 40 so I had to separate the stuff I was keeping from stuff forwarding to him. Anything that got in the way was photographed in situ, removed, bagged/boxed for future refurbishing cause it all has to come off for body blast and painting.

This is just before I shut'er-down Saturday evening.
HPIM2455.webp

HPIM2456.webp
HPIM2455.webp
HPIM2456.webp
 
So lets recap:

-the roll cage is still loose, needs a couple of tubes bent and the front drops done. Then the flanges through the floor and so on to the frame.

-the rear aux fuel tank is still needing mounting flanges welded to it and still has no holes whatsoever in it.

-sliders, rear sliders/bumper and front brush guards need final fab and full welding to be done.

-the bed needs to be blasted and rebuilt using parts from a guy I know ;)

The plan moving forward:

- pull the 2F
- drop in the 3B/5spd/split case with mounts on to locate said mounts
- dry fit and adjust the front clip
- mock up all under hood components (brake master, power steering, york compressor, intercooler, route exhaust etc. etc.)
- finish fab on the front brush guards
- finish all sliders/ cage fab.
- when finished mocking up all systems strip the frame bare, plate, powder coat the chassis and rebuild engine, tranny, transfer case and diffs (including front disc conversion)
- etc
- etc
- etc

baby steps :rolleyes:

Here are some more shots from Sunday

My chief mechanic took care of the rad starting at the top hose
HPIM2458.webp

HPIM2462.webp
I can't use anything off this engine with my 3B so everything gas related was left connected to the motor (coil, e-brake cable, rad hoses, air filter housing, heater hoses etc.) In this shot only gravity is keeping the drive train in.
HPIM2472.webp
HPIM2458.webp
HPIM2462.webp
HPIM2472.webp
 
A few more

To remove the tranny it helps to remove the tranny hump. To remove the tranny hump you have to remove the heater and the fuel tank as well as the go pedal. Oh well, its all got to go anyway.
HPIM2471.webp

HPIM2473.webp
Drained just under 5 gallons from the tank through the plug under the cab. A bit of a PITA cause the second you crack the seal you get gas... fast. So as its dribbling out you try to remove the plug right? well the gas runs down the wrench you stuck between the catch funnel and the underside of the cab, soaks your glove, runs down your arm... anyway after cleaning up the mess I still wanted more than a trickle so I wrapped a rag around the wrench to stop the fuel there. I don't get why that plug has to have like an inch of thread on it - it was leaking fuel after a half turn from tight.:lol:
HPIM2477.webp
HPIM2473.webp
HPIM2471.webp
HPIM2477.webp
 
The last time I refurbished a Toyota I found a nice 6" diving knife. This time I got a 6" adjustable wrench, a new tooth pic, ear plugs and a flyer for Fort Mcpherson Tent and Canvas :grinpimp:
HPIM2476.webp
HPIM2476.webp
 
Pulled the 2F out tonight. I have a 4 wheel engine dolly that I hope to be able to set the 2F/4spd/t-case on once I assemble the dolly. That way I can roll it around as needed. For now she's just hanging from the ceiling. The chassis rolls around much easier without that lump of iron in it.

P1010107_2.webp

P1010108_2.webp

P1010109.webp
P1010107_2.webp
P1010108_2.webp
P1010109.webp
 

Users who are viewing this thread

Back
Top Bottom