Diff breather extension (1 Viewer)

This site may earn a commission from merchant affiliate
links, including eBay, Amazon, Skimlinks, and others.

Keep

GOLD Star
Joined
Mar 27, 2003
Threads
69
Messages
428
Location
Chapel Hill, NC
Extensions all done! -B-'s instructions were great. :D

That's a post that absolutely must be saved from the SOR forum.

It'd be nice if we could get all the little smiley faces too.
crazy.gif
 
Keep,
Glad that everything went smoothly. The instructions were intentionally written as over-kill but those that were reluctant to start the project could use the write-up with confidence that they were not forgetting anything.

-B-
 
Over-kill:

N, See "beonese"
 
is this 'how-to' still available somewhere? I'd like to extend the tubes...
 
I believe CruisinGA snagged the technical how-to write up off of the old SOR board. I sent him a PM. Perhaps he'll cough it up.
 
US Spec 80 series Diff, Xfer, and Auto transmission breather extension.
=============================================
Part 1


Adapted and plagerized from:
David Zilm's
http://www.safari4x4.com.au/80scool/tech/breather/Breather.htm

and
George Scolaro's
Diff & Gearbox breather extension

and
LCool site
Welcome to Land Cruiser Owners On Line

Background
==========
Toyota has always made a half hearted attempt at providing diff/tranny breathers. Anyhow, a few dollars worth of 1/4" ID fuel line (the cheap low pressure stuff) and some tee and P-clamps will quickly provide peace of mind when crossing water more than ankle deep.

In addition, on the 80 series, Toyota put a spring loaded flapper valve at the end of their front diff breather. When the diff end of the breather hose is unplugged (e.g. when pushing the suspension down to remove/install new coils) a definite hiss of air rushing into the axle housing will be heard. i.e. the axle housing is under partial vacuum. I'm sure this accentuates:
a) ingress of water past seals etc. and;
b) migration of grease from the birfields into the axle/diff housing area
- it certainly can't help!

On US spec 80's it is possible to connect front diff, rear diff, auto, and transfer box breathers into a single breather connection that is mounted high in the engine compartment. A by-product of the modification is that you can make the breathers at the diff ends a bit longer to allow for full droop of the axles without fear of the breather hoses popping off in the future. This modification is required if you plan to install longer shocks like the OME L-series shocks.

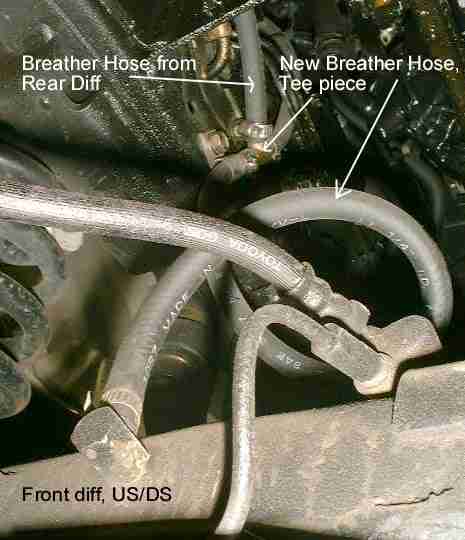
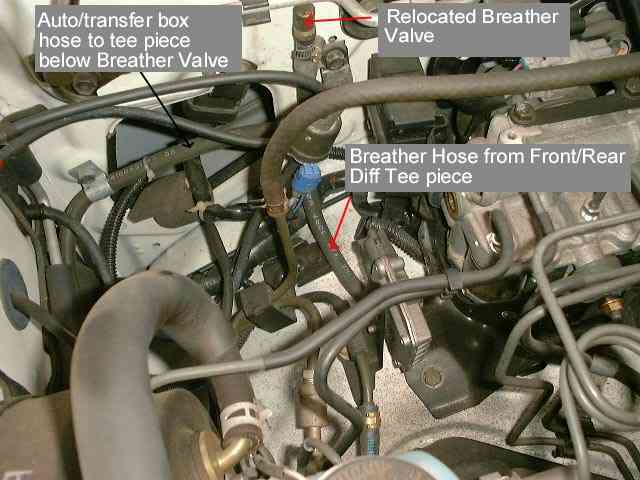
Following are a few pictures showing how George routed the lines to connect all these units together.

frdiff.jpg


The picture above shows the new longer breather line connecting the front diff to a tee piece that has the breather hose coming from the rear diff. Visible just below the Tee piece is one of the P-clamps holding the new breather hose to the chassis rail. The original front breather hose and termination box is removed from the vehicle. Note the breather hose connecting to the front diff has a spiral to ensure sufficient extra hose to account for maximum axle droop.

valve.jpg


The picture above shows the completed installation. See George's complete write up for more pictures.

The Breather Valve
==================
The breather valves are designed to permit gas (and liquid) to exit the axle or transfer case housings. A modification needs to be carried out on only one valve. Below is a cross section of the original rear diff breather valve. The valve body is brass, with a steel cap, spring, and rubber flapper.

80%20Series%20Breather%20Valve.jpeg


The 60 series Landcruiser used a plastic body and cap, without either the spring or rubber flapper. You may wish to purchase one of these if you do not wish to modify one of the original breather valves.

The 80 series rear diff breather valve after modification is shown below;

Modified%2080%20Series%20Breather%20Valve.jpeg


Tools
=====
12mm combination spanner
12mm socket
14mm socket
ratchet and extension
sharp utility knife
flat blade screw driver
needle-nose pliers
adjustable pliers
side cutters
safety glasses
ramps, or jack and jack stands

Parts
=====
The following parts are recommended to complete the modification.
Most are available from auto parts shops like NAPA and AutoZone.

25 ft of 1/4" ID rubber fuel line (Cheap low-pressure hose)
10 P-clamps to fit above hose (with 1/2" mounting holes, 10mm)
10 hose clamps to fit rubber fuel line above
3 1/4" brass "T" pieces (the ones with barbs)
8 7" long black wire ties
2 8mm x 25mm 1.25 bolts (or just use wire ties)
hand cleaner
paper towels

(Photo of the parts)

--------------------------------------------------------------------------------
 
Last edited by a moderator:

US Spec 80 series Diff, Xfer, and Auto transmission breather extension.
==============================================
Part 2


Modification Procedure

Overview
========
The procedure is simple, and will take about 2.5 hours once you have all the tools and parts required. The new breather line will run from the rear axle housing, to the inner rear cross member, along the inside of the left chassis rail to the front axle. From there it will join with the front axle breather, the transfer case breather, and the automatic transmission breather. At this point the new breather lines will join and the remaining leg will run up into the engine bay. The new breather line will be secured to the chassis with P-clamps, and cable ties where access to the bolt onto the chassis is extremely difficult (like behind the fuel tank).

Brass tee pieces are used above the front axle, at the ends of the transfer case and transmission hoses, and just below the relocated breather valve. Hose clamps are used at each breather outlet and each tee piece.

Work begins at the rear axle housing towards the front of the truck. Breather lines are mounted above the brake lines.

Please read ALL of the modification details before starting. There are a lot of steps involved, but most are just reasonable installation procedures.

This procedure has worked fine for the '97 US 1FZ-FE model. Your mileage may vary, so use these instructions as a guide.


Detail
======
Clean the underside of the car with degreaser and a pressure wash, then find a level, and preferably clean dry hard surface. Get the car on the ramps or jack stands.
Proceed as follows;

Rear Axle
=========
1. feed one end of the breather line rearwards from the front axle housing
along the inside of the chassis rails, above the brake lines,
past the main fuel tank
2. slip one P-clamp (tail pointing rearwards on the right side) over
the new breather line
3. slip one hose clamp over the new breather line
4. remove the original rear axle housing breather hose
5. discard the rear breather hose but keep the brass breather for modification.
6. push the new breather line onto the rear axle housing breather outlet
7. secure with the hose clamp
8. ensure there is sufficient spiral in the hose to allow full droop of
the suspension without snagging or rubbing
9. secure the new breather line to the fuel tank cross member using the
existing parking brake cable guide bolt
10. remove the bolt holding the brake lines to the chassis at the rear of
the fuel tank
11. install a P-clamp over the new breather line, tail outer most and
pointing down
12. loom the new breather line neatly across the rear of the fuel tank,
and secure with cable ties
13. secure the P-clamp and brake lines with the original bolt
14. remove the bolt holding the brake lines to the chassis at the front of
the fuel tank (and behind the transfercase crossmember)
15. pull any excess new breather line forward from in front of the fuel tank
16. install two P-clamps over the new breather line, tail outermost and
pointing down, just forward of the fuel tank
17. secure the new breather line to the brake lines behind the fuel tank
with cable ties at each brake line clip
18. secure the rear most P-clamp and brake lines with the original bolt

Transfer Case & Auto Transmission (Need verification of this section)
=================================
19. disconnect the xfer and tranny breathers from the oil dipstick
20. install a tee to connect the xfer and tranny breathers
21. install a section of new breather hose to the other end of the tee
that joins the xfer and tranny breathers. Route the new hose to
the left inner fenderwell and secure with a P-clamp and 8mm bolt.
Leave enough hose to connect to a tee near the final location of
the breather outlet. (See left inner fenderwell picture)

Front Axle
==========
22. route the rear breather line forward to the front axle housing
under the engine mount, to the front axle housing breather support
23. secure the new breather line to the chassis using bolts from the
brake line mounts and P-clamps
24. use cable ties where appropriate
25. cut the rear breather line approximately 6" forward of the left
front engine mount
26. remove the front axle breather hose from the front axle,
and chassis rail. Listen for the suction!
27. slip a hose clamp over the open end of the new front breather line
28. install this section of new breather line onto the front axle
breather outlet, and secure with the hose clamp
29. allow sufficient breather line for full front axle droop from the front
axle housing to meet up with the breather line from the rear
axle.
30. cut the new front axle housing breather line at a point where it
joins with the rear axle breather hose.
31. slip one hose clamp over each of the the new front axle housing
breather line, and rear breather line
32. clamp the rear axle line and the front axle line to the
brass tee piece with hose clamps
33. route the remaining section of new breather hose down along the
left inner guard just in front of the left engine mount
34. slide one P-clamp and one hose clamp over this section of breather line
35. secure the breather line to the remaining outlet of the
brass tee piece using the hose clamp
36. secure the P-clamp using the original front axle breather
hose support bolt and chassis mounting hole
37. the OEM front axle breather valve may look identical to the rear
axle brass valve or it may be a black plastic housing (late '97)
You can discard the old front breather valve and hose.

Engine Bay
==========
38. route the section of breather hose to a convenient location in the
engine bay which has an 8mm bolt hole. This will depend on the extra
equipment installed on your car. See picture for a location that is
available on most US spec 80 series on the left inner fenderwell.
39. rework the rear breather hose support bracket to hold the new breather line
40. mount the breather line support bracket to inner fenderwell
41. install the breather line into the support and secure by
compressing the metal loop slightly
42. cut the breather line, leaving sufficient length to install
an original breather valve
43. join the diff/tranny breather with the rear/front breather hoses
using another brass tee and hose clamps. This connection will be
against the left inner fenderwell just below the location where
the modified breather valve will be installed.
44. slip a hose clamp over the end of the new breather line

Breather Outlet
===============
45. non destructively remove one of the original breather valve caps
(See before and after drawings)
46. re-assemble the breather valve without either the rubber flapper
or spring, as per the modified 80 series breather valve drawing
47. remove the breather valve from the original breather hose
48. install the modified breather valve into the open end of the
new breather line in the engine bay (left inner fenderwell)
49. secure the modified breather valve onto the new breather line
using the hose clamp

Completion
==========
50. ensure all clamps are tight
51. inspect brake lines for any damage
52. account for all unused clamps and hose
53. account for all tools used
54. clean the tools
55. clean thyself
56. remove the car from the ramps or jack stands

Installation Options
====================
1. Run the rear breather line through the frame
(enter approx 1 ft in front of rear axle)
2. Use in-line fuel filter from lawn mower application or
other fuel filter application instead of the modified brass breather.
3. Use the 97 plastic breather housing and mount instead of the
modified brass breather.
4. Omit steps to relocate diff and tranny breathers.
5. Omit steps to raise the truck on jack stands or ramps
6. Substitute wire ties instead of P-clamps. They will work OK but don't look as "factory" as using the P-clamps.
7. It would be easy to adapt the above instructions to provide
two breathers, one for each axle, in the engine bay. This would
provide additional protection against one axle burping grease+oil mixture into the other axle. (Edited: 2-May)

I will take a photo of the parts if requested. Everyone knows what these things look like but a photo would make the instructions more complete.

If your truck is lifted or if you are not "thick" you can do the mod without raising the truck. If you have access to a lift then everything will be a lot quicker than sliding around on your back and getting out and back underneath the truck. A LOT faster.


-B-
 
Last edited:
Um, -B-,

I think you exceeded your 4 paragraph specification there. ::)

Excelent presentation. :bow:

Off to procure some fuel line............ :beer:
 
Landtank (RicK),

How is your schedule this summer ???? when do you want to get together to do the breathers, Let me know, keep in mind drinks on me.

Let me know

Al.
 
 Excellent presentation Beo !

 I have only one observation to share. When I did the breather extensions on both my sister's and my own '97, I ran a separate hose for the front diff (also into the engine bay with its own filter), rather than teeing into any other lines.

 The reasoning for this is admittedly anal... but I've heard it said that if you are on this forum, you are probably somewhat-to-very anal about your truck, so...

  One of the most common front axle faults is compromised axle seals (from not doing this mod, among other reasons!), and the resulting seepage of grease into the diff fluid. If this gets out of hand, it is entirely possible for the front diff to become overfilled, and begin to regurgitate the resulting greenish, gooey slop.

   As soon as the goop gets to the first tee, it blocks the very small aperture in the tee fitting, and forever clogs and blocks the hoses for the remainer of the breather system connected to it - even after the axle seal issue has been addressed. For the price of an extra few feet of hose and filter to cap it with, you can isolate the front diff from the others and never have to worry about it.

  Just my anal .02c worth.

 Cheers!

  R -
 
-B- great post as well as the one on the knuckle kits.

D-Master, my first priority as I'm told is to finish the basement. WE'RE putting in a pool table, her choice which I don't mind! So everything must be moved to make room. Honestly it will be about a month I think before I'll have time.
 
Ron,
Thanks for the feedback. Your point is well taken and I will edit the above to indicate your comments as an optional procedure.
-B-
 
Rick,

That's fine man, I was checking on your basement progress, hope you get it done the way you want.

Let me know when you ready man.

Thanks Al

Note: Thanks to -B- for the great info.
 
Someday I'll get around to extending my breathers :D

Hey man - I hate water. Give me the rocks. :D

Yeah, well, it's gotta get done - only had the 1/4" in my truck for like close to 2 years now. :D :D
 
I put a starter in a '95 Pathfinder a while ago. I was impressed it had separate steel breather lines for the various boxes, terminating at the top of the firewall with little hooks to face the openings down. Stock I'm sure.
 
Unlike the instructionsRe: Diff breather extension

Well lads, thanks for the instructions, I finally managed to do (most of ) the breather extensions over the (Canadian) long weekend.

I managed to get the 1/4" ID hose and hose clamps at a local NAPA, but no T fittings, so I just did a full extension of both the rear and front (no T connection).

Unlike the instructions I:

1) Did bit of wheeling to get the bottom dirty
2) Did mine at the cottage on a gravel driveway (on a tarp)
3) Didn't use jack stands or ramps (and trust me I'm not that slim :'()

No real problems to report. No suction when I pulled the original lines. I managed to easily 'rebuild' the rear valve (it was in relatively good condition, so I left the spring and the rubbr flapper).

My front is one of the newer one as it terminates in a small, platic black box (why the change?). Until I find a better place, I found an 'empty' bolt hole on the DS fender close to the firewall and terminated the original black box at this location. I then terminated the rear breater at the same point. I have also extended the front diff lock breather, but have to do the rear and extend the tranny and xfer case breathers as well.

My wife thought I was nuts, but asked to come wheeling with me and we had a great time playing around a local site - almost managed to pull off all of my rear bumper trim :D. Let's just say that the stock breakover and departure angles, while OK, cause a few drags here and there. We (she was doing lots of driving too - water, steep inclines, sand, ditches, etc) managed to level off a few dirt and sand ridges while dragging with the diff locks on - must get sliders!

Cheers, Hugh
 
Hugh,

>> I managed to easily 'rebuild' the rear valve <<
>> (it was in relatively good condition, so I left <<
>> the spring and the rubbr flapper). <<

The breather rebuild is to intentionally remove the spring and the rubber flap. These allow air to exit but do not allow air to enter the diff. This one-way valve is what causes the (unwanted) vacuum in the diff. When you have a vacuum, air/water/grease can get sucked in from somewhere; usually past the axle tube seals. After the breather is modified (i.e. open,) clean air from the higher location can get sucked into the diff.

-B-
 

Users who are viewing this thread

Back
Top Bottom