
Completed 2 headgaskets now, my write up (w/ pix)
Tail of two ‘Cruiser head gasket jobs by two root beer drinkin’, Yes on 8 supportin', mormon brothers from Utah:
Between myself and two brothers, we have three 80 series cruisers. Mine is the sweetest, a charcoal grey 1994 with 180K on the clock. My younger brother has a black 96 with 185K and my older brother has a champaign 92.
Since my younger brother is currently local, we decided to do the head gaskets on the 94 and 96 as PM.
There are plenty of detailed write-ups that you can get here on MUD, so I’m just going to post some of the things we ran in to as well as some pix.
First, a shout out to all you 1 banana mechanics, THIS IS DOABLE! Do not freak out if you must do it.
Second, a shout out to all you experienced dudes (Doug, Dan, et al): thanks for your time and willingness help peeps you don’t even know. There is a great family of support here on this board.
What is required:
Here are just a few suggestions from our experience:
Doug’s DVD:
Setup
Tools
Light
Order
Gloves
Shortcuts
Moron
Stuff to do "While In There:"
In our estimation, here are the “required” things to do while you’re in there:
Surprises:
Remaining problems:
Summary
Well, I now have two head gasket replacements under my belt. Its been a lot of work, but well worth it. Doing these projects have removed the mystery of “what’s under there?” I’m hoping we can get these other problems worked out and be smooth as silk.
Total costs: about 200 for the gaskets, 130 for the injectors, 500 for the head work, 200 for all the fluids, hoses, fuel filter, belts, clamps, etc. Right around 1,000 bucks for each one
Tail of two ‘Cruiser head gasket jobs by two root beer drinkin’, Yes on 8 supportin', mormon brothers from Utah:
Between myself and two brothers, we have three 80 series cruisers. Mine is the sweetest, a charcoal grey 1994 with 180K on the clock. My younger brother has a black 96 with 185K and my older brother has a champaign 92.
Since my younger brother is currently local, we decided to do the head gaskets on the 94 and 96 as PM.
There are plenty of detailed write-ups that you can get here on MUD, so I’m just going to post some of the things we ran in to as well as some pix.
First, a shout out to all you 1 banana mechanics, THIS IS DOABLE! Do not freak out if you must do it.
Second, a shout out to all you experienced dudes (Doug, Dan, et al): thanks for your time and willingness help peeps you don’t even know. There is a great family of support here on this board.
What is required:
- IdahoDoug’s DVD
- FSM (more on this)
- The right tools (surprisingly, very few specialized tools).
- Time (make sure you’re not hurried and do it right).
Here are just a few suggestions from our experience:
One thing that really helped us was having two people. Coordinating two schedules is a bit of a pain, but having two sets of eyes, two brains (in our case my brain was sufficient), and someone to repeatedly fetch tools and other crap you drop so you don’t have to climb up and down a million times.
FSM:
Make sure you get it. I saved some coin by downloading it. One advantage to this is I would print out sections that I needed and made notes on it regarding this specific project as we went.
Doug’s DVD:
Get it! It assumes you have the FSM.
Setup
We set up two tables, one for the tools and one for the parts. We just used plastic tables and covered them in shop towels.
Tools
If you can get your hands on some air tools like an air ratchet, that will save a lot of wear and tear on fingers, hands, and arms. Also, it makes taking some of the bolts in and out much easier due to there being very little room to crank a ratchet in some cases (think intake manifold). We even bought those ratchet bits from Harbor Freight for 2 bucks and change. They turn your drill into a ratchet. Nice.
Light
Make sure you have plenty of light. We strung up some halogens and pointed them down into the engine bay. Kept us warm too.
Order
Categorizing and labeling all the parts is an absolute must. You’ll take so much stuff off, there is no way you’ll remember where everything goes. We put all bolts/nuts in sandwich bags and labeled them as we went. Then we placed them on the parts table in order of removal. In some cases where parts/cables stay in the engine bay, we would label those parts with marker on masking tape as well. It’s easy to get lazy on this point because you want to keep up the momentum of tearing down, but stay diligent!
Gloves
Wear latex or other gloves. Makes you feel like a doctor. Also protects your hands from chemicals and cuts. Also makes nightly clean up a breeze
.Shortcuts
We elected to not disconnect the exhaust pipes from the exhaust manifolds. We just removed all the nuts and studs from the head (not too difficult on either rig) and pulled the manifolds back for removal and installation. Seemed easier than removing those unbelievably stubborn exhaust bolts.
The second time around, we didn’t ever take out the heater valve assembly on the fire wall. It was never really in the way and was a pain to take out and install.
We installed as much as we could without installing the valve cover. That sucker takes up a lot of room and its easier to reach other parts of the engine with it off. Note: just be sure not to drop stuff in head while you work!
Moron
Take out all the driver side sensors before removing the head. I had to feed Dan’s dogs another 60 bucks because I busted that plastic TVV that sticks out the side. Lame oversight.
Stuff to do "While In There:"
In our estimation, here are the “required” things to do while you’re in there:
- Send your injectors out to be cleaned. We sent the Witchhunter in WA. Total price, including shipping both ways was 128. Got the spray charts and everything.
- Have your head machined and valves adjusted. This is the most expensive part of the whole ordeal, but worth it. Those heads look brand new and knowing the valves have been adjusted and fitted with new guide seals is worth it. Cost here: 484, including tax.
- Replace fuel filter. There will never be a more easy time to do it. No brainer.
- Replace all vaccuum lines and other hoses. Cheap, easy to do with the plenum on the bench. Good peace of mind.
Pix:

Rigged up this light.

Tool Table, sometimes got mixed up with parts.

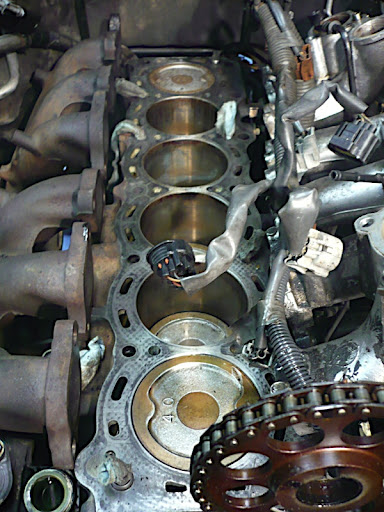
Valve cover off.

Look at the carbon on these bad boys. Some brake cleaner dripped out from the intake into the cylinders when I was changing the fuel filter. Piston #1 and #6 are in the process of being cleaned. 6 was not steam cleaned.
Almost done cleaning, just have fire rings and more cleaning on the block top. Cylinders look really good.

Head back from the shop. Sweet.

A thing of beauty

Installed

My brother watches TV while I work...

...so I cut strips in his new head gasket while he's not looking

A little help... Putting the battery cables back on. That is a good feeling.
Actually, the positive battery cable broke while we were installing it. A whole saturday of start-up anticipation shot in one simple snap.

1994 HG, cylinder 6. Thoughts?

1996 HG, cylinder 6. Thoughts?
Rigged up this light.
Tool Table, sometimes got mixed up with parts.
Valve cover off.
Look at the carbon on these bad boys. Some brake cleaner dripped out from the intake into the cylinders when I was changing the fuel filter. Piston #1 and #6 are in the process of being cleaned. 6 was not steam cleaned.
Almost done cleaning, just have fire rings and more cleaning on the block top. Cylinders look really good.
Head back from the shop. Sweet.
A thing of beauty
Installed
My brother watches TV while I work...
...so I cut strips in his new head gasket while he's not looking
A little help... Putting the battery cables back on. That is a good feeling.
Actually, the positive battery cable broke while we were installing it. A whole saturday of start-up anticipation shot in one simple snap.
1994 HG, cylinder 6. Thoughts?
1996 HG, cylinder 6. Thoughts?
Surprises:
We were surprised the amount of carbon/goo build-up in all intakes and on the cylinders. Took a lot of time scraping and cleaning to get it all clean.
One thing that I was quite surprised about was how good of shape the engines were. My injectors were not really that dirty, the cylinders on both rigs were in great shape, etc. These are well built machines.
One thing that I was quite surprised about was how good of shape the engines were. My injectors were not really that dirty, the cylinders on both rigs were in great shape, etc. These are well built machines.
Remaining problems:
Check Engine light back on! WTH? Code 71. This is after replacing every part in the egr system and making sure all ports were clean. Gas mileage sucks too, like the EGR valve is unplugged from the VSV.
My cruiser seems to run rich, with a very small stumble at idle. Strong smelling invisible (after warm-up) exhaust that spits out watery soot at first startup.
Also, my A/C now turns on, the compressor turns on, but no cold air. Freak. I did nothing to the A/C during this project. WTH?
Other than that, it runs awesome and quiet.
Summary
Well, I now have two head gasket replacements under my belt. Its been a lot of work, but well worth it. Doing these projects have removed the mystery of “what’s under there?” I’m hoping we can get these other problems worked out and be smooth as silk.
Total costs: about 200 for the gaskets, 130 for the injectors, 500 for the head work, 200 for all the fluids, hoses, fuel filter, belts, clamps, etc. Right around 1,000 bucks for each one
Last edited:
 section of the FAQ
")

 to count wrenching as family night.