On Board Air For SBC Serpentine Setup (1 Viewer)

This site may earn a commission from merchant affiliate
links, including eBay, Amazon, Skimlinks, and others.

DomSmith

SILVER Star
Joined
Nov 16, 2004
Threads
299
Messages
3,763
Location
Oceanside, CA (Fire Mountain)
I've had a York based On Board Air setup on my 40 with a small block Chevy for several years now and when I changed motors I had to make some significant changes to accommodate the new Serpentine Belt setup so here goes...

What I started with...

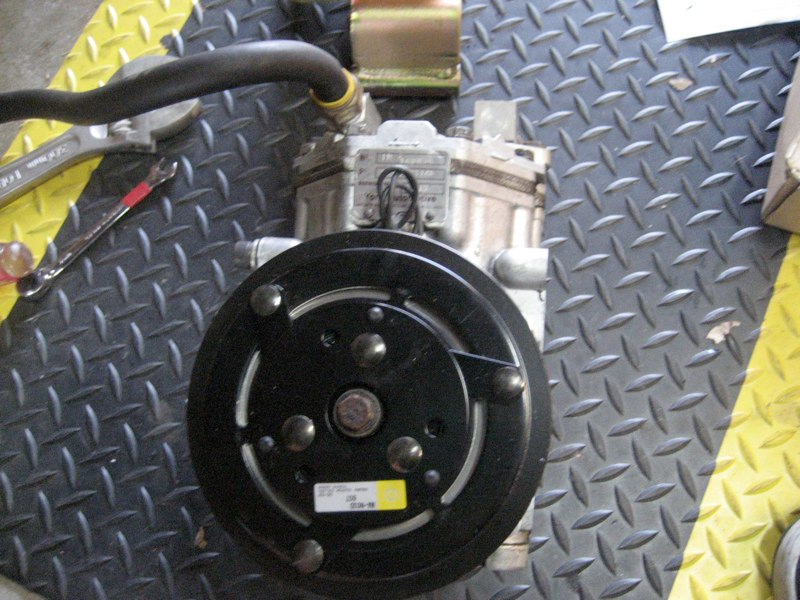
The York compressor was attached to the drivers side of the motor using a custom slotted (read: adjustable) bracket that a buddy had made at his motorcycle shop. I had mocked one up with cardboard and he plasma'd and welded it in about 15 minutes. The right tools make all the difference. It would have taken me 2 days and it would have been FUBARed. The mount bolts to the front of the head and ran off the power steering pulley. All the plumbing was along the drivers inner fenderwell and ran to a 5 gallon tank under the rear of the truck that then dispersed to three air fittings. One at the rear and one each near the kick vents in front of the doors.


IMG_1591.jpg


Going to the Serpentine setup was no small task. For one the alternator was now where I used to have my compressor so the compressor would have to be switched to the other side...


IMG_1740.jpg


The issues at hand were:
1. I needed a serpentine pulley on the York (to replace the V-Belt pulley).
2. I needed a new bracket that would mount to the A/C location on the Ramjet (located on the passenger side rather than the drivers side).
3. I needed to move one battery from the passenger side to the drivers side (along with making new battery cables to fit).
4. I had to reroute the air lines to the passenger side.
5. And Re-wire the compressor and valve to the passenger side.
6. I would also need a new 105" Serpentine Belt.


I turned to the resource I had used when I first set up my system many years before: Kilby Enterprises
 
Last edited:
Nicely done. what are you using to cool that motor?
 
I started looking at pulleys for a serpentine setup and was pointed in the right direction by Texican. I ordered the 6 groove clutch (Part #25-513352) here: Kilby Serp Clutch

I also ordered the bracket (Part#KE-4000) that would replace the idler pulley on the serpentine setup here:Kilby York Bracket

I also noted on the Kilby site that I would need a 105" serpentine belt for the setup and sourced one at my local parts counter- Gates: KO61045 (13/16"x105" O.C.)

All the rest of my existing OBA stuff would work just fine with a bit of re-organization.


Here's the clutch kit with instructions and the bracket with hardware...

IMG_1697.jpg
 
Last edited:
The first order of business was changing the York clutch from V-Belt to serpentine. The kit comes with a small instruction sheet and some fittings to get the job done quickly and easily. The hardest part was the fact that my compressor was not mounted and I did not have a vice large enough to hold it in place. Trying to loosen and tighten to the proper specs (20 ft lbs) while it was on the floor was a pain.

Removing the V-Belt pulley...

IMG_1698.jpg


Old pulley and field coil removed...

IMG_1699.jpg


New field coil installed...

IMG_1700.jpg


Pulley installed over the field coil...

IMG_1701.jpg


Finished product...

IMG_1702.jpg
 
Last edited:
Once I had all the parts lined up it was time to check for fitment. I knew that one of the batteries along the passenger side of the motor would have to be displaced and I was certain I had room on the other side...

Here you can see (with just the front battery installed) that there was no room for the compressor...

IMG_1733.jpg


Before tearing the battery trays apart I first removed the serpentine belt and the idler pulley. This is where the factory AC unit would be if I was using a GM AC unit...

IMG_1752.jpg


Then I bolted the OBA bracket to the mount to be certain it didn't fit.

IMG_1756.jpg


You can see that the bracket comes with three mounting points but only two were used on this application. The arrows show the two bolts that I used...

yorkbolts.jpg


On my old setup the York was in the vertical position where as this setup would require it to lay on it's side.


IMG_1757.jpg


IMG_1758.jpg
 
Last edited:
The next thing I did was flip the air inlet and filter to the front to salvage some room...

IMG_1759.jpg


Next I removed the rear battery and tray and moved the front battery tray back a little to clear the compressor. This made enough room for the compressor to fit easily without modifying one set of battery cables.

The next challenge was placing the other battery tray to the opposite side of the engine compartment which actually went smoothly. I was able to mount it in the same manner as it had been on the other side with little modification. I did have to fab up one vertical support to help support the weight a little better but that was it. After measuring for new battery cables I crimped new tabs on them and was ready to go battery wise in no time.

The plumbing did take a little more work as I had to remove and re-route the high pressure hose through the frame and over to the passenger side. I also moved the pressure switch and gauge over there and re-routed power from my dash switch to that side. I used to have a small diode that allowed one way current to keep the RPM's up when the compressor was running but I removed that. If the compressor was on and I tapped the pedal it would jump to high idle and stay there until the compressor reached 120 PSI and then it dropped back down. Now I just use a hand throttle and I'm done. No returning to the cab to tap the pedal as needed. (EDIT: See link here: Hand Throttle)

I slipped the new 105" serp belt on and voila!

Here's the final fitment...

York Final.jpg


York Final 2.jpg
 
Last edited:
now that is a thing of beauty! hey Dom how are your battery trays mounted ? i want to do dual batterys with my tuned port set up.
 
Lone gunman-

What the hell is that beast in your avatar!? I thought maybe bear but it looks like a long tail!?:confused: Is that the famed Chupa Cabre?

As for the batteries it's a bit ghetto but my truck is not going to win any show awards. They each rest on a stock Toyota tray that is bolted to the inner fender just at the top of the fender using the small lip that surrounds the tray...

IMG_2540.jpg


Here's the under side of the mount...

IMG_2541.jpg


Then they each have two fabed up brackets made of angle iron (two arrows) that bolts to the flat part of the tray and then the inner fender...

IMG_2539.jpg


Every time I post up I think my s*** is more and more ghetto...

:rolleyes:
 
Last edited:
hey dom thanks for the reply! i didn't think the factory tray would fit with the V-8 guess i will have try it like that. or have my buddy fab something similar up.

and as far as my avatar, its two G.I. Jo's posed on a dead squirrel
21ewye.jpg
 
yeah i thought it was pretty funny and made a good avatar considering that i go by lone gunman and am a bit of a gun nut.

and thanks but those pics did just fine, now i have a good idea on how to mount another battery. i wasn't sure if the fender would handle the weight of the battery's.
 
Hand throttle

Hi dom,

I'm doing the exact Ramjet/o.b.a. setup in my fj40. I'm pretty much finished and found your hand throttle link. It wont open though??! When I converted to the Ramjet I lost my hand throttle. Could you send your info on what you did? Btw...I have referred to your posts a lot and you have saved me a ton of time!!

4granit
 
There are a couple of vendors that make Stainless Steel battery trays for the Optima and standard line of batteries that will definitely save you foot print room. This company makes them to mount on the factory support or a custom support with the factory bolt pattern. I have one in my 40 that is far superior to the factory battery tray.

Stainlesstrays.com

As you can see on his site, the single and double Optima trays save considerable foot print space. He is a great vendor to work with, very honest.
 
I was looking up the links/parts to do the same basic set-up on my 60. 160 clams though for the bracket and a few bolts seems a bit much to me. I bet something very similar could be fabb'ed up no problem.
 

Users who are viewing this thread

Back
Top Bottom