Wobbly Harmonic Balancer (main pulley) on 1HDFT (1 Viewer)

This site may earn a commission from merchant affiliate
links, including eBay, Amazon, Skimlinks, and others.

About half way home or less.
Stereo cut out.
Alternator light came on. Pulled to next exit. All three belts had bounced off. The alt had swung on its mount till it grounded the main cable on my intercooler tubing. (Tundra 100a alt with a custom tensioner). Cable melted. Alt tried to weld itself to the intercooler tubing.
Now I'm crossing the Mojave with one alt belt that keeps jumping with any engine speed over 2200 rpm (55mph) and only a 50-watt solar panel keeping the batts charged.
ImageUploadedByIH8MUD Forum1430344524.818017.webp
 
I am now having my balancer replaced as preventative maintenance. Good luck.....
 
Poopy diapers - Was this related to the crank repair?

Best of luck making it home!

PS - Jose welded and dressed the damaged keyway on my crank in Baja and she lasted to Ecuador, jajaja. Pretty f'n common in the less-rich world. Just now starting to drip again after 60k kms. So, not sure how much I'd worry about balancing issues - shorter term anyways. Maybe yours is too far gone though. JB Weld? Next level!
 
I think the belts are related to the crank issues. Must be some weird vibration. The belts were inverting and/or slipping off. Happened a few times out in the freeway. Was able to find a new alternator and belts and truck is running again. But I'm hesitant to rev over 2200 rpm (it was dark/late I didn't want to wrench at night).
 
Hoping that the fix holds, and you make it back to NorCal without any further drama. Maybe a visit to the VH Swap Meet this weekend is in order for some Cruiser camaraderie and to pickup a few parts for the full repair.
 
Good you made it back and with the engine still in one piece. I guess that's part of the fun of hitting back country and 4x4ing.
 
How many km's are on the hdft?

Thinking I'm also going to pick up a spare balancer and replace ASAP. Had a balancer separate on a 22RE after a timing chain guide repair and luckily I only had to replaced the intake or exhaust valves(don't remeber which as it's been years), but it could of been much worse. A new balancer with an inspection of the crank would be nice peace of mind.
 
Just did a curiosity-search, and the Mr. T number 13411-17010 comes up as the crank for the 1HZ, 1HD-T and 1HD-FT. Looks to be a good number for N. America due to the 1HZ...worth seeing if Onur can get one for you at a decent price.

If you are diving into this at home and need a hand, let me know. I would be happy to help as that knowledge and experience might come in handy some day if one mine lets-loose. Have seen the inside of plenty of gasser Toyota and Nissans.
 
Last edited:
I think I might tackle it myself. I'm motivated.
Engines Australia is sending me a new crankshaft, harmonic balancer, main/thrust/rod bearings, rod bolts, and seals. All genuine Toyota parts, except the bearings.
$1200 delivered.
The AUD is a little weak right now, and their prices are great.
Got a line on a cherry picker and engine stand.
Just read through the repair manual. Should be easy enough (famous last words). Only tricky thing I see is flipping the motor upside down without flipping the engine stand. And taking the crank out while leaving the pistons in (I won't be taking the head off, since it was just rebuilt 6000 miles ago). Since I'm buying a new crank I can use stock size bearings. Should be easy peasy.

Make yourself familiar with the timing too. Since you'll leave the head on, you won't be able to rotate the crank with the pistons on without interfering with the valves. So you'll have to drop in the crank in the same position as you took it out, then resonate the timing gears.
cheers,
J
 
I just did this exact swap with a 3b in a stand. Easy peasy I suppose, except I had to take off the fromt cover and oil pump cover and injection pump just to get the crank out. Basically I took the entire engine apart minus the head and Pistons. Went together well and I made a cool cheap pvd priming pump to charge the galleries while hand cranking as well as primed the oil pump with a bit of compressed air through the oil dip stick while cranking the motor over. Primed super easy this way. Not to hijack, but if you want I'll post pics of it.
g
 
post pics please. interested in the priming. the 1HDFT has some sort of priming near the oil pump. I plan on a lot of assembly lube.
 
Yes, there is an allen head bolt on the oil pump. You take it out and add 30ml (i think) of oil. It is all in the fsm-do you have that? If not i can drop box you the electronic version.
Jan
 
I've got the fsm. Wish I had the book version. I'll have mine printed and bound I guess...

in other news... my crankshaft and bearings already showed up from Engine Australia. To be clear... I submitted the order saturday, they processed it sunday (it was Monday for them)... it showed up here today (wednesday.)

wow.
 
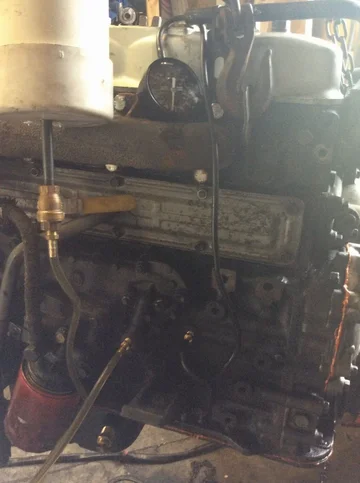
So I built it based off the work of some Chevy guy on a Chevy forum if all things. So please forgive me for that. Took me about 1/2 an hour to build cus I had all the parts laying around. So before anyone says.... " wow that's going to blow up" ... I only used 25lbs of pressure with no clamps on my tubing and it was fine. I tapped everything and didn't use t tape. I DID glue the pvc together. I used the low oil presure sender for fill and the oil pressure sender for presure guage, but you can use anywhere that accesses the block journals and don't need a guage. When I hooked it up I filled primer with 2L oil and only filled my compressor to 25lbs just to be safe. I then hand cranked the engine over slowly and within seconds you could feel the whole engine loosen up and rotate freely. Eventually I got a bit of oil out the rocker. I did watch the clear tubing carelyfully incase it ran dry. You don't want to push air in.

So I shut the premier off and removed the oil filter and put a bit of hose and a bolt to plug the crank case breather vent and put the rocker cover back on and filled with 5l oil until it showed in the dip stick. I then removed the dip stick and put 25 lbs pressure into the dip tube with a rubber tiped blow gun and pressurized the crank case while turning the engine over clockwise? Anyway it was the rotation when it runs To prime the oil pump. That took a bit and would recomend doing that with the starter motor, but oil did barf out the filter hole. Once you fill the filter 75% of your system is primed, but more importantly the pump is primed and the bearing journals are primed. I would still turn it over a bit with glow plugs out just to get the rest of the air out of the system before starting it up. If you packed the oil pump gears before assembly with vasoline it's suppose to make a good tight seal and prime fast. I didn't! But sounds like an easy great idea. So I explained it in detail to avoid confusion which makes it Sound like a lot of effort, but actually it's not hard nor time consuming at all and you get another large rarely used tool you can store for decades. Wahoo.

I used:
4 inch pvc pipe about 18"
2 x 4 inch end caps
1 male air line coupler to top of tank
Some bolt on top you have a tap for for filling
1/4 npt pipe extension male male on bottom
1/4 inch ball valve
2 x npt brass barbed fitting
3 ft clear tubing
Gear clamp and bungee to suspend it
I was going to add 2 90 degree brass barbed fittings and a length of clear tubing to indicate how full the thing was, but I ran out of parts. Would be handy. I sort of measured by weight. Clean the thing inside like meticulously cus it's going straight to your bearings. No filter. I ran the thing for a while and watched for any junk just to wash the tubing before I hooked it up.

Edit. In hind sight a small inline fuel filter would have been cheap insurance against dirt.
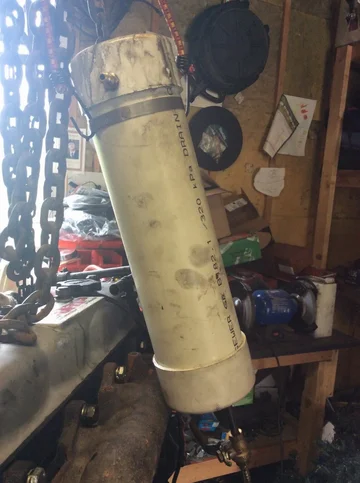
image.webp
image.webp
image.webp

image.webp
 
Last edited:
Gerg, this is an awesome effort and super creative, but why not just do what the FSM tells you? And if you find that too little, why not just disconnect the fuel solenoid on the injection pump and turn the engine over with the starter a few times, till the oil has circulated?
 
Jan that is a great idea if your oil pump primes fast. I've always done exactly what you've mentioned. With engines I've redone in the past priming the pump has taken an awful lot if time and it just feels terrible turning the engine over dry for a couple minutes. Packing the oil pump gears will help it prime infinitely faster than as if they are dry. I swore after that experience I'd prime the system before I turned it over. The actual key is always priming the oil pump. Once that's done the rest of the system literally takes a few seconds to run through, course while your doing this your pumping air and not oil through your bearings and everywhere else and are relying solely on assembly lube. Sadly you can't put assembly lube everywhere. I guess at the very least pack oil pump gears with vasoline. Priming would then most likely take less than 15 seconds. I've always wanted to build a primer and this one was super easy.
g
 

Users who are viewing this thread

Back
Top Bottom