Wiring repair tips: EGR Burned 80

This site may earn a commission from merchant affiliate
links, including eBay, Amazon, Skimlinks, and others.

Joined
Dec 5, 2017
Threads
5
Messages
19
Location
DFW Texas
Been battling finding a rough idle/surge issue, that got progressively worse, then a blown fusible link. Replaced the fusible link, and checked the normal stuff (fuel filter, fuel pump, etc.). Poked around the last few weeks and finally got to the upper loom that passes by the EGR and it's fried Crispy. I cannot see the wiring but can feel the wires will need patching.

Question: Any advice, tips? Can I just loosen the harness from the firewall to get access to repair, or do I need to pull the whole thing from the engine side? I see nothing that covers this in the repair manual.


20200224_190225.webp
 
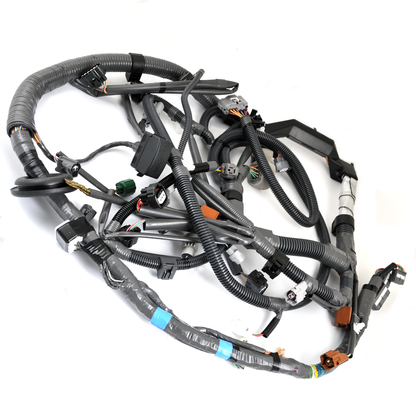
I had a similar issue and decided to pull the entire harness to assess the extent of the damage and determine the best course of action, repair or replace. Its a bit of a tedious job to remove but not impossible. I didn’t have to disassemble too much, just removed the throttle body from the intake to get to the rear injector plugs. Took about two hours to remove. I ended up replacing the entire harness with new oem due to the extent of damage and the uncertainty of intermittent issues going forward. The install took about double the time, most of it was getting the harness and plug routed over the bell housing going to the trans. One tip would be to attach a pull cord to the trans plug when you remove the existing harness so you could use it to pull the new one into place. Have fun.
 
I've been having the same type of symptoms and am looking at buying a known good wire harness and having my mech @Cruiserhiggs ensure it is good and wrap it to eliminate future issues.
 
FWIW others have repaired the melted/shorted wires without removing the entire harness.


Post #17 in the thread below goes over the steps one person followed:


Warning: if you have the plastic/aluminum radiator be careful if laying
on top of the engine while doing this repair; too easy to snap off the plastic pipe nipple for the small coolant hose, rear of top tank.
 
FWIW others have repaired the melted/shorted wires without removing the entire harness.

@Pippylongsausage - Thanks, I was considering that to be a possibility~
@HIteq- Thanks, I'm 100% sure that's the proper way to do it. I'm hoping to avoid that, but it's my preferred method. It may happen anyways, once I can see the extent of the damage, I'll make a determination.
@OffRoadScott - Thanks, good luck, keep me posted on how that works out.
@Kernal- Thanks for the links, exactly what I was looking for! I searched before I posted and did not see anything closely related. I need to study the search tool a little better. **Yes, and thanks for the tip on the radiator, I learned about that on my Ram 2500 Cummins, the hard way.
 
With the age of these trucks and new parts going way of the Do-Do bird it's time for people to learn how to repair wiring the proper way. It's not that difficult and tooling is pretty inexpensive.

It is way cheaper to repair than replace, you learn a new skill that can keep your truck on the road a lot longer and how to get off the trail if it does fail. :meh:
 
do you have to get an emissions test where you live?
Yes, until 2022, then it will be emissions exempt.
@Haspin FJ Thanks, I had no idea. Good to see the entire loom out of the truck to get an idea of scope or project. This will be my route if the repair isn't feasible, I can get a lot of wire, heat retardant, and beer for $650.
@fjbj40 Yes, I'm hoping to repair this one.
 
I wasn't trying to steer anyone away from a repair. Ive got heat shielding around mine after not being very careful with it when I did the HG as I was new to the whole mud experience and did not know about the common issue with the harness. Good for now but know I could have to deal with it anytime. With that said I also know what 20 years of engine bay heat can do to a harness in many places and it would be my luck if I would take the harness all the way out would cause other new unseen issues and might be worth starting over fresh and know it's a done deal for another 20+ years and before they're also no longer available. It doesn't take many tows or failures in remote places to make it worth the cost of a new harness and actually get something for the $$ in the end and avoid ongoing unknown issues from a degrading harness.
 
I recently removed the throttle body and valve cover for some maintenance on them and I had a clear shot of the wiring harness and was able to wrap it in some thermal wrap. Loosening it from the firewall and removing the tie down that holds it down near the valve cover, gives you some slack in the harness. I've read of some guys actually re-routing the wiring harness elsewhere, away from the EGR.
 
My harness shorted at the 5/6 injector pigtails as they exit the main bundle . I had to open up the bundle beyond the short to install a repair. Once open it was clear that the wire insulation in that spot was shot, 10 wires were suspect.
F32393B6-3A92-40A8-AC75-92FB9F872224.webp

After a $270 flatbed ride home I wasn’t taking anymore chances with this fried harness so I got a new one and installed thermal insulation in key areas. I consider myself lucky because if the breakdown happened on the trails, that day(s) would have been a lot worse and costly. Here is the before/after of the new harness.
7152A982-7C42-4CA9-8A98-363B3A2AF722.webp

With insulation installed
96288518-AB30-4355-8B93-D763EFCFAACE.webp

On another note, I am now a AAA-gold member. FYI you cant upgrade your membership within 2 months of a tow...
 
I have had mine wrapped this way for almost 2 years with success. So far 3 days on the Rubicon has been the harshest test yet.

When I first got my 80 about 2.5 years ago I took the opportunity while doing the engine evaluation (compression test, valve clearance, seals, gaskets, all hoses, oil leaks) with the Valve cover and upper intake off to inspect, wrap with silver heat reflective tape, then wrap with exhaust wrap and finally stainless ziptie it all together and to the valve head holder to keep it off the EGR.

Also, after the initial inspection and evaluation the cooling system 100% replaced was a priority for phase 1 of the 80 restoration. I say this because my Aisin blue new factory fan clutch failed after a month. The 15k CST silicone and clocking the fan clutch to 97.5 degrees has been amazing for cooling in any situation. To me additional heat under the hood only worsens our wiring harness worries.

Thanks to all in this thread and the mud community and I'm leaving this here for the next person.

Screenshot_20211206-222534.png


Screenshot_20211211-103829.png


Screenshot_20211211-103815.png
 
With the age of these trucks and new parts going way of the Do-Do bird it's time for people to learn how to repair wiring the proper way. It's not that difficult and tooling is pretty inexpensive.

It is way cheaper to repair than replace, you learn a new skill that can keep your truck on the road a lot longer and how to get off the trail if it does fail. :meh:
Do you have some resources you cant point us to? The electrical stuff getting old and becoming NLA scares me since I dont know how to repair it properly.

Which is also why my harness at the EGR is header wrapped, heat tapped, hose clamped, and tied to the valve cover with bailing wire :)
 
My harness was bad, if you can source a known good one and replace your existing one with the known good one then you have a spare and you can fix it over time too.
 
Looks like you should have a bit more space between the two.

Is the harness (black plastic section) still bolted to the firewall or has it drooped down?

Either way you could also put a heat sleeve (split velcro style) over the EGR tube for more protection.
 
Last edited:
This job is way easier with the valve cover removed. I knocked out my spark plug seals and checked my valves while it was off.

Yes, there is a bunch of space on mine. There is a little clip stud attached to the head that used to hold the plastic ring that kept the harness off the EGR.

Yours looks like my temporary fix, I attached a photo of my finished product, process below:

1 Remove valve cover follow FSM, this may include unbolting the heater valve (great time for new heater valve, clamps)
2. Replace and/or perform PM bits of your choice
3. Carefully remove all old harness tape
4. Inspect harness, carful the plastic and wires are old, and brittle.
5. Repair or if good continue
6. Wrap with reflective tape
7. Wrap with exhaust wrap while using stainless zip ties to hold it all together
8. Finally, use a stainless steel zip tie to mount to the factory stud to pull the harness and your new tape job away from the EGR permanently.
9. Finish up the rest of it and enjoy!

Screenshot_20220311-080334.webp
 
This job is way easier with the valve cover removed. I knocked out my spark plug seals and checked my valves while it was off.

Yes, there is a bunch of space on mine. There is a little clip stud attached to the head that used to hold the plastic ring that kept the harness off the EGR.

Yours looks like my temporary fix, I attached a photo of my finished product, process below:

1 Remove valve cover follow FSM, this may include unbolting the heater valve (great time for new heater valve, clamps)
2. Replace and/or perform PM bits of your choice
3. Carefully remove all old harness tape
4. Inspect harness, carful the plastic and wires are old, and brittle.
5. Repair or if good continue
6. Wrap with reflective tape
7. Wrap with exhaust wrap while using stainless zip ties to hold it all together
8. Finally, use a stainless steel zip tie to mount to the factory stud to pull the harness and your new tape job away from the EGR permanently.
9. Finish up the rest of it and enjoy!
See I want that level of clearance. That looks great. You must have removed the old harness wrapping to keep it that thin.
 

Users who are viewing this thread

Back
Top Bottom