Voltage Regulator (ext.) / How it works (1 Viewer)

This site may earn a commission from merchant affiliate
links, including eBay, Amazon, Skimlinks, and others.

I think IG is ignition and F is for field. Alternators need power to charge, unless they are self exciting 1 wire types. You really need to have a manual with a good wiring diagram to help sort things out
I’ve been using the wiring diagrams posted throughout mud.

Ok…kind of figured it out. The ignition wire wasn’t going from the fuse box to the voltage regulator’s IG. But once I hooked up the VR the belt or something is squeaking….and the alternator is at 16v+. Why would that cause anything to squeak??

So that was definitely the issue…now just either need to adjust the VR for a tad less voltage or just replace it.
 
Except now the blinkers aren’t working….again. lol!!

Edit: cleaned the fuse holders for the blinker relay side and all good. So weird how gremlins pop up! @ charliemeyer007
 
Last edited:
Except now the blinkers aren’t working….again. lol!!

Edit: cleaned the fuse holders for the blinker relay side and all good. So weird how gremlins pop up! @ charliemeyer007
@charliemeyer007 I know I’m driving you nuts! Haha
 
@charliemeyer007 I know I’m driving you nuts! Haha
get an OEM regulator. not something you want a crappy version of. brand new one is like 60 bucks. (amayama) in the big scheme of things its worth it. that said , adjusting that tab is not destructive. and is very easy. that said it doesnt look like something made for adjusting hahaha. took me a while before I had the confidence to bend a thing that doesnt look like its meant to be bent lol. but it is.
 
A lot of you don't like electric stuff and especially not complicated things like an external Voltage Regulator. So maybe it's time to explain how this black box with 3 or 6 wires works. It's really pretty simple.

A VR (Voltage Regulator) regulates the charging process of the alternator. Our mechanical VR's have only 3 positions.

Position 1. Full charge
The battery voltage is less than 13.6V.

Position 2. Trickle (or Half) charge.
The Voltage is 13.6V. The battery is now fully charged and needs only to be topped off.

Position 3. No Charge / the battery is full and more charging will damage (cook) the battery.
The Voltage is 14.4V (or between 14.4 and 14.8 depends on the factory setting aka "set point")

Here is the Toyota explanation from the FSM (Factory Service Manual)


I've "translated" the FSM diagram in this one which is easier to read and understand.
The left part of this diagram is the alternator, the right part shows the Voltage Regulator.
No matter if the VR has 3 or 6 wires, there is always a E, IGN and F wire/terminal.
The other 3 are N, L and B in case of a 6 wire VR. More about this later.
E = Earth / Ground
IGN = Voltage from the Ignition key (= battery voltage) aka "Sense".
This voltage is used to detect how high the battery voltage is.
F = Field. This voltage activates the alternator and controls the output voltage of the alternator.

Look at the VR part of the diagram. The heart of the Regulator is a 3 way switch that is activated by magnetism. Most people call this a relay which is in a way correct.

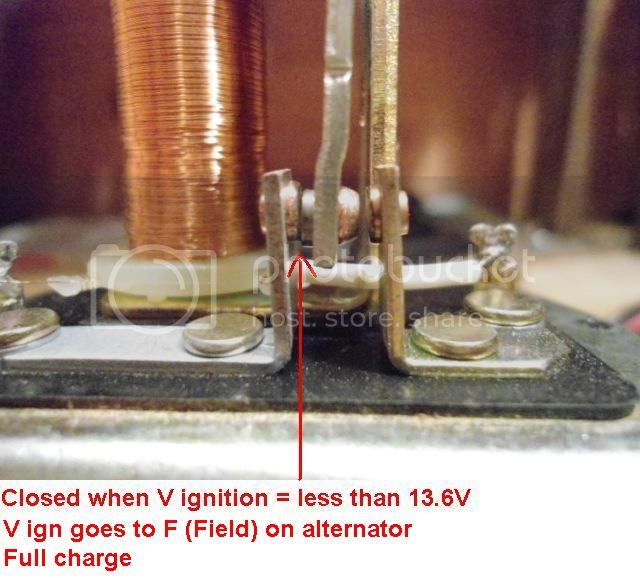
The switch is pulled closed in the top (1st) position by a spring.
The Voltage from the battery (passing the ignition key) goes directly to the F terminal. Therefore the alternator is activated to charge with full power. Note: The resistor is bypassed / overruled / shortened out.

When the voltage goes up, the coil of the switch is energized and builds up a magnetism that starts pulling the switch to the 2nd position.
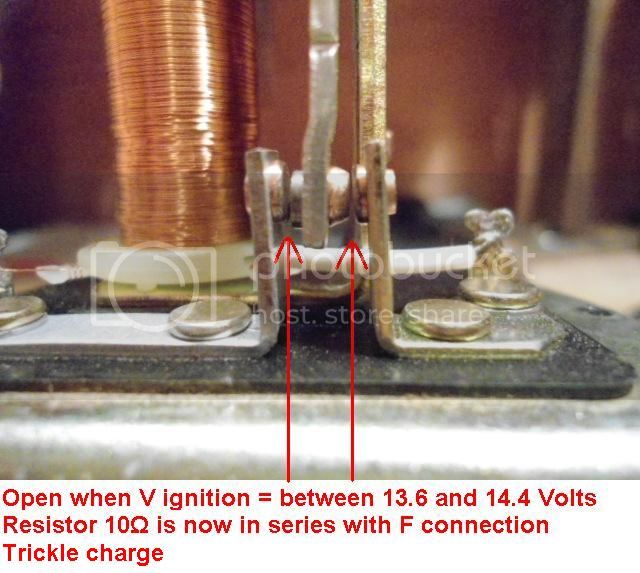
When the battery voltage reaches 13.6V the coil is enough energized to actually pull the switch to the 2nd (open) position.
At this point the switch is open and the 10 Ω (ohm) resistor is now in series with the F terminal. The voltage to the F terminal and thus the alternator, is reduced to approx. 6 to 7V.
The output of the alternator is now decreased and the battery will be Trickled charged.

The battery voltage will continue climbing until the Voltage is 14.4V. At this point the coil is so much energized that it pulls the switch in the 3rd position.
When the switch is in the 3rd position the F terminal is grounded so the charging process is stopped.
Unfortunately (or on purpose by design, I haven't figured that one out yet) now the V ignition is also grounded via the resistor and this creates a lot of warmth and makes the VR feel pretty hot.

Here is the same story but now in a graphic.


Here are 3 pics with the different positions.

Full charge


Trickle or Half charge


No charge / Battery is Full


I also made little movie so you can see it live!


Rudi

Good evening I'm having and issue with my toyota toyoace 1979 5r. The charge light comes on when reved and flashes the voltage regulator clicks continuously to the flashing charge light. When. Head lights are turned on the charge light goes away and VR doesn't click anymore. VR also doesn't click at idle and charge light is off any help with diagnosis
 
Good evening I'm having and issue with my toyota toyoace 1979 5r. The charge light comes on when reved and flashes the voltage regulator clicks continuously to the flashing charge light. When. Head lights are turned on the charge light goes away and VR doesn't click anymore. VR also doesn't click at idle and charge light is off any help with diagnosis
I replaced the voltage regulator today and its running normally now.
 
Reading 13 pages and I'm lost, can anyone help wiring my brand new 55amp alternator w pump , 1986 crewcab 2L diesel. PO tried to do something but the alt was never working. I wired my alt 3 plugs accordingly to this
1724484402638.png
and the Sense wire being connected to battery+ started arcing and I read 3-4 DC amps regardless the engine is running or ign is on. I'm 99% sure the above picture is not how mine should be wired. Also FYI I never wired the top Lamp connector as I don't think I have an alt lamp on my dash (w o tach)

On one side there is a circular green 6pin plug that goes somewhere but connects nowhere atm; red, white, blue, black, yellow and green.
photo_2_2024-08-24_10-47-18.jpg

Under the hood there also is another set of unkown stripped wires, the green wire with the connector is actually Yellow-Black cut at the loom.
photo_2024-07-16_14-02-31.jpg

Aand here is the alt: Remark ALT962 is the model name, the one thing I didn't understand is the seller said its plug n play and don't need an external voltage regulator, I can measure/ check cont. and do all testing but I certainly lack knowledge of this electrical wizardry.
photo_7_2024-08-24_10-47-18.jpg

photo_1_2024-08-24_10-47-18.jpg
 
Reading 13 pages and I'm lost, can anyone help wiring my brand new 55amp alternator w pump , 1986 crewcab 2L diesel. PO tried to do something but the alt was never working. I wired my alt 3 plugs accordingly to this View attachment 3709427 and the Sense wire being connected to battery+ started arcing and I read 3-4 DC amps regardless the engine is running or ign is on. I'm 99% sure the above picture is not how mine should be wired. Also FYI I never wired the top Lamp connector as I don't think I have an alt lamp on my dash (w o tach)

On one side there is a circular green 6pin plug that goes somewhere but connects nowhere atm; red, white, blue, black, yellow and green.
View attachment 3709428
Under the hood there also is another set of unkown stripped wires, the green wire with the connector is actually Yellow-Black cut at the loom.
View attachment 3709429
Aand here is the alt: Remark ALT962 is the model name, the one thing I didn't understand is the seller said its plug n play and don't need an external voltage regulator, I can measure/ check cont. and do all testing but I certainly lack knowledge of this electrical wizardry.
View attachment 3709432
View attachment 3709431


this green round 6pin male connector your holding , .....

isn't this attached to your current remotely mounted voltage regulator on your fire wall or inner fender ?

the black square box with 2 feet on it ....


1724487758296.png
 
View attachment 3709434View attachment 3709435Do you mean the brown rusty box with 4 connections coming from bottom? or the smaller box nudged between the tupperware and fender?


can you post your MODLE ID code here please ...

your above : 1
986 crewcab 2L diesel , is not enough specific vehicle info here ?

better yet , can you simply post a clear and crisp photo of the engine bay data ID plate , this will have all the detailed specific info. on it to double confirm and verify you got the correct DIESEL alternator here to start with ,,,,

your old alternator has
GREEN 3pin plugs on it right , that are shaped differently from the white one on the new alternator in your photos above ?

or

is it a black 3pin plug set up ?
Ahh would've loved to but the plate under the hood is scratched beyon id.
photo_2024-08-24_12-35-30.jpg


Instead I have the paperwork:
photo_2024-08-24_12-35-24.jpg


The previous alt and new one is exactly the same besides the 3pin plug color was BLACK on old one, the plug size/type is same.

I think(!) that blue-white wire from the old alt wiring was going to a small box written 12V which I can assume now is a voltage regulator or some sort? I'm thinking the alt seller doesn't know what he has and this alt does need the external VR.
And the green wire with the connector I mentioned goes thru the loom all the way to battery + terminal. Which leads me to believe the green connector(battery+) end goes to the presumably voltage regulator box with 12V written on top. RIGHT??:bang:

BTW I'm super thankful to you ToyotaMatt! I feel we are making progress and some things start to make sense! Only if the P O burned the truck down and doing it from scratch would've been easier.
photo_2024-08-24_13-04-18.jpg
photo_2024-08-24_12-36-13.jpg


photo_11_2024-08-24_12-04-55.jpg

EDIT: Whoops, I was wrong about the green wire. It turns into a yellow-black wire which leads through a thick harness that goes into the left side fender and to somewhere in the cab, yet I couldn't see a yellow-black wire anywhere near the ignition switch nor the combination switches. I'm guessing that it leads to ignition switch with a different colored wire. Or perhaps it might be the alternator light that leads to the inst. cluster?

Tomorow I will fix the shorts and fix previously cut cables and attach the battery to see if I get a reading with ignition ON/OFF from the green wire (yellow-black)
 
Last edited:
Got it working, the VR acts a bit lazy but starts to charge the battery at 12.1 Volts and keeps it around 12.1-12.5V.

Green wire from alt goes to no.67 on contact of VR, Ignition (I wired to a unused switch inside my control panel because my ign barrel is not 100% functioning) wire goes to no.15 contact of VR and grounding is done via VR casing.
photo_2024-09-02_10-26-18.jpg
photo_2024-09-02_10-26-22.jpg
photo_2024-09-02_10-26-14.jpg
 
Start with a load test on the battery, weak/bad battery can cause all sorts of issues. I would then check your volt meter, lastly I would check the alternator - charging on most 12 V systems is like 13 to 14.5 V.
 

Users who are viewing this thread

Back
Top Bottom