Valve adjustment interval? (5 Viewers)

This site may earn a commission from merchant affiliate
links, including eBay, Amazon, Skimlinks, and others.

I am thinking I may try the cold way since i doubt I'll get very accurate readings with it being as cold as it is here and it being my first go around with the 2f. This summer when the engine won't be cooling as fast from the ambient temp and I have a round under my belt I'll go the fsm route and see how much of a difference there was doing it cold vs warm.
Yeah, as others have said, erring on the side of 'loose' is better than erring on the side of 'tight'...

...but the question still stands...what is tight?

Is a tight valve one where there is no gap and the feeler gauge won't slide in? Or is a tight valve one that is 1 or 2 thousandths off...?

I ended up justifying to myself that I did a good job because not only did I feel that I got consistent resistance on the feeler gauge across valves, but when I removed the feeler gauge from the gap, as I mentioned above, the rocker arm still had up and down play in it...it would move up and down and I could hear/feel the gap open/close...
 
When adjusted correctly the feeler gauge should slide between the rocker and the valve stem with slight resistance . When the feeler gauge is removed there will be a gap equal to the thickness of the specified feeler gauge used. This is called valve to rocker clearance or valve lash. This insures that the valve will close fully and allow for wear in the valve seat and valve face . As the valve and the valve seat wears the valve stem will rise. This is why you should do this at regular intervals to assure a properly tuned engine and to avoid premature costly repairs.
 
Last edited:
When adjusted correctly the feeler gauge should slide between the rocker and the valve stem with slight resistance .
Right, I understand that much...hard part is building the intuition around what 'slight resistance' feels like...maybe getting a set of those Go No Go feeler gauges will give me a better intuition about what being one or two thousandths of a inch off feels like...
When the feeler gauge is removed there will be a gap equal to the thickness of the specified feeler gauge used.
Understand this part, too, but as mentioned above, if my intuition is wrong about what the correct resistance on the feeler gauge should be, then I might be setting the valve lash too tight or too loose...but again, I think if I give those Go No Go feeler gauges a try, then I can build an intuition around what being one or two thousandths of a inch off feels like...
 
As the valve and the valve seat wears the valve stem will rise. This is why you should do this at regular intervals to assure a properly tuned engine and to avoid premature costly repairs.
Huh, this makes sense...I think I'll run the valves every year from now on.

This might be slightly off topic, but it is related to the conversation to this thread, but I was wondering if it is common to visually inspect the valves through the cylinder spark plug hole to see if they are burnt or not...using some sort of videoscope.

I do have a vac gauge installed in the vehicle cabin as a way to diagnose what is going with the engine, and that the behavior of the manifold vac can indicate a burnt valve (as can the ol' dollar bill trick in front of the tail pipe), but valves that are working correctly should be brownish/white...and if it is possible to inspect with the head still on, that might be a useful technique, too...although probably not on an annual basis.

And the other question I had kicking around since the last time I had the valve cover off, was I saw some darker deposits on the head around the valve stems for a cylinder...was wondering if that might be an indicator of leak valve guides...didn't take a picture but probably should have...

Vacuum Reading Diagnosis.jpg
 
I think I have a set or two of those in my tool box. Used them for different things but good to know that's what they are intended for! I'll let you know how much of a difference the pinch is when I do it. I'm hoping to do it around Christmas when I have some time off, but the suby needs a timing belt and there is plenty of snow to snowmobile. The cruisers usually come first though!
 
Compression check will tell the tale pretty well, I usually do this after the valve adjustment since I pull the sparkplugs when I do the valves to replace /inspect , plus it makes turning the engine over by hand so much easier . the carbon build up around the valves is usually from fuel deposits from combustion. I have a vacuum gauge for diagnosis but I rarely use it for anything except for taking up space in my tool box.
 
Jhollow .... Snow mo when you can! Brappp!
 
The cruisers usually come first though!
Land Cruisers are the best co-conspirators/allies...!

I've noticed that my willingness to take risks increases proportionally when I've got the rig running the best I can...because a well running Land Cruiser can be trusted to succeed in those situations where my confidence as an operator begins to fail...
 
Yes, I have those tools for a variety of engines . They are very handy . But I still think trying to get an accurate valve lash setting even with the tools described above with a running engine is ludicrous and would not attempt due to safety reasons.

To try to regain my honor:
My mis-statement started a furor. I apologize for my mistake. The FSM title reads "Adjusting Valves" & "Valve Clearance Adjustment" & that phrase stuck in my mind. I meant to say, the FSM recommends the valves are CHECKED while the engine is hot and idling.

Since it is next to impossible to adjust a rocker arm adjusting screw when it is hammering up and down while the engine is running, it never dawned on me that anyone would even try.. Wow, the maintenance manual sure leaves out a few necessary words... like "Stop the engine to adjust."
Ok, enough of that...sorry about that.

86 Maint Manual
86Maint.jpg


2f.jpg


[Edit] - and just for the record (not that anyone cares), for the last 26 years I have always checked my valve clearances when the engine is hot and idling, then shut of the engine to adjust them, then start back up to check again. It takes a couple rounds. It is the method I prefer. Others may choose to do it differently. The end result is the same.
 
Last edited:
Tried adjusting my valves the way the manual prescribes Friday night and it was a CF. I know it's possible to do it with the engine idling, but I sure don't see how. I really screwed it up. Came home, did some more research, and decided to do it cold the way some on here have suggested. Worked like a charm. The engine runs smoothly, seems to have a hair more power, and I didn't notice the exhaust smelling quite as potent tonight. Now, if it will just help my gas mileage...
 
I've done it both ways, but the "warm engine off" method is what I'm most comfortable with as well.
 
but I was wondering if it is common to visually inspect the valves through the cylinder spark plug hole to see if they are burnt or not...using some sort of videoscope.

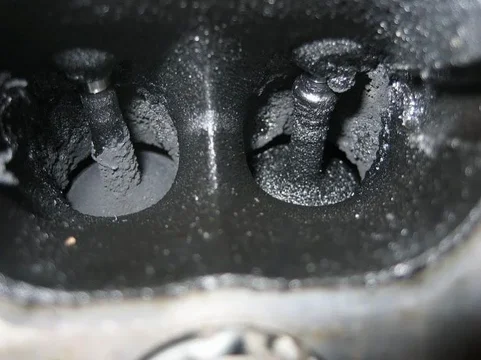
Borescopes will not let you see if a valve is not seating correctly and leaking. In fact, even when the head is off and tilted on it's side so you can peer at it close up...with a magnifying glass, there is no way to visually tell whether a valve is leaking or not. Leaking valves usually look just like properly seating valves. As augirthedude mentioned, a compression test is the best way to check for leaky valves when the head is installed. Carbon build up on the valve is mostly detrimental on the stem side of the valve which could be visible from the port on the head via a journey down the carb and manifold using an expensive articulating borescope (not the one from HF). See borrowed web pic below (not a LC engine)
dirt.jpg

Valves can be kept clean by using good quality gasoline, running the engine up to full operating temp often, or spraying a little water mist or carb cleaner/sea foam into the intake of the hot running engine every blue moon.
 
Borescopes will not let you see if a valve is not seating correctly and leaking. In fact, even when the head is off and tilted on it's side so you can peer at it close up...with a magnifying glass, there is no way to visually tell whether a valve is leaking or not. Leaking valves usually look just like properly seating valves. As augirthedude mentioned, a compression test is the best way to check for leaky valves when the head is installed. Carbon build up on the valve is mostly detrimental on the stem side of the valve which could be visible from the port on the head via a journey down the carb and manifold using an expensive articulating borescope (not the one from HF). See borrowed web pic below (not a LC engine)
View attachment 1002767

Valves can be kept clean by using good quality gasoline, running the engine up to full operating temp often, or spraying a little water mist or carb cleaner/sea foam into the intake of the hot running engine every blue moon.
Cool. Thanks for the excellent clarification (as always) OS!

Yeah, I was referring more to using the visual inspection (via borescope) for checking for discoloration of the face of the valve (rather than trying to inspect the seats) as an indicator of conditions of a burnt valve.

upload_2014-12-8_12-38-50.jpeg


I'm definitely going to add valve adjustment to my annual maintenance regime, since I have a fairly low mileage 2F (~200k miles) in good working order (except for some minor piston slap while warming up).

Also a fan of the Seafoam treatment in both the gas tank and crank oil...although I think next year I'm going to pipe the Seafoam directly into the carb fuel bowl through the vent tubes (I'm lazy and don't want to remove the air horn) instead of into the fuel tank...I have a feeling that stuff eats away at the rubber fuel lines I have installed...

I also use StarTron as a fuel additive every once and a while, which helps keep the bacteria undercontrol (especially with all the ethonal being added into the gasoline).
 
I also think this is going to be a yearly thing for me from now on. I am lucky in the small town I live in we have one gas station that sells ethanol free 91 octane. I run it in every gas engine I own. I definitely notice a difference when I have to travel anywhere and use ethanol gas in both fuel economy and performance. I also notice that my carbed engines (most vehicles I own) need carb cleanings and fuel filters less often, and when I do clean them they are usually pretty clean compared to engines ran on ethanol gas I have dealt with.
 
This thread addresses myths and truths (see post #20) behind the root causes of burnt valves on 2F engines:

https://forum.ih8mud.com/threads/2f-burnt-valves-reason-carb-jets-smog-air-pump.78846/

This is a very interesting thread, I recently bought an 84 60 as parts, but the PO deleted and blocked off the smog pump and the engine was going, he said something about the valves. My fj40 has a 76 motor in it if I remember right, and is desmogged with no air pump, and it runs like a top, great compression last time I checked. I eventually want to desmog the fj60, but now this worries me.... Ah well something else to research and learn.
 

Users who are viewing this thread

Back
Top Bottom