Todays wrenching (3 Viewers)

This site may earn a commission from merchant affiliate
links, including eBay, Amazon, Skimlinks, and others.

You get one of those with the Dashman Dash Box to cut the spot welds that hold the upper dash pad frame to the cowl... definitely a good thing to have around...

I need to get one, been looking at that pad frame lately and want to get rid of it. Thought about just using a cut-off disc but drilling out the welds would look better.
 
My luck continues with my 80. Was replacing my radiator today and broke the water bypass nipple. Looks like my new $200 radiator will be $400.:bang:
006.webp
 
i posted this thread in the 40 section..

CAN'T get the 40 into GEAR.. So here's the whole story.. i have a '74 fj40 with stock 4 speed tranny and transfer case.

When i parked my rig where it sits now 3 months ago it was in 2 wheel drive.. the front hubs were locked because it was snowing and i had been using 2 and 4 that day.. it sat there for about a month.

Next time i went to move it a month later.. i started it fine went to go and spun the tires because of the snow so needed to put it in 4wd to get out.. would not engage into 4h or 4low or into 2wd from that moment on.. no grinding or bad noises or anything.. seems the transfer case is stuck in neutral or something.

i tried rolling the vehicle back and forth while shifting as sometimes that helps and nothing will catch.

any insight?

PM'd you.
 
My luck continues with my 80. Was replacing my radiator today and broke the water bypass nipple. Looks like my new $200 radiator will be $400.:bang:

You should just give it to me chip....Always wanted a white cruiser.....:D
 
some progress this weekend:

springhanger.jpg

frontspringhanger.jpg


New meats
newtires.jpg

KOOL! Now how about the stuff you are selling for the FJC? PM sent. Unfortunately, my clock is ticking on making the deal due to my trip to Moab.
 
Thanks for the help.. i was able to get her into gear with a little manipulation.. linkage is pretty sloppy/loose which is the problem. Felt GREAT to :steer: it around the neighborhood for the 1st time in 3 months though! That is the LONGEST period i have gone without driving it since i put her on the road in 2002.
 
Saw Tom's project up close and personal today, (krazyfj) he's doing nice work. I hope he gets it done in time to show it off at the Spring Meeting.

He was kind enough to sell me his Metal Tech bumper and All-Pro rock rails off his FJ Cruiser. I have some R&R to get the rails cleaned up and looking good again cosmetically, but the bumper is very sweet and a lot cheaper than a new one costs. Now that I know what bumper I will be running, I can order my new skidplating on Monday.

One thing I noticed is that he had completed removed the rear bumper off the FJC. (I should have taken pictures.) It seems to me that it would be very simple to fab up some better protection in the back while improving the departure angle. I'm going to work on that.

I have a friend with a shop that has CAD, laser cutting, metal breaks to handle 1/2" stock, etc. I just found out from him that he would be willing to let me "play around with some stuff" at the shop and he is open to producing stuff that is profitable.

I'm hoping I can come up with a few pieces here and there that work for me and that will be marketable. Most everything comes from the West Coast and the S&H is brutal. (Tom will also vouch for the lack of great customer service and packaging from some vendors.)

If someone has an idea for a simple part that should be able to be easily replicated for any rig, let me know. I would probably need the real sample to be able to replicate. It is not my intention to stamp out cheaper copies of other people's stuff in which they have tied up a lot of R&D and investment, but there's plenty of basically generic parts/designs that I might be able to do.
 
Rust, Blood, Water & Electricity - How to DeRust your RockRails

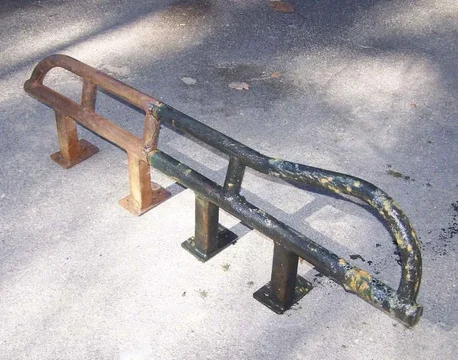
I started cleaning up the rock rails for the FJC I bought from Krazy FJ. Should have put on the leather gloves right from the beginning. That angle grinder with the HD wire brush can be nasty if you are a little lax and get it bound up between the converging tubes and your finger tip gets in the way. I managed to crack the nail and trim it simultaneously well down to the quick. The finger tip is sore and the nail is turning black. I'll add the angle grinder with wire brush to my list of least favorite tools behind the table saw - don't ask.

Anyway, the first order was to remove the skidproof tape applied here and there on the top of the rails. Given its adhesion, I will probably add some after repainting. o. Most of that peeled off easy, some needed persuasion from my chisel.

There was some powdercoat still on them, that's why the grinder came out. I need to have bare metal to remove rust. My concoction doesn't remove paint or powdercoat, just the nasty corrosion. (As an aside, powdercoat is an expensive alternative to paint if the item being powdercoated is going to be abused. It will rust underneath and peel. Paint works and is easy to touch up.)
001.webp
002.webp
003.webp
 
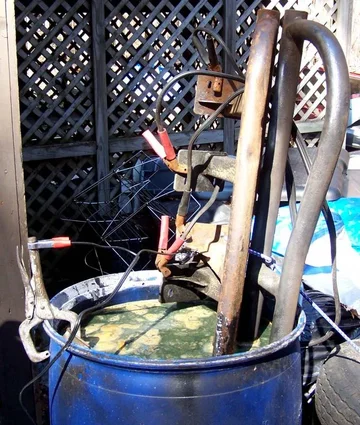
My juice barrel holds about 60 gallons of my special clear juice, but it isn't tall enough to totally immerse a rail. The next step was to hook up the battery charger. I dropped one rail in and hooked the negative clamp to the rail. I added one of St Pam's brownie pans (I'm too fat anyway) to the barrel and hooked up the positive.

Initially I went with 50 amps, but cut it back to 10 after about an hour. You can see the water clouding up a bit as the chemical reaction is starting, that isn't a camera reflection. There's plenty of chemical reaction going on now as I'm writing this and I should have more pix after another day or so. If this works like I think it should,
I may have to buy a pool to be able to do a frame, or maybe a whole vehicle at once :grinpimp:
004.webp
007.webp
009.webp
 
MMMMM - soup. This stuff looks like an EPA supersite, but it is really just some floating rust colored goo. Nothing harmful in here.

001.webp

This is the first look at the rail before rinsing. It still has some residue on it that will be hosed off. Rinsing and brushing with a broom gets it down to your basic black.

006.webp

Looking better after being hosed off.

007.webp
001.webp
006.webp
007.webp
 
I gave the rail a quick pass with a handheld wire brush and then tried some light sanding with 100 grit. (My finger is too sore and swollen from yesterday's fiasco to tempt fate with the angle grinder, I think it may also have a mild sprain.) You can see that the blackness is being replaced by some shiny steel color where I did the brushing and sanding. I'm optimistic that it will clean up nicely once the dipping process is complete.

008.webp

I flipped the rail over to do the other end and decided I'd get the second rail going. I connected the 2 rails together with a set of jumper cables. I hooked the charger up again and set it on 50 amp to get the reaction started quicker. I'll drop it down to 10 in an hour or so and let it simmer until this evening. It needs to go about 12 hours or so to be effective, so I will probably leave it in overnight at 2 amp to finish it up.

010.webp

I haven't decided what I'm going to do to finish them up. Powder coating is out, it just gets scraped off and rust forms underneath it. I'll probably just rattle can them, brush them with Rustoleum or use spray on bed liner. That way they can easily be touched up after getting scraped up. Any suggestions?
008.webp
010.webp
 

Users who are viewing this thread

Back
Top Bottom