I am having a very high skilled mechanic install Saginaw PS, who works on nothing but Toyota/Lexus. He has FJ40's and FJ80's so he knows his way around them.. I am just curious as to how long it will take. he has never installed one though.
Navigation
Install the app
How to install the app on iOS
Follow along with the video below to see how to install our site as a web app on your home screen.
Note: This feature may not be available in some browsers.
More options
Style variation
You are using an out of date browser. It may not display this or other websites correctly.
You should upgrade or use an alternative browser.
You should upgrade or use an alternative browser.
Saginaw installation time?
- Thread starter BBQ BOY
- Start date
This site may earn a commission from merchant affiliate
links, including eBay, Amazon, Skimlinks, and others.
More options
Who Replied?dgangle
total rice
soooo many variables....depends on his speed, skill level, how many people he has working on it, distractions, trips for parts if he is scrounging his own parts versus purchasing a "kit", on and on. I'd budget a couple days but this is a question best posed to him. did you ask? what did he say?
Cruiser Outfitters charges 8 hours.
- Thread starter
- #4
I am going to buy the kit from MAF. The mechanic has no idea how long it will take since he has not seen it nor has he installed a PS on 40's.
Is the a better kit anywhere else?
Is the a better kit anywhere else?
Cruiser Outfitters, or get the Bill Dorry brackets from Orangefj45.....
dgangle
total rice
which ever one you buy make sure it has a slip joint in the shaft to allow some flex/keep stress off the input shaft of the box which causes leaks. they may all have them now, 9 years ago Downey's was the only kit that did.


Also the CO kit has a just a round bearing that is supposed to slide up over the steering shaft in brace inside the steering tube rather than that square pillow bearing which easily bolts up to the firewall in front of the column. Don't ask me how in the hell you are supposed to slide the round bearing from Kurt up onto that shaft........I'm still trying to accomplish that.
I am going to buy the kit from MAF. The mechanic has no idea how long it will take since he has not seen it nor has he installed a PS on 40's.
Is the a better kit anywhere else?
I used Mark's A. (Mark's Offroad) kit and had good luck. He included the frame plates, column firewall plate, joints, shaft, etc. I found my own pump, bracket, and gear box. After it was mounted, then had custom houses made.
I'd get a "not to exceed price" from the guy. As mentioned, he's going to be learning on your rig. I personnally don't like paying for trial and error time. I could see it taking atleast 12-16hrs if you've done it a few times and had every part you needed on hand.
- Thread starter
- #9
well the mechanic is a friend and is doing it for free as a favor. He wants me to leave with him for at least a week so he can take his time.
Also the CO kit has a just a round bearing that is supposed to slide up over the steering shaft in brace inside the steering tube rather than that square pillow bearing which easily bolts up to the firewall in front of the column. Don't ask me how in the hell you are supposed to slide the round bearing from Kurt up onto that shaft........I'm still trying to accomplish that.
I used a 3/4" round bearing purchased from Tractor Supply - I took a grinder to the steering shaft just a little at a time until it fit snug - after all, the bearing can still do it's job of keeping the shaft from flopping around....
I just finished up a 5.3 Vortec engine swap and (HAD) to convert my OEM Toyota steering (Firewall location) to Saginaw (Front bumper location).
I read each of the Saginaw conversions listed in the Tech section and started.
The whole process took me about 3 nights (6 hours).
I found a 1995 Jeep Cherokee being parted out and bought the gearbox, draglink, tie rod ends, etc.. for $150...
Works like a champ.... (The PS hoses from the Cherokee even fit !
Goos luck
Bad Coco
GOLD Star
I ended up using the slip shaft from flamming river. Great set up.
Had the same problem with the bearing from Downey trying to slide it over the shaft. Once I got it started, I was committed to send it home the rest of the way since there's no easy way of getting it off. Ended up taking the shaft out of the rig, removing the steering wheel and setting the end of the shaft on a brass plate to pound the bearing assembly down to position with a piece of pipe that was the right size for the bearing race. The other thing was to leave the bolts that secure the bearing housing to the fire wall loose until you have all the shafts lined up and together so it will self align itself and then tighten, the first time I installed without doing this,I had a slight bind when rotating the steering wheel. I'm very happy with the Downey kit, the way it performs and the customer service that you get when you need them.
Dave
Dave
Also the CO kit has a just a round bearing that is supposed to slide up over the steering shaft in brace inside the steering tube rather than that square pillow bearing which easily bolts up to the firewall in front of the column. Don't ask me how in the hell you are supposed to slide the round bearing from Kurt up onto that shaft........I'm still trying to accomplish that.
dgangle
total rice
well the mechanic is a friend and is doing it for free as a favor. He wants me to leave with him for at least a week so he can take his time.
that changes EVERYTHING. i see a disaster on the horizon for you. not that he can't do it but hasn't done it and is doing it for free. so you got a guy who is a professional (read: makes his living turning wrenches), doing something new for free working on it when he gets a chance. hummmm, if this goes wrong don't say i didn't warn you. you are at his mercy and other than your freindship, he has no incentive to do it well or quickly.
it's not that i am a 'glass half full' kinda guy, just been the victim of very slow, untruthful, uncontentious people that i was PAYING to do a job for me. can't imagine if they were doing it for free. you get what you pay for
Last edited:
Do it yourself....it really aint that hard....it took me a weekend once you take the fender off ( 30 min.) everything is easily accessible....the hardest part was going back and forth to the auto parts store...good luck!
- Thread starter
- #15
that changes EVERYTHING. i see a disaster on the horizon for you. not that he can't do it but hasn't done it and is doing it for free. so you got a guy who is a professional (read: makes his living turning wrenches), doing something new for free working on it when he gets a chance. hummmm, if this goes wrong don't say i didn't warn you. you are at his mercy and other than your freindship, he has no incentive to do it well or quickly.
it's not that i am a 'glass half full' kinda guy, just been the victim of very slow, untruthful, uncontentious people that i was PAYING to do a job for me. can't imagine if they were doing it for free. you get what you pay for
Well I see and understand your point. But the thing is that he has done a lot of work where I have paid him and he is very impressive when it comes to detail. He has been working on 40's and 80's that were made to offroad for years. He is also a Mud member and local chapter member. He opinion is very much valued. He cut his teeth on 40's and had been working on toyotas fore about 25 years. Also, he has his own shop with no employees. He doesn't wanting anyone screwing up his work. That is why I am leaving it with him for a week because he has a very successful business to run.
he has done some nice work to his 40 and I love his 80. He just put a Z motor in the 80. I want to buy it but he won't sell it to me cause it is his trail rider.
Last edited:
Also the CO kit has a just a round bearing that is supposed to slide up over the steering shaft in brace inside the steering tube rather than that square pillow bearing which easily bolts up to the firewall in front of the column. Don't ask me how in the hell you are supposed to slide the round bearing from Kurt up onto that shaft........I'm still trying to accomplish that.
You will need to lightly sand the shaft. We've sourced the closest bearing we could but it still requires a couple minutes with a flap wheel or sanding disc to get it to fit. I get it to where the bearing will slide up and down the shaft with a slight amount of force, enough that the bearing has no free-play on the ID but is not so snug your risking damaging the bearing while installing. It doesn't have to hold itself in place, it will be sandwiched between the column tube and firewall plate if/when any future repairs or service is needed. We've had these bearings in service for well over 10 years now with zero problems, I think for the few minutes of extra work it offers a much cleaner conversion and less overall slop in the end.
Some more pics:
https://forum.ih8mud.com/40-55-series-tech/134536-steering-shaft-welding-advice.html
dgangle
total rice
Good luck. I learned a long time ago that asside from one's parents, no one does anything without wanting something in return. And then even parents want something in return, if it is nothing more than their children behaving.
Cut his teeth and been working on 40's for 25 years and never did a Saginaw conversion? Wow, prolly never did a FDB conversion or a lift kit either, huh?Something doesn't add up.
Cut his teeth and been working on 40's for 25 years and never did a Saginaw conversion? Wow, prolly never did a FDB conversion or a lift kit either, huh?Something doesn't add up.
Downey
SILVER Star
BBQ, I wouldn't apologize for putting your trust in your buddy. Just work along side of him and you can both learn together (while your keeping an eye on him).
Regarding the tight fitting firewall anchor bearing, I think most of us use a 3/4" bearing since it is the closest to the Toyota shaft. The Toyota shaft should be 19mm, which mathmatically equals 3/4" (.03937 X 19 equals .750), but when I check my equivalents chart it shows that 3/4" equals 19.050 millimeters??? If this is true, evidently you would have to remove .050 with emery paper???
Regarding the tight fitting firewall anchor bearing, I think most of us use a 3/4" bearing since it is the closest to the Toyota shaft. The Toyota shaft should be 19mm, which mathmatically equals 3/4" (.03937 X 19 equals .750), but when I check my equivalents chart it shows that 3/4" equals 19.050 millimeters??? If this is true, evidently you would have to remove .050 with emery paper???
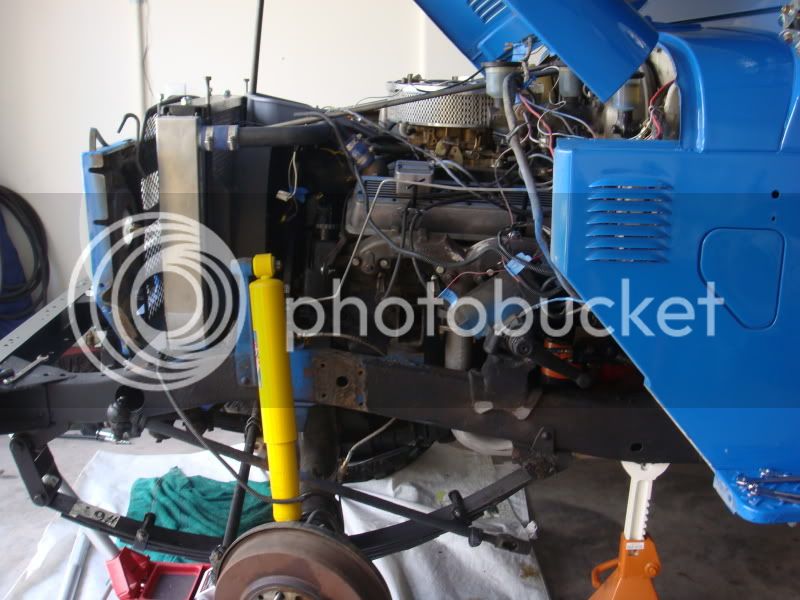
Here are some pics of the Downey install.


Here's a few more to give you an idea of what you'll be up against.


Similar threads
Users who are viewing this thread
Total: 1 (members: 0, guests: 1)