Pioneer AVH-P8400BH installed in '95 FZJ (1 Viewer)

This site may earn a commission from merchant affiliate
links, including eBay, Amazon, Skimlinks, and others.

Joined
Oct 5, 2011
Threads
13
Messages
175
Location
STL, MO / Middle USA
First off, my apologies to maasai4x4 for the thread-jack earlier, I decided maybe it was better to start my own thread instead of invading his, so I edited my other post before putting this up.

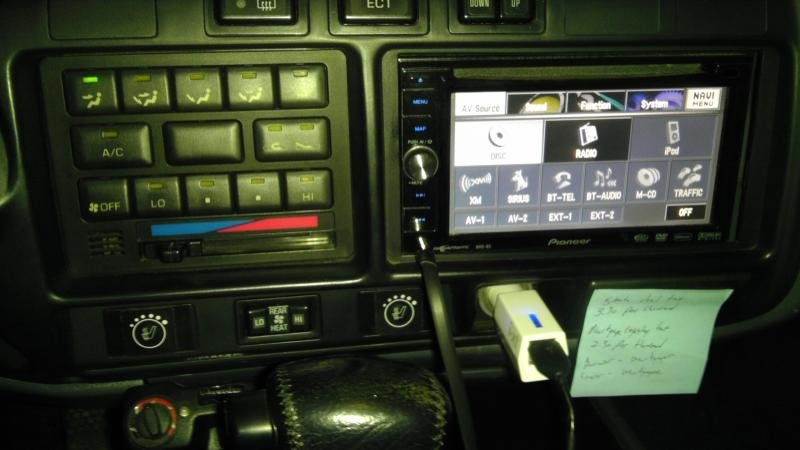
I spent the better part of Saturday sweating in my garage installing a new Pioneer AVH-P8400 with the back-up camera & parking brake bypass. I'm gonna fab-up my own USB & 3.5mm aux input using a spare blank-off switch plate & install it under the climate controls when I get the time, for now the USB extension cable routes into the glove box. I stopped by Micro Center & picked up a 64 gb USB flash drive on the way home from work tonight, I plan to load it up with tunes & see how it works tomorrow.

I don't have an iphone, so I can't speak to any of the "advanced app" functions, but my android bluetooth phone & audio work flawlessly so far. Internet scuttlebutt is that at some point Pioneer may provide firmware updates which will allow android users more of the features available to iphone types.

I popped a DVD in while driving with the family yesterday to test the player & it works great, though I probably won't really use it until the baby is old enough to have a forward facing seat. Then I may invest in some headrest monitors & take advantage of the dual zone features of the head unit so the lady & I don't have to be subjected to whatever kid program my girl wants to watch ad-nauseam.

I probably spent the most time installing the camera & routing the cable through existing holes & grommets so as to maintain water-tightness (as much as there is, anyway) and avoid making any new holes in the vehicle. The other biggest chore was tapping the reverse light circuit to connect the head unit so it switches to the camera display automatically when to shifting to reverse. This task was made much easier by having a digital copy of the EWD handy.

I still have all the OEM speakers, with the OEM amp behind the dash, unplugged. I'll probably replace all the speakers & install a 5 channel amp this winter, though I was actually surprised how decent it sounds with the 17 year old speakers, especially once I set the high pass filter at a 100hz cut-off.

Sorry the pics aren't great, it was too sunny out & I was using my cell phone camera.

Head unit in dash:


Microphone for hands free / bluetooth phone:


Detailed view of microphone mount:


Back-up / rear-view camera:

 
Sadly, no. Was too hot / dirty / in a hurry to mess with the phone during the install. I will be getting back in behind the head unit at some point in the near future to install the 2nd USB & 3.5mm aux input, so I can probably get pics of behind the radio then. Otherwise I can try and answer any questions the old fashioned way (words) though it might take a thousand of them to make up for the pics I didnt take...
 
Looks great. Can you break down the costs? I know they get you for $50-$75 for every additional option you get.

Also, I was looking at these yesterday, and there are several different levels of the head unit, with many options I will never use. How did you decide on that model?
 
Looks great. Can you break down the costs? I know they get you for $50-$75 for every additional option you get.

Also, I was looking at these yesterday, and there are several different levels of the head unit, with many options I will never use. How did you decide on that model?

Cost:

(all items purchased from vendors on Amazon.com, prices include standard shipping)

Pioneer AVH-P8400BH head unit - $517.24

Pioneer ND-BC5 universal rear view camera - $153.99*

Scosche TA02B wiring harness - $2.99

Parking brake override bypass - $24.01

Superspeed USB 3.0 extension cable, 3ft (x2) - $6.68**


* = Firstly, this was not something I felt I needed, but really, how do you have a 7" touchscreen head unit without one... I could have went with a much cheaper rear view camera (koolertron, etc), but really liked the reviews of the pioneer unit. The build quality of the camera and all the associated wiring is very good, I don't feel nearly as bad now for paying what I did for it after the install.

** = You don't need USB 3.0 compatible cables, and in fact the head unit comes with a USB extension cable, but they were cheap enough & I like that the end you plug your device into is just the metal shroud (no molded plastic around it), which should make mounting it into a toyota switch blank plate a bit easier.


As for why this unit, the biggest selling points for it over the "lower" models for me were:

2 USB inputs - I plan to "permanently" install one extension cable so it's mounted to the left side panel of the glove box so I can mount the 64gb thumb drive full of MP3's & leave it there out of sight, yet it's still accessible when I want to update it. As mentioned in my original post, I also plan to route the other USB & aux 3.5mm jack to a toyota switch blank plate & mount it below the climate controls for easy charging & hookup.

Detachable Face - Security! Not everyplace I park is somewhere you'd want a unit like this on display.

The dual zone audio / video & sd/sdhc card slot were not what I'd consider critical features, but certainly should prove to be nice to have.
 
Can you post a picture of the rear viewing angle shown by the screen with the camera mounted where you have it?
 
Can you post a picture of the rear viewing angle shown by the screen with the camera mounted where you have it?

Sho'nuff.

Camera Display:


Reference view:


I know it's hard to see in the first picture, but from inside the truck you can actually see the edge of the curb, just "above" the bumper. After the first time I backed up close to something, then got out & looked, I'd say I can now estimate my distance from an object to within +/- 1" at the center of the bumper. (FWIW, I don't park that crooked, the curb is actually curved, & not parallel to the parking space lines) :cool:

Took a couple other shots for reference inside my garage:


Reference:


With door open:


& a couple other shots of the USB input & digital radio screens:

USB:


Digital Radio:


Which reminds me, I still haven't set the correct time on the clock... :doh:
 
Looks really good. Thanks for posting those pics. Did the camera come with a cable long enough to mount back there? How did you route the wires? Does the camera kick on automatically when you go in reverse? If so, how? Did that harness you used match up pretty well with what came with the head unit? Looking to get a 2400BT and camera after backing up into a Civic last week. :bang:
 
Looks really good. Thanks for posting those pics. Did the camera come with a cable long enough to mount back there? How did you route the wires? Does the camera kick on automatically when you go in reverse? If so, how? Did that harness you used match up pretty well with what came with the head unit? Looking to get a 2400BT and camera after backing up into a Civic last week. :bang:

Yes, the cable that is permanently attached to the camera is at least 20' long. It might have been nice if this had come with a disconnect near the camera. I'll probably add one if I ever need to remove it from the vehicle.

I basically followed the route of the wiring harness that powers the license plate lights back up to the drivers kick panel. I removed the 3 pins of the camera cord from the plastic connector that attaches it to the little power converter/heat sink so it would be easier to route the cable through the three grommets I encountered on the way into the cabin.

First there is the rubber plug with the two power wires for the license plate light that goes into the tailgate. I cut a slit between the two wires and ran the camera cord through it into the tailgate. I should also note that I would never trust double sided foam tape on an exterior mount, so I drilled three holes under the plate light housing for two stainless screws with washers and nuts on the inside and one in the center of the housing where it meets the tailgate body which I carved out into a little "U" for the cable to run into.

Once inside the tail gate, I routed the wire through the rubber tube between the tailgate and the body of the vehicle. Once inside the body there is a recess about 3" deep towards the front of the truck. If you drop your spare tire, you'll see where the wiring comes out of this underneath. There is about a 1" diameter rubber grommet there where the two wires from the plate light come out and join the main portion of the rear harness. This grommet already had a slit cut into it from the center out (like the first cut into a pie), so I just pulled all the wire though the hole, slid it into the grommet and popped it back into place.

From there you'll need to tape or zip tie the camera wire to the main harness, (I routed mine along the top side of it for protection) over to the grommet in the driver's side rear fender. This grommet has two "pipes" built into it which have wires in the larger one, and a vent or drain tube in the smaller of the two. I ran the camera wire through the smaller one with the vent tube and then taped the whole thing back up.

You are now inside the cabin, from here I followed the routing of the gas door release cable and wiring harness up into the driver's kick panel, and reinstalled the plastic connector on the 3 pins of the camera cable.

I zip tied the power converter/heat sink to an existing control unit bracket inside the kick panel, and then extended the other wires in the kit from the converter/heat sink over to the head unit harness where it sends it's video signal via RCA plug, and gets it’s switched 12 volts and ground.

There is a large flat OEM wiring harness connector right about where the top of the "dead pedal" would be inside the driver's kick panel where I tapped the red/black wire for the reverse light signal and routed that wire to the head unit so it automatically turns on the camera view when you shift into reverse. Needless to say, this is where having a PDF copy of the Electrical Wiring Diagram on the old lady's ipad was extremely helpful.


Here's an image I found of the actual contents of the kit:


http://75.77.207.246/scott/tlc/nd-bc5.jpg
 
Last edited:
Nice Job!

I put a Pioneer Avic D3 in mine. I didn't hook up the GPS because I find it's better on google maps with the traffic updates. I am looking at putting in the wireless backup cam. And I did the dvd bypass too, works great for long trips.


IMAG0241.jpg
IMAG0241.jpg
 
Update:

Finally got my USB & 3.5mm aux input switch plate made and installed it under the climate controls a couple weekends ago. It turned out pretty good, and keeps the dash looking "clean".


Center console with USB & 3.5mm aux input switch plate installed:

http://75.77.207.246/scott/tlc/USB-AUX-in-dash.jpg

Close-up of USB & 3.5mm aux input:

http://75.77.207.246/scott/tlc/USB-AUX-Zoom.jpg

Side view of USB & 3.5mm aux input:

http://75.77.207.246/scott/tlc/USB-AUX-Side.jpg

You can see the 3.5mm panel mount jack with it's retainer nut recessed into the front of the switch plate. Contrary to my original idea that a bare metal ended USB extension would be easier to mount, I ended up trimming some of the molded plastic off the USB extension that came with the pioneer head unit & JB Welded it to the switch plate after drilling & filing the rectangular hole. To the right are the seat heater switches for my Corbeau seats that I mounted in switch plates for the floor console.
 
Last edited:
I'm doing a similar install with a kenwood dvd/nav HU soon. Is that plate with the USB and aux input just popped out from the dash or is it a piece you bought? I haven't been behind the dash of my FZJ80 yet.
 
Very nice, clean install!
 
Fantastic job....very clean. Where abouts in St Louis? I am getting ready to move from Jerseyville, IL to Alton, IL and work in Berkeley, MO near the airport.
 
I'm doing a similar install with a kenwood dvd/nav HU soon. Is that plate with the USB and aux input just popped out from the dash or is it a piece you bought? I haven't been behind the dash of my FZJ80 yet.

If you have any blank-off plates in your dash you can pop one out & use it. I purchased some from CDan as I needed extras for the heater switches which mounted into the floor console behind the shifter, and I also wanted to have a spare in case I botched one up.
 
Fantastic job....very clean. Where abouts in St Louis? I am getting ready to move from Jerseyville, IL to Alton, IL and work in Berkeley, MO near the airport.

Thanks. I'm in south city near Gravois & Loughborough. There are a couple 80's roaming that part of the city, but not too many. :steer:
 
Good job!:clap:
 

Users who are viewing this thread

Back
Top Bottom