Lol, I know. The Alcans will work just fine, but it was a nice idea.
-
North American Clubhouses - East RegionCA.ON- SOTEC CA.ON- Upper Canada Land Cruisers CA.QC- Club TORQ CA.QC- Quebec Cruisers AL- DixieLand Cruisers AL- Hot South Cruisers FL- Florida Land Cruiser Association FL- Northwest Florida Toyota 4WD FL- Tampa Bay Land Cruiser Association GA- Pavement Pounders GA- Georgia Cruisers GA/FL/AL- Red Hills Land Cruiser Club GA- YOTA IL- Windy City Land Cruisers IN- Hoosier Cruisers IN- Indiana Land Cruisers KY- Kentucky Landcruiser MA/NH- Yankee Toys MI- Lake Michigan Land Cruisers MS- CottonLand Cruisers NC- Olde North State Cruisers NJ- Garden State Land Cruisers NY/CT/MA- FJNortheasters NY- Gotham City Land Cruisers OH- The Buckeye Birfield Syndicate PA- Keystone Cruisers PA- Steel City Land Cruiser Club SC- Palmetto State Land Cruiser Association SC- Upstate Cruisers SC- Swamp Fox Land Cruisers SC- Low Country Land Cruisers TN- Appalachia Cruisers TN- Bluff City Cruisers TN- STLCA VA- Bay to Blue Ridge Cruisers VA- COVA CRUISERS VA/DC/MD- Capital Land Cruiser Club VA/NC- Mid-Atlantic TLCA VA- Star City Land Cruisers VT/NH/MA/ME Acadian Overlanders WI- Land Cruiser Legends WV- Mountaineer Cruisers
-
North American Clubhouses - Central RegionCA.AB- Oil Country Cruisers CA.AB- Rocky Mountain Land Cruiser Association CA.AB- Toyota Ghost Wheelers AR- Razorback Land Cruisers AR/MO- Ozark Mountain Cruisers CO- BookCliff Cruisers CO- Colorado Land Cruisers CO- Derailed Cruisers CO- Rising Sun 4WD Club CO/WY- Horsetooth 4 Wheelers Cruiser Club IA- Tall Corn Cruisers KS/MO- Tornado Alley Cruisers LA- Bayou State Land Cruisers LA- Louisiana Land Krewesers MO- Gateway Cruisers MT- 406 Cruisers MT- Big Sky Cruisers NE- Flat Land Cruisers NM- High Desert Cruisers OK- Green Country Cruisers SD- Dakota Territory Cruisers TX- Alamo City Land Cruisers TX- Bayou City Land Cruisers TX- Lone Star Land Cruisers TX- Lone Star Land Cruisers - Austin Chapter TX- The White Trash of the Elwood Chapter TX- Toyota Trail Riders
-
North American Clubhouses - West RegionCA.BC- Coastal Cruisers CA.BC- Okanagan-Similkameen Land Cruisers CA.BC- Peace Canyon Toyota Swamp Donkeys CA.BC- Calgary Chapter: Swamp Donkeys
CA.BC- Vancouver Island Cruisers AZ- Copper State Cruisers CA- Beach-n-Toys CA- Central Coast Land Cruisers CA- Central Valley Crawlers CA- Gold Country Cruisers CA- Inland Empire Cruisers CA- L.A. County Trailcrew CA- Mountain Transit Authority CA- Pacific Mountain Cruisers CA- San Diego Cruisers CA - Santa Cruz Land Cruisers CA- SoCal 80's CA- Southern California Land Cruisers CA- Toyotally Awesome Cruisers HI- Hawaiian Island Land Cruisers ID- Treasure Valley Land Cruisers NV- Battle Born Cruisers of Northern Nevada NV- Southern Nevada Land Cruisers OR/CA- Jefferson State Cruisers OR- Cascade Cruisers OR- Central Oregon Cruisers OR- Portland Metro Cruisers UT- Red Rock Cruiser Club UT- Wasatch Cruisers WA- Central Washington Cruisers WA- North Sound Cruisers WA- South Sound Cruisers WA- Spokane Land Cruisers
Navigation
Install the app
How to install the app on iOS
Follow along with the video below to see how to install our site as a web app on your home screen.
Note: This feature may not be available in some browsers.
More options
Style variation
You are using an out of date browser. It may not display this or other websites correctly.
You should upgrade or use an alternative browser.
You should upgrade or use an alternative browser.
oL Milk Jug [60 Build Up]
- Thread starter under_psi
- Start date
This site may earn a commission from merchant affiliate
links, including eBay, Amazon, Skimlinks, and others.
More options
Who Replied?Lu came up to help me get the hard top on the goat this am. That little top either got a lot heavier sitting in the shed the last 2 years or he and I are getting old and weak.

Then we turned our attention to the ole Milk Jug to install the @lcwizard 4Plus FJ60 flip kit.

As always, a beautiful product. This actually moved his shocks up a bit as well. The Foam Cell Pro were at the end of the droop in stock position. This makes the geometry all better too. Clean Clean look.

We also added some ARB vent hoses to the diffs

Cowboy made sure we did not slack too much. Before he left Lou helped me move the 80 back into the shop so I can get the WooPow Mosley Motors head installed next week

Then we turned our attention to the ole Milk Jug to install the @lcwizard 4Plus FJ60 flip kit.
As always, a beautiful product. This actually moved his shocks up a bit as well. The Foam Cell Pro were at the end of the droop in stock position. This makes the geometry all better too. Clean Clean look.
We also added some ARB vent hoses to the diffs
Cowboy made sure we did not slack too much. Before he left Lou helped me move the
80 back into the shop so I can get the WooPow Mosley Motors head installed next weekunder_psi
SILVER Star
- Thread starter
- #83
damn oL MilkJug started running poorly on Tuesday afternoon. It was mainly an idle issue. Wouldn’t stay running until warmed without the choke on, or throttle applied. After it would reach a decent temp, it would lope and have a rough idle. I did a little searching and realized that was a waste.
i have the sniper and desmog kit on hand, so why not jump in. I have a DUI distributor on order, but it looks like it will be the 1st week in November until it ships.
So, i dove in while i had an hour to piddle yesterday afternoon.....i was able to remove the main actuator/smog solenoid rack in one piece. Even the bolts in the manifold came loose easily and for that, i am grateful.
Only have a couple of pics right now, because i have been tied up at work (for all the wrong reasons) most days and nights. Will piddle on it this sunday when i have time.
damn all this vacuum line junk. Reminds me of the “rats nest” under the UIM on my RX-7‘s. 11 solenoids and 68 different vacuum lines for the sequential turbo set.....this is essentially the same. Block off, idler, plugs, and voila.......mo power, leas BS.....
Right on. Right on.
Turns out it was probably the idle solenoid wire had grounded out but hell. We were committed to the Desmog anyway at this point

Air rail gone and plugged.

Air pump gone. Pulley via JimC

PCV/EGR mod
Mosley Adapter in place

Sniper bolted in

Air rail gone and plugged.
Air pump gone. Pulley via JimC
PCV/EGR mod
Mosley Adapter in place
Sniper bolted in
We left it with all the hard stuff done and waiting on a fuel pump. Throttle cable run. Wiring figured out. This went very smooth. I’m thinking with the pre work Lou did and what’s left this will be about a 10 hour job wothout going all into the the intake and exhaust. Gonna be sweet.
man, warp speed on the de-spaghetti and sniper. solid work and yes that’s going to be a sweet setup.
I do like those wheels, but is that as far as you can tuck them under the fenders? What do those tires actually measure out to?
I do like those wheels, but is that as far as you can tuck them under the fenders? What do those tires actually measure out to?
The FJ60 drag link hit the rims so they needed 1” spacers.
Tires are 34x11.50 on the truck
Lou had the Milk Jug 85% ready this am.
I piddles with some small items while he installed the electric pump and filters.

(Photo was taken before he zipped all the filters up)
We got it all done in a couple of hours and it fired up perfectly.

We ended up bumping the timing to 11* and then adjusting the IAC and in about 15
minutes we had all the gaskets burned in and took it for a ride. Runs perfect.

We used the clamp on O2 and the gasket smokes until it’s cured
I piddles with some small items while he installed the electric pump and filters.
(Photo was taken before he zipped all the filters up)
We got it all done in a couple of hours and it fired up perfectly.
We ended up bumping the timing to 11* and then adjusting the IAC and in about 15
minutes we had all the gaskets burned in and took it for a ride. Runs perfect.
We used the clamp on O2 and the gasket smokes until it’s cured
you meathead got it going on...
Late 84 and up 60s have the same bolt pattern as the FJ80. Beef.
Direct bolt in.
Brand new ToyoDa pump
Took us about 4 hours. No leaks. No weaving around. Turns the 105# meats in the asphalt with no issue.


Direct bolt in.
Brand new ToyoDa pump
Took us about 4 hours. No leaks. No weaving around. Turns the 105# meats in the asphalt with no issue.
Bomar
SILVER Star
Man great info....That would have saved me 3 trips to West TX offroad on my old 62..
under_psi
SILVER Star
- Thread starter
- #95
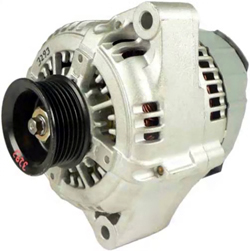
Piddling around this am, I decided to toss on my Quality Power one wire 140 amp alternator this am. It came with a supplied “J” bracket to fit over the OEM mount. Simple, right? Just one wire from the alternator to the battery. Seems legit.
I loosely fitted the brackets the way they are shown to go, as well as having ref’d the one install I’d seen here on mud.
it came with some extra flat washers to shim it with, and when I referenced the other install again, didn’t look like it used any.
I knew immediately that it wasn’t lining up, but I tightened it down anyway to get a reference as to how much I would need to shim it.Looks like 1”. Ooof. Gonna have to revisit that.
I then noticed that the belt didn’t fit in the pulley groove at all. It would probably work, but I don’t roll like that. So, I’ll have to revisit that as well.
so. I punted on that project like some bad carnitas and slapped the OE one back on.

See other member’s install below here. Pulley is different


I loosely fitted the brackets the way they are shown to go, as well as having ref’d the one install I’d seen here on mud.
it came with some extra flat washers to shim it with, and when I referenced the other install again, didn’t look like it used any.
I knew immediately that it wasn’t lining up, but I tightened it down anyway to get a reference as to how much I would need to shim it.Looks like 1”. Ooof. Gonna have to revisit that.
I then noticed that the belt didn’t fit in the pulley groove at all. It would probably work, but I don’t roll like that. So, I’ll have to revisit that as well.
so. I punted on that project like some bad carnitas and slapped the OE one back on.
See other member’s install below here. Pulley is different
under_psi
SILVER Star
- Thread starter
- #96
After that I decided to pop in the new horn contact. Mine has only been working when the wheel was in one specific position.
I popped off the horn cover & the column cover and removed the steering wheel.
While I was in there, I cleaned up most of the old dust and crap that had built up since ‘86.
The horn contact is a brass push pin w/ contact head & a spring with a very small clip, and the contact wire that slips over the end. You can definitely tell it’s worn comparing it to the new on.
The clip can be seen from overhead, on the top of the column, if you depress it. after 10 min trying to get the clip with some small tip needle nose pliers and a pick [mind you I can’t see anything that small up close] I realized 4 more screws would allow me to remove the multi switch plate.
From there it only took me about 5 min.
Thankfully I didn’t lose the original clip, as a slip of the pliers and the new one was lost in the abyss of the driveway aggregate.
I popped it all back together and it works like a charm.
Bad carnitas..... Funny.Piddling around this am, I decided to toss on my Quality Power one wire 140 amp alternator this am. It came with a supplied “J” bracket to fit over the OEM mount. Simple, right? Just one wire from the alternator to the battery. Seems legit.
I loosely fitted the brackets the way they are shown to go, as well as having ref’d the one install I’d seen here on mud.
it came with some extra flat washers to shim it with, and when I referenced the other install again, didn’t look like it used any.
I knew immediately that it wasn’t lining up, but I tightened it down anyway to get a reference as to how much I would need to shim it.Looks like 1”. Ooof. Gonna have to revisit that.
I then noticed that the belt didn’t fit in the pulley groove at all. It would probably work, but I don’t roll like that. So, I’ll have to revisit that as well.
so. I punted on that project like some bad carnitas and slapped the OE one back on.
View attachment 2488891
See other member’s install below here. Pulley is different
View attachment 2488894
View attachment 2488895View attachment 2488896
Dustin Messina
SILVER Star
Piddling around this am, I decided to toss on my Quality Power one wire 140 amp alternator this am. It came with a supplied “J” bracket to fit over the OEM mount. Simple, right? Just one wire from the alternator to the battery. Seems legit.
I loosely fitted the brackets the way they are shown to go, as well as having ref’d the one install I’d seen here on mud.
it came with some extra flat washers to shim it with, and when I referenced the other install again, didn’t look like it used any.
I knew immediately that it wasn’t lining up, but I tightened it down anyway to get a reference as to how much I would need to shim it.Looks like 1”. Ooof. Gonna have to revisit that.
I then noticed that the belt didn’t fit in the pulley groove at all. It would probably work, but I don’t roll like that. So, I’ll have to revisit that as well.
so. I punted on that project like some bad carnitas and slapped the OE one back on.
View attachment 2488891
See other member’s install below here. Pulley is different
View attachment 2488894
View attachment 2488895View attachment 2488896
Was it this one? I was eyeballing it.
Toyota Landcruiser HIgh Output Alternators
Toyota Landcruiser High Output Alternators Below are the available amperages we have for the Toyota Land Cruiser 1969 to 2016. Our high output alternators are a direct bolt-in replacement for your original factory alternator. Please note that we may need up to five working days to build...
www.qualitypowerauto.com
under_psi
SILVER Star
- Thread starter
- #100
Piddled around a bit more yesterday.
I have had some new window weather strip pieces for the doors and some of the @TRAIL TAILOR powdecoated door handles.
I like the dechromed look, so that was also part of the process when replacing the beat weather stripping. I have new rear and side window chrome-less gaskets, and will have them done next week, i am not going to do that.
if only you could get away with removeing the upper door chrome trim that goes around the windows.......
anyhoo. The door handles are straight forward for the front doors, but the rear ones need some modifying. There is a little beak shaped piece that screws into the OEM rear handle to catch the release lever.
Pro tip: Removing the rear door handle is a snap if you unscrew the door catch/latch. You can get your socket in straight to the rear bolt. I tried it before doing this and it was most difficult, and unnecessary. I left all the lever rods in place.
when i reinstalled the latch catch on the rear handles, i immediately noticed that they didn’t come close to lining up with the release paddle. The OEM handle has a longer piece that the beak piece bolted to. I assessed it and wasn’t ready to punt (let a door handle beat me), so i removed the handle and ground the attachment piece down (It was making the slightest bit of contact on the smooth/curved side. I chopped a grade 8 washer into 1/3’rds and tacked it into place on the handle piece. Reinstalled it and it works like a charm. Not the best fix, but was the best way to do it in a pinch. One other note, you will NOT be able to reuse the m5 screw that held it on the OEM handle. It’s too short, and needs a nut on the back side since the new pieces are universal, and have larger holes. I used a Toyota m6 bolt and a m6 lock washer.
anyway, the handles look good and i like the look of the no chrome window ledges. Didn’t take pics of that. Maybe later...
another task while in there was to use sound deadener. I had a glass company replace my windshield and the 4 window regulators recently. I’d asked them to put the noico in the fron doors for me. When i picked it up, the rear (Chy-Na) ones were a no go. The front are OEM regulators, but the rear knockoff’s gear is too long. So it was hitting the inside edge of the door at the hinge area. I bought them from cruiser corps and they said they all Should fit. But they don’t. I cleaned and greased the rear regulators and the glass runs as well. They seem to go a little easier not......my weak ass kid still can’t do it without strain and Drama.
i noticed that the doors didn’t feel/sound like they had the noico installed, but i took their word for it. What I found yesterday, answered my questions.....
they stuck the noico right on top of the inside of the door panels....right behind the door panels......fixed that too.....it was actually really funny. “That’s not how any of this works” was my immediate reaction....
 seems legit.

Test fitting the hack job....


Can definitely see the size of the gear isn’t the same. These were also not NEARLY the same quality....which is why i cleaned up and reused the OEM ones, as opposed to chopping off that regulator gear To make it work......maybe i can return them....

I have had some new window weather strip pieces for the doors and some of the @TRAIL TAILOR powdecoated door handles.
I like the dechromed look, so that was also part of the process when replacing the beat weather stripping. I have new rear and side window chrome-less gaskets, and will have them done next week, i am not going to do that.
if only you could get away with removeing the upper door chrome trim that goes around the windows.......
anyhoo. The door handles are straight forward for the front doors, but the rear ones need some modifying. There is a little beak shaped piece that screws into the OEM rear handle to catch the release lever.
Pro tip: Removing the rear door handle is a snap if you unscrew the door catch/latch. You can get your socket in straight to the rear bolt. I tried it before doing this and it was most difficult, and unnecessary. I left all the lever rods in place.
when i reinstalled the latch catch on the rear handles, i immediately noticed that they didn’t come close to lining up with the release paddle. The OEM handle has a longer piece that the beak piece bolted to. I assessed it and wasn’t ready to punt (let a door handle beat me), so i removed the handle and ground the attachment piece down (It was making the slightest bit of contact on the smooth/curved side. I chopped a grade 8 washer into 1/3’rds and tacked it into place on the handle piece. Reinstalled it and it works like a charm. Not the best fix, but was the best way to do it in a pinch. One other note, you will NOT be able to reuse the m5 screw that held it on the OEM handle. It’s too short, and needs a nut on the back side since the new pieces are universal, and have larger holes. I used a Toyota m6 bolt and a m6 lock washer.
anyway, the handles look good and i like the look of the no chrome window ledges. Didn’t take pics of that. Maybe later...
another task while in there was to use sound deadener. I had a glass company replace my windshield and the 4 window regulators recently. I’d asked them to put the noico in the fron doors for me. When i picked it up, the rear (Chy-Na) ones were a no go. The front are OEM regulators, but the rear knockoff’s gear is too long. So it was hitting the inside edge of the door at the hinge area. I bought them from cruiser corps and they said they all Should fit. But they don’t. I cleaned and greased the rear regulators and the glass runs as well. They seem to go a little easier not......my weak ass kid still can’t do it without strain and Drama.
i noticed that the doors didn’t feel/sound like they had the noico installed, but i took their word for it. What I found yesterday, answered my questions.....
they stuck the noico right on top of the inside of the door panels....right behind the door panels......fixed that too.....it was actually really funny. “That’s not how any of this works” was my immediate reaction....
seems legit. Test fitting the hack job....
Can definitely see the size of the gear isn’t the same. These were also not NEARLY the same quality....which is why i cleaned up and reused the OEM ones, as opposed to chopping off that regulator gear To make it work......maybe i can return them....
Users who are viewing this thread
Total: 1 (members: 0, guests: 1)