
Navigation
Install the app
How to install the app on iOS
Follow along with the video below to see how to install our site as a web app on your home screen.
Note: This feature may not be available in some browsers.
More options
Style variation
You are using an out of date browser. It may not display this or other websites correctly.
You should upgrade or use an alternative browser.
You should upgrade or use an alternative browser.
OEM Sub Tank or Aux Fuel Tank setups - For FAQ
- Thread starter Romer
- Start date
This site may earn a commission from merchant affiliate
links, including eBay, Amazon, Skimlinks, and others.

- Thread starter
- #22
From another thread, an important step on installing the Tee in the vent line between the hardline and the tank:
I bought the hose and used a cut down section between the hardline and the tee. The tank side was like glued on and access was crap. The hose condition seemed fine, so I cut that down and reused the side. I have a section of the hose I carry with me as a spare.
The hardest thing is finding a brass tee. I had to go to one of the old mom and pops hardware store and assemble a brass tee with 6 pieces of brass stuff. This made the length of the hose on both sides smaller and I had to cut some more off the hose after I first built it.
Ken,
Did you also replace the filler hose that goes from the hard line to the main tank?
A few more parts and I will be ready to finish this install.
I bought the hose and used a cut down section between the hardline and the tee. The tank side was like glued on and access was crap. The hose condition seemed fine, so I cut that down and reused the side. I have a section of the hose I carry with me as a spare.
The hardest thing is finding a brass tee. I had to go to one of the old mom and pops hardware store and assemble a brass tee with 6 pieces of brass stuff. This made the length of the hose on both sides smaller and I had to cut some more off the hose after I first built it.
- Joined
- Sep 17, 2003
- Threads
- 69
- Messages
- 4,620
- Location
- Sunnyvale, CA
- Website
- www.george4wd.taskled.com
For the rivnuts there's a tool (similar in concept to the bolt/nut/washer scheme above, i.e. it is very low profile. The main 'advantage' of the tool is that the nut-washer part has spurs that 'bite' into the face of the rivnut to prevent it spinning while you are tightening the bolt part to compress the rivnut. You use two spanners to set the rivnut, one to turn the bolt and one to prevent the nut-washer (with the spurs) & rivnut from spinning.
I borrowed the tool from a friend, not sure where he got it from. But it was cheap and works a treat on rivnuts. He had several sizes of them to cover the common sizes of rivnuts.
We used the same tool (smaller sized one) to set the rivnuts in our snorkel installs.
cheers,
george.
I borrowed the tool from a friend, not sure where he got it from. But it was cheap and works a treat on rivnuts. He had several sizes of them to cover the common sizes of rivnuts.
We used the same tool (smaller sized one) to set the rivnuts in our snorkel installs.
cheers,
george.
That Rivnut tool(s) came from Olander in Sunnyvale, CA. They supply fasteners and tools to a lot of the Silicon Valley companies. They have had a good selection of Rivnuts in inch and metric and the inexpensive low profile tools in-stock. They also have the expensive "real" tools - two kinds IIRC - on the tool board behind the counter. Had access to the real tool a time or two via work and via another 80;s Bay Area friend. FYI
Instead of the T I used a Y fitting that was rated for fuel when transfering the fuel it is a straighter shot to the main tank less going back to the filler neck.From another thread, an important step on installing the Tee in the vent line between the hardline and the tank:
I bought the hose and used a cut down section between the hardline and the tee. The tank side was like glued on and access was crap. The hose condition seemed fine, so I cut that down and reused the side. I have a section of the hose I carry with me as a spare.
The hardest thing is finding a brass tee. I had to go to one of the old mom and pops hardware store and assemble a brass tee with 6 pieces of brass stuff. This made the length of the hose on both sides smaller and I had to cut some more off the hose after I first built it.
- Thread starter
- #26
Instead of the T I used a Y fitting that was rated for fuel when transfering the fuel it is a straighter shot to the main tank less going back to the filler neck.
Can you post where you got it and part number? Is it brass?
I made this after searching for 2 weeks while I ran a plastic T. Was not comfortable with the plastic T.
Can you post where you got it and part number? Is it brass?
I made this after searching for 2 weeks while I ran a plastic T. Was not comfortable with the plastic T.
http://www.eldonjames.com/html/Automotive_HTML/BN_ycon.html
Black Nylon is for fuel
This worked very well.
Last edited:
downsizing to pump
The other way to do this is use two hose barb reducers. Use a 1/2" T and then a hose barb reducer 1/2" to 3/8" and then 3/8 to 5/16". I think it would be best to use a 1/2 to 5/16 but I didn't find one.
chris
The other way to do this is use two hose barb reducers. Use a 1/2" T and then a hose barb reducer 1/2" to 3/8" and then 3/8 to 5/16". I think it would be best to use a 1/2 to 5/16 but I didn't find one.
chris
Cruiserdrew
On the way there
&*%$ Rivnuts
Rivnuts--------3
Home team---0
Not to rehash the whole rivnut thing, but the one that installs on the right side above the the cross-member is a bastoid.
I finally gave up after installing 3 and having all 3 be failures. Knocking one of them out I boogered up the hole a bit, so even though I had a good shot at #3 it wouldn't seal in the hole right. So.....
I was going to weld to that body seam, but wanted to be able to take it out again easily. Instead, I cut a 7/8 hole with a hole saw next to an existing hole in the rib. There is then just enough room to install a steel backing plate with a 7/16 hole drilled in it. Then you can carefully feed a 7/16 bolt through the mounting strap and a nut into the inside of the rib. Then working through the hole you can get a wrench on the nut and tighten the bolt from below.
It makes an extremely solid connection, and in the end is a superior way to mount the sub tank strap. I saw the forward Rivnuts pull out of Clownmidget's truck in death valley, and having now done this myself, I think it's because it is hard to install them properly. The backing plate, bolt and nut are never coming out of there. Not to mention it's a 7/16 bolt so extremely strong in this application.
Anyway, I thought I'd post up and put up a pic in case anyone else is struggling with those damn Rivnuts. I got all the other rivnuts installed without too much drama, but I may go back and install the left side tank strap the same way I did the right.
Last edited:
Cover that hole with something Andy so that the floor member does not fill up with water or debris. Mice will get in there too.
Cruiserdrew
On the way there
Cover that hole with something Andy so that the floor member does not fill up with water or debris. Mice will get in there too.
Remember there is already a 14mm hole right there! I am going to weld an 1/8 plate over it tomorrow. I was just sick of fawking with it today.
- Thread starter
- #32
I just welded it there. I can get the tank out as long as the ones near the rear crossmember have rivnuts/bolts. I could then have the empty brackets or with a die grinder, take it out later. Thats what I had to do as the first time I welded it, I had the brackets in the wrong spot.
Here is a pic of the tool I used for the riv nut under the frame.
It is a long thin piece of metal (simpson strong tie from home depot)with the bolt OD diameter drilled thru one of the existing smaller holes.
It worked as a handle to hold the riv nut in place as you wrench it down.
You should put some grease or oil on the bolt to help it tighten without spinning the riv nut. You could also use a thin lock washer between the riv nut and metal if needed.
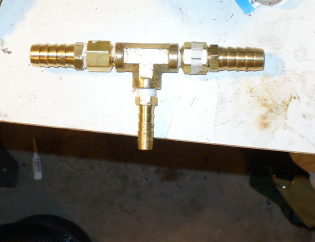
Also here is a pic of the Y fitting for the fill hose from the sub tank.
With a T in there Fuel was almost coming out of the filler neck. It was working but just wanted to make it a little cleaner.
It is a long thin piece of metal (simpson strong tie from home depot)with the bolt OD diameter drilled thru one of the existing smaller holes.
It worked as a handle to hold the riv nut in place as you wrench it down.
You should put some grease or oil on the bolt to help it tighten without spinning the riv nut. You could also use a thin lock washer between the riv nut and metal if needed.
Also here is a pic of the Y fitting for the fill hose from the sub tank.
With a T in there Fuel was almost coming out of the filler neck. It was working but just wanted to make it a little cleaner.
Last edited:
Do you have a part number and website for that T fitting?
http://www.eldonjames.com/html/Automotive_HTML/BN_ycon.html
The Black Nylon is for fuel.
- Thread starter
- #36
Thanks that picture did not look like black nylon. I think we had the link for the black nylon earlier.
Cruiserdrew
On the way there
It's done
Finally, the subtank install is done! I started the project in September when Ali was here to do Rubicon. He brought me the nutsert tool to get started with the tank mounting. This is after 2 years of collecting parts, including the tank from dclee, the switch from Christo (the last one) and the electronic module from George Scolaro.
As anyone who has done this can tell you, there are lots of tiny details that are critical to the eventual operation of this mod. The one I struggled with was which wire from the sender carries the empty signal? It turns out, there are several versions of the sender with different colored wires. George shows it as red, Mangler has yellow with a blue stripe. Mine had both! To make a long story short, Mangler was right-it's yellow with a blue stripe. On some it is yellow with a green stripe. The wiring is the biggest PIA of this project.
George was very helpful to me and tolerated several phone calls from me trying to get things straight. So George-If you see this, thank you for your assistance. Speaking of which, George's module ROCKS. THat's the best $25 I've spent since I bought his LED lights. If you are doing this swap, you want George's module. Unlike some, I kept all the wiring and the module behind the dash. It fit and there is a nice spot above the ashtray and below the radio box.
So yesterday, I finished, filled the subtank, hit the button and........nothing. Zilch, Nada. Damn. It was too dark to tear the dash apart again. So I slept on it. Today, I tore the dash apart again. Just for grins, I tested the main power supply----no power. Yippy, problem found on first attempt. I chased that down to a bad fuse, replaced, hit the switch and the pump started humming. I could actually hear the gas trickling into the main tank. I sat under the truck to make sure it would shut off at the end, and right on schedule (about 25 minutes) it shut off. I am in business.
I'm posting this to thank George, Romer, and Boston Mangler who all answered questions and PMs to help this electrically challenged newbie through the process. I also want to thank Cruiserdan for getting me all the parts and helping me figure out the connectors and how they come apart. Ali was a big help as well with the proper Rivnut tool and encouragement of the electrically challenged.
Cruiserdrew
On the way there
congrats andy, no more jerry cans for you! i guess you will test those rivnuts at DV!
Indeed I will. The easy riv nuts in the rear body rib are solid. I'm not worried about those. The really hard one has been superceeded by a real nut and bolt. The only one that could be a problem is the driver's side forward one. I think I got it very solid.
I found out the subtank from dead empty holds 14.5 gallons. That gives me 40 gallons on board which should be plenty for DV. I can't wait for my first $200 fill up.
Andy,
Congrats, I'm going to do the subtank install this springs, right now I'm collecting bits and pieces. What kind of fuel transfer pump did you use, OEM? I maybe giving you a phone call when I'm ready to do mine.
Congrats, I'm going to do the subtank install this springs, right now I'm collecting bits and pieces. What kind of fuel transfer pump did you use, OEM? I maybe giving you a phone call when I'm ready to do mine.