New 80 owner, head gasket, and build...

This site may earn a commission from merchant affiliate
links, including eBay, Amazon, Skimlinks, and others.

Finished up routing the cb antenna cable, I ran it through the hatch, behind the interior panels, and under the carpet to the center console. I used a small fish tape to feed it through the hatch and into the side panel from the headliner. I installed a '07 Camry power outlet with the flip cover in the console. The plug is a spare from my parts bin that I modified to fit. I spliced it to the yellowish plug which had key on power and ground(blue power, white ground).

IMAG0460.jpg

IMAG0461.jpg

IMAG0462.jpg

IMAG0472.jpg

IMAG0471.jpg

IMAG0472.jpg

IMAG0473.jpg

IMAG0475.jpg

IMAG0476.jpg


Another project I finished up a few months ago:

IMAG0477.jpg


That is a Fobus paddle holster holding a Glock 17. That's my backup gun since I carry most of the time, lol.
 
IMAG0484.jpg

IMAG0483.jpg

IMAG0482.jpg

IMAG0481.jpg


I finished the trans, t-case, and front axle breather extensions. I used a new oem breather for the front axle and extended the line with 1/4" fuel hose and a 1/4" hose barb. The trans and t-case lines are open until I find a filter for them.
 
Which OEM breather part number did you use?
 
43209-60050

The catalog shows the front and rear as this number, but the front frame bracket is different, but it is same for rear. It didn't make any difference to me since I mounted it in the engine bay. When I ordered these, they were the last 2 in the US, but there may be more in stock now. If going remote mount, another model like tacoma breather would work also, and may be cheaper. These were 20 something my cost each.
 
This morning I replaced the distributor connector housing as well as the coil.

IMAG0496.jpg


Here is my old connector with the tab broken off.

IMAG0497.jpg


There is a tool to de-pin connectors but I just use a pick. Start by prying up the white lock tab and pull it out.

IMAG0498.jpg


There are small black tabs that hold the pins in, they need to be bent away from the pin while pulling the wire out the back side.

IMAG0499.jpg


Here is the de-pinned connector, you can see the tabs here. Most of the time the tabs just break on old connectors as mine did.

IMAG0500.jpg


Here are the pins, the square is where the tab locks into.

IMAG0501.jpg


Slide pins into new connector, should hear a click when they are in all the way, and prress in the white lock tab.

IMAG0502.jpg


Done. I did the coil also and I used oem connectors.

IMAG0503.jpg


Here are a few pics from my O2 sensor relocation. This only works on 93-94 models with pair deleted. I had the oem O2 plates installed after my pair delete.

IMAG0504.jpg


I used the O2 sensor recall kit since the recall was still open on mine when I checked TIS. The kit includes gaskets and nuts.

IMAG0505.jpg


Plates off and harness rerouted.

IMAG0506.jpg


Sensors mounted.

IMAG0507.jpg


I routed this wire behind the a/c line to hold it in place without zip ties.

IMAG0508.jpg


This wire was routed under the cruise control and air box.

IMAG0509.jpg

IMAG0510.jpg
 
I picked up these 1/4" small engine fuel filters to use on the trans and t-case breather hoses.

IMAG0511.jpg


Installed.

IMAG0512.jpg
 
The trans and t-case lines are open with no oem valves and terminate at the dipstick. I didn't know if this was a function design or cost design so I added filters and stayed with an open line.
 
I have not posted an update in a while but have been wrenching when I have free time. Installed missing fuse box cover and new gas pedal for the oem hand throttle.

IMAG0516.jpg


I installed a vacuum cap from a 3.4l Tacoma since the aftermarket cap was cracking already.

IMAG0518.jpg


Replaced upper and lower shock bushings. The old bushings were flat and causing clunk sounds over bumps.

IMAG0519.jpg


Oem hand throttle installed.

IMAG0520.jpg


IMAG0521.jpg


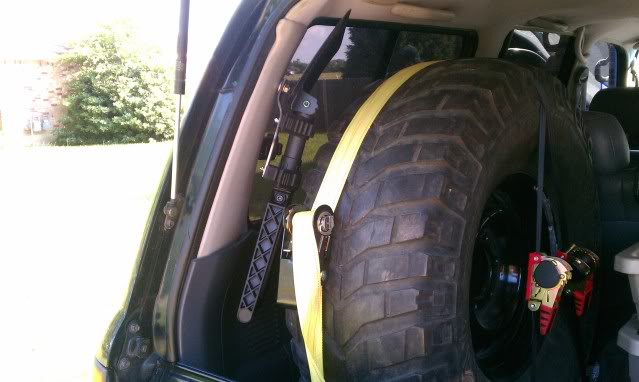
I did the spare tire mod. I used 1/2" steel tube cut to 80mm and painted, and metric bolts 90mm or 100mm(I can't remember).

IMAG0524.jpg


IMAG0525.jpg


IMAG0526.jpg


IMAG0527.jpg


Today I installed these:

IMAG0554.jpg


IMAG0555.jpg


IMAG0556.jpg


315/75R16 BFG All Terrain K/O, I will have 30mm front and 15mm rear Ironman spacers here Tuesday and installed by the end of the week. I am going to break them in at small offroad park next weekend. Now I have to save for a lift.
 
Yesterday I installed Ironman 30mm front and 15mm rear spacers. I changed the diffs and t-case oil to Toyota synthetic 75w/140 that I got free. The thicker oil actually made my rear diff less noisy. It has a whine about 60mph and is much less noticeable now which us why I wanted to try this oil. I also checked the alignment and set the toe. The caster was a touch low, but it drives great. I will add some caster correction after I lift it. I trimmed the front bumper ends since it was rubbing very slightly on one side.

IMAG0566.jpg


IMAG0565.jpg
 
Last edited:
I am off work for a few days so I have been repairing a few small things and finally installed the drivers window run. I also started on my roof rack using Gamiviti gutter mounts and my OBA with a york 210 and used bracket.

IMAG0583.jpg


IMAG0585.jpg
 
Great build. Man you got that head off fast and make it look so easy.

Thanks. It helps being a Toyota MDT, lol. I have been working on cars for a living almost 11 years. I also have the luxury of using my bay at the dealership for bigger projects like the head gasket.
 
I finally finished my roof rack and mounted it on the truck and actually used it this weekend on a 3 day camping trip to the lake. It is way over built and I spent way more than I had planned, but it works great. I originally planned to use the atv ramp idea, but changed my mind and just built my own from scratch. I used 1.5" aluminum cross bars, 3/4" thick wall aluminum front to rear bars, 1/4"x2" aluminum floor slats, and 1/8"x3" aluminum trim. The f/r bars are bolted to the cross bars with 1/4" stainless bolts, and the floor bars and trim is held by 5/32" rivets. It's painted flat black with rustoleom and the floor is rustoleom bedliner. It is actually very quiet.


I made these mounts up a few days ago and have since painted them. They are holding a Gerber camp axe II, and a Gerber e-tool folding shovel with quick fist.


i am a mechanic too and wow ... impressive work but you know your product !
 
Yesterday I installed Ironman 30mm front and 15mm rear spacers. I changed the diffs and t-case oil to Toyota synthetic 75w/140 that I got free. The thicker oil actually made my rear diff less noisy. It has a whine about 60mph and is much less noticeable now which us why I wanted to try this oil. I also checked the alignment and set the toe. The caster was a touch low, but it drives great. I will add some caster correction after I lift it. I trimmed the front bumper ends since it was rubbing very slightly on one side.

IMAG0566.jpg


IMAG0565.jpg

That color is the absolute bestest!....imho

I was dreading my eventually head gasket job but am further motivated by you.

Mahalo for the great and simple write up.:bounce:


I worked a half day and the other half on the LC since I was supposed to be off. I installed the 2nd battery and tray, and installed an early 4Runner washer bottle in front of the main battery. I need to fab a bracket to secure the bottle but the wiring is extended and the hose rerouted.
 
Do you have the part number for the plastic injector harness/clip thats on the main harness?
 
York 210 OBA and other updates...


Finally made a bracket for the 4runner washer bottle.


I wanted to take more pics of the steering box rebuild, but took longer than expected and didn't take the time to. I am almost leak free now, distributor is my last and only leak.


Here is my York 210 OBA. I am using a bracket from a member here and I added an idler using the a/c tensioner pulley. I am using a longer a/c belt and driving it from the crank pulley. I replaced the a/c tensioner pulley with a flat aftermarket pulley and added 2 nuts to the adjustment bolt to reverse tension the belt.


The pulley setup was done this way to increase belt wrap around the a/c compressor and help prevent belt slip.


I am using a Viair manifold, 3/8 check valve, and 110/145 pressure switch, all 3/8 dot hose and push fittings and an Ingersol coalescing filter. I have a quick connect on the manifold and rear bumper.


2.5 gal Viair tank.


Here are a few pics of the York with the bottom cover removed to add the sight glass. I sealed the cover with fipg since the gasket tore and I didn't want to wait for a new one.


My surprise for the texters that think it's ok to not pay attention when driving.
 
nice build, keep it up. are you in a TX county that does safety inspection only? i'm in harris county and was wondering if i could pass the emissions test with the mods you've done to your truck's exhaust.
 

Users who are viewing this thread

Back
Top Bottom