Need Oak heat switch install info.

This site may earn a commission from merchant affiliate
links, including eBay, Amazon, Skimlinks, and others.

Don't worry about what color the wires are. They all have the same circuit in order.

See pictures and go from there

Picture1: from the switch

Picture2: to the other end of the wire connects to the 2 plugs under the center console.

Sent from my hawn finga using IH8MUD
ForumRunner_20130124_181119.webp
ForumRunner_20130124_181141.webp
 
Just double checking here. first pic is the driver and pass heater plugs, correct?
Next pic is the pos. and neg. ends of the heater kit. Where did you guys see the plug to direct fit the power plug from? Do I unplug the other end of the 2 red & black (power) wires and use that terminal?
And, how do I disconnect the terminals from the switch? Don't want to crack the plastic housing.
Thanks.
SSSS plug.webp
SSSS.webp
 
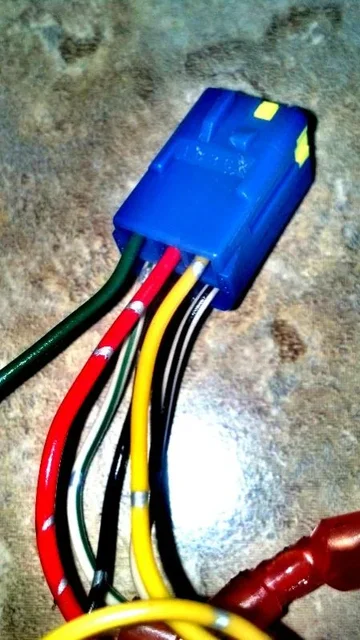
Blue plug
NUM OF PLUG/COLOR/DETAILS

1: Y, LOW
2: R, 12V
3: G, ILLUMINATION
4: W-B, GROUND
5: B, HI
6: W-G, ILLUMINATION

Clear plug

1: L-O, LOW
2: R, 12V
3: G, ILLUMINATION
4: W-B, GROUND
5: L-Y, HIGH
6: W-G, ILLUMINATION

ForumRunner_20130125_145851.webp


ForumRunner_20130125_145927.webp

Sent from my hawn finga using IH8MUD
ForumRunner_20130125_145851.webp
ForumRunner_20130125_145927.webp
 
Where are the blue plug and clear plug located?
Ohhh, those plugs are out of the heat switch.
 
Last edited:
Ok I will scan my jibberish to pdf and post it
 
Where are the blue plug and clear plug located?

Those go to the switch, honestly dont remember what side of the ls the blue one was on but I put it ds
 
This picture of the DS console plug showed what looked to me as 2 white/black stripe so I nipped the illum and soldered first, It might be a dark dark green and maybe my eyes are shot but I swear the illum ground and main ground look identical.
IMG_8544.JPG

Bad pic but I looked thru and couldn't find a better one of the DS console.
 
here they are, sorry I don't have time to touch them up, got a lot going right now. Hope this helps, as always if you're not sure trace continuity, hook up switches but not seat side one and put a meter on it when you go from high to low. As many have said you can literally burn your rig to the ground if you don't pay attention, unlikely you would but still possible.
 

Attachments

here they are, sorry I don't have time to touch them up, got a lot going right now. Hope this helps, as always if you're not sure trace continuity, hook up switches but not seat side one and put a meter on it when you go from high to low. As many have said you can literally burn your rig to the ground if you don't pay attention, unlikely you would but still possible.


I can't agree more. This is why I have waited this long to put the switches in the console for the seat heaters. I will attempt to solder the wires without burning up the truck and burning down the garage. There isn't alot of room to solder wiring between the seats.( You did a great job at that.)

Did you use the red and black wires for power in post # 22 or is there a power source to plug into under the seats?

Thanks very much for posting the diagrams.
 
This picture of the DS console plug showed what looked to me as 2 white/black stripe so I nipped the illum and soldered first, It might be a dark dark green and maybe my eyes are shot but I swear the illum ground and main ground look identical.
IMG_8544.JPG

Bad pic but I looked thru and couldn't find a better one of the DS console.

The wire looks like it is #6 white/black stripe.


School me on getting the power from the heater to the switch.
 
The console provides 12V power already so I used that, you'll solder Shane's 12V AND the swtich on the same wire, I had a large ground ring already installed when I put in the stereo amps so I used the ground for it but you could use the 12V ground on the console side too. It's hard to tell but you'll see two wires spliced in on the 12V pigtails on the console in the pictures if you look closely.

I've seen guys do it under the seat too but since the stock heaters are on the same fuse as the rear heater that I don't use anymore I opted for that and put in a smaller fuse, I think I went from the stock 25 to a 20, figuring any issues that I might have would end there rather than a burned down rig. I chose the console tap for power only because the seats always have power, they are fused but are always hot, I wanted to make sure when the key was off everything was dead seat heater wise and I wouldn't have to worry about any transient drain problems later.

I like you was doubtful and worried so I opted to just plug in a switch pushing the wires into the console pigtail first and making sure everything worked on the seat side with a meter. You don't need to power the heaters yet to do this, you're just checking to make sure the high/low signals are being sent, the LED's work, and everything is dead when the key is off, it definitely will install confidence knowing things work before you commit to nipping and soldering . I don't know how much you've soldered but a quick tip, tin both ends of the wire first, this way you can just heat them both up and stick them together without fumbling for more solder.

You'll notice that on the seat sides to the matching console there are TWO wires that are identical because they actually run to and from, these are the HIGH LOW wires that you'll use yellow and blue from Shane's kit, you can either splice them in under the seat or push out the pins on Shane's connector and slide them into the stock like I did. Put them under some good light and you'll see that Shane's connector has a locking tab, undo that and then look inside the back side, you'll see the catch that keeps it in the connector, slide a small screw driver up inside that as far as you can, NO BRUTE FORCE HERE, and then firmly hold the wire and the screw drive and pull back out, should slide out with minimal resistance, if you deform the hump on the pin don't worry it's pretty easy to straighten out, just no BFFI (brute force and effing ignorance)

DON'T forget the diode, I had done the DS first and then forgot to add a diode to the pass side AFTER I had already soldered it all, PITA. I doubled up on shrink tube and then used that cheap snake stuff found at harbor freight to wrap and then 3m black tape.

Since I was worried about the pigs being long enough I put them in the lower slots, you'll have to scrape a bit off the ends of the console to do this or you can't orientate them the right way, this gave me enough room to pull the connectors thru and plug the switches in. Mine was tight because I put 3 additional 12v outlets in the front console and 2 more in the rear and customized what was the rear heater outlet to LED panels that light up the back floor when the rear doors are open, so getting the consoles back in was tricky to say the least because I had a half dozen wires in the front and rear console to contend with.

If I get some more time I'll video the pin removal with the other end of Shane's kit under the seat you'll have the extra black and red wire, there are really only ONE red and ONE black going into the control box, they're just spliced together, you can feel where if you run your fingers from the control box back to the first four pin pig tail. I thought about stripping them back and nipping them but folding them over and shrink wrapping the ends seemed much easier to me plus it leaves the pins on the wires should I ever need them again, of course the red will be hot when the heaters are on so double shrink or tape it, you don't want it coming in contact with the metal on the seat bottoms.

OK rambled enough, hope I didn't confuse you more!
 
Last edited:
Warezdog, thanks much for your input. I'm slowly progressing.
The pigtails on the oak switch wiring are just too short. I need to get some wire and extend them about 6" . If you ever have to pull the console again, ( and I'm sure I will have too ) you couldn't get under the console to pull the switches, to pick up the console. What size wire should I use to extend the switch wiring?
Whats worse- I can't seem to get the pigtails apart from the switches. Any ideas?
Next, I need two diodes and shrink tube. I'm hoping Radio Shack has them.
I pulled the seat out of the truck. Don't anything I can plug into that looks like any of Shane's kits plug though.
URGH.
 
Found the diode on line at radio shack and searching other posts regarding seat heat install I found connector housings and pins.
Anybody know if there is a tool for wiring together the 6 pins to male connectors to fit the 2 female heat plugs under the console? Or would it be easier to just add more wire to lengthen the pigtail wiring and solder the connections?
 
I would imagine you'd need a molex tool to crimp the pins properly to install the new plug, I didn't have time or money to wait on them anyways so I just soldered them. I think any stranded gauge close to stock would work, if in doubt go a bit larger, also harbor freight sells little kits of shrink tube too.

Personally I'd just extend the pigs and solder it in but that's me. You'll still have to run Shane's power plug to the seat but you can remove the orange and blue as described and push them into the stock seat side connector. I didn't have time to video removing the pins from Shane's connectors but if you're worried just give it a whirl on the switch side plug, you're not going to use it anyways.

They slide right out when you have a micro screwdriver inserted on correct side, just push it in till you feel it stop and pull both out. If you're on the wrong side you'll know, if memory serves me correct when you open up the hinge the screw driver goes on the hinged side under the connector.

You could always make a yard trip and look for longer pigs an maybe matching console ends and just solder the two together as well, if nothing else find an ES300 even without heat switches the pigs are still there, bring a saw and prybar to hack out the console enough you can get your hands in there with a nippers to get as much as you can.

BTW the pig switch end just use a small flat screw driver to get the ramp on the pig to pass the switch, not too much or you'll crack the switch housing.
 
You could always make a yard trip and look for longer pigs an maybe matching console ends and just solder the two together as well, if nothing else find an ES300 even without heat switches the pigs are still there, bring a saw and prybar to hack out the console enough you can get your hands in there with a nippers to get as much as you can.

Thanks for your help again.
Think I'll forget the idea of the pins and solder them in.
This will be one of my projects for a later date.
For now I installed the original switches. I'll grab some blanks from the dealer and drill out a hole for these switches for now.
:cheers:
 
No prob, I try to walk a couple yards a month in search of LC goodies and I'm on the hunt for a steering wheel so I'll be looking for a ls400, if I see any pigs I'll let you know.
 
Sweet. That would be great.
I had the chance to buy a 1997 80 with a blown/broken motor over the holidays. The guy wanted $1200. it was over my $ pain threshold. But, the first thing I was going to do is pull the steering wheel and send it and some $$$ to Shane for a new one.
 
Was going to do the same thing with Shane because his leather is so tits but I just don't have $450 to toss at a wheel right now, so many other things to do, rear IPOR, sliders, Depo's etc are higher up on the list. I'd be happy to get something close to matching out of the yard for $25-50.

Now if I had an extra wheel barrow full of cash taking up space in my guest house (don't have guest house) I'd go the Shane route and have the shifter done too.
 
Hmmm. so what year LS400 is like the 80 steering wheel? I'll keep an eye out around my neck of the woods.
 

Users who are viewing this thread

Back
Top Bottom