"Mi Toyota es Fantastico" - Spanish BJ73 (1 Viewer)

This site may earn a commission from merchant affiliate
links, including eBay, Amazon, Skimlinks, and others.

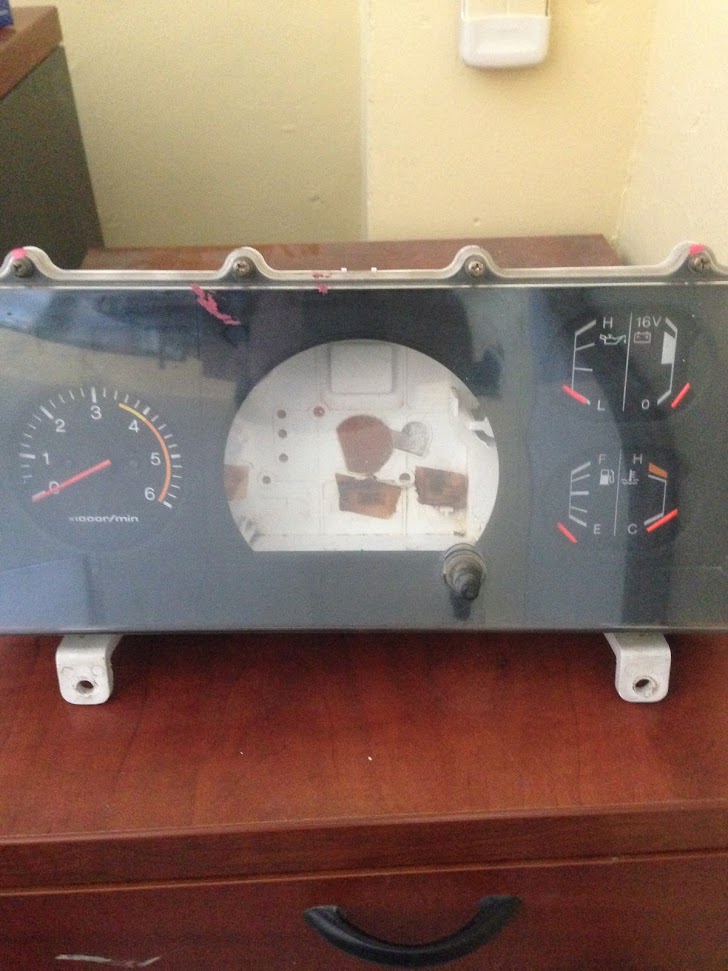
Price for that 12v cluster ?

Not for sale yet. Not sure if you are asking for it or asking what I paid for it? But, If you want it I'll give you first crack at it if I do decide to sell it.
 
Well, it appears I may have my first problem with the 73. I recently returned from about 18 days of being out of town and went to start the 73 up and no joy. I drove it the day before I left just to make sure everything was good to go and didn't have any issues.

When I attempt to start it nothing happens with the exception of some of what I assume are the relays clicking back and forth. Can you tell I'm not a master mechanic?? Other than that, the motor doesn't turn over at all.

I took the batteries out and I'm having them tested/charged on a stand-alone charger we have at work. So far I think they are looking ok. Showing 27.6 volts together right now.

I'm starting to think it may be more of an issue with the starter or maybe the relays because I have had an intermittent issue in the past. Probably 2 or 3 times over the course of the last 3 months there has been a time when I went to start the truck and after it started it sounded like the starter was still spinning very rapidly, very similar sounding to a jet turbine is the best way to describe it. Once after I immediately turned the truck off it continued to spin and "diesel" (not sure if that is the right term) or run the engine for several seconds.

I'm going to reinstall the batteries tonight and give it one more go. If it doesn't work I'm probably going to have it towed to the local mechanic. That is no small feat in itself as the truck is at the bottom of my 10-15* downslope drive and has to get through a very narrow gate at the top. If it appears unsafe to extract the truck I may try to remove the starter myself assuming the starter is the issue.

I have searched and read a few threads on similar issues and seems the consensus is to rebuild the starter if that is the issue or replace relays. Anything else I should be looking at?
 
Last edited:
Just a quick follow-up since I jumped onto another thread in the diesel section. I re-installed the charged batteries and the truck fired up the first try. No issues since and drove to work today just fine. Counting my blessings that it was an easy fix for now.
 
I'm curious what the consensus is on having springs rearched? Good, bad or in different?

I'm planning an extreme budget suspension refresh to include new shocks and bushings and planning to go this route until I decide what the final plan is going to be.
 
hi,
that cluster is same with my lj 73, engine 2lt. maybe fuel gauge is usefull if yours starts to show spikes on either temperature or fuel.
first one is scary, you have loads on info on mud on it.
 
I'm still working (slowly) on the cluster. Thank you for the info.
 
Here's a little project that I have been (very slowly!) working on. The concept is to merge a 12V cluster that I pulled from a VM73 and a 24V cluster from a 3B to give me the factory tach that I don't currently have in my 73 (24V). Ideally I'll be able to leave my original instrument cluster completely unmodified just in case I need to return to stock.

I guess I should start by saying that I have never done anything like this and have no idea if it will work without significantly more modification.

When I found the 12V cluster in the junk yard I didn't know immediately that it was a 12V cluster. I had assumed it was a Euro spec Cruiser and it would be 24V but being a Portuguese spec VM powered Cruiser it is 12V. It would have been perfect because it looks brand new and would have been a nice swap.

A couple weeks later my friend and I found another 3B powered Cruiser that had already been pillaged. I managed to grab the cluster from that one as well. The problem with this one is that the gauge faces were starting to corrode and I don't think they can be salvaged without a lot of work.

So the plan now is to swap all the faces from the 12V gauges to the 24V guts of the cluster, assemble and attempt to install in the Cruiser. I'm working with a couple guys in the office who are professional electricians and mechanics so I'm not totally in the blind which is nice.

Here you can see the state of the 24V cluster.
ugnQj0ecQc4ose90gjsbmw9LkhxhZ-gucx9CyBvuawVSFy1z1s--XhOZKDxBuaScf786lUqEbmvdrb7FRdzuYrzoKRIkF813fLG_Rxg7m_xIzef93bY59YAiqvgxJ-Dw7DqqBF7twtFoPC_haheGR9nNaJ_XR9tySk5Je7i7FysTaZEcSZ5qR5hj7326SUj4zYWsvDxbc6pOVoFHIRSLm69MFevM5Qg8WUoL1Dcdn19GkMIuR5pEMMWyQ3T4sMded1-v_jUOdXngWwARkPxQRtv9OigKAUihL2E6SqhsvpcsJ4Tq3fo1fDfLwbkAlOlAg-Rn2vVY6txcg9Lea2SWB9zQbsi5w-iprLTpi7-oLCf4uQZUZ8VZYtL_pLKZGMls9f05vNdNf4ZZNcKLJUCRLATohcgQl0oKKo6_CPqj0l0b58AVMBUtc59OZsd9KJFfVwTgEIV7ajMiJ-1lzURY0C5FRPBqUgn8uMTvpE_p7O8CraaOpptGq_zzJaUlFQXEQDfh6Up22rIT2Nmhig-RyLuHoGpW5oRq822__OIsvZOyrSBGRBKwjj9qKfEUiR79myfgOy_2nO1FALRC30xsFvuSlX-_j2g=w1619-h971-no

aeOK3LUbdkPdbQoPlV-V7379d4G82KQ0NZ5wn0iZtEk1MKzHt0pHhvVXKdDibA4ka9zGNSPiz_IM1vcwDFB_U8bhDHQUMh2lmyErWfH7By7j-xF20hdxZAp-ONKYmbvvac5E9f3vANaXKijvV1nzhlaq-c_-zbuwoE8Oc2mQtIhOknXkDDjPgSaGeLbO8BPtgWu-vxSQB7DaPM0KejtbWg_wFvvWm6gQ_sDwXlRW-61bdh_Y4Y2fPJGaYGVis7riDswiTHGL5iZinSOLT1E5AdCgf_LyBRfldpbN4t0bo58ccWCwQVdY7WUEvT3cgxiQP39tPfDRA0STelnP6crbAPihl9fR3K6fWV8b_fz9rAdX2zNNeC5s0hIhNG5K1jRi5gFMELZENPv1WyuMf95AWHC5YiNSeFvzbtAFhkuc_MBDI6ozwkW5kA8y2Aa8OW3vzT0Q7sYiE5Rgx55kc0i3KH9QtYGC7KuBLshApIlC7DTxu-tuBIhaFHx5ry5dZtHe2XvcEeq1vAcYvfVPdB7Yaqqp4Vw2MYj5y_uPq9wE2jQ3r2TmFdbWHRg38DOJrkxQ0Ru_daVTywSuPA-j6KHFVkapURIwGQQ=w1619-h971-no


Disassembly starting. 12V cluster in the background (so clean!)

dD6WU7RhLqJyR5HyWbY-FTSpvA5kPvLTV-yGWcNgW-YLgGddrgDkjHKAcivvqrbFi-EMYzvFTFjpx-zGfKYRNzHmh_-PPMYaelA9EhrYz3C0ZzJ6RZi2Ii53RvMbZ-ILGDK9RmtV7GOvff5xdQg3Nm2o0emVe2aIpb3_S-mWOeDAtUFWa56BI7OZgpUD_Uq6o_-lwmZgcKyh-s8GOCayPk1BcAaahOvnDhjLiUqkQKHSmv1fNcnPqtCCCfR3j8-CdYgJysCK0g0aL7bc3KNwU1mqGB5rDWVLy2Bv8Q9qoMUzb7Hbx-A-AFTBRN0OS4u1eaTlHVXZuhXqEjAc5OGOhJv78loVesr7iMWHA-VCyG9yjdoOXeZzB2WA5cgnn2Gd6hYB3wclxezlCzNxUyjq-BpYWxK_DkkoJoBbU5RwazKpoKEJOGaayjrZS39cvxkg6pmdOkmUH7vveyKOQMRg3cQkp03P9vNTvbgbf2eEmeVGzhx1w9K-FAudtXhUvn609V4gPGtUKomvWlWcqMXom_2GwHnjmTqJT2lhmex9IhmIxrcmPwU_ATLHHF_jQWdADOrZ5Y_c9g8cJgkStnnibRuyvPGu_EI=w1619-h971-no

8YHgRA6WzFT_zhxO7dMrIniHmza63fX4jVzhAyTyOnAh0xps3BRwW0hD1e8QGiiubK-NNekVVLU0-8RAKv3eX3ucQvaFyrjBnU7_r8Ue2RWqTgpOGwTs5FoPCFLUpCGmqdz4D1l6pNBwI7egBB4-vIiT2ImU72r0qj1SpCw3989NI6dHv5T0yoNPh3zwv6-m40rm55TGysABO6d5ctTccJBrDPAUtNuFIt2vNgFqYAwJb7Z2BmrRjYgUaWfbS-BKOysUXOGruOOPyWwmvkxUrqA3R9fX50cAb6VBp7xOvucHAKKHygxlEO5uaBGstXRnLGe4HfpPsm55hB1RMd7lR0IIv1xWCws2EqfGhojJUu0oA5PBzG0ry-xH5KUZRZ-_r-5OexsXsTd8hQmgiYW7JvtOK5kL9Dev6vqST8o6FpWkbhNaKbwRf0DwXrlw8WzibZJmYdyFsNP-0ug2-AgO4ErRLL-_dTX3LZgxE92FugF1WVkznlCH_cfvP44nf85Zu5SnRP_2r8oerz7Fn0D6I0qPPtVEIl4XmOF-ns5_LcRDvfKpGo8UEQsjolqV87pqSlUwfx4F3Kk4egw5RjwlvBXF1op75hQ=w1619-h971-no


Rusted faces
tUDTNo2JEyQbRzitWZ5d3AzyfhbBtBNb7IHBome5A4nUd3zV9L4L-zJwXlu1Qc4T8_xci3l4DO03hZ6HR0J8di1o3TMm6Q4pAM3pck7vQ13v5KvrfItQShSw6NEiuIa3rHOpJPWJMUflC9Tsk7x6ThqPaVQIi8ldE9nAoEZTfhhULS5tlB0Ns7KwSdsEPz2s3BX5HlU6mOtLXUg8Nl4IpzchpShtkXYM7btpE1e8Bq5AlBjh183UkUE4DNMsqyvXqn9-OT08xM_1o306_4ZLIEygjjfCccQiVSHLsA-ynBZVjFCow-Aox6t88EKrhssi4RvWq1FmzMGIMKFbLNT2tkb6-n0uXOpc_ZOv82yV_Dqcrf2LuN8IwlrDTYf5qlcY7pCLaVsmstx0_vF2UZBtc8ginMTowvtlBwxpcMATtJpw1ME_cnpB6WM7yKHnlubPc8kUp4PaPnj9WI59XzZEfsWQYV2yZ_BPfw9goAz1lRkSHnbfcGf6sFQN75vhj2qZfHu1_22yQAoldibqRkpt1HO2eduXzdokz2MSd7QEd-i71b1xDbcK-OLtCsYzn7TK95GnOkWwbz9ai2_UqdJZGCkvgrndBD0=w1619-h971-no


I have not disassembled the 12V cluster to cannibalize the faces yet. Project stalled at this point. During my initial amateur inspection several weeks ago it appeared that many of the parts are exactly the same as indicated by marking on gauge faces and internal parts. The biggest difference being the voltmeter for the battery.

I'm going to try and get back into this project and see if it will actually work. One thing I have not determined is if the truck is prewired for the tach signal. Way out of my element on this one...

If anybody has any tips, tricks or input it would be greatly appreciated. Even if it is to tell me I'm insane and this won't work ;)
 
Last edited:
I'm curious what the consensus is on having springs rearched? Good, bad or in different?

I'm planning an extreme budget suspension refresh to include new shocks and bushings and planning to go this route until I decide what the final plan is going to be.

Hey Chuck,

I noticed that nobody has answered this question, yet. I am no expert in suspensions, and I am not an expert in metallurgic and science/compositions of metals.

But, re-arching factory springs is a common low-budget practice that its widely used in Venezuela. As a matter of fact, my ex-FZJ60 (60-series with 1FZ engine in it) had re-arched factory springs for years and never suffered from ill-effects. Though, I will acknowledge the fact that to re-arch the springs you will have to deform them past their elastic limit and this, in time, will cause fatigue of the material.

But, it can be done and you might be able to enjoy it for quite sometime before this happens.

Here are some photos of the FZJ60 just because hahaha

120-2094_IMG.JPG


Scan128.jpg


Scan17.jpg


Scan36.jpg


I'm going to try and get back into this project and see if it will actually work. One thing I have not determined is if the truck is prewired for the tach signal. Way out of my element on this one...

If anybody has any tips, tricks or input it would be greatly appreciated. Even if it is to tell me I'm insane and this won't work ;)

Regarding the dash face swap, I don't see why it wouldn't work, though you might have to retain your 24V meter pod to get a reading that will mean something. Now, you can see if your truck is equipped with some of the components you will need to get a tach signal. 3B engines have the tach-sensor mounted on the right side of the bellhousing. The wiring for such sensor almost seems to be part of the wiring harness that feeds power to the reverse and 4wd systems for your transmission and transfer case. I would start by looking if that sensor is even present. See the below photo for tach/sensor location reference:

532 (M).jpg


Good luck and hope this helps!

-Alberto
 
Last edited:
Small hijack .. sometimes I feel like going to the dark side and swap in an 1FZ-FE engine in Tencha ..

hijack over !
 
Alberto,

Thank you for the feedback! You pretty much hit the nail on the head as far as my plans go right now. I'm trying to keep the cost down for now until I figure out which direction I'm going to go with this Cruiser. I know re-arched springs aren't the "best" solution, but if it gets me two more years, that's all I'm looking for right now.

As far as the gauges go, I might just swap in the 12V meter purely because it looks better knowing that it won't be accurate. As soon as I get a chance I will crawl under the Cruiser and look for the tach wiring on the bell housing. thanks!

By the way, I love 60's. As my first Cruiser I still lust after them. I think my ideal Cruiser would be an 80-series chassis with a 60 body on top!
 
be very careful when u swap the gauge panels not to leave any fingerprints. fingerprints can be removed, but its tricky, so best avoided.
my oil pressure showed very low on idle, mechanic measured with a proper gauge and said its ok, so I just bent the metal blade in the gauge to make needle sit higher. not sure its best way to do it though, its just what I did.
 
Alexy, good point to remember. I noticed my finger prints on the crusty gauge faces when I removed them. I'm going to have to dig out the nitrile gloves so I don't put any prints on the nice faces.

I also tried some rubbing alcohol to remove some of the dirt and it left some residue as well.
 
I've been making some slow but steady process on the cluster swap. I know this isnt a really sexy mod for most you, but its a major project at my skill level!

Here's the 12V cluster prior to cannibalization. I wish this was the condition of the other 24V cluster I found that I'm using for the base, life would have been a lot easier up to this point.

jNXD8VI0sCgwwrypXtlBks-yIz57AaEQR91R-XwnzgpboLrC_t-nqCAbqMAULvqwNB1wlYD3P6QDE42J6Xxeid4NgBXVBTNSvw6FRrdz1Jgnr2LMGwVCuYA6C8NvkJdlkl_6LHYcEkmeEmYgrKABfKeZRr9g-w38Uc4RXV6FiXmr1oCDQRGDB6zR_qZ0oSrudp0Sr_JZNTs3Ibb5tBEVO7Ce1_ug-hk91ngbwMikloXi34YLIcJ9mWqvRMofBMPop9D-b87tSt_fQSHdKljqJv_Jvi2IES7s3Vk0jvANcLk0wygk1xLHCmpU-QiC5ivYzJVS5s8HVmQ_CVFXBub2a-0dlOgJel8oFxsiMIydR6jOn3SS_IZKmq607MRNVoa0dU4tz5YxHWSjgaGTrDPZlGNYV868WgJjK6yv2_5j8qu5wRO9XZDgBBxQSVUnWwPaZFAHw919A2nbildjdZtsEzssmxLDsIp_49Qkvf9zOfyEOfoEvowPv8s9jQkGsAV94Ha5RH2JQBr5UiViWiQtCr4UudGvJ30omFfHRyYghAnpUvShiCta9KZivaE619SD9C9738DQT73aFoDaTnaF0uSQxp4v04PWnoy_xsIntPOGPaqb=w1619-h971-no


Here's the main part I looking for in addition to the tach faceplate.

UjND0sBur0kVlfWbDaZajuk3ItxS-YDMGTb5B0xiK8oX0TFzBZo9O_8kfaDvmzT3TrHSwNlQYokfqmV1tElDHStB9psoIAFy0COl3pYznLKeEdxPT6Yko3KEPnZ9gzeU8sH-hgNKXD_023acsuZ4RMA7boUyK3RIyRn141FZG6KhpD2fQxu2XkYuRGzdgm6bD7APg8t-o4hjQjr4AEXu7qWrdPrqE9VD7CBLdzuZBv7RqZcQCYqjmAS8rBzlAXBCe6SoBGf5wllYjMXijvqEAXfvA0i2odq6BXmsZgrXl4kvRbYkCDTH2gJ9e36Igje9BnJO1VsRMFHnYfkrvi1MCN2vv_jCzokbeKtTWwbJq1LXMyR6YH3y-g3CJ6bREnlsGO1vQXh_Ceq40Kdf3KnK-aaMKJ_dVPEsnGyNFt5x02N4oxqPQ6SjY2TvvF7nT7DtcK6veFSAD3LO3CyPZHlk6dFF7GLQyPJqd0xorZY1KNmuAqCuzGYez3hfNYoiDvybSwvninK6RTjSDUhF7E7TfGQ9NDNP9wawKq4rZ2foZb7KgzDY1MHuWcO_ciY0g2aZ-8zpH673djylfprY1puKhDQjAIp0dIQmOiCfrDYRIUoCw4n5=w1619-h971-no


Flipped it over and SUPRISE it says 24V on the back just like the real 24V gauge. I knew this was going to be easy...

GgHtCdMtCfjaN3e_oAt0-uSjSdeUmz_T6Iopstuv4AVA_TUCVw-Q-YW3kTa_ZpkrmSw1sJTDPOo-i47nOmmxO6PZiwosYByAUgG7Kw9NqozWt5vpc8Wmma6Mws8bDU45_U3Uxeyo5GNBxdIBd7XaUysaU5FTtUcOZUEeGk9NHKJtWyKjRmnU9hTly7eijTKhyHF0XB9YFsgMGR4vElqL9wgGHxwA6TccPdV2Y6cAIj-MVfcYznqRb7rt81ZhZdCYGpSOSa0ObfOO59j9h1ckL261wlFPpiOczgwNMZIetCJxIM8LxbTnuEEq0BooGvIH-TWBrTfTsGHixhFY8w6AdXIHgNtZIPzshQItjNLciGHt_-b5N58FaE9w0XHijd9mjJ1geUxXpCLZ2s1wPKvtMrH73ewHHJ2gGvKmclk3mKMZRFI_P8uSFTvv24UscLad3FN6uxYQ5k1hSP6mzFSTGkveKzYQoSt3pyXK-_t7G-JqPLlKc7kwltqxOcK7yVwBsVfj0AbiKae722aDv8xrrjoPCQMFY3ciZVFTSPz9EOVkMZB4BLQy-OcXb5RIHZOX_vVaRnFnI3uD43m5DHuu-Fpz7bByrSXZnqmrM6nt-V3bujsH=w1619-h971-no


Closer inspection reveals the 24V on the 12V side was actually crossed out with a marker (left one).

Flipped it over again and it was obviously the pair of two resistors on each side were different. I'm told this is what accounts for the difference in voltage. I'm learning!

MQenXb0Z9Qs_-wQ4eBwx8Gzt1u7LtjMh5Zvcj--Hel_FxD_QQaEOIXwExW9H0LOCptYoH60E-67y1gHgWYqjFMix26x-fTY_dR7ZX53a2CJjFIy-gRWfljlkiJIbpGuoQBqK-abbUDUIJNv57epm3oPVZCbMsJa-Wx3x2gN3tY_aFhCt37WOuIjAsTzJmlLFe8LR4bxZ6J71Vqts-77d6v9ac0Qhbdgc1XEKadc7WWsvfwMa0JSzlWUi57vifTiw1y5NMsosUsUTJd7fLSGpGTa_noFLoQILRSPRRQ3pjK2hs_OD-GSwhoUTuvIfW2o5hr2TAYUX2JH20KhpV_XzyMg69XAOQcbKgFm3C1dBZw52vw4WVRi4L-1txeT_vQOoz5Na-_8l0F12_xDAJtu24_shTe2Kfjzw7Qbgmz61EiOYipJhlnC8YcAPWPhRl7RPd3lXpF8IJdgvq7w6UqNbHjsSt156SqQnQGAd9GAJGlgzw0MjsX2UAJOEDqzPsgUGfazls821UTLNi47vsBVVE20mGgpnYup871qfjo0-jAMsj06rlSHgmMyo4Hch6C1DZY3EE8w8t5HF9kOP0eg5T2gK0GpoUhRhCYatlQ2YnG0yOjdn=w1619-h971-no


The initial plan was to surgically removed and swap the resistors. Then we realized we could just unscrew the 12V meter and swap the 24V in. All in a about a 2 minute process. Now the only real issue is that the labeling on the gauge will be off. I'm willing to deal with that for now to get this all working.

During the assembly process I did a little touch up spray painting on the voltmeter needle because it was somewhat faded.

2Lq31751Ufl4CnRTXMafZnkK3Go0rRTeQMNB71ig49-KosFaQUbSMld3YdeYcyC6dPFqTkAopE0eQKUp_uS7WFu5w4E4uMTqZFj5mFZSXjGZVg-uAbe4riPmAJTz5L1P7xrFLSolvhVS523iqcleR7NzyTRjAKw-L__F3s411zPdIWEO66Uttmf-YX2-UYktSqhor9Z8UVhb1bQHMvKuGArZwLLs4sIj4OWc9ycedWJ8S8yCz3X5vaTpIjlsvHYCPNRnLwD_Vb6RKkmGPGtUOEDlYQg8sFr6fyRbE4X4yizf3xcs2y6K1vGNV1BJK54IZNQXdGFWoVIkR1uNPD4_KY4Jj-XYXKA4QustSSfTrnhC6Vev0BTSEw3Ckf2cLH_CkXEt9d-LdCILqluR-W8EcopbwEo53LYLK4if0ORT-cYXc7Y1v3YjnX-nnKiUYLCvUf4g4rFjzwS_TEYtWp2ycjDznXI22enhEzMEbr4AHHRNnxCS8hBY5m7T_K9qUY9OAMsWmfw4o_1lKunAB9KsLTBRjTR0ScdtGME6XMIfz58MfN3Q__64CZuSG6Gf77xOaykiBKdO90LyeVVqv9-lzDlwhYf2c7K-KpoEAk_eYn6F9p-W=w729-h971-no


Here it is as it stands now, ready to be tested.
9iEpqUMDJoMv1Fpm34UtnmWoszbQLPLdum7ONMjw9MR1n7ZwL0XeFwjLsv6Y5oEwFrTfFW10QAw3A3fCu9nBPqJYsIOUlx0FfXzqITaeIh6qKRI-bGTO-eYn8V_fDjbkyhV4ERo4yAK3iRly5MoeRLC0vpoJ16lrA3zF51R8s0GqiloTndgR4lcKL2QkFzvMibtkYUOsje_id_05n8nxfgNees_EvxFBa7m303ua9RTOlxv_winpr1GXHDKu_zak4Qu973F1-0BNk7nNZbBLHb_rmiG0WKRmfRZhnZhhKRUoNl6o08sWv30BUI2OnpC5sOKVFTJ7IUX1BVuFgFmyk66bdAeSge6wEFxtpBamIfmLj4QhfTHrAnxZ0-6ysOPivzAcO1jRdhA9E09T3Aujohg71eEJIEM3W0xnI-sluYxts0kxi1OIm7I6-s4WZMgSfgPNzwEH_1ZwaacAlwmmU4KeGxames285FqYMI_tPIZPNs9ZVEbdIkvx9mD74cwpivZcKlJQ0DVp4tcl0Hr1RAO5iHMGIgHTwZxXPbn5XBTQl9HowKxl47nY7wlOlhWOvDaXhyUmdqgQNzPJZMkfvVvWQm3nwnWNuYAR1VGia0J1Zujt=w729-h971-no


Based on @AlbertoSD's guidance I started looking for the magnetic pickup/senor on the bellhousing/flywheel. Here is what I see in that general area. I'm not sure exactly what I'm looking at. There is definitely something there, but I'm not sure if its a bracket or the remnants of what used to be the sensor.

(edit) after looking a little closer it looks like the area where the sensor goes is not the bracket area but that flat area below that. Also looks like its plugged or blocked off?

sfMmIGgwGzkHaILf6aNEXII7kwHIh_nr9FqVMx5gSMgqCfvw7OKXKWFd5WYcOxl0Ccgg0xGh4HHzHyQevySiAK-JQaRa947fR5hpS0pp_kpTxYFjea8fwKEQeTOiQbW6PQtg2nRPBy0SPZi-bQWcaRBr9wUn-BjIa-E3xo1ut-qsh_aq66O9l8Ervxj8TdIxa3PvI_Us0SJg-oqXq0vTevHwvdI0xU4nORkxR8haAHlJxzEA23o52rWye4Yo1tKWDJwssMayRu84HNSpzJvk8wE10q4HR-67GW7v8b3VCsZ6rrfk9Lr6ITY7jRWdSdYH-p3eBdh0YLbBDI3hHHQXN7y_II7riWGuAMSErwnjWzOx4wAuX0fWW5AD6kd3EJ_YGw4PtBJZUfNC6iate9xhxBcaO2c14i5qp4JiFVpfiUrYhCgljDWvSqk6-i-RLmMhzorbYnmpgP9raZPs-wFRJatrUpe-faWonAeC-sBqaL5BESfg_idTxbvimrJDNtl05L5rFuECjCLpZg8DE43GEcYL44HhKzfFtd8lynByPNM8pSOLeSPG-4RMNb7MiYihFw_4JP8TdxaimLM3KM6_VSqDe2IIkHsnGb9LsqpeORzY2PUS=w729-h971-no


My buddy and I did a little internet searching and found that I might need this.

Tachometer RPM Revolution Detector 81-90 3B 2H [83180-60040] - $149.99 : CruiserParts.net, Toyota Landcruiser Parts

Am I barking up the wrong tree?
 
Last edited:
Well, it is with great sadness I announce the sale of my BJ73.

Despite the thread being cold, dark and silent recently, I have been enjoying it as a DD. I'm attempting to make a career change and if successful, looking at the possibility of living overseas for the next 4-5 years in a different location. That fact, combined with some other life events, led me to the decision to sell.

Fortunately, the new owner is a former Toyota 4wd truck owner and I believe will be an excellent custodian of the Cruiser. I have directed him to the forum as well our very reputable vendors that we have the pleasure of knowing here.

Thank you to all who provided advice, guidance, mentorship and parts! I appreciate it and thoroughly enjoy the camaraderie here on 'Mud and specifically in the 70-Series section. I don't know what the future holds, but I will pop in from time to time to see what's going on here!

For now, the Hundy will be getting some much needed attention...
 
Tom, I can't wait to see and hear about the progress. So jealous!!
 
Hi Folks. My name is Tom and I bought Chuck's BJ73 over here in Spain. I have had it for almost a year and am putting it through a rehab. When I get done I will have to probably go to rehab!! I will post pictures soon. Adios!

Here are a few pictures on what is going on with the project. I think I will label it the Mañana project. She was suppose to start getting painted today with a Toyota 8U6 color but it didn't happen. Maybe mañana! More to follow.

IMG_0767.JPG


IMG_0768.JPG


IMG_0769.JPG


IMG_0770.JPG


IMG_0772.JPG
 
Tom, let me know when it's done so I can buy it back :rofl:!
 
awesome find, got to get me one of those decals for my Spanish BJ73!
 

Users who are viewing this thread

Back
Top Bottom