Is it possible to add an air con to a HJ 61?

This site may earn a commission from merchant affiliate
links, including eBay, Amazon, Skimlinks, and others.

Joined
Nov 1, 2012
Threads
4
Messages
12
Hello, I am in Europe and I have found a nice HJ 61, but with a shortcoming: it has no air conditioning.

Is it possible to add air conditioning?

I ask this because maybe even those HJ 61 without air conditioning, they have the space and everything prepared to add the air con afterwards, or maybe not (maybe everything is hardwired in a way it is not possible to add easily an air con, and one should change many things to fit a new air con, that make the overall process unfeasible).

Thanks.
 
Yes it is. The cable fittings are all there, the heater controls have the hole for the switch, and the crank pulley is there already.

You'll need the 2nd pulley for the waterpump, the bracket for the AC compressor, the compressor itself, the cooler box, the lines (get new ones made), and the dryer.

Finding the parts is tricky, especially for LHD. I did find all my stuff within 1 month here in Classifieds, and including shipping it was not cheap ($2500 or so).

Installation is straightforward - you'll have to drill the firewall, and I had to remove my pre-heater and have to relocate the 24-12V transformer, which means adressing the rats-nest of hidden wiring the PO left me.

It might be easier if you have space and time to find a worn-out 61 with AC and part it out.
 
Farstar - Wow, someone doing the same mod as me?
I've just sourced 2 sets of 2nd hand A/C from evilbay. 1 for a FJ and one for a HJ. The FJ set was free and the 2H one was $150 –mostly complete too!
I’m just waiting on a new condenser to arrive and then I’m going to tackle the issue. I’ll probably source a new compressor when the time comes to fire it up. I just need a few niggly parts before I get serious ;)
I just wanted the spare parts in case I needed something odd, as I’m over 2.5hrs away from a wrecker and about 1.5hrs from an auto parts place. I’m in Australia.

Keep me posted as to how you get on.
:cheers:
 
about finished with my AC addition

I'm about done with adding AC to mine.

I used the AC section of the underdash box from a FJ. After removing the dash, the heat duct near the floor in front of the shifters and the round duct that goes above the glovebox, you can then remove the ribbed accordian looking AC delete duct.

On my 1983 Left hand drive diesel, I had 3 dimples on the firewall that appeared to have been stamped there from the factory. I drilled the 2 closest to the center of the vehicle for the AC tubes from the evaporator. Install the factory FJ "cooler box" aka the evaporator, and seal the gap around the tubes with strips of tar-soaked cork - this I could only find at AC parts stores online.

My evaporator was used and needed complete disassembly to get clean, it took about 4 or 5 cleanings to get as clean as I wanted it. I used AC coil cleaning foam from a hardware store to clean it, I think it needed 2 full cans to get clean. Make sure you label the wires coming out of the evap. box before you install it. One set of wires is to measure temperature, the other is the low pressure cut out or binary switch, I'm not sure which it has. but it will still be wired the same.

I made the compressor bracket and bought the crank pulley and belt. I think the belt was around 41inches long.

I bought the condenser (mounts in front of the radiator), the drier, a sanden 709 compressor and the hose kit from a place online that sells AC parts for hot rods and antique cars. The tar-cork tape came with the hose kit. The hose kit did not have the correct fitting of the small tube of the evaporator. It's a 14mm o-ring fitting I think.

I made my mounts for the condenser (mine was 14inches tall and 24inches wide) and it was mounted slightly offset to the passenger side so the fittings on the hoses would be 90 degrees and I had less hose chaffing to worry about. I had to drill a hole for the top condenser fitting and cut two rubber grommets to cover the sharp edge of the hole to prevent chaffing, and eventual failure of the hose.

The drier is mounted on the passenger side of the radiator core support above the front of the inner fender well.

The 709 Sanden compressor is mounted on the passenger side of the bottom of the 3B engine block. The compressor I bought had a double v-belt groove pulley on it and I think the front groove lined up with the AC crank pulley.

After mounting everything and and tightening the AC belt I installed all the fittings and cut hoses to fit them. Push the fitting all the way into the tubes. When all the hoses are installed, wrap tape around the hose and mark a line with a marker across the the metal end of the fitting to be crimped and the tape. This way, when you remove the hoses to have them crimped, if the fitting get rotated at all, you know which way they should point to line up correctly.

If they get crimped with the fittings mis-aligned, you will be making another hose since the hoses are too stiff to be twisted and forced into place. Have them crimped at a place that does AC hose crimps, they called it a bubble crimp and only one place near me had the right tools (about 45 minutes away).

The last thing I need to do is wire it. This is where my AC conversion gets a little different. My diesel had a FJ body on it, but he kept the diesel dash (dash cover, Heat box everything, I have no idea why, I would have just tossed the gas gauge cluster and replaced it with the diesel cluster, but maybe it's not that easy. When he put the diesel dash in he stripped out some of the wiring but not all.

If I had stock wiring that worked, I'd plug in the AC switch, the connections on the evaporator, the compressor and replace the AC amplifier with one from a FJ62 (FJ62 amplifiers don't look for an ignition signal like the FJ60 amplifiers do). After plugging it all in it should work.

Here's more info on the AC amplifier with a diesel slant to the thread:
https://forum.ih8mud.com/60-series-wagons/478439-c-amplifier-wiring.html
Here's the non-abbreviated link:
https://forum.ih8mud.com/60-series-wagons/478439-c-amplifier-wiring.html

I have a FJ62 AC amplifier I can't use because too many connectors have been stripped out. So here's what I'm doing to wire it all:

1. Wire 12v positive though the AC dash switch (it has three wires, the third wire is for the light inside the switch) then from the other side of the switch to..
2. the low pressure switch, located in the A/C evaporator box "cooler box" , I cut off the factory plug and installed a new delphi plug since that what I had. from there it goes to...
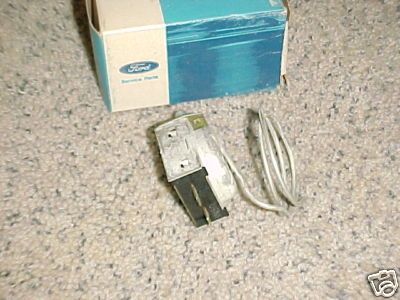
3. a AC temperature control thermostat, mine came from ebay and was called "1968 Galaxie NOS AC Temp Control Thermostat " The temp probe from this sticks into the evaporator coil, from the info I could find it goes about 1.5inches from the top and side. The rest of the switch remains outside the evaporator box and gets mounted where its convenient, I mounted mine above it. from there it goes to...
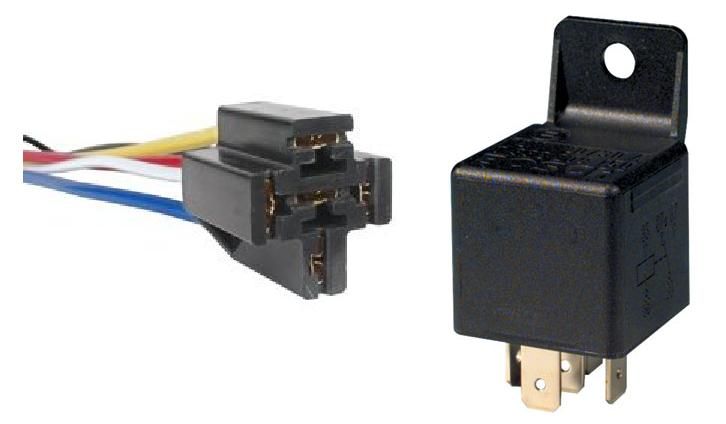
4. the switch side or coil side of of a 12v relay. see the next post for info on wiring a relay. so AC switch would connect to the 85 terminal and the 86 terminal would go to a good clean ground.
5. The high power side of the relay would be wired with positive going through a 10A fuse to relay terminal 30 and relay terminal 87 would go to out into the engine compartment to feed power to the compressor clutch. The wire going to relay terminal 87a can be taped off or removed since it won't be used.


here's a few pics:
http://i947.photobucket.com/albums/...ioning/thermostatswitchfrom68FordGalaxie2.jpg
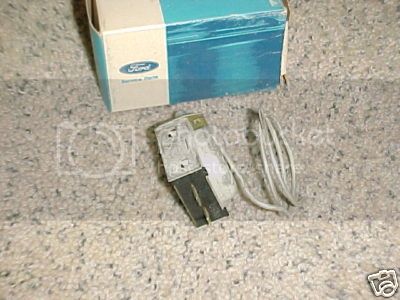
http://i947.photobucket.com/albums/...ioning/thermostatswitchfrom68FordGalaxie1.jpg
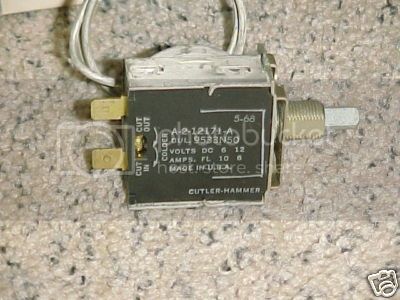
I'll wire to each of the brass terminals in the second pic. This keeps the evaporator from freezing solid. The small loop of metal is a capillary tube that inserts into the fins of the evaporator to sense the temperature, and cut power to the AC compressor clutch if the evaporator gets too cold.


I hope this helps. See the next post for a way to wire it to automatically turn off AC only when your cranking the starter. Edit: I'm not sure if the following auto off on cranking is necessary but I'll leave it in case someone finds it useful or need the info about wiring a relay.

Rollinns
 
Last edited:
Auto AC cut out when starting / cranking the engine

With this mod or addition, you don't have to manually turn off the AC every time you (or someone else) starts the engine.

This may even eliminate nagging by passengers to turn off the AC before starting the engine.

How it works: The relay will only "trigger" when the vehicle is being cranked. When it "triggers", it cuts out power before it gets to the AC switch on the dash by opening the circuit.

Side note: I'm not really familiar with how the AC Amplifier works, so I could be wrong, but it does not appear to cut out the AC when the engine is being cranked. Someone who is more familiar with AC amplifiers on 60s and 62s please let us know.

If you want to add this you a stock FJ, HJ, or BJ, then add a 12v bosch style 5 terminals relay as wired below between the fuse box and the AC switch on the dash.

Note: I have to custom wire my AC due to the reasons stated in my eariler post, if you don't have to do this skip the rest of this paragraph. For me I'll begin the circuit in my previous post (this relay goes before number 1 above) with a 12v bosch style relay with 5 terminals and wire the AC switch through the normally closed contacts. I have to run a new wire from the fusebox since I don't have one to cut into. Wire it as directed below.

The relay MUST be a 5 terminal relay, nearly all 4 terminal relays are missing the 87a terminal shown below. Even though the 87 terminal is not used, a 5 terminal relay must be used since it will have a normally closed terminal which is what we need for this mod. Use a different relay at your own risk. I know there are some out there that understand this, but for electrical beginners stick with a 5 terminal relay and you'll be fine.

Here's a pic of the relay to use (link to credit for pic):
http://i947.photobucket.com/albums/...g/5terminalrelayandconnector_zpsb1890c3d.jpeg
Here's a diagram of the terminals (link to credit for diagram):
http://i947.photobucket.com/albums/...cruiser Air Conditioning/relaywiringguide.jpg

Here's how to wire the terminals:
30 - 12v positive power (see Note 1)
85 - To ground
86 - power from the starter (see Note 2)
87 - NOT used (see Note 3)
87A - To the power in side of the AC switch on the dash (see Note 4)

Notes (wire colors are all based on wiring colors for a 1983 diesel 60 - yours may be different):

1. It's best to tap into the fuse box, the factory color for the AC circuit is a blue wire with a red stripe. Cut this wire. The fusebox side goes to terminal 30. The other side goes to the dash switch - see Note 4.

2. the starter wire in the ignition switch is black with a white stripe - tap into this wire - DO NOT CUT IT or your vehicle won't start, also if this relay ever fails then your vehicle will still start since you only tapped into the wire, and didn't cut it. The AC cut-out while cranking feature will end upon relay failure. The AC might not work if the relay fails, so carry a spare relay with the spare fuses you carry.

3. This is not used - to avoid a possible short, remove the female terminal from the connector if a relay connector is used, if a connector is not used and female terminals are slid directly onto the other terminals, wrap this terminal on the relay with electrical tape or break/cut this terminal off the relay

4. This is the blue wire with a red stripe to the stock AC dash switch that was cut earlier. This side goes to the AC dash switch.

I hope this helps,

Rollinns
 
Hello Everyone,

this is a very old thread, but it perfectly fits to my question as I have basically a similar issue.
As it is hard to find in Germany original AC sets, I purchased a used AC-Converstion kit from Australia which I hope to fit into my 88 HJ61 LHD.
Attached you can find pictures of this kit.
I learned already quite something about the preparations from the explanations above, but have still some issues.
1. The main issue is that this set was removed longer ago from an Australian HJ61 (12V) RHD. During this prozess most of the cables was removed, and it seems that also some sensors or switches are lost.
Anyway the main components are available, and as I am in China currently I assume I can buy a new Dryer, Thermostat, Switches and even a general cable set to connect all. As here conversion AC-Sets are very easy to buy directly in 24V.
Like this I hope that I only need a 24V-12V converter for the compressor everything else I will change to 24V directly.
2. I also have to change the ventilation box from RHD to LDH. For this I found an old (unfortunatly empty) LHD ventilation box wich I will try to fit with the evaporator from the coversion kit.
Let see how this will work out.

3. My question is now: does anyone knows this kind of conversion set, and can help with a conection diagram or other details so that I know which parts to purchase.

Thanks a lot for any kind of detail
Andy

AC Conversion Kit 1.jpg


AC Conversion Kit 2.jpg


AC Conversion Kit 3.jpg
 

Users who are viewing this thread

Back
Top Bottom