Installed new Plugs and air filter today (1 Viewer)

This site may earn a commission from merchant affiliate
links, including eBay, Amazon, Skimlinks, and others.

MEOW.
 
umm......excuse my ignorance, but i've also wanted to do this myself...where are the pics of the spark plug extraction and installation?
I've always been told the plugs were in the intake valley and a PITA to do.
i;m happy to be "enlightened".
cheers
peter
 
Great post. Thanks for getting some pics up. I did this about a month ago and it sure would have been a help to have this.
 
I've always been told the plugs were in the intake valley and a PITA to do.
That's the starter contacts -

With the cover off the coil packs are easy to spot and the plugs are right under them. Pretty easy especially with Rob Reds Tool assembly guide.
 
I didnt start off with the idea of a how to thread - more like a primer to encourage others to do it. I will probably do another step by step post for those that want that detail.

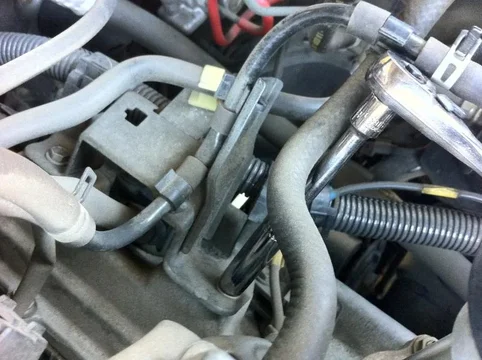
Step 1. Remove the two 10mm head nuts and two 10mm head bolts securing the plastic cowl (the one with the bitchin 4700 logo) :) This gives you basic access to all DS plugs. For PS plugs the upper airbox needs removal (easy).

IMG_0305.jpg
IMG_0305.jpg
 
Last edited:
I'm adding some additional images for clarity. This isnt a step by step so they are not in sequence.

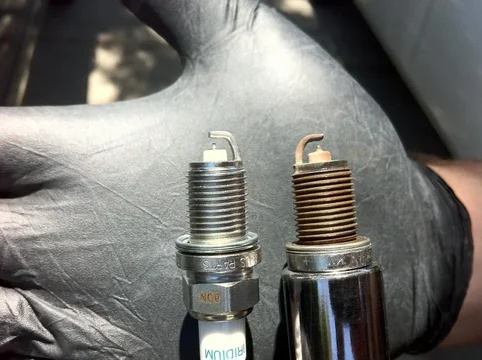
New versus 140,000 miles

IMG_0318.jpg


This bracket Blocks access to cylinder 6, 7, 8. Remove two 10mm head bolts to free it. You can then move it out of the way.

IMG_0322.jpg


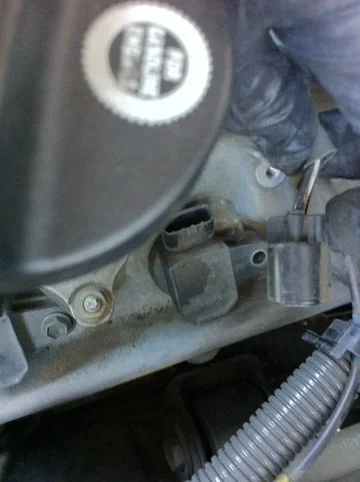
Cylinder 6 (and later cylinder 1) needs to unclip the the coil pack from the harness. All Others can remain plugged into the harness.

IMG_0330.jpg
IMG_0318.jpg
IMG_0330.jpg
IMG_0322.jpg
 
Last edited:
For the passenger side it couldn't' be easier:

Unsnap the 4 clips on the airbox filter box
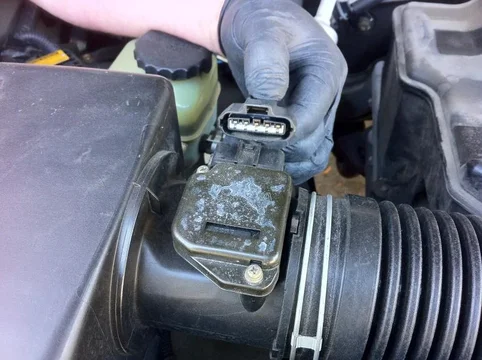
Unplug the MAF sensor
Loosen the Clamp at the throttle body intake
Remove two 10mm head bolts securing the airbox extension (Kojima Press :D)
Unplug 4 hoses going to the above
Lift Upper airbox out of the engine bay


Airbox Filter and MAF

IMG_0352.jpg

Throttle Body Clamp

IMG_0359.jpg

Airbox Extension

IMG_0365.jpg
IMG_0352.jpg
IMG_0365.jpg
IMG_0359.jpg
 
Last edited:
After you lift the airbox out you see this

IMG_0369.jpg

Start the R/R process one at a time, just like the others. Like Coil Pack 6, Coil Pack 1 (far left) will need to be disconnected from the harness.

IMG_0373.jpg

Here is what a Coil Pack Looks like out of the block.

IMG_0381.jpg
IMG_0373.jpg
IMG_0369.jpg
IMG_0381.jpg
 
Last edited:
RobRed, thanks for the thread and pics...new Denso's should get here tomorrow & oem plugs get replaced after 116K.

I'd suggest a shot of compressed air down the plug cavity after the coil pack is removed. Check the coil pack resistance as long as you're there. A little dielectric grease at the plug and top end won't hurt.

As to anti-seize goop on the plug...I use it religiously on everything from chain saws to trucks to airplanes. It can save hours of helicoil madness:mad:. You won't see a change in resistance nor plug temp under load. Copper based anti-seize will get you to 1800F;).

Agreed the FSM doesn't call for it, but it's the same for lug nuts, suspension pieces, etc....it sure makes disassembly a lot easier.

Steve
 
Hello RobRed,

Have you noticed any mpg improvements since the new plugs? I am at 138 k as well and was thinking about getting on this job soon....

Looking for a little extra motivation as my LX runs great currently...


TIA

TLC Dan
 
Looking for a little extra motivation as my LX runs great currently...


Dan -


RobRed helped me do my plugs this weekend (big thanks Rob! :clap:). In fact, my hand makes a cameo in one of his pics above. :ban:

I had no problems with the engine at 145k on my LX. After changing the plugs, the engine sounds and feels smoother. There's no new power per se but you can definitely notice the smoothness when you just rev the engine in 'N'.

I recommend doing the plugs at your mileage. I think they're called for around 105k on 100's.

Follow RobRed's doc. You can't go wrong.
 
Hello RobRed,

Have you noticed any mpg improvements since the new plugs? I am at 138 k as well and was thinking about getting on this job soon....

Looking for a little extra motivation as my LX runs great currently...


TIA

TLC Dan

Darin doesn't track his mileage but I do... I got an increase of about 1mpg after the change compared to the prior 3 months averages. The truck just runs better.

Look at the pic above comparing a new plug to the 138k plug. That should be all the motivation you need!


RobRed, thanks for the thread and pics...new Denso's should get here tomorrow & oem plugs get replaced after 116K.

I'd suggest a shot of compressed air down the plug cavity after the coil pack is removed. Check the coil pack resistance as long as you're there. A little dielectric grease at the plug and top end won't hurt.

As to anti-seize goop on the plug...I use it religiously on everything from chain saws to trucks to airplanes. It can save hours of helicoil madness:mad:. You won't see a change in resistance nor plug temp under load. Copper based anti-seize will get you to 1800F;).

Agreed the FSM doesn't call for it, but it's the same for lug nuts, suspension pieces, etc....it sure makes disassembly a lot easier.

Steve

Good suggestion on the compressed air and dielectric. We didnt, but did inspect each hole for any debris etc and they were actually pretty clean. We can debate anti-sieze on plugs, i dont see the need on something with a crush washer.
 
This is a great write up and should be a sticky (don't think I missed it).

Thanks for taking to the time to snap all the pics and to go so far as to make the list of sockets and extensions need. Bravo!:cheers:

Anybody know what the torque specs is on the plugs?

I'm also curious as to how many people have checked the gap on their plugs before installing?
 
Great write up Rob. I need to do this as well. We are just a notch under 132K. I just haven't gotten to it yet. I am looking forward to it now. Thanks much!
 
Used this procedure and successfully replaced my plugs. Without the great photos and directions, this would have taken days instead of ~90 minutes. Well done!
 

Users who are viewing this thread

Back
Top Bottom