I found the source of my oil pan metal! (3B cam r&r pics) (1 Viewer)

This site may earn a commission from merchant affiliate
links, including eBay, Amazon, Skimlinks, and others.

Joined
Sep 2, 2007
Threads
373
Messages
4,437
Location
Longmont, CO
After 10000 miles of not worrying about it I finally went searching yesterday for the source of the metal chunks I found in my oil pan. (https://forum.ih8mud.com/diesel-tech-24-volts-systems/233005-oh-no-metal-oil-pan.html)

You may recall that my oil pressure, which was in spec but not stellar, had been falling a bit and was now just below spec (https://forum.ih8mud.com/40-55-series-tech/274235-low-oil-pressure.html).

And you may also recall that the diameter of the chunks hinted that they might have come from a cam bearing, and that I took a wild guess that it could be the front bearing, given that the front two rockers had bad divots in them (perhaps from a cam that was wobbling a bit)...

Well it turns out that sometimes even wild ass guess are right!! Some pictures, which should be helpful for anyone pulling a camshaft:


1) Getting at the cam sucks, you've gotta take a lot of stuff off! If you're me, you even have to take the oil pan off, more on that later :doh:. At the very least, grill/bib, radiator, air cleaner, rocker cover, side cover all need to go.


2) Crank pulley has to go too, I didn't need to use a puller this time, was actually able to pull it off by hand.


3) I was worried about the automatic timer, which the FSM says will come away attached to the timing cover, and that there is a timing cover heating process that should be used for getting it back in and out - seemed like a pain. Turns out that my timer stayed on the pump when I pulled the cover, so it was moot!
IMG_4740-800.jpg
IMG_4743-800.jpg
IMG_4745-800.jpg
 
Next you have to get the lifters off of the cam. Turns out that the side cover is good for something other than just leaking!!


1) Pull the rocker shaft assembly, and then pull out the pushrods.


2) Open the side cover and pull out the lifters. I tried using a magnet for this, but it was actually easier to just stick a finger into them and pull.


3) KEEP EVERYTHING IN THE ORDER IT CAME OUT!! I'm told if you mix up lifters that you should just replace them. '

Note that with the bib off for this job I actually considered moving my diesel emblem to the "correct" side. In the end I decided not to a) because its fun to be different b) I was quite tired by the end of this job and c) because I know it annoys Tom and thats funny too. :)
IMG_4748-800.jpg
IMG_4751-800.jpg
IMG_4753-800.jpg
 
With the lifters out you can pull the camshaft.


1) Turn the crank by hand until the holes in the cam gear line up with the two bolts holding the cam in place.


2) Then carefully slide the cam out. You have to be careful not to damage the bearings, but its not too difficult. If a lobe gets hung up on something, turning the shaft while supporting it did the trick.


3) With everything out, its the moment of truth - did I do all this work for nothing?? Was it the #1 bearing that was out (since thats really the only replaceable on with the engine in the truck)???
IMG_4746-800.jpg
IMG_4754-800.jpg
tease.jpg
 
... and the answer is... YES! The number 1 bearing was trashed, there was NO babbit material left on it, only the steel shell remained. Lucky thing too, because while you can [barely] replace the #1, the others would be mostly impossible.

1) There is a trace of babbit left around the oil passages but the rest was wiped clean (And moved to my oil pan).


2) Another bearing pic.


3) Compare this to a new bearing. You can see on the sides of the bearing they are thicker, and have two colors, one for bearing material and the other for the steel shell.
IMG_4757-800.jpg
IMG_4762-800.jpg
IMG_4764-800.jpg
 
Thankfully, peering down the hole, all the other bearings look fine, and, amazingly, the camshaft itself was fine (no marks, nothing to catch a finger nail, and the new bearing fit beautiful). So now the question is, what to do about this?!?!? I couldn't find a good way to pull the bearing out without risking block damage, so I figured it'd have to be knocked inward:


1) The original idea was to lay a piece of wood along the bearings to catch the #1 as I pressed it into the block, and then somehow reach in there and crush the bearing so it could slide out sideways. Step a) worked fine, but I dropped the bearing when trying to crush it. I had to pull the oil pan to get it out, but that actually went fast and easy since it had a nice new gasket. Crusher's suggestion from last time about silicone-ing one side of the gasket so it comes away with the pan worked great!


2) Second problem was how to press the new bearing in without damaging it. I found a piece of scrap aluminum and gave it a quick spin on the lathe to come up with Drew's Precision Cam Bearing Beater.


3) Installation is easy, then, insert bearing, apply hammer.
IMG_4765-800.jpg
IMG_4766-800.jpg
IMG_4767-800.jpg
 
Last edited:
Boy, can hardly believe this is the only damage done!!

Despite this mishap you're still a lucky b***** ;) ;) ;)
 
1) TADA!!!


2) Reassembly, then, is easy, just the reverse. However there is the timing issue, which is kinda a pain in the ass. You have to install things such that the mark on each gear (crank/cam/timer) each line up with the right mark on the idler, all at the same time. Since the other three gears were not removed (and I didn't want to remove them) I tried just spinning the crank until the marks lined up, but the gear ratios are not equally matched so it turns out it might take hundred of turns to line them up! Spinning the crank with a wrench is tough, so I gave up and pulled the idler - shoulda done that first, its easy. Picture of everything lined up properly.

And thats it!

I don't know for sure if this is going to bring my oil pressure back, but it can't hurt! I'm waiting for silicone to dry before my test drive.
IMG_4768-800.jpg
IMG_4771-800.jpg
 
Just took it for a test drive -

Hot HOT oil pressure is up to 45psi at 2700 (my usual highway cruise), up from 34psi or so.

Idle is doubled when Hot HOT to ~13psi from ~7psi.

Looks like that fixed 'er... :)
 
Great diagnosis and repair work Drew! Well done!:beer::beer:

Has the "cam bearing replacement" made your idling RPMs more consistant too?

But of course you're right and I am VERY disappointed indeed that you never corrected your "diesel badge placement"!! :frown::lol:

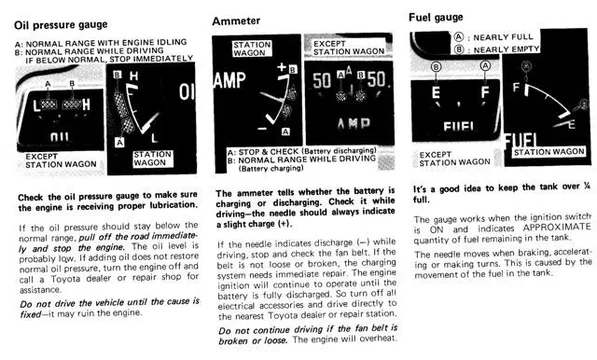
By the way, I've eventually bought a "flat bed scanner" and I find this interesting from my owner's manual:

Gauge segments.JPG

A lot of people criticise the EOM oil pressure sender unit and gauge but mine has never played up in 30 years. And it is interesting to note that Toyota placed a bit of importance on where the needle sits within those segments on the gauge.

:cheers:

PS. But then again - Toyota loses a bit of credibility with me because my ammeter needle has NEVER fallen within that "correct charging segment area" in 30 years - but yet I have also never had a charging problem in that time.
Gauge segments.JPG
 
Last edited:
Has the "cam bearing replacement" made your idling RPMs more consistant too?

No, that little joy remains. The sound has changed a little bit for the better though - I've always had a slight tick not unlike an exhaust leak which has diminished.

A lot of people criticise the EOM oil pressure sender unit and gauge but mine has never played up in 30 years. And it is interesting to note that Toyota placed a bit of importance on where the needle sits within those segments on the gauge.

Those regions are in line with what I've always assumed, so thats good to know. Interestingly, since I fixed this the stock gauge needle has returned to the same position that it was at when I first got the truck. I've found that while you can't use the stock gauge to get a true value, it is nonetheless fairly consistent, and is good for identifying changes in pressure - accordingly, I think this bearing damage might have occurred AFTER I got the truck. :eek:

That mystery will likely never be solved. I still think there is a relationship with the rocker arm divots on the front two rockers, but its not clear to me which was the chicken and which was the egg.
 
well done master. clap clap clap!
 
I tried just spinning the crank until the marks lined up, but the gear ratios are not equally matched so it turns out it might take hundred of turns to line them up! Spinning the crank with a wrench is tough, so I gave up and pulled the idler - shoulda done that first, its easy.


Well done ! I face that same problem too. You used a wrench... but I used my hands !!! Even with glove, my hands was hurt by turning the pulley hundred time. Then, like you, I just removed the idler gear.
 
This may be an old thread, but it's relevance for me today is right on. Is it considered thread poaching if I post my pic of the shards of metal I found today?
 
Not really poaching if you have a cam bearing issue and are doing the same thing Drew did. Good rule of thumb is to ask yourself if you are adding value to what has has been posted and are staying within the scope of the original posters topic. Otherwise it's better form to start your own thread with pics of the metal you found...

Since it sounds like you are not sure what the metal is from, I would suggest you start your own thread and then reference back to this one if there is a common issue or repair...
 
While in the midst of my engine swap into the rust free FJ60 from Cali, I decided to pull the camshaft to check the bearings since I have the engine out (also because my oil pressure was low). The first bearing has some scoring and a chunk missing. Can't see the other two. The camshaft has some pitting on the lobes, going to take it in for an estimate on having it redone. The lifters all have some pitting underneath except for two, is this something to worry about?
I plan to replace all cam bearings.
Then I noticed some of the gears have some pitting as well, plan to leave those alone or this will get crazy haha!
Will post pics later.
 
This old thread put me onto worn camshaft bearings so I thought I would chip in and keep it alive.

Just pulled all five bearings from a 1989 3Bii

20231023_203219.jpg


20231023_203720.jpg

Bearings No. 1 and No. 4. have severe spalling. Minor on No. 2 and No. 3. No.5 just looks worn.

These bearings came from a 567,000 km engine which was well serviced. Main and big-end bearings were near perfect. Camshaft looks flawless. Engine was clean inside with no sludge or metal.

At this mileage, I would not quite use the term 'weakness' but it seems to be a reasonably common issue on high mileage 3Bs....

EO
 

Users who are viewing this thread

Back
Top Bottom