Navigation
Install the app
How to install the app on iOS
Follow along with the video below to see how to install our site as a web app on your home screen.
Note: This feature may not be available in some browsers.
More options
Style variation
You are using an out of date browser. It may not display this or other websites correctly.
You should upgrade or use an alternative browser.
You should upgrade or use an alternative browser.
I can make LPB box sides
- Thread starter Awl_TEQ
- Start date
This site may earn a commission from merchant affiliate
links, including eBay, Amazon, Skimlinks, and others.
More options
Who Replied?Awl_TEQ
Supporting Vendor
- Thread starter
- #183
Got a few more hours in today. I had two guys in to finish welding the side panels I have committed to making and I was going to spot weld the first floor together. I need to put the floor and cross-members together to move on to the wheel hump and rear post (which are the only things I haven't actually made yet). Trouble is, I was really hesitant to put 70+ spot welds on while depending solely on my measurements (yeah I triple checked them - minor OCD - but still...).
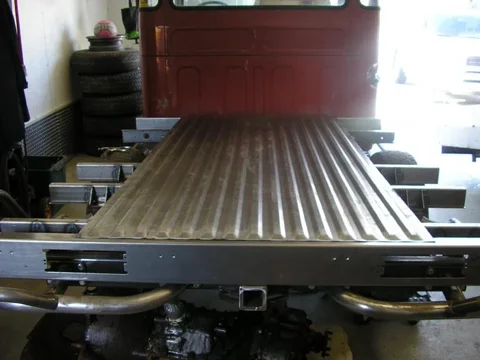
Soooo.... after the guys went home at lunch time I headed home to get my little utility trailer. Loaded up and took the floor home to test fit on my frame with it just tacked together and able to move bits around if necessary.


Soooo.... after the guys went home at lunch time I headed home to get my little utility trailer. Loaded up and took the floor home to test fit on my frame with it just tacked together and able to move bits around if necessary.


Awl_TEQ
Supporting Vendor
- Thread starter
- #185
This is what I really wanted to check. I was worried these humpty-hump cross members wouldn't meet the frame in the right spot but they seem ok. I left room for a strip of rubber and plastic like my original bed had.

This one doesn't line up on purpose. The frame this bed is destined for has a different mount at this location (1963 frame). So it's made to fit that.

And the piece of resistance - the front mount.

So everything looks good, I guess I can read a tape
I'll take it back to the shop tomorrow and weld her up solid. And I can add the corner floors as well. I have a template/ sample wheel hump ready in the flat that I can play with tomorrow too, just a proof of concept to iron out the details and make the mistakes on.


This one doesn't line up on purpose. The frame this bed is destined for has a different mount at this location (1963 frame). So it's made to fit that.

And the piece of resistance - the front mount.

So everything looks good, I guess I can read a tape

I'll take it back to the shop tomorrow and weld her up solid. And I can add the corner floors as well. I have a template/ sample wheel hump ready in the flat that I can play with tomorrow too, just a proof of concept to iron out the details and make the mistakes on.
Kevin,
Have you thought about hot-dip galvanising these beds (or at least the floor...). Given you are in Alberta, and you are planning to use this as a daily driver, that would be a great way to keep the salt at bay. I am not sure how you would prime the outside of the bed in order to get the paint smooth, but you could cover the inside with Rhino Line. If you then galvanised the frame, you would have a fairly salt-proof rig.
If you hear of any law firms looking for corporate/aviation lawyers up there, let me know. If I get the job I will move to Calgary and pay you to teach me your fabrication/welding skills on the weekends. I am continually in awe; I get excited whenever I see a new post to this thread.
Cheers,
Josh
Have you thought about hot-dip galvanising these beds (or at least the floor...). Given you are in Alberta, and you are planning to use this as a daily driver, that would be a great way to keep the salt at bay. I am not sure how you would prime the outside of the bed in order to get the paint smooth, but you could cover the inside with Rhino Line. If you then galvanised the frame, you would have a fairly salt-proof rig.
If you hear of any law firms looking for corporate/aviation lawyers up there, let me know. If I get the job I will move to Calgary and pay you to teach me your fabrication/welding skills on the weekends.
Cheers,
Josh
Awl_TEQ
Supporting Vendor
- Thread starter
- #187
Josh! - the president of the Awl-TEQ fan club, Adelaide chapter.
My uncle has an airline. Well just four or five planes. Oilfield hot shot and crew changes. A couple of hangars, licensed structural repair and maintenance facility.
Corrosion
To my knowledge we don't use salt on the roads around here. They use some sort of calcium? solution mixed with sand.
My frame and armor will all be zinc dichromate plated and then powder coated. I was going to do the hot dip but it can leave slag or buildup and the crystalline finish is sometimes visible through the powder. I am considering the zinc dichromate plating for the bed as well. My plater says he can do the whole bed by dipping one side at a time but I doubt he can get enough throw into the nooks and crannies to properly coat everywhere. So I've been thinking of plating each piece individually after welding and then spot welding everything together. That would leave the actual spot welds to worry about because the act of spot welding will vaporize the plating at that spot. But everywhere else would be covered. Then a normal primer/filler/color paint job overtop.
The cab and bed will both be lined under and inside - both sides of the floor so to speak - with a color matched spray on liner.
Magnesium chloride? That is what Boulder, Co (where I grew up and my folks live) uses on their roads to melt snow. They say it is less corrosive, but it still rusts cars out with considerable vigour.
Surely if they dip the bed in zinc dichromate, they would cover just about everything, no? Is that as effective as galvanising?
I've always dreamt of finding a brand new troopy tub and having it hot dip galvanised, so rust would never be an issue...some people fantasize about naked blondes covered in chocolate sauce, I dream of bare metal troopy tubs covered in zinc. Sometimes I worry myself. Heck, what else am I gonna do down here?
Cheers,
Josh
Surely if they dip the bed in zinc dichromate, they would cover just about everything, no? Is that as effective as galvanising?
I've always dreamt of finding a brand new troopy tub and having it hot dip galvanised, so rust would never be an issue...some people fantasize about naked blondes covered in chocolate sauce, I dream of bare metal troopy tubs covered in zinc.
 Sometimes I worry myself. Heck, what else am I gonna do down here?
Cheers,
Josh
Forget itI've always dreamt of finding a brand new troopy tub and having it hot dip galvanised, I dream of bare metal troopy tubs covered in zinc.
Josh
I made some parts " hot dipping" would never do it again.
Saw a Citroen 2CV twenty years ago, they dipped the whole car,
( experiment) the car was junk.
Not a backyard company did that, was a company with experience over more than twenty years with galvanising.
The only way to build a galvanised car is, use galvanised steel, than form & weld it - as Audi or Porsche do.
Cheers
Peter
best rust prevention ( wrote it in Mark Merbesfields thread some month ago
http://mike.british-cars.de/rustprevention.htm
Last edited:
Awl_TEQ
Supporting Vendor
- Thread starter
- #190
Surely if they dip the bed in zinc dichromate, they would cover just about everything, no? Is that as effective as galvanising?
Josh
Forget it,
I made some parts " hot dipping" would never do it again.
Saw a Citroen 2cv twenty years ago, they dipped the hole car,
( experiment) the car was junk.
Not a backyard company did that, was a company with experience over more than twenty years with galvanising.
The only way to build a galvanised car is, use galvanised steel, than form & weld it - as Audi or Porsche do.
Cheers
Peter
Hot dip is .... hot. Something like 800-900F molten zinc tub that they just dip stuff in. It would likely warp the material and add 100lbs to it. They charge by weight plus a base fee. Zinc dichromate is an electroplating process. The magnetic currents in the solution are affected by the ferrous material and can prevent the zinc from penetrating inside corners and between spot welded joints (the places where water goes!). My plater says he can do it but I don't want to risk a full bed. I use him for smaller stuff and he does good work so I know he can coat the cross members, brackets, floor sections etc separately.
I am also going to make some parts from pre-coated material we call Satin Coat. It is basically galvanized material with a finer crystal structure that can't be seen. This material has a couple of drawbacks as well. It is terrible to weld because the galvanizing contaminates the weld and causes popping and spitting when the zinc vaporizes. This is a problem with my construction technique because I have a lot of welding. The fumes are also deadly over time. Another problem is when I shear and punch the material the edges are not plated - just raw steel. So there is still rust problems. I can surface grind the weld areas and remove the plating for a clean weld - but how do I treat that then --- plate it? We're back to plating after welding to get all surfaces.
Damn rust

You guys want to know what I'm gonna do to my bed?
Finish each individual part (punch, bend, weld, grind, captured hardware)
Zinc dichromate plating (this will run about $500.00 BTW)
Spot weld together (and a few little TIG welds here and there)
Seam sealer where appropriate
Primer, color matched liner inside and under, paint
Done.
can only write it in celsius:Hot dip is .... hot.
this zinc bath has 450 Grad Celsius hot, hot, hot,
you can imagine what can happen too your steel
zinc cromated steel surface is also not so easy to paint, I had made
my experiences
now I know how to paint them , but again I would not galvanise again.
You can use it on bumpers, frame if you want, but I think it´s not necessary if you know how to prevent rust
...old school
Grease it, grease it, grease it !!
Cheers
Peter
Last edited:
Celsius in Fahrenheit :can only write it in celsius:
this zinc bath has 450 Grad Celsius hot, hot, hot,
you can imagine what can happen too your steel
zinc cromated steel surface is also not so easy to paint, I had made
my experiences
now I know how to paint them , but again I would not galvanise again.
You can use it on bumpers, frame if you want, but I think it´s not necessary if you know how to prevent rust
...old school
Grease it, grease it, grease it !!
Cheers
Peter
Umrechnung Fahrenheit - Celsius
Last edited:
Peter,
Easy to convert C to F: take the temp in C, double it, subtract 10% and add 32. Take 18c for example. Double it = 36 - 3.6 (10%) = 32.4 + 32 = 64.4 (65, as we don't need decimals in F because it is more accurate than C; 1 degree F does not cover as large a range as 1 degree C. This is why countries which use the French/metric system generally express the temperature to the tenths) Simple.
Kevin,
I had no idea it was so hot...guess I need a more realistic fantasy.
Josh
... in Australia you have Celsius...Peter,...
64.4 (65, as we don't need decimals in F because it is more accurate than C;
Josh
Roos need decimals
thats why you have Fahrenheit in the States..
no Roos no decimals necessary


... in Australia you have Celsius...Peter,...
64.4 (65, as we don't need decimals ....
Josh
Roos need decimals
thats why you have Fahrenheit in the States..
no Roos no decimals necessary


Awl_TEQ
Supporting Vendor
- Thread starter
- #196
I bent up a first attempt at the wheel hump this afternoon and it looks promising. I have to change the layout a bit and my machine shop is making a special tool for me to help with the bending.
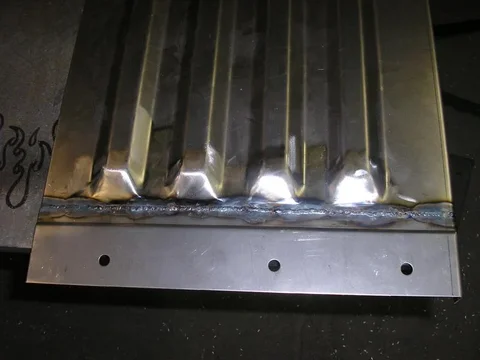
I had some trouble with the welding of the floor to the cross members. My spot welder has limited reach so it was a real bear to maneuver the floor assembly around in the jaws of the machine. Also, for some un-known reason the weld it was producing was very inconsistent. So I flipped the floor over and tried drilling a hole in the cross member and then "plug" welding it to the floor from underneath. This worked OK but the TIG welding process puts too much heat into the floor and it started to warp. So I nixed that plan. I made some weld coupons (samples) and took them home to my MIG welder to try. That worked much better and so for all future cross members I make I will be punching a string of holes in them to plug weld with my MIG. This is a better plan anyway for those that might buy these parts and have to assemble them in their garage. They are more likely to have a MIG at home.
I had some trouble with the welding of the floor to the cross members. My spot welder has limited reach so it was a real bear to maneuver the floor assembly around in the jaws of the machine. Also, for some un-known reason the weld it was producing was very inconsistent. So I flipped the floor over and tried drilling a hole in the cross member and then "plug" welding it to the floor from underneath. This worked OK but the TIG welding process puts too much heat into the floor and it started to warp. So I nixed that plan. I made some weld coupons (samples) and took them home to my MIG welder to try. That worked much better and so for all future cross members I make I will be punching a string of holes in them to plug weld with my MIG. This is a better plan anyway for those that might buy these parts and have to assemble them in their garage. They are more likely to have a MIG at home.
Awesome stuff you're designing there. I can't wait to see the finished product.
I'm just kicking back and hoping that you may decide to make a roof panel some day.
I'm just kicking back and hoping that you may decide to make a roof panel some day.

I would need some measurements for the three hinges locations. Should be safe to assume the middle one is in the middle but what's the spacing for the outer ones? I would need the distance between the two holes on a single hinge and then the center to center distance from hinge to hinge. Preferably using calipers for the individual hinge hole spacing and then as accurate as possible hinge to hinge (like 1/32" at least.
Other option is to drill the holes yourself and tack weld some nuts inside the channel. But why do that if I can do t for you included in the price?
I'll get some measurements as best I can. It would be great to verify it with another early 45, I'll see what I can do. I'm by no means afraid to drill my own holes and weld some captured nuts, but like you said, if you can do it
Awl_TEQ
Supporting Vendor
- Thread starter
- #199
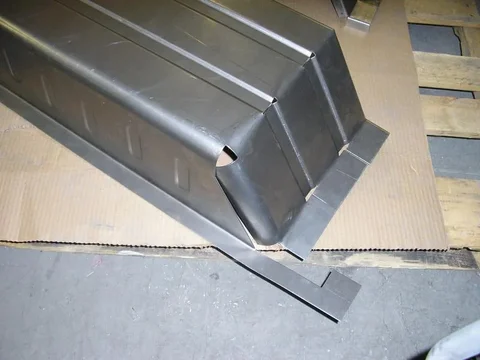
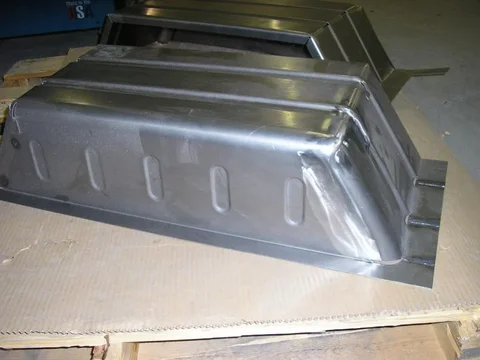
Feels like its been a long time since an update. I've been busy with the winter to summer changeover - digging out the lawnmower and hoses etc. I had some time this week to make a couple of attempts at a wheel hump. These two shots are of my first attempt - proof of concept to see if I could bend it the way I wanted to. I can slap together a simple angular hump in a half hour but I wanted to make it look as original as I reasonably could given the tools I have on hand. Given enough time I can make it identical to the factory one but that wouldn't be cost effective for those that might want to buy them. I can replicate the two ribs running the length of the original and try to bend it with larger radius tools instead of sharp bends that standard tooling makes. I have a small rib embossing tool and I threw a few in the side to stiffen it up. The original has three ribs running vertically on the sides but thats too difficult to do with my tooling.
My first try - kind of ugly - destined for the scrap bin


My first try - kind of ugly - destined for the scrap bin


Awl_TEQ
Supporting Vendor
- Thread starter
- #200
My second attempt after tweaking the layout. I finished up one corner to show what it will look like finished. This one is also going in the scrap bin after I take it home and see how it fits. I still have to add the holes where it bolts to the cross members as well as close a few gaps in the layout.


Similar threads
Users who are viewing this thread
Total: 1 (members: 0, guests: 1)


