HDJ81 alternator upgrade and associated wiring/fusible link (2 Viewers)

This site may earn a commission from merchant affiliate
links, including eBay, Amazon, Skimlinks, and others.

Joined
Nov 29, 2016
Threads
22
Messages
220
Location
Arkansas
Hi all, I have a 1991 HDJ81 (JDM) with the 1-HDT that I will be upgrading the alternator on. As far as I know, I have the original, stock DENSO 60 Amp 12v alternator (27060-17020). I am pretty sure of this because on ToyoDIY, for my VIN, I can either have a 60 Amp or a 100 Amp alternator from the factory, but since I do NOT have the "cold weather package", I believe my factory alternator is the 60 Amp version. I did have the factory AISIN winch, if that makes a difference.

Anyway, I will be upgrading to the Terrain Tamer 120 Amp 12v alternator (27060-17250TT) and I wanted to know two things:

1) Do I need to increase the wire size that runs from the alternator to the Left Hand battery positive terminal?
2) What about any fusible links for this alternator-to-battery wire? I did not see any fusible links on the wire that runs from the alternator to the left hand battery positive terminal.

To be clear, I visually traced the wire that runs from the stock alternator output and it goes over the radiator and goes directly to the left hand battery positive terminal (not the right hand battery like I would have thought...the right hand battery is so much closer to the alternator, doh!). My concern in this scenario is that if I have a stock 60 Amp alternator and I go and put in a new 120 Amp alternator, that the stock wire size will be insufficient. As an example, the Radd-Cruisers website shows for their 110 amp high output alternator that for a wire run of less than 5 feet that a 4ga fine stranded copper wire should be used. For runs over 5 feet that a 2ga wire should be used. Also, that the wiring should be protected with a fusible link as well.

Any other advice on this?

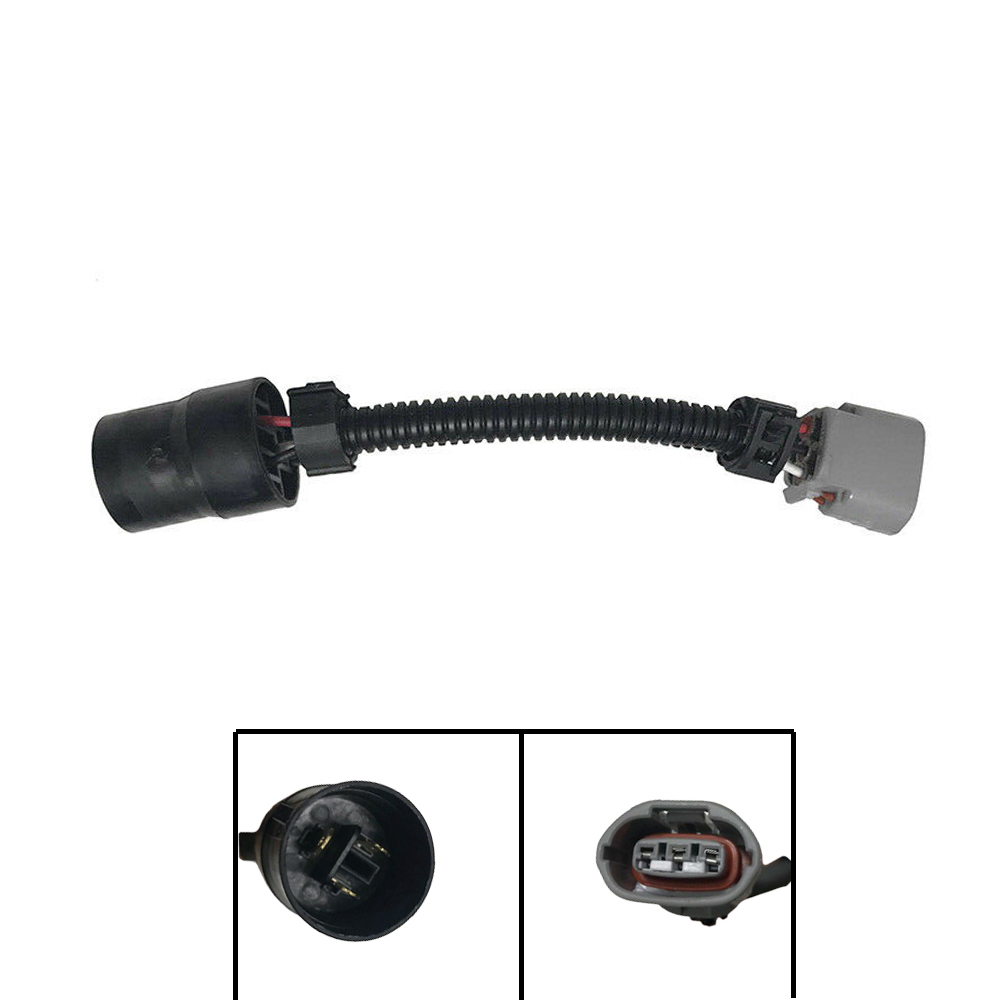
Also, I do know about the need for the 3-pin adapter to go from the round to oval connection since mine is a 1991 HDJ81 (the new Terrain Tamer only has a round 3 pin connection and the early HDJ81's had an oval 3-pin connector). Also, I am aware of the need for the longer alternator adjusting bar/tension bracket (16381-17020) to be able to fit the larger 120 Amp alternator.

Thanks!
 
Thicker cable won’t hurt especially if you have lots of accessories. I run 1/0 ga

Fusible links you don’t need to change.

you can also get pigtails to convert 3-pin round to any other end you want

example a 3-pin round Nippon Denso to an oval plug
c48d3a90-90c6-429f-b0ae-c60bba8c2c73_1.d3723e7a471a7c773cf121e5a79b982e.jpeg


Good call on the bracket looks like you got what you need.
 
Last edited:
Thanks @veiloctane! I will have to look and see what the factory wire size is versus what size I would need, and then size accordingly. The only non-factory accessories I am running is a Badlands ZXR 12K winch. Everything else is stock. My HDJ81 did have the original AISIN 8,000 lb factory winch, so I would think the wiring would be adequate, but who knows.

What is the consensus on fusible links on the specific wire between the alternator and the left hand side battery? I never saw a fusible link on my 91 HDJ81 on this specific wire. I seem to remember somewhere that you do not want your alternator to run without a battery load, so I'm not sure what to do about a fusible link?
 
If you cannot find your Fuse-able link you can follow the alternator wireing battery to the side of your battery box. It should look like this. A black fuse link distribution box and a Grey connector next to it.
4FF1478C-A06D-4C23-A148-FE7D52FE129F.jpeg
HDJ81 Fusible Links - https://forum.ih8mud.com/threads/hdj81-fusible-links.1104639/

Here a good read on mud on fuse-able links

Post in thread 'Fusible Link Rating'
Fusible Link Rating - https://forum.ih8mud.com/threads/fusible-link-rating.174136/post-2487786

I would Keep the fuse-able link in a factory configuration
Same values. I have heard that these fuse-able links are discontinued from toyota but you can re-build your own from using universal fuse-able link wire from local parts store you can bring in your old ones to match it.

I have included a diagram here to help you.

For the winch my HDJ81 came with factory winch and I changed it to a Warn 8274 the factory wiring is 2ga and usually connected directly to battery because of high current drain. For myself i am upgrading to 1/0 ga or because under extensive winching I notice the cables getting a bit warm. I won’t be going direct to battery but to a manual heavy duty cutoff switch.

93AFECFB-2BE8-4855-8299-3F0F5F17BFA3.jpeg
 
Last edited:
Wow, thank you so much @veiloctane ! Want to make sure I get this right and don't create a headache for myself down the road.

Ok, just want to be sure here. I took your photo and drew a red arrow pointing to the wire that comes from the alternator and then goes over the top of the radiator and over to the left hand side battery (aka the passenger side battery on an HDJ81 JDM vehicle). If I follow this wire I am unable to find a fusible link anywhere between the alternator and the left hand side battery. Is this correct? This is the wire that I am wondering if I need to upgrade from the current stock size (no idea on AWG) to something bigger.

Alternator_wiring_edited.jpeg


And here is a screenshot of the Toyota EWD for what I think is the wire above (please see the screenshot below with the red arrow showing the same wire). The part that confuses me is that I don't know if my 1-HDT JDM HDJ81 is considered a "Europe Diesel"...I would have thought it was different, but who knows.

Screen Shot 2022-06-20 at 3.04.02 PM.png


I am able to find the fusible links on the right-hand side battery (aka the driver's side battery on an HDJ81), like you pointed out. Getting spares for all the fusible links sounds like it shouldn't be too difficult, I just want to make sure I am getting it right. Like you pointed out, I am aware that the factory OEM fusible links are NLA, but that you have to make them yourself now.

Thanks again for all your help...this is what makes ih8mud so valuable!
 
I see what's going on that cable goes to the second battery then to the 24v switchover for the starter. If your plan to leave it factory as Toyota intended you can wire direct to second battery as per diagram no fuseable link needed

It's been a while since I looked at mine as I also have a 12v starter conversion and 24v switchover delete. I did this to simplify my dual battery setup for my fridge and accessories. in my own opinion it's one less point of failure and less wiring to run
 
Last edited:
I did this exact upgrade and didn't swap to a larger wire. I drained the batteries many times and never had problems for years, but this winter after sitting for a long time I did have a weird electrical smell after driving which I suspect was the wire under high charge loads? So I swapped it out with a 2AWG which was adequate for this load (the amperage limits get de-rated due to engine bay heat so choose the proper chart carefully....I can't find the charts now but they're out there and 2AWG is fine). No fusible link in-line with this connection per stock configuration.
 
Thanks @jellis! Your timing is impeccable...I just ordered a custom battery cable that is 2 AWG for the +/- 5 ft. run that goes from the alternator to the positive terminal of the passenger-side battery (HDJ81 - RHD).

I found a helpful table from the website (www.batterycablesusa.com) where I ordered the battery cable from. Please see the table below...I highlighted in green the 2 AWG entry, which is what I ended up going with for this specific run. The current carrying capacity is derated for engine bay temperatures. Furthermore, the Terrain Tamer 27060-17250TT alternator came with a test result printout, and the max amperage at full load is 179 amps (the alternator, however, is rated at "120 amps" nameplate). Like you said, the 2 AWG should be just fine for this purpose.


SAE J-378 Table of Allowable Amperage for conductors 50V or less with 105C rating
GaugeAmps OutsideAmps Inside
AWGof Engine Spaceof Engine Space
88068
6120102
4160136
2210178
1245208
1/0285242
2/0330280
4/0445378
 
Last edited:
Thanks for the info and reference! Their extreme battery cable looks awesome, good to know that's out there!

You will be glad you upgraded when you see how small the stock cable is compared to that 2AWG, it's pretty amazing I never had any problems! Very very lucky!
 
i know some people use a Fuse link from a 100 series
they have fuses that can be changed it could be a good option.

82620-60010

1656703251182.png


1656703342158.png
 
Thanks @jellis! Your timing is impeccable...I just ordered a custom battery cable that is 2 AWG for the +/- 5 ft. run that goes from the alternator to the positive terminal of the passenger-side battery (HDJ81 - RHD).

I found a helpful table from the website (www.batterycablesusa.com) where I ordered the battery cable from. Please see the table below...I highlighted in green the 2 AWG entry, which is what I ended up going with for this specific run. The current carrying capacity is derated for engine bay temperatures. Furthermore, the Terrain Tamer 27060-17250TT alternator came with a test result printout, and the max amperage at full load is 179 amps (the alternator, however, is rated at "120 amps" nameplate). Like you said, the 2 AWG should be just fine for this purpose.


SAE J-378 Table of Allowable Amperage for conductors 50V or less with 105C rating
GaugeAmps OutsideAmps Inside
AWGof Engine Spaceof Engine Space
88068
6120102
4160136
2210178
1245208
1/0285242
2/0330280
4/0445378
Wanted to follow up on this. I am upgrading my alternator to a 280A unit and wanted to confirm the cables that needed upgrading. Any need to upgrade the chassis to motor ground as well to match? Thanks!
 
Wanted to follow up on this. I am upgrading my alternator to a 280A unit and wanted to confirm the cables that needed upgrading. Any need to upgrade the chassis to motor ground as well to match? Thanks!

.

YES ....

equal in equal out ...

- if you pump in all that 280A B+ when needed , then how is the NEG- on a smaller gauge , say stock toyota smaller thinner copper conductor going to also flow it ?

- its like a Cold air Intake and a CAT back exhaust ,

- neither one gives you any more PEP or HP gain without the other , faster AIR in , Faster Air out .....

make sense ?


- curious ? what made you decide on , and or choose a 280A Alternator , ??

- do you have a HIGH Load AMP draw devise or the like going on .....

thanks for the WHY behind this , its intriguing ....:)

Matt
Thanks for the response! this makes total sense and I see how silly of a question it was in the first place.

I went with 270A because I do have some extra draw plans: winch, 40A charger for a 3rd house battery in the camper, etc. either way, it is overkill for my needs but my OEM alternator is going out so I needed a replacement anyways. Any the cost of this 270 M2k unit ended up being about the cost of a new OEM 80A alternator from Partsouq, so I went for the upgrade!
 
i simply ran the wire to my right-side battery as opposed to running all the way over. and ran a separate cable between batteries. it really doesn't matter. the shorter cable does allow for a more efficient charge back as there is no loss due to cable length
 
The stock 80 (?) amp alternator can be replaced by a bigger one - the three pin connector changed at some point from round with 1/4 inch spade lugs to a more compact sealed style at some point, and there is a different tensioner bracket available to accomodate something like a 110 amp alt from a 1hz in a 79 series which has a larger body. The mount itself is the same.

I made new primary earth and positive connections using 35 mm sq welding cable but anything similar will do. Make sure the lug crimps for the starter motor and the main engine earth link are done well.
 
i recently gave up on the toyota alternator and got a 140 amp alternator from a Nissan versa and machined a bracket to line up. its a smart alternator and adjusts output according to battery charge levels. fantastic upgrade and loving the steady flow to all my accessories

it cost me 100 US for the alternator vs 400 plus for the toyota.
 

Users who are viewing this thread

Back
Top Bottom