H42 four speed manual transmission into 1992 FJ80 (1 Viewer)

This site may earn a commission from merchant affiliate
links, including eBay, Amazon, Skimlinks, and others.

Joined
Nov 23, 2005
Threads
84
Messages
4,125
Location
Birmingham, AL
I have almost finished installing an h42 four speed from a 1986 fj60 into my fj80 and thought I would post up what I did and why I wanted to convert to a manual transmission.


Why?

My first car was a ’77 40 series, and I have always preferred a manual transmission. Ever since I bought my current 80 four years ago I have felt that it would really benefit from a manual transmission. I love my 3fe, but it lacked power with the 35’s and the a440 and had a hard time pulling up hill, especially off-road. It always seemed to be between gears, first was too low for anything but crawling and 2nd was too high and the engine would bog down. I could have regeared to 5.29’s but that would have been expensive, and I would still have an automatic, which I don’t like and don’t truly understand. Also, off-road with drum brakes and smaller disks in the front, I always wished I had more engine braking ability for steep descents. On top of that, I had a serious and quickly worsening rear main leak, so the transmission was coming off anyway.

For the past few years I have been looking for info on a manual swap and found that a later model 60 series transmission should bolt up to the 3fe without too many modifications, at least it wouldn’t require an adapter. The 85-87 year 60 series actually had a 3f bellhousing, which clocked the transmission 7 degrees and also had a spacer between the transmission and transfer case to make the total length the same as an h55 5-speed. There are numerous threads in the 60 series forum about fj62 owners swapping their a440s for manuals. There were even a couple of swaps into 80s, but no one, that I could find, had actually used the later bellhousing, although everyone seems to agree that it should make things easier.

This was my favorite thread from orangefj45 and I read it and reread it:

https://forum.ih8mud.com/60-series-wagons/125194-fj62-out-auto-crawler.html

lowtideride did an amazing conversion with an h41 installed in an 80 for project uranus, but he used a 60 series body:

https://forum.ih8mud.com/60-series-wagons/57360-project-uranus.html

davisdrafting successfully installed an h41 into his 80, but he used a 2f bellhousing and had to do a lot of modifications:

https://forum.ih8mud.com/80-series-tech/144333-manual-trans-swap-ideas.html

https://forum.ih8mud.com/hardcore-corner/150577-need-help-clutch-fork-fj80.html

Based on these threads and other info gleaned from the net, I knew it could be done fairly easily and that I probably had the mechanical ability to finish the conversion. So it was time to start collecting parts.
 
Last edited:
What is needed?
To do the swap you need:

Transmission/transfer from a late 85 to 87 fj60
3f bellhousing + clutch cover from the same year truck
60 series flywheel
Clutch Kit – Clutch, Pressure Plate, throw out bearing, pilot bearing, and alignment tool.
Brake and Clutch Pedals clutch pedal bracket
Throw out bearing hub
Clutch fork from 85-87 60 series, fork ball, and boot.
Clutch master and slave cylinders
Front driveshaft from 60 series
Crossmember from 85-87 60 series
Transmission Shifter

I started my parts collection with the h2/split case when a 1986 fj60 popped up at the pull-a-part in town. I went to go check things out and found that the engine had been removed, but transmission was still in the truck hanging by the crossmember. Since you can’t take a transmission jack in the yard, I had to figure out a way to get the transmission out of the truck without hurting it or myself. I finally pulled the back seat cushion out of an old maxima parked next to the land cruiser, placed it under the transmission, removed all but two of the crossmember bolts, dropped the last one on the passenger side and watched the transmission softly land on the cushion. Then I had to drag the entire assembly out from under the truck in the gravel lot. Funny story… At least I had company.

As I was cursing and yelling trying to get it moved out from under the truck, a barefoot old man with a gray beard down to his waist came and sat Indian style calmly next to the truck and started casually talking about what I was going to do with transmission. Once I was fairly sure he wasn’t going to murder me, the absurdity of the situation made the whole experience a lot more fun. From two trips to the junkyard I eventually got the transmission, transfer, bellhousing, clutch cover, master and slave cylinders (which I eventually bought new anyway), crossmember, front driveshaft, shifter, clutch pedals and bucket, transmission tunnel cover with boots and a york compressor from an old Mercedes for a later project for less that $200.

I ordered a full clutch kit from the parting section with a fork and everything included, and UPS delivered the most damaged box I have ever seen, all that was left was a flywheel and throwout bearing/hub. After some searching and several messages, I finally found another nearly new clutch kit from another mud member, and a fork from a third mud member. I ordered a new rear main seal, oil pan seal, pilot bearing, clutch boot, front and rear output seals for the transfer, and front and top seals for the transmission. I probably should have gone ahead and rebuilt the transmission and transfer while they were on the stand, but I figured I would get everything installed to make sure I liked the combo before I put more money into it.

I would have to say that gathering all of the parts was by far the most time consuming and frustrating part of this process. I got the transmission in August and still did not have everything I needed when we started the process with our club HAMOM at the end of January.
 
While the H42 was on the stand I thought I would clean it up and replace some seals. When I pulled it out of the junkyard 60 it was solid black covered with oil and dirt. After hours of cleaning it still looked filthy, but I was moving on.

I replaced the front and rear output seals on the transfer along with the boot on the 4wd selector. I also resealed the top cover of the transmission, and was going to do the front cover seal, but it was backordered and arrived the day after I had it installed.

The stock split case shifter moves front to back for the 4wd selection and left to right for the High-N-Low. I wouldn’t mind that configuration, but the stock placement of the shifter would end up directly under the dashboard and partially into the passenger foot well. So I decided to build twin sticks.

The stock shaft for the shifter is just under 5/8” diameter, so I used 5/8” ID X ¾” OD X 1” spacers from the hardware store along with ½” barstock and 1” flat stock to mock up the start of the twin sticks. I reused the stock joint from the h-n-l selector as well as the square bushing for the 4wd selector, .

Pics of the "cleaned" transmission on the stand with the beginnings of the shifters:

twinsticks1.jpg

twinsticks2.jpg
twinsticks1.jpg
twinsticks2.jpg
 
oil return line

One of the common problems with the H42/split case combo mentioned frequently in the 60 series forum is an overfilled transmission and dry transfer caused by the failure of the seal between the two. Apparently when the seal fails, the transfer pumps all of its oil into the transmission. The correct fix is to tear down the transfer and replace the seal, but most people run a hose from the fill plug of the transmission to the fill plug of the transfer. Several vendors sell a kit for this purpose, and if I had to do it again I would buy one of those. However, I chose to drill and tap the fill plugs myself and add fittings and hose. It was a complete pain and wasted most of the time I had helpers on the first weekend of the swap.

Pic of the completed oil return line:

oilreturn.jpg
oilreturn.jpg
 
Removing the auto was pretty straightforward following the instructions in the FSM. The only catch was the 1992 manual leaves out the last required steps of removing the bolts that actually attach the transmission to the engine. The top four are especially tricky, I eventually used several extensions and reached in from the shifter console.

A440 removed:

a440.jpg

Removing the oil pan and scraping off the old gasket was the toughest part of the install IMO. Thankfully however, the rear main was simple with the oil pan off and I had magfj60 helping with the oil pan gasket.

New rear main seal installed:

rearmain.jpg
a440.jpg
rearmain.jpg
 
Last edited:
The first step in reassembly was to bolt on the bellhousing. The 3f bellhousing bolts right up to the the 3fe without any issues. The flywheel was next. I put it in place and everything lined up perfectly, but the flexplate bolts were just a hair too long. I widened the holes slightly in my drill press and bolted it up following the pattern listed in the fj60 repair manual. I also used anaerobic sealant on the threads to prevent leaks.

Next was the pilot bearing. A good tip here is to make sure the pilot bearing slides onto the transmission shaft easily while the transmission is accessible and not up on a jack under the truck. Mine did not slide on easily, so I cleaned the shaft with a scotch brite pad until the bearing would slide on. I hammered the pilot bearing in with a socket, installed the clutch plate using the alignment tool and bolted on the pressure plate following the sequence listed in the FSM.

Pic of the bellhousing and clutch installed:

bellhousing.jpg
bellhousing.jpg
 
This would have been the correct time to install the clutch fork, I waited until the transmission was installed and it made things a lot harder. There is a support on the passenger footwell that I had to cut to make room for the clutch fork. It would be much easier to cut without the transmission in place. I also think you could do a small body lift and get by without the cut.

Where I cut the support.:

wheretocut.jpg

I will try and get a picture of the actual cut later, it is difficult to see with everything installed though.
wheretocut.jpg
 
The next step was to test fit the transmission.

I bought a harbor freight transmission jack for the job and it made this part of the job very simple. Raise the transmission into place, level it out so it will go straight into the clutch and slide it in. I bolted it in place temporarily, marked where to cut the shifter hole and looked to see if everything fit. It turns out that the h-n-l selector barely hits the passenger footwell, so I marked that spot and pulled the transmission back off. With the transmission removed I cut the new hole for the shifter and hammered the floor a little bit to make room for the selector. This is another modification that could probably be avoided with a small body lift.

Transmission in place:

boltedin.jpg

The second time I installed the transmission it only took me thirty minutes, which makes me feel better about not doing a rebuild while it was out since I know it is so easy to take in and out now.

I also removed the rear heater lines and bypassed the connections while the transmission was out.

rearheatdelete.jpg

rearheatdelete2.jpg
boltedin.jpg
rearheatdelete.jpg
rearheatdelete2.jpg
 
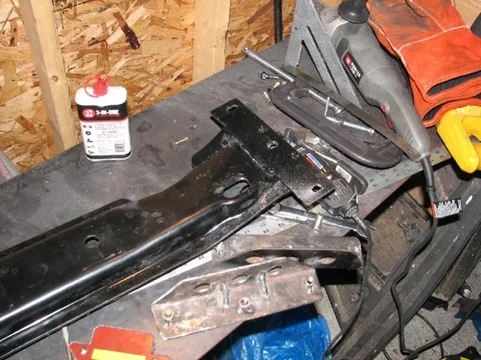
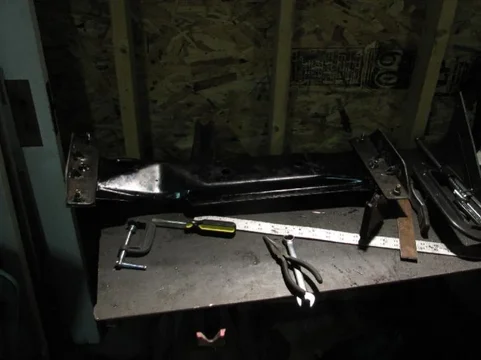
With the transmission now bolted in and supported by the jack it was time to start on the crossmember. The h42 crossmember mounts ended up directly between the front control arm brackets. I knew the mounts were going to be farther forward than the a440 mounts, but they ended up in a bad spot. To make things more complicated, the transmission(and mounts) are clocked 7 degrees by the 3f bellhousing and the split case hangs down right next to the original crossmember mounts. My original plan was to build a skidplate crossmember that cantilevered forward to the forward mounts, but the angle of the mounts and the transfer placement made that unrealistic. I ended up cutting the ends off of the 60 crossmember and welding on new mounts. I then welded two new mounts to the inside of the frame and bolted it on with 3 3/8 grade 8 bolts per side. I am happy with the finished product, it tucks up nicely.

xmember.jpg

xmember2.jpg

xmembercomplete.jpg
xmember.jpg
xmember2.jpg
xmembercomplete.jpg
 
Last edited:
Just curious does the auto not have a kill switch that stops from starting if its not in park or neautral and or any other computer related switching.
 
The next step was to install the master and slave cylinders. There is a hole for the master cylinder in the firewall already, most people use it to route cables(me included - something else to figure out now), but it does not have the mounting holes. I drilled the holes for the master cylinder bolts and bolted it in. I then bolted in the slave cylinder and clutch fork(should have done the fork earlier) and routed a new line. I bought a preflared 60" 10MM line from the auto parts store and used a spare brake hose I had on the shelf. I still have to do some cleanup on the house mounting, it is zip tied in for now, I have to make a bracket to mount the hard line to the body of the truck.

master.jpg
master.jpg
 
Just curious does the auto not have a kill switch that stops from starting if its not in park or neautral and or any other computer related switching.

It has a neutral safety switch, I jumpered it for now. I will have to add a switch to it to use the cruise control. I will detail all of the wiring later, I realized I have not taken any pictures of that.
 
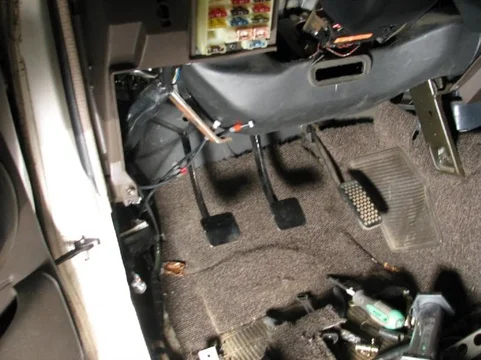
With the master cylinder installed it was time ot move onto the brake and clutch pedals. I had the pedals from the donor 60 along with the pedal bucket, but it was nothing like the 80 series setup. The factory 80 pedals use individual mounts, whereas the 60 uses one pedal bucket. I cut the clutch portion of the 60 bucket off and added some bracing to the left side. After bolting it in I thought it flexed too much so I added bracing to the dashboard that helped stiffen it up. I will probably redo the mount in the future. I cut about an inch out of the brake pedal arm and rewelded it and added a sharp bend in the clutch pedal. bucket.jpg

pedals.jpg
bucket.jpg
pedals.jpg
 
the driveshafts had to be lenghtened/shortened, but I was not comfortable doing that myself, so I took them to a driveshaft shop. The front of the 60 transfer case is different than the 80, so I mixed the back half of the 60 shaft and the front half of the 80 shaft. You can see the front shaft in the pics of the crossmember above.

My rear shaft was striped pretty badly and needed to be retubed anyway. The new shaft is looong:

reards.jpg
reards.jpg
 
makes me wonder if the same thing might work in a '93....
:popcorn:
 
After the driveshafts, I moved on to the shifters. This part was harder than I expected. the transmission shifter barely hit the dash in stock form, I had to bend it slightly to get it to clear. The twin sticks took some serious work. to clear the floor and go somewhat close to the stock position(I gave up and cut the floor), they have to bend in toward the transmission, back, in again and up through the floor. I would cut, bend, weld, test fit...etc. until they were where I wanted them. I just cut the head off of a bolt and welded it to the ends instead of trying to thread the rods.

twinpolished2.jpg

twinpolished.jpg

twintable.jpg
twinpolished2.jpg
twinpolished.jpg
twintable.jpg
 
Last edited:
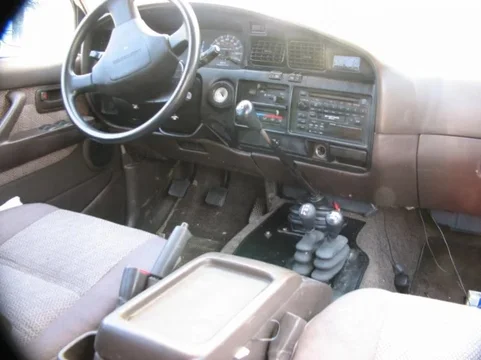
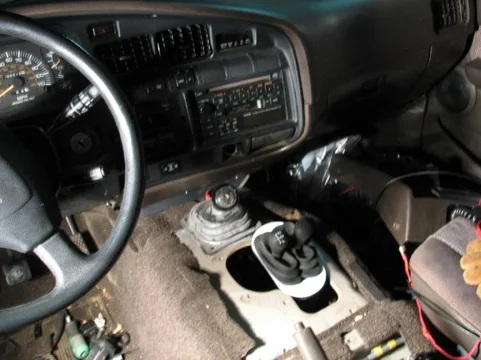
I didn't want to put the stock shifter console back in, partly because I didn't want to try and sew new boots, and partly because I like the more utilitarian look of the plain floorboard. To cover up the holes in the floor I ended up cutting out a plate that roughly followed the ouline of the stock console. I trimmed the edges with door molding. I also splurged and ordered some custom knobs from a mud member, Amaurer, and they are a work of art. He has a website, Kickass Stuff For Your 40-Series, where he sells custom knobs and dash pulls. I sent him my transfer knob to copy and had him label the new one with 2wd-4wd for the second stick. I also asked him for an h55 shaped knob with the 4 speed pattern cut into it. excuse the dirty interior:

shiftersday.jpg

interiorday.jpg

interiorday2.jpg
shiftersday.jpg
interiorday.jpg
interiorday2.jpg
 

Users who are viewing this thread

Back
Top Bottom