Featured 100 - Campfire

This site may earn a commission from merchant affiliate
links, including eBay, Amazon, Skimlinks, and others.

Which bags are you using? And do you have any pictures of the install? I've been out moving the trailer around and thinking it would be nice.

Air-Lift air bags about $100
Maintain ride height up to 1000# - So they say. I never pushed them that hard.
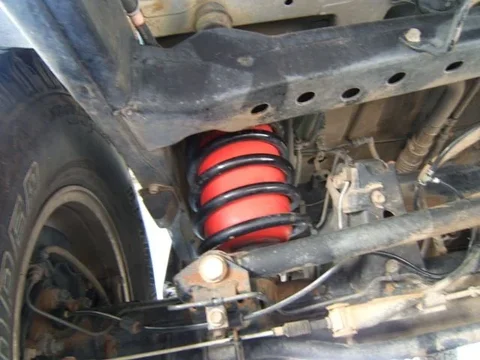
Not a lot to see installed, just a bag in the coil spring.
Installation= 1.Drill a larger hole in bottom of spring perch 2. Remove bump stop inside spring 3. Stuff bag into spring 4. Route air lines

Provides the same great ride as stock with just about any load. I pull everything with 100 and run different air pressure (max 25psi) depending on what it is. I do not run air in the bags when I wheel.
 
Nice ride and nice photos. Keep em coming!
 
Air-Lift air bags about $100
Maintain ride height up to 1000# - So they say. I never pushed them that hard.
Not a lot to see installed, just a bag in the coil spring.
Installation= 1.Drill a larger hole in bottom of spring perch 2. Remove bump stop inside spring 3. Stuff bag into spring 4. Route air lines

Provides the same great ride as stock with just about any load. I pull everything with 100 and run different air pressure (max 25psi) depending on what it is. I do not run air in the bags when I wheel.

Thanks Phil, I put a set of Firestone's on my Dad's Dakota, but that setup has brackets, axle mounts, etc...
I really didn't want all that crap under mine. If the Air-Lift's just fit in the springs, I'm ready for that.
Thanks again.
 
When I was considering Air-Lift bags I was told they don't work so well when "off-roading"...even when aired down.

LCP: You are happy with the performance, without trailer, when crawling around, etc., off-road?
 
There is a lot of mis information about air bags for some reason. I've been running them in a well modified Jeep TJ for about 5 years and in the LC for about a year. I've run them off-road, on-road with no load and with a large load and haven't found a downside yet. I've run up to 30 lbs in the LC to level things out and it rides great. In my Toyota mini truck, I've run air shocks for the last 13 years with no complaints and in spends half of it's time towing 4000 lbs plus of landscape materials. Again, no downsides that I'm aware of and yes, I have a brake controller and trailer brakes before I get flamed for towing that much with a mini truck.:)

One snag that I did run into with my LC install was that the hole in the spring perch was not centered with the nipple in the air bag. (Nipple and airline pass through the bottom spring perch) The edge of the first hole I drilled made contact with the nipple and caused an air leak. After taking it all back apart, I used the brass nipple on the airbag to "mark" the spring perch. Basically just wobbled a slightly inflated bag to see where the nipple would contact the perch.

End result, with original hole, was an oval hole in my spring perch. Nipple doesn't contact the perch now and it doesn't leak. Hopefully my picuture comes through so you can see what it looks like.

Adam R.
 
Last edited:
There is a lot of mis information about air bags for some reason. I've been running them in a well modified Jeep TJ for about 5 years and in the LC for about a year. I've run them off-road, on-road with no load and with a large load and haven't found a downside yet. I've run up to 30 lbs in the LC to level things out and it rides great. In my Toyota mini truck, I've run air shocks for the last 13 years with no complaints and in spends half of it's time towing 4000 lbs plus of landscape materials. Again, no downsides that I'm aware of and yes, I have a brake controller and trailer brakes before I get flamed for towing that much with a mini truck.:)

One snag that I did run into with my LC install was that the hole in the spring perch was not centered with the nipple in the air bag. (Nipple and airline pass through the bottom spring perch) The edge of the first hole I drilled made contact with the nipple and caused an air leak. After taking it all back apart, I used the brass nipple on the airbag to "mark" the spring perch. Basically just wobbled a slightly inflated bag to see where the nipple would contact the perch.

End result, with original hole, was an oval hole in my spring perch. Nipple doesn't contact the perch now and it doesn't leak. Hopefully my picuture comes through so you can see what it looks like.

Adam R.

Good info and testimonial! Thanks!
 
Since we don't have a lot of volunteers for ROTM, I decided to update mine with some of the mods I've been working on.

When I was considering Air-Lift bags I was told they don't work so well when "off-roading"...even when aired down.

LCP: You are happy with the performance, without trailer, when crawling around, etc., off-road?

There is a lot of mis information about air bags for some reason. I've been running them in a well modified Jeep TJ for about 5 years and in the LC for about a year. I've run them off-road, on-road with no load and with a large load and haven't found a downside yet. I've run up to 30 lbs in the LC to level things out and it rides great. In my Toyota mini truck, I've run air shocks for the last 13 years with no complaints and in spends half of it's time towing 4000 lbs plus of landscape materials. Again, no downsides that I'm aware of and yes, I have a brake controller and trailer brakes before I get flamed for towing that much with a mini truck.:)

One snag that I did run into with my LC install was that the hole in the spring perch was not centered with the nipple in the air bag. (Nipple and airline pass through the bottom spring perch) The edge of the first hole I drilled made contact with the nipple and caused an air leak. After taking it all back apart, I used the brass nipple on the airbag to "mark" the spring perch. Basically just wobbled a slightly inflated bag to see where the nipple would contact the perch.

End result, with original hole, was an oval hole in my spring perch. Nipple doesn't contact the perch now and it doesn't leak. Hopefully my picuture comes through so you can see what it looks like.

Adam R.
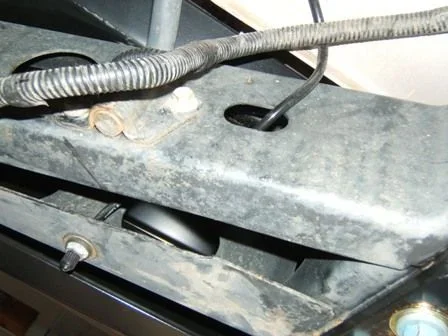
With great advice passed around, I dove into the airbag thing. I purchased a set of AirLift bags and wound up waiting almost two months for a "week or two" order. I was looking at something that would not deter off road manners, and help with towing the camp trailer that has a tounge weight of around 400 lbs when loaded. The installation was easy as you just have to remove the springs, drill open the holes (or elongate them as seen above) and put them inside the springs. Total install time was around 1.5 hours including running the hose and drilling a spot for the valve.
Here are the bags installed...
Aibags 002LR.webp

And my "hide-a-way" valve in the bottom of the rear crossmember.
Aibags 004LR.webp

The loads in the back are no problem now either. I've loaded the back cargo area and just added 10 PSI and the 100 sits level. The directions state not to run the bags "empty" so I keep around 3-4 PSI in them to keep them in place. With no-load, you can't even tell that they are installed. However, if you forget that there is 15-25 PSI in them, you will know it from the STIFF ride.
With them installed I have towed the trailer to Yosemite with 20 psi in them and it even improved the towing manners on the road.
Aibags 002LR.webp
Aibags 004LR.webp
 
Last edited:
The Skid Plate thing...

Not really impressed the way the factory front skid plate looks with spacers in it after the front diff drop installed, I set off building a design of my own. Shortly after posting My Skid Plate Build, Christo posted the link to his awesome design of his skid plate and made me feel so unprotected. I have taken his advice and decided to add some vent holes and beef up the mounting brackets for some added strength.

But on to the bumper...

I sold a used car fix up project and had enough out of it to pay for a Slee rear bumper without the spare tire carrier. I wheeled the Barney-Riley Trail with Spressomon, and I had the chance to sit in his and see the rear view out the rear window. My previous Pathfinder had a rear tire carrier and I just don't like the loss of vision so I ordered no tire carrier.
Removing the trailer hitch made me realize that all my hitches will be a little to high now in the towing profile.
RRbumper 003LR.webp

The bumper is built so nice and with all the brackets on the sides, etc. I no reservations on towing with it after seeing it.
RRbumper 001LR.webp

Cleaning things up before installing the new 180 pound deflector.
RRbumper 005LR.webp
RRbumper 001LR.webp
RRbumper 003LR.webp
RRbumper 005LR.webp
 
With my towing a camp trailer, car trailer, and a boat now and then, I really wanted some nice safety chain connections. And wanting to protect my new bumper a little, I decided to build a little attachment.

The bumper with no real chain attachment points.
safety chain 003LR.webp

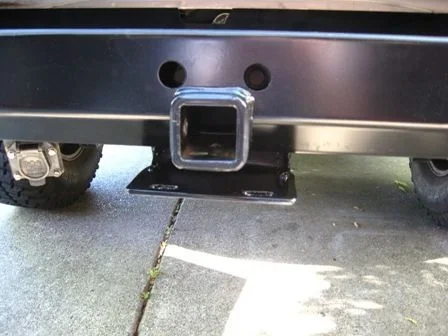
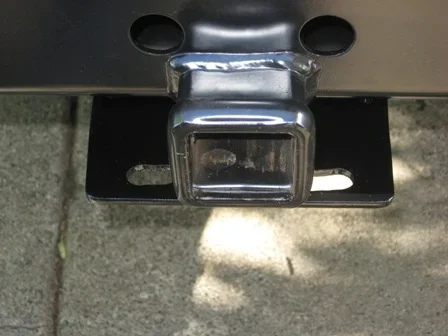
When removing the factory hitch, I found this neat plate that bolts the hitch to the rear crossmember.
safety chain 004LR.webp

A little .25 steel plate and we're on the way.
safety chain 006LR.webp
safety chain 003LR.webp
safety chain 004LR.webp
safety chain 006LR.webp
 
I figured this could be a skid plate for all the rocks I might find when trail hopping. Here is the back veiw of the plate when installed.
safety chain 012LR.webp

A little Semi-Gloss black spray paint and it almost matches.
safety chain 010LR.webp

With some screw closed chain links, I should be in business.
safety chain 013LR.webp


I'm now trying to get back to the skid plate and finish that up. I'll try to update for those interested and post some pictures.
One great motivation for adding mods to the 100 is all the flippin' soccer mom/Gloria Vanderbilt clad 100's in town that seem to come from the direction of the Country Club and never seem to be dirty. But when I see the husbands drive them, they all seem to look at mine with :bang: that "my wife won't let wheel it" look.:flipoff2:

Stay safe out there, and wheel your mall Cuiser...:grinpimp:
safety chain 010LR.webp
safety chain 013LR.webp
safety chain 012LR.webp
 
Last edited:
Great write up, photography, and modification choices. It is nice to see you really use yoru truck as intended in the original design.
 

Users who are viewing this thread

Back
Top Bottom