Builds Evolution of a Land Cruiser: My 80's build thread (5 Viewers)

This site may earn a commission from merchant affiliate
links, including eBay, Amazon, Skimlinks, and others.

IN-CAB WINCH CONTROLS

Woops, forgot about this little mod I did a few months ago! I wanted in-cab winch controls but I didn't want to go through the hassle of using an OEM switch. Besides, where's the bling in having everything OEM?? I'll leave that to guys restoring classic cars :flipoff2:

I like the panels sold by 12V Guy but they were kinda pricey and couldn't really find one to fit my size needs. So I set out to make my own. Here's a list of all the parts I used:


Wiring everything up was really easy. Because the winch has its own switches and relays, all I did is tap into the in/out wires behind the plug for the remote control. Here's a nice diagram I found online on how to wire it up. Every winch is wired differently, but all you need to find is which wires control the in/out from the remote.

curcuit_zps01989787.jpg


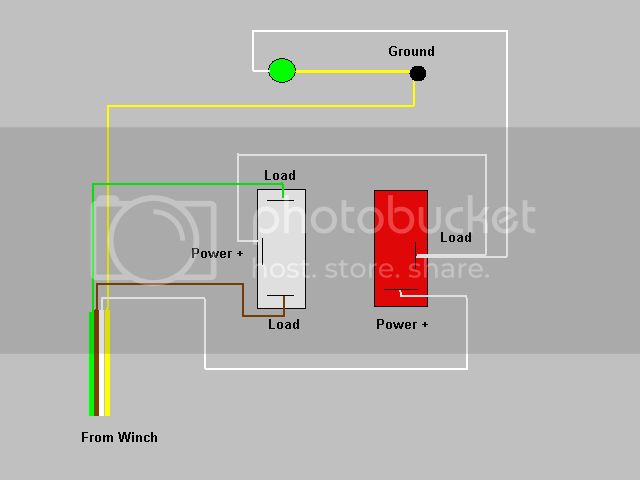
I didn't follow the diagram exactly. I did not have all 4 wires coming from the winch as shown in the picture. Here's what I did:

- The RED switch is the master on/off switch. You need to flip this switch to activate the in/out switch.

- The WHITE switch is the momentary in/out switch. Momentary meaning if you let it go, it turns off. This is the type of switch you want for a winch, not a regular toggle that stays on.

- For the WHITE wire, I tapped into the cigarette lighter. This is only providing the 'on' signal for the switch and doesn't need a lot of power. I used the cigarette lighter since it comes on with the key in the ignition. That way, the winch can't be powered when the car is off. The WHITE wire will send power to the in/out toggle switch and also to the LED indicator light. When you turn on the toggle switch, it powers the in/out switch and turns on the LED light.

- BROWN and GREEN are the in/out signal wires from the remote plug at the winch.

- YELLOW wire is the ground. I simply found a ground behind the dash and used that to get the LED indicator light to come on.

And the finished result :clap:

20120909_191652-kdcollage.jpg
 
Last edited:
Seans bumper coupled with your awesome front bump will look and perform bad a**. Very nice build.....wonder what color yer gunna paint?:hhmm:
 
Haha Thronturds :flipoff2:

At that time I was clueless about this stuff. I just bought them cause they looked cool and were cheap. I now see how hated they are in the offroad world!
 
Lookin great man. Your build reminds me a lot of mine - get an 80 and wheel the piss out of it. Also, congrats on getting featured on Toyo tires FaceBook page!
 
Lookin great man. Your build reminds me a lot of mine - get an 80 and wheel the piss out of it. Also, congrats on getting featured on Toyo tires FaceBook page!

Only us following this thread knows why the cruiser looks so ratty in that pic. Too bad they didn't post one with the new bumper.

Pat
 
Only us following this thread knows why the cruiser looks so ratty in that pic. Too bad they didn't post one with the new bumper.

Pat
Well it's sorta my fault, I submitted that pic on their wall a while back. I should send in an updated one!
 
HOOD LIGHT

You know I gotta say, this has to be one of the top 10 most useful mods. Can't believe I didn't do this sooner. Ordered the waterproof LED strip as shown on some other MUD threads. Got the 24" version with 60 LEDs in the cool white color for $29.99

http://www.superbrightleds.com/more...-high-power-led-waterproof-light-fixture/680/

The light seems to be really well built. I see this lasting for a long time. Mounted it under my hood using some 3M double-sided tape right behind the rubber seal

8540344055_d73493536c_h.jpg


I ran the wiring behind the insulation and zip-tied it to the windshield washer tubing

8540343847_d8c989ef04_h.jpg


I didn't want some fancy pants pressure switch to have the light turn on when the hood is opened. I don't always need the light on and sometimes I leave the hood open in the garage for hours. So I bought a tiny push-button switch at Radio Shack and installed it on the battery tie-down bar. Soldering the wire to the tiny terminals was not a fun task.

8541446030_1749c045a8_h.jpg


AND THE RESULT! Here's how it looks in my garage with all the lights off. This is a very accurate photo of the real output. This little light could prove invaluable on the side of the road or at the campsite at night. Heck, even in my garage I'm often in need of a bit more light.

So shut up, buy the light and slap it on.

8541445870_d5f834d6f9_h.jpg
 
Nice. It was on my list to do a light for under there. Never would have considered something so big though. That's some serious light power!
 
great looking cruiser! im certainly inspired now to get some progress done on mine. keep up the good work!
 
Nice. It was on my list to do a light for under there. Never would have considered something so big though. That's some serious light power!

Thanks! It's a sweet light. And for $30, you can't go wrong!

great looking cruiser! im certainly inspired now to get some progress done on mine. keep up the good work!

Thanks, glad I inspired you to spend more money :D
 
HEAD GASKET WOES

- 2 days ago I was treated to a waterfall of coolant leaking around the transmission housing. After doing some research online it looks like it's the hoses for the rear heater. I plan on bypassing the rear heater this weekend and will be ripping out the entire unit out from under the passenger seat.

Ok, some follow up to this. I bypassed the rear heater yesterday hoping that would take care of the coolant leak. I was wrong. I was still leaking lots of coolant; several drops per second. Only thing left would be the worst possible scenario...HEAD GASKET :crybaby:

Did some reading on MUD and learned that I probably have an external head gasket failure, meaning the seal around the firing ring is still intact, but the head gasket failed around the outer edge, dumping coolant out back. A coolant/block test or compression test wouldn't reveal this problem since the firing ring is still sealed (if it's only an external failure). Well fak.

So this morning I use a tiny mechanic mirror, a flashlight and my contortionist skills to try and peak behind the block against the firewall. It's insanely difficult. I can barely see anything. But I'm able to get a tiny glimpse of the culprit. Sure enough, HEAD GASKET :censor: I can see a puddle of coolant on top of the transmission and I catch a small view of where it's been seeping out of the head gasket.

Sign me up to the Official Head Gasket Club. 1996 Land Cruiser with 167k miles, only 4k miles after I bought it :mad: Luckily this isn't a daily driver so I don't have to rush anything. I'll be taking my time, working on it little by little. I need to start studying the FSM and IdahoDoug's DVD that I ordered a while back just in case.

I'll be doing all the work myself and changing out some basic stuff while I'm in there. I'll document the journey in this thread. Good thing, I ripped out most of this stuff including the intake manifold when I bought so I won't have any surprises. Bad thing, I need to do it all over again :censor: Once the head is out I'll take it to a machine shop for valve adjustment, check for warping, re-surfacing, etc.

Here's what I get after a few minutes of idling. Sad to say I won't be driving her for a while after this weekend.

8546619658_17ebe13722_b.jpg


And here's a photo of an old head gasket showing cylinder #6. The green arrows point to where I THINK my head gasket failed. Since the truck runs fine and I'm getting no smoke at all, I believe the firing ring may still be intact.

8545538391_210d8de48d_o.jpg


And somewhere along the line Toyota realized their head gasket was a weak link in the setup and redesigned the ports as you can see here. Hopefully this one will hold up better. Although this gasket is going on almost 17yrs old after all.

8546635670_0f68909530_o.jpg
 
Last edited:
Man I'm really sorry to hear that. While it is a nice feeling to work on things yourself, it's a bummer when you are in the middle of the repairs and want to take it out for a drive....

Glad it's not your daily.
 
REAR HEATER BYPASS

And since I bypassed the heater already, I might as well document it here. Here's a view before tearing into it. One of the POs had already changed some hoses here, but they didn't touch the hard-to-reach hoses of course! You can see they had already been leaking a bit and getting old.

8546624372_bcef291229_h.jpg


8546623802_23c89041bb_h.jpg


After removing all the hoses. I ended up loosening the wiring harness and heater valve up top to make it easier. The heater core port on the driver's side is a pain to reach!

8546623368_d36f0ac83a_h.jpg


Everything bypassed. Note the metal hose on the bottom with no connection. That's the one going to the rear heater. There's a similar hose on the other side of the block too.

8546622726_c81b0d2e1d_h.jpg


Used constant torque clamps on the hoses going into the heater core through the firewall. Driver's side was not fun!

8546622132_a7a30a7e36_h.jpg


Passenger side heater core port and bypassed rear heater below

8546621876_21664a1bbd_h.jpg


Some of the old hoses. They look somewhat fine from the outside...

8546621576_a972996b7f_h.jpg


But check out the inside. CHANGE YOUR HOSES! They could be ready to go at any time!!

8545523799_65e7f38f29_h.jpg


Anybody need a rear heater, works great! :flipoff2: Gave me a ton of storage room under the passenger seat. I think I'll use the space to store a set of good jumper cables.

8546619954_a3ce879744_h.jpg
 
Man I'm really sorry to hear that. While it is a nice feeling to work on things yourself, it's a bummer when you are in the middle of the repairs and want to take it out for a drive....

Glad it's not your daily.
Yeah man it does suck. Especially now that the weather is getting nice and my rear bumper is on the way. I knew I'd have to do it eventually, just didn't think it'd happen so soon. Oh well. Hopefully it will last another 15 years after this! :)
 
MONSTALINER COLOR CHOICES

Gotta have something to look forward to after the head gasket is fixed! Here's the finalists (the greens, not really feeling the copper color).

Left: Coppa Feel
Center: Sans Panties
Right: WWII OD GREEN

I'm kinda torn between the two greens. Darker or lighter? Or maybe both...2-tone?? :D Here's several shots in different lighting as they always look different.

Outdoors in full sunlight

8545523553_a3bb90351d_h.jpg


In the garage with indirect sunlight

8546620560_48f063802b_h.jpg


And in the garage under fluorescent lights

8545522999_da3d08a9bb_h.jpg
 
CLUSTER LEDs

Today I also installed a new set of cluster LEDs I purchased from member 'lilevo'. All 4 of the main bulbs for $15 shipped. I got the white color. Very nice improvement over the sad, dim little OEM halogen bulbs with plastic green covers. The light is nice and crisp. :clap:

8547363146_bcf70b99c6_h.jpg

Nice, now your looking like an LS400. Very clean indeed.:clap:
 

Users who are viewing this thread

Back
Top Bottom