Builds El See 1996 FZJ80 build

This site may earn a commission from merchant affiliate
links, including eBay, Amazon, Skimlinks, and others.

Another question: on amazon they don't appear to be welded at Y merge like yours. Is that something you did or had a shop do? Sorry if this is a dumb question, pretty new to all of this.
 
Another question: on amazon they don't appear to be welded at Y merge like yours. Is that something you did or had a shop do? Sorry if this is a dumb question, pretty new to all of this.
The images are from Magnaflow. It is exactly what I got.
 
I finished building the sub amp and inverter mounting panel. It's not as pretty as I would like but I wanted to get the amp and inverter installed. The inverter will be replaced with a larger and better inverter. My nice 1500w unit would not fit so I installed a HF special 750w for now. I also took some pictures of my ham radio install.

Subwoofer, sub amp, 750w inverter and power block.
full


Side panel installed to show access when glove box cover is removed. The ashtray was removed and will house 120v outlets, usb port and Anderson powerpoles.
full


FTM-350 ham radio body installed beside glovebox where factory amp was.
full


FTM-350 head unit mount.
full


Out of the way microphone.
full


Antenna install. Great SWR at this location however being lower than the roof does limit my range compared to a roof mount. The upside is I can pull into the garage and not have to lower or remove the antenna. My roof rack also interferes with a roof mounted antenna.
full


I moved my Scan Gauge II from my Bronco and installed it in the LC.
full
 
@MODist wow. Best build thread ever. I really appreciate you taking the time to explain how you are doing these things. Will come in handy for sure. Keep it up!
 
How much did the sub woofer set up you have cost you with all the wires the fuse box ,woofer and the other electronics to make it work . The reason I'm asking Is I have a 97 lx 450 and it has a small 4 inch sub woofer in the console and its shot so I wanted to get something better . I went to the car install place and they showed me a under the seat Memphis all in one unit SA110SP - Memphis Car Audio. or the
Kenwood KSC-SW11
so I was just wanting to kind of compare the cost difference . the memphis is 350.00 and the kenwood is 140.00
 
Last edited:
The subwoofer cost about $12 and the amp was right about $100. I built the box out of spare plywood and spare 18ga wire. 8ga wire would have been fine to power the sub but I went with 4ga to power the inverter and other accessories. I paid ~$35 for the 4ga wire(15 feet each strand) which will get you ~ 25 feet of 8ga wire.
 
After road testing the sound I have been disappointed in the low end of the sub. During initial testing I wired the dual 4ohm voice coils in series and drove it with 200 watts. The new new sub amp only puts out 100 watts at 8 ohms, 200 watts at 4 ohms and 300 watts at 2 ohms. I rewired the sub voice coils in parallel for a 2 ohm load. The jump from 100 to 300 watts rms is a nice 4.5db increase. It does put out more sound now but the poor $12 sub is working right at its limits. Don't get me wrong, it puts out great sound for what it is. I want more volume to help drown out the road noise. I'm torn between replacing it with a Kicker 6 3/4" CompRT which will drop right in or modify the box for a Pioneer TS-SW2002D2 8 inch shallow mount. I could either modify the existing hole and bracket or make a new hole lower in the box and cover the existing 6" hole. The 8" should give more sound while working less however there is the issue of the box volume (.25cf). The existing 6" sub and the Pioneer 8" both call for a minimum .5cf while the kicker is good down to .18cf. Then there is the price, the Pioneer is about half the cost of the Kicker.
 
Another idea is to stuff two 6.5" subs in the box. However I'm not sure how effective that will be with such a small box. Anyone have ideas on this?
 
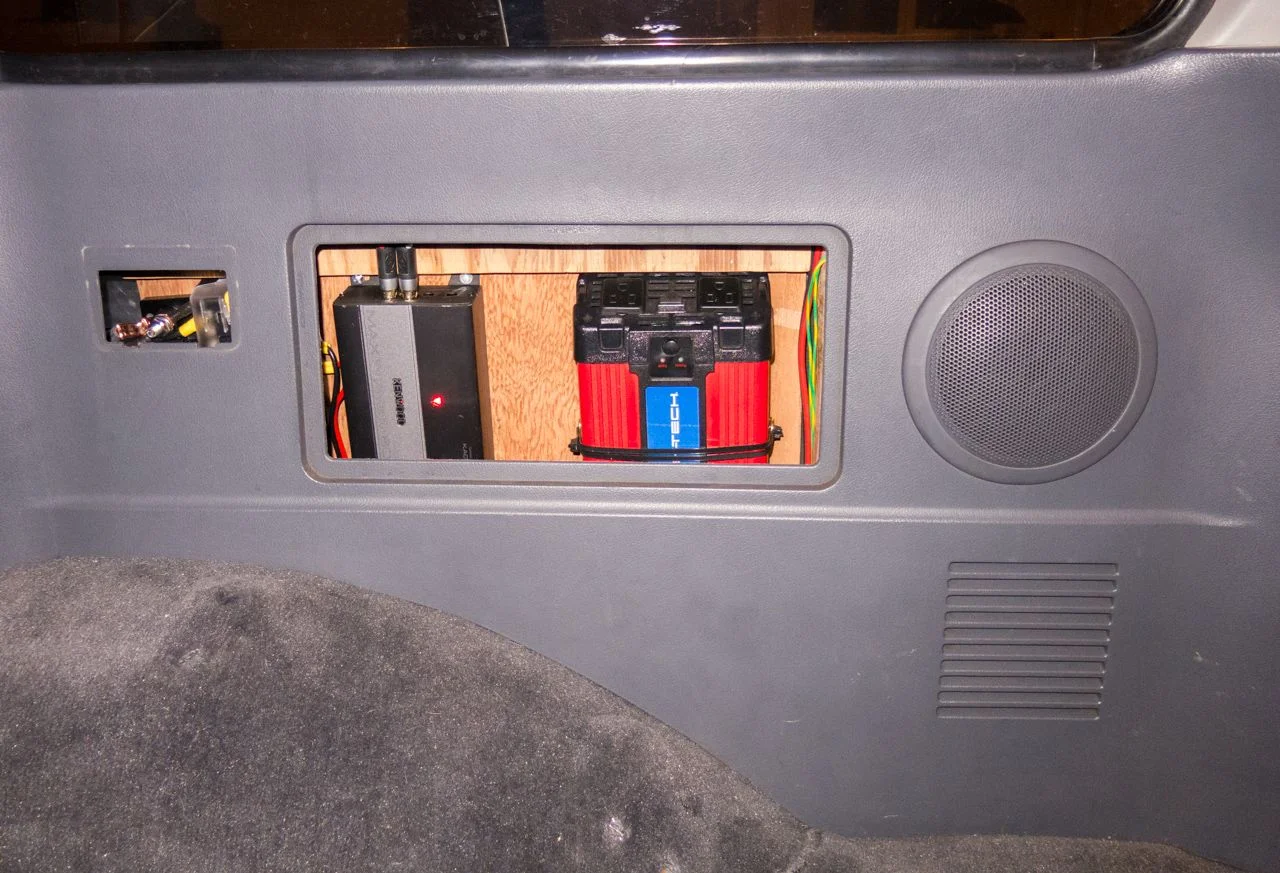
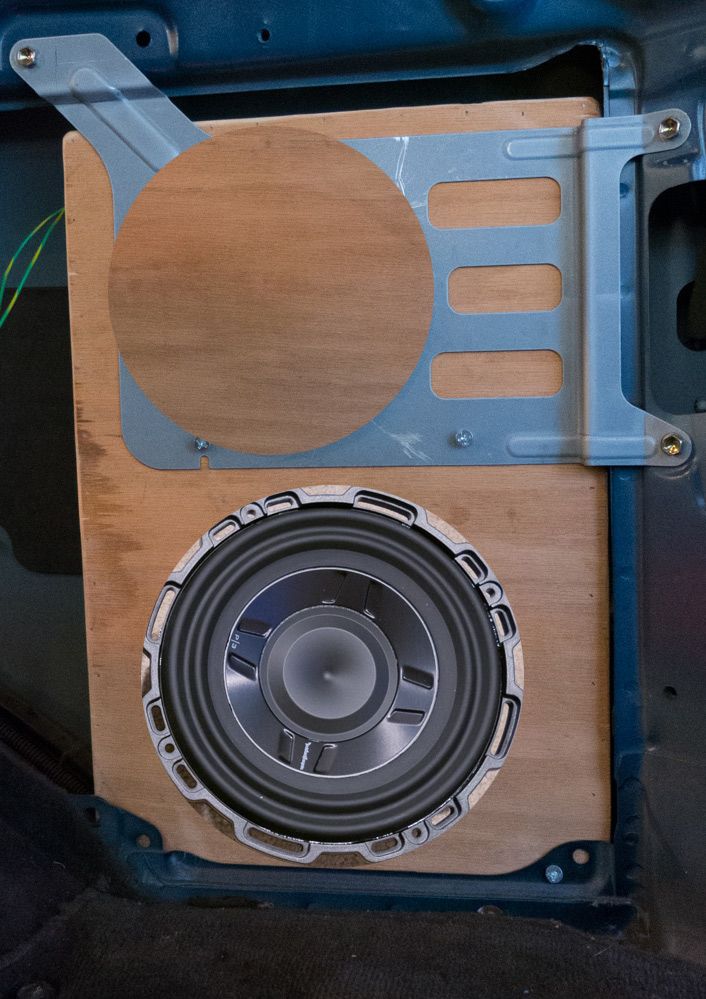
After thinking of a few more solutions I settled on a 8" Rockford P3SD48 dual 4 ohm shallow sub for $93. This sub has a recommended enclosure volume of .25cf, half that of most other shallow subs. Mine is .25cf empty and about .2cf with a sub. At first I planed on enlarging the existing hole to fit the larger sub but opted for the simpler solution of making a new hole on the lower part of the enclosure. I used the cutout as a cover for the existing 6" hole. I forgot to take pictures of the finished product and didn't want to remove the panel again just for a picture so I Photoshopped it so you get an idea.
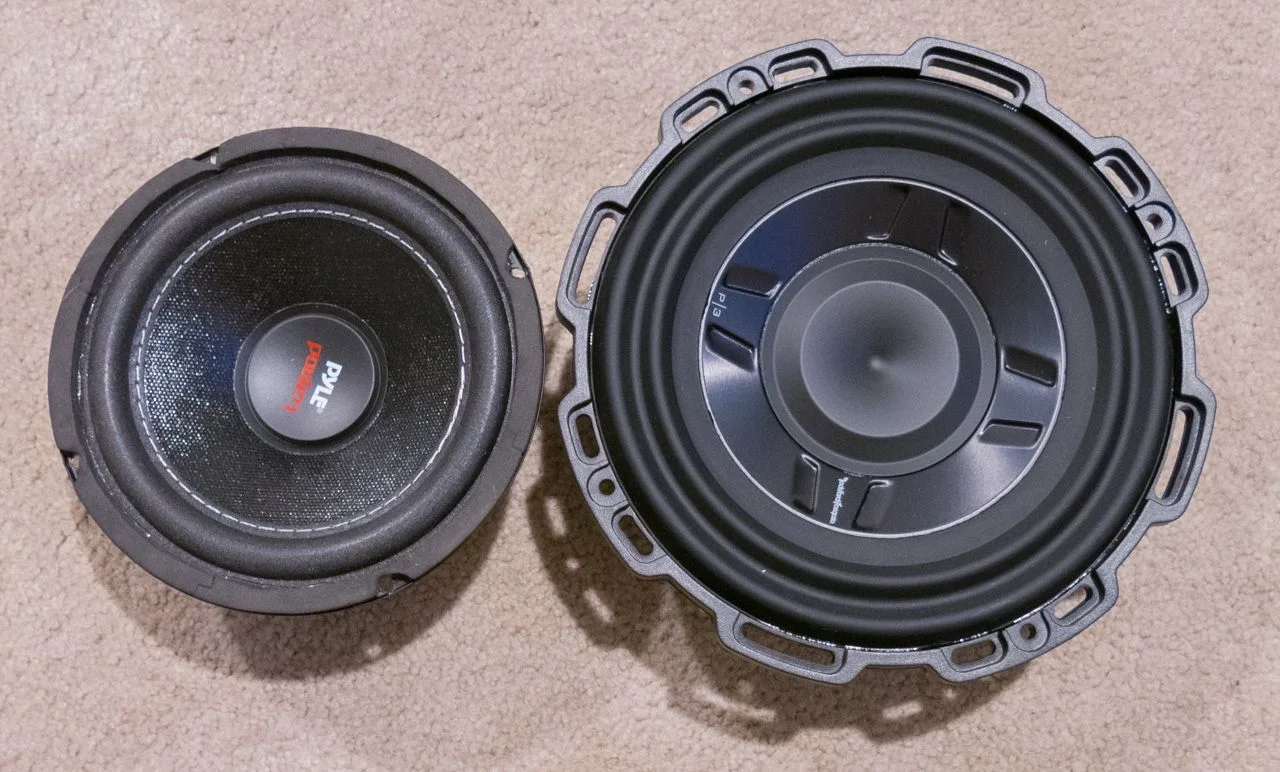
full


6" vs 8" top
full


6" vs 8" bottom
full


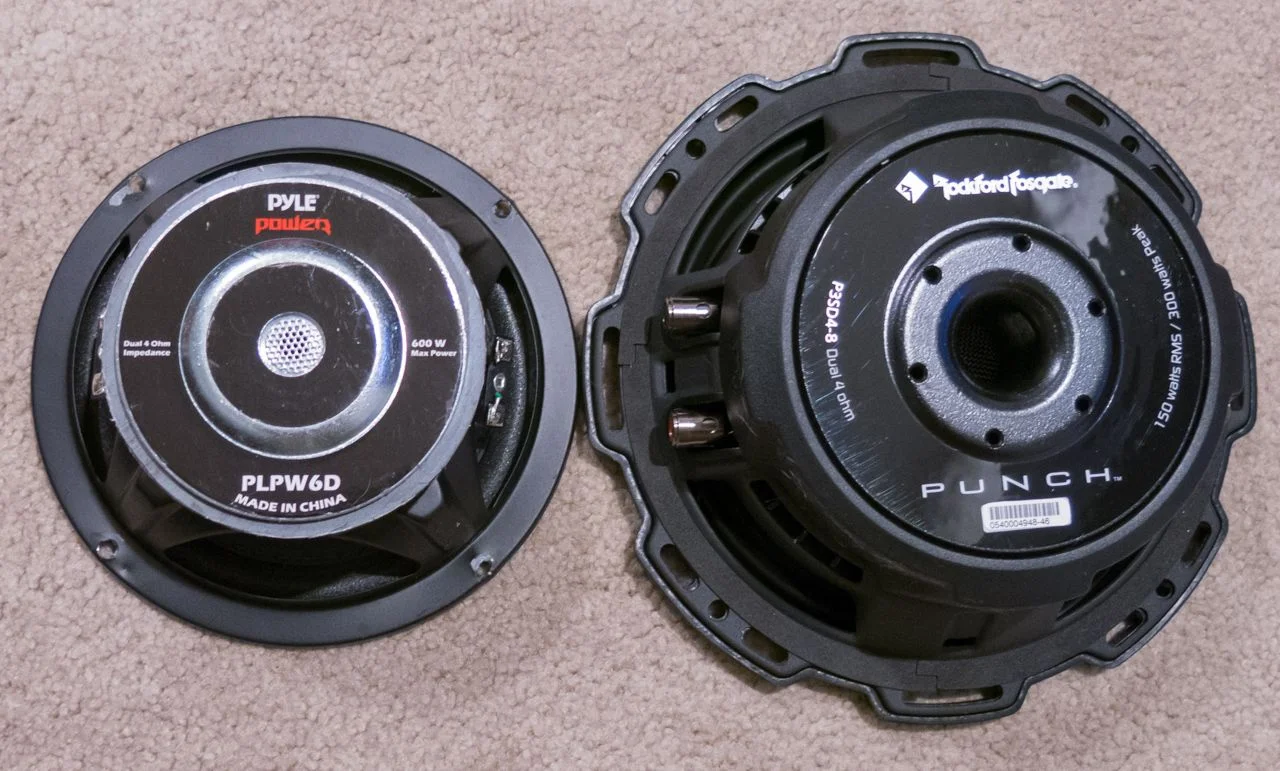
6" vs 8" height, 8" is just a little shallower at 2.6"
full


The bass has improved in both clarity and volume at high levels. At this point the small sealed enclosure is the most limiting factor. I knew this from the start as maintaining the factory look was one of the design limitations. Because of the small enclosure I've had to set the crossover frequency to 70hz to prevent over driving the sub. The box has a huge drop off around 80hz. I'm using the power for force the sound out of the enclosure below that. With a slightly larger enclosure and a port I could drop my amp power by half and still get more sound.

Below is a ration on s scale of one to ten. One being the factory sound and 10 being clean and louder than I can comfortably listen to.
The initial build with 6" sub and testing amp. 5
Final 6" amp install with new micro amp. 4
Rewiring of sub from 8ohm to 4 2 ohm and micro amp. 5.5
New install with 8" sub and micro amp. 6.5

Takeaways from this build:
  • 80 series land cruiser acoustics suck, nothing we didn't already know.
  • Loading up the rear of the 80 further reduces the acoustics of the vehicle.
  • Sound deadening of the vehicle helps reduce unwanted noises and cleans up the audio. It however attenuates the bass notes requiring more output from install.
  • Sound deadening of the doors increases the output of the door speakers both inside and outside the vehicle.
  • A sealed subwoofer enclosure will be limiting in volume, especially with sound deadening.
The sound outside the vehicle with the doors and windows closed is the inverse of what a typical car stereo would sound like. At high volumes the vocals outside the vehicle are 90% of what is inside. Higher frequencies and bass are fully suppressed. You hear enough to follow the beat of the bass but no low frequency vibration at any volume level.

At some point in the future I will build a larger and improved enclosure for the 8" sub. Overall I am happy with the sound from the thrown together enclosure.
 
For the floor I got a 4' x 17' roll of sound deadener & heat barrier. I still have 33" left on the roll. In reality the 4' x 14.5' roll would have been all I needed. It's very light weight, the entire roll was under 5 lbs.
Floor insulation

For the doors and sides I used 50 sqft x 80 mill FatMat with only a 4" x 4" piece left. In reality I will use it also. This isn't very thick but it is very heavy. The entire roll was 25 pounds.
Door insulation

I have my interior out and I'm looking to capitalize on the opportunity - now that you've had your sound/heat insulation for a few months, would you do anything different? I've seen people dry ice out their old insulation and then fight dynamatt. It just looks like a whole lot of work. You're method looks much easier. Your install looks really nice - not to mention your stereo and everything else - nice work.
 
I wouldn't do anything different but I would have liked to do the roof. Maybe later this year I will get the time to finish that part. I didn't remove the old insulation attached to the carpet.
 
I haven't forgotten about this thread. I'm stuck waiting on MetalTech 4x4 to find my Ironman 4x4 bumper. I ordered it at the beginning of February and it was promised to be delivered by the 22nd. Well the lied and made excuses as to what happened to my bumper then tried to sell me a used and damaged unit. So I'm now waiting for it to ship slow boat from Australia with an expected arrival of April 20th. I did replace my backup camera with a non IR model that works so much better at night.

Me waiting for the bumper to be delivered.
full


Winch sitting ready to be installed.
full


New backup camera.
full
 
New tent solution for the summer. 12x12 quick popup, 12x12x8 tent, and bunk cots. Only one of the two cots are pictured but they can be configured as two identical cots or in bunk bed configuration for more floor space. 25 minutes setup and teardown for a single person or 10 minutes for two.

All packed for storage
full


Exterior of the tent and popup.
full


Sitting corner
full


Sleeping and storage
full
 
After two and a half months the front bumper and winch install is done.

First bumper send by Ironman 4x4.
full


All that packaging and yet the bumper was damaged before wrapping.
full


Winch installed.
full


Second bumper (actually the third)
full
 
Ah that bumper looks really good on there!

I saw your grill guard and brush guards on CL, that maybe I want..
Yea, they were picked up earlier today.
 
Well we have been traveling so no new upgrades to the 80. The wife wasn't happy with the sleeping solution so we agreed on an upgrade. My first thought was to tow the 80 behind our F250 for better mileage. Nope, we settled on a solution that gets worse mileage. In the end I am not complaining one bit.

full
 

Users who are viewing this thread

Back
Top Bottom