Builds eatSleepWoof's '14 LX

This site may earn a commission from merchant affiliate
links, including eBay, Amazon, Skimlinks, and others.

Finally wrapped up the rust-fighting.

After the last photos I applied another few coats of primer, resulting in very nice, even coverage everywhere.

I then started the painting process. This is the paint I used (went through 3 cans):

6cRM9TD.jpg


The flat black came out looking quite nicely. Paint dries very quick and is easy to work with.

WNvqIwT.jpg


RDFemKP.jpg


mtgjsrs.jpg


nDFdc3z.jpg


HrZzOOe.jpg


KRCX7Zd.jpg


ZFbmTWn.jpg


FtYizkW.jpg


Y8UwVaI.jpg


xx9HEKp.jpg


bbz0huA.jpg


8hZ0HDf.jpg


jelGs3D.jpg


s6sPl32.jpg


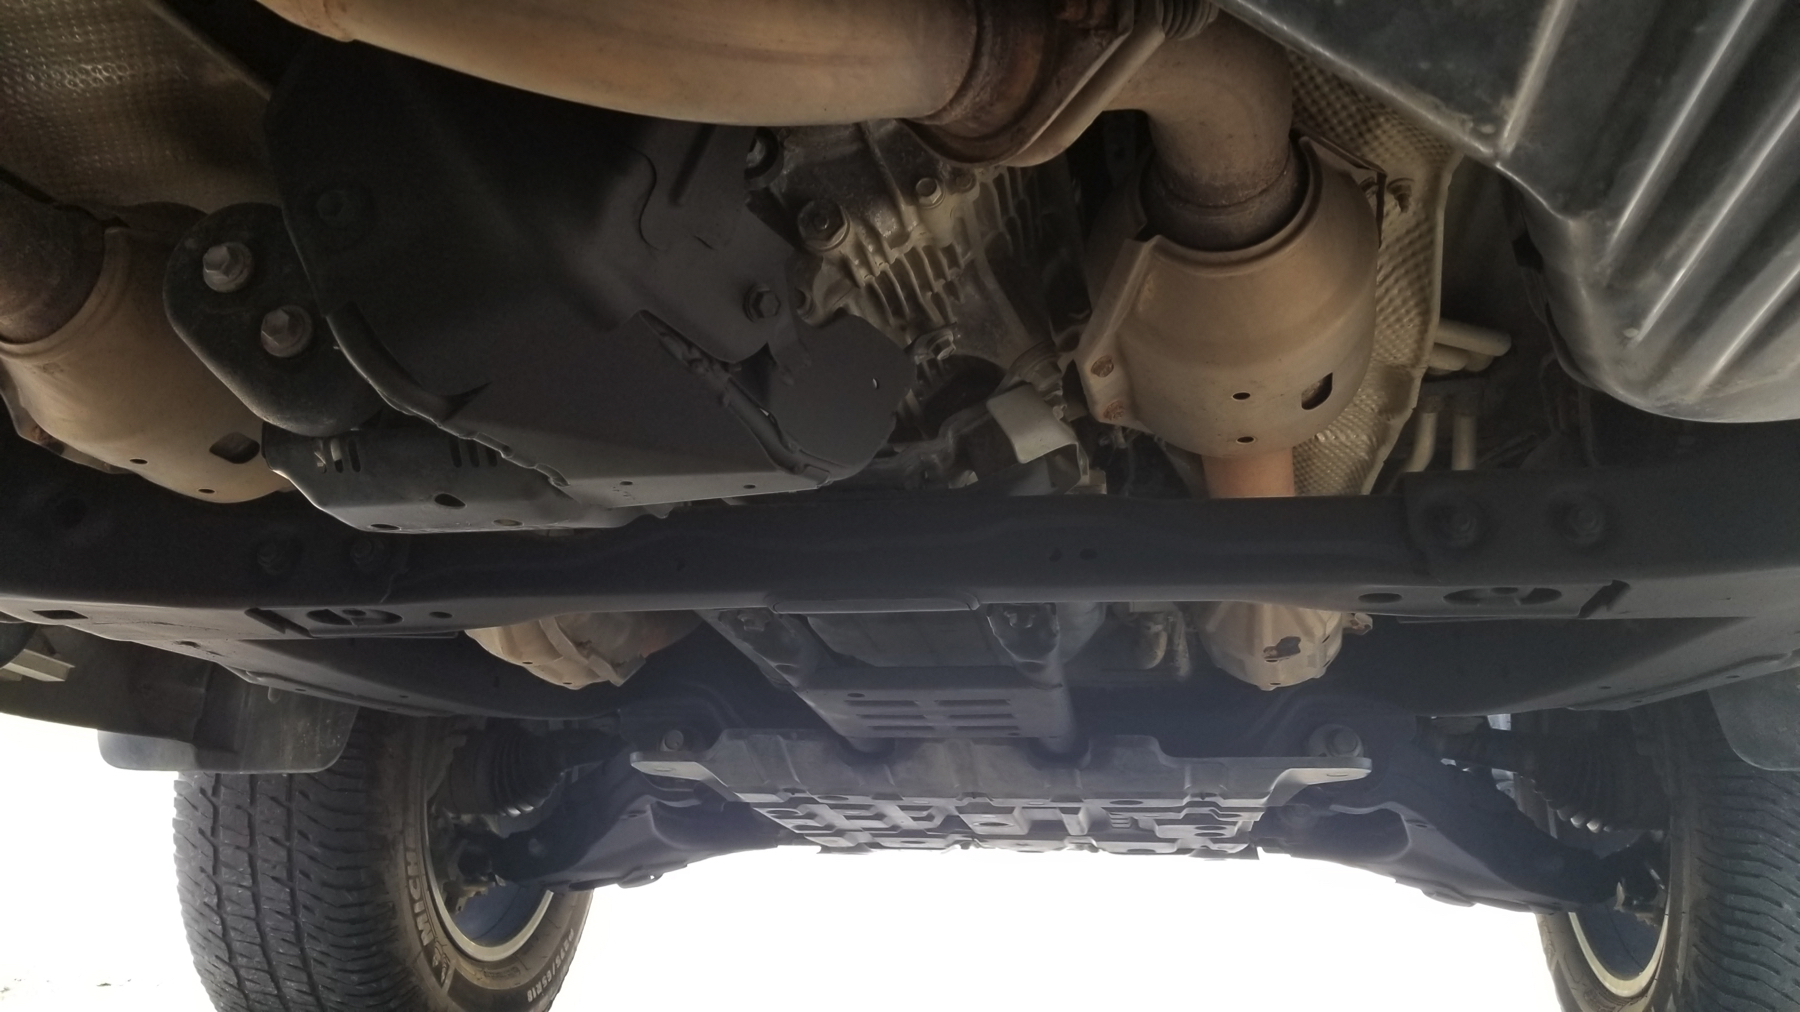
As you can see from the photos, I covered pretty much every piece of metal that I could. I didn't touch the driveshaft, the exhaust, or anything else that would get hot. Actually, I suppose the rear diff may get hot, but I'm hoping it won't be hot enough to burn off the primer/paint.
 
After painting I went to town with FluidFilm. Three cans was enough for very thorough coverage, and I then put another entire can into the frame and cross members via the multitude of original holes/openings in both.

H1i7yve.jpg


nBgXTW1.jpg


xEpj8We.jpg


V9rAYfi.jpg


zg1OGFA.jpg


VyzTRpk.jpg


1gYDcOt.jpg


uF6QzQO.jpg


Time will tell how well this lasts, but I suspect I'll be happy with the results.
 
Great work! I'm planning to do the same before winter kicks in here. Should I be cautious of spraying any particular part down there (like exhaust, ...)?
 
Great work! I'm planning to do the same before winter kicks in here. Should I be cautious of spraying any particular part down there (like exhaust, ...)?

You guys in Ontario have been getting unusually warm weather lately, I would take advantage of that and do this work ASAP. All these products are best applied in warm~ish temperatures.

I would definitely avoid spraying the exhaust. I also tried to avoid any rubber parts, AHC components, etc. A little overspray here and there is inevitable, but don't spray intentionally.

After the first few drives yesterday I did notice a lot of smell and (after the first drive) a cloud of steam/smoke coming from the bottom of the car (on seemingly all sides). I suspect that was from fluid film dripping on to components that got hot (like the exhaust) and then burning off. The smell/smoke was a lot less after the second drive, and will probably soon disappear altogether.
 
All these products are best applied in warm~ish temperatures.

Total agreement. Even in warm weather, I like to immerse the spray cans in very hot water for a while before applying. Seems like it gives a more even spray pattern.

That's a job well-done with your rust prep and paint. A lot of work, for sure, but worth it. If you ever sell, I hope the next owner will appreciate your diligence!
 
My LX came with the OEM jack, but was missing the tool kit, so I couldn't even lower the spare. I picked up a seemingly unused OEM tool kit + jack from eBay.

WNanZQ3.jpg


I've gotten really sick of the amount of dirt and fur my dog leaves in the car, and decided I need to get the crate back in, like the setup I had in my Tacoma. Unfortunately the crate my dog requires is quite huge (40"x28"x32" square), and requires significant compromises.

I first removed the 2nd row seats and set the crate up there... (should also mention I had to fully disassemble the crate and then re-assemble it inside, due to not being able to fit it in through any other means)

AiD1yhj.jpg


Hm0wGeD.jpg


73jILrq.jpg


This positioning has several downsides:
- the crate door does not open; it's reversible, but both orientations hit something as it swings, so I can't use it; planned on making a custom, bi-fold one out of plywood
- no ability to take any passengers
- significant increase in road noise due to no longer having the noise dampening provided by the 2nd row seats

The last point is what ended up being a deal breaker for me. I went for a quick 15 min drive and found the noise to be unacceptable.

So I then decided that the drawers I had sunk so much time and effort into had to go in order to make room for the crate.

4XO1q6j.jpg


2ZEG0XJ.jpg


I'll re-install the 2nd row seats tonight. I know they won't have full range of motion, and will have to be fairly vertical in order to clear the crate, but I'm hoping they will still be useable for the occasional passenger.

I went through all the stuff I had in drawers and simplified it down to the essentials - these fit into the big, red Milwaukee bag on the right of the crate, and a few smaller bags on the left of the crate. Simple, and not nearly as cool as drawers, but it should work. I may make a shelf on the right of the crate which will cover/hide the bags, and provide an elevated, horizontal surface for other items (like skis).

Once the seats are back in, the crate floor will receive a piece of 1" rigid insulation on the bottom (to help with winter camping), and some other minor convenience-related things.
 
Last edited:
I've gotten really sick of the amount of dirt and fur my dog leaves in the car....

I hear you on that one, ours definitely leaves his mark.

I have been pondering building a "crate" in within the drawer setup so it wasn't as obtrusive.

My pup is small for a Shep (we think he has some Mal in him) at ~70 lbs so that helps, but something to consider if workable. Mine will be where the 2nd row seat used to be, and place him up high with some storage underneath for the second battery etc.

I originally had a crate-like enclosure on the drawers, but that was a bit too tight. Tried giving her the entire reign of the area on top of the drawers, but damn... fur & dirt on the carpeted ceiling, and in every little crevice all around... Madness. Got to have a full crate to keep it all contained.

A nice setup would be a crate that fits in to the 60-section of the 60/40 2nd row, with the 40-section still in place.
 
That is a massive crate. How big is the pup? I've heard the safest size for dogs in a car is just enough to turn around. I've got two 55lb huskies and was thinking I'd be able to fit 2 Gunnar crates side by side in an LX, but maybe not....
 
That is a massive crate. How big is the pup? I've heard the safest size for dogs in a car is just enough to turn around. I've got two 55lb huskies and was thinking I'd be able to fit 2 Gunnar crates side by side in an LX, but maybe not....

As far as safety goes, the less room, the better. It's kind of like a seatbelt, you don't want the dog to flying around at all, if that's an option. That said, I think there has to be a compromise between safety and comfort. My dog is quite tall and has long legs, so while she's not the largest out there (~80lbs), she does need the room that this crate provides (especially since she sleeps in the vehicle - ie. crate - when we camp); anything smaller and she'll be cramped.

Speaking of the crate, I'm finally done with it. Second row seats went back into place, and the crate received:

- Zinger's (crate manufacturer) drain-through flooring
- 1"-thick, rigid pink insulation (R5 value) to help with minimizing heat loss during winter camping
- A rubber mat which I turned into a "tub" of sorts, and secured to the walls of the crate using a combination of zap straps and rope; this keeps the dirt contained, mostly covers the openings in the bottom section of the crate
- 3"-thick dog bed, covered with a towel for easy cleanup
- Another rubber mat underneath the crate, with a flap over the tailgate

Her furness will now be comfortable, secure, and warmer. And the LX will be much, much cleaner.

... Phew.

vfzn4pc.jpg


YegXTWD.jpg


IU1AerE.jpg
 
Installed a set of Hikari Ultra LED bulbs (HB3 / 9005) into my high beams to replace the Canadian-Tire-special junk that was in there.

Photos taken with daytime light coming through the side garage window, and garage lights on. Very excited to see how these perform in real conditions!

Driver - original, passenger - Hikari:


Note the much tighter beam focus on the Hikari; I believe this will result in light being thrown a lot further. There is also a very clean cut off, and a huge increase in brightness (not really visible in the photo). Vertical light throw/bleed looks to be about the same as with the original bulbs. The colour/temperature is a great match for the low beams (which will be replaced in a week, too).

Only low beams:


Both Hikari high beams:

Did these fit behind the dust caps? Plug and play solution?
 
Thanks, Isaac! Will order some for low and high beams soon. Hope the 13+ headlights are plug and play like they are on 08-11

They are. Mine is 2014.
 
I'm not happy with the (stupidly expensive) dog crate. Lately it started squeaking like mad, virtually non stop, and I wasn't able to do anything about it. Noise is coming from the hinge, and there's no way I can do anything about it. The crate is also a bit wider than needed, and the vertical walls don't work nicely with the either the sloped 2nd row seat backs, or the curved tailgate. So I pulled out the crate.

I decided to build a new base platform, and a plywood crate on top of that, with sloped front/rear walls to maximize space. Considered fancier setups with storage for maxtrax or slim drawer underneath the crate, but think I'll be keeping it very simple.

First thing first, the base plate was made out of 3/4" birch plywood:

juF9bM6.jpg


Securing it proved to be difficult. I considered many, many options of how to make it happen. Variety of u-bolts/j-hooks around the 3rd tow seat anchor points, bolting down via original hardware holes, etc.

Bolting down through original seat bolts would be nice, but they are an M10x1.0, and I can't for the life of me find any bolts like that locally. The closest is M10x1.25, which obviously doesn't work. Don't want to order online and wait. Also not overly crazy about the idea of re-using original seat nut/sleeve, as I've cross-threaded & stripped one of those before, and am super paranoid about doing it again.

Using u-bolts around the anchor points has its own challenges.

I ended up finding a nice, simple solution that I anticipate will hold up just fine. I pried off the "covers" around the anchor points for the 3rd row seat, and found an empty hole at the top, which the cover clips into. The cover also clips on in four other spots, and after testing things out, I decided this hole/clip was completely unnecessary for the cover to sit securely, which meant I could use this hole to install a M6 rivnut!

Note the brass rivnut installed:

vJfGN3E.jpg


I did the same in all four anchor points. The two rear points had to be removed (just two bolts each) for rivnut installation, but the front ones did not.

I then took four sacrificial M6 bolts, tapered the end of each, and screwed them into the rivnuts.

aoMZzaD.jpg


Placing the plywood platform overtop and applying some pressure resulted in impressions in the plywood, at the exact locations of the rivnuts. Drilled the four holes, glued + stapled carpet, and bolted down the new base platform:

JJCqTOi.jpg


Will build the dog crate soon, and will bolt it down to the platform. Then I think I'll make simple shelves on either side of the crate for more storage.
 
Last edited:
The struggle is real, and I appreciate all you go through to keep your pup safe and happy. Invest in one of these. K9 II Variable Speed Dog Dryer I try to blow my dogs out every weekend to dimish the fur snow globe that was happening. Extremely effective, and maybe you can skip the crate and just switch back to your hammock seat cover and have the pup wear one of these. Clickit Terrain
 
The struggle is real, and I appreciate all you go through to keep your pup safe and happy. Invest in one of these. K9 II Variable Speed Dog Dryer I try to blow my dogs out every weekend to dimish the fur snow globe that was happening. Extremely effective, and maybe you can skip the crate and just switch back to your hammock seat cover and have the pup wear one of these. Clickit Terrain

Thanks for the tip - had no idea such things existed. The idea is interesting, but $500USD is a little tough to swallow. I'll give it some thought, though.

Maybe I can put my ARB Twin to use for the same purpose. Now that would be wicked!
 
Really like your truck. If you think dogs are messy, kids are worse. And more expensive...
 
Really like your truck. If you think dogs are messy, kids are worse. And more expensive...
 
Really like your truck. If you think dogs are messy, kids are worse. And more expensive...

I'll make a crate for the kid, too! :D
 

Users who are viewing this thread

Back
Top Bottom