Navigation
Install the app
How to install the app on iOS
Follow along with the video below to see how to install our site as a web app on your home screen.
Note: This feature may not be available in some browsers.
More options
Style variation
You are using an out of date browser. It may not display this or other websites correctly.
You should upgrade or use an alternative browser.
You should upgrade or use an alternative browser.
Complet Front Brake Service
- Thread starter Timmy65
- Start date
This site may earn a commission from merchant affiliate
links, including eBay, Amazon, Skimlinks, and others.
More options
Who Replied?These videos are so helpful!
2001LC
SILVER Star
Good job timmy. Thanks for sharing.
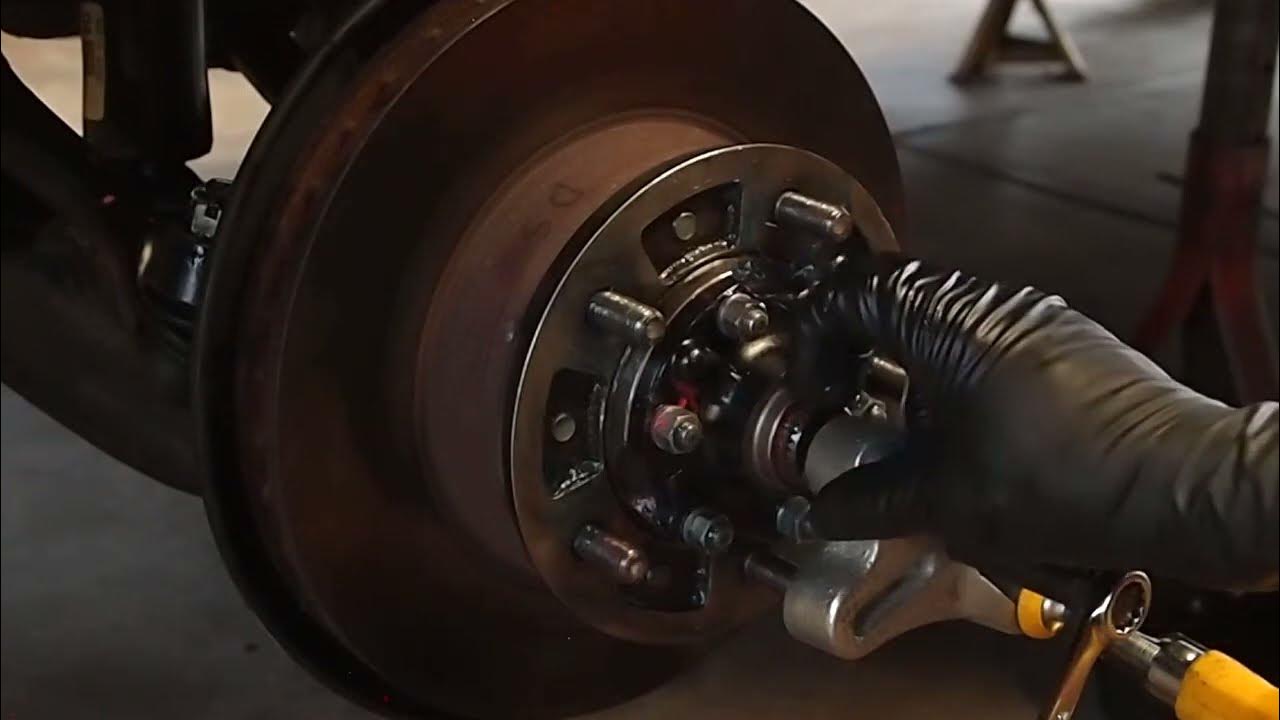
I've had some very difficult cone washer, where someone glued them in. It can be a trying job of pounding on a brass dowel.
This was day two of pounding on cone washers, found them glued in. I did more damage to my brass dowel, than I had in last 20 wheel bearing service.
I love this tool. Even glued in cone washer a breeze an fast.
If, wheel hub to hub flange face metal surface curled. Due to being pounded on, which should never be, I pound back and flat file. Making sure nothing prevents hub flange from seating flush on wheel hub.

Tip: Lay the tire/wheel face down on the ground. Set wheel hub/lugs in wheel. Works very well to hold the hub, as you break free rotor bolts and when you torque them back down.

I use the Slee spindle lube tool. To lube axle needle bearing & brass bushing. Provide no contamination in the axle in the spindle. Which contamination/water entry, happens a lot when grease cap reused. When I've not pull knuckle or FDS (AKA CV).
Axle needle bearing & bushing are required to be lubed every 30K miles, as are wheel bearings.
.JPG")
When knuckle off, I just pack axle needle bearing & brass bushing, with grease by hand.


FSM, states: hub flange (HF) nuts as non reusable. New HF nuts threads are sealed. If threads of HF nuts, not stretched/loose. I reuse them, with some blue on the threads. The 24ft-lbf torque, need not be reduced for the lubed threads. Since torque spec, takes into consideration already.

Snap ring should never be reused. They expand each time we install and removing. This result in loose fit, which damages snap ring and snap rings axle groove.
Loose snap ring ride on edge, and often pop off axle.

They also enlarge axle groove, pushing splines upward and round the axle groove. Then axle groove then, can no longer retain the snap ring. Which will also result in hub flange, getting hung up on axle. We then need to file down curled axle splines, to remove hub flange.

Setting new snap ring to hub flange gap, to under .20mm. Insure a few things; One, being that FDS outer seal, pulls into knuckles rear seal as designed. Two, insure we don't get water entry passed these (good) seals.
This was my first axle puller tool, just toss together with stuff lying around. I pull axle, to seattle grease where FDS butts to the brass bushing in back of knuckle.
Settling grease, is very important. To, insure we get a true snap ring to hub flange gap. If not done, we struggle to install, even the thinnest snap ring (1.8mm). As we drive, the grease settles. We then, end up with a snap ring to hub flange gap, in excesses of design limitation. Axle will move in and out of hub flange, past design limitation. Resulting in sawing action wearing down splines of axle, pound at axle groove expanding it which increases gap, and excessive gap between knuckle seal to FSD outer axle seal.
 www.youtube.com
Here's the axle puller I now use.

The 100 series has two size front brake pad shim kits. In 2003, 100 series were fitted with larger pistons, in the front calipers. Thus the two sizes of shim kits. The 03-up has wider clips on outer shim to fit the large pistons. When we put the 03-07 shim on 98-02 caliper, they're very tight. So tight a fit, we need to bend the clips. Just the opposite when 98-02 shims shims, placed on 03-07 calipers.
Tip: For improved braking in the 89-02, install the 03-07 front calipers.")
The shims tie the pads to pistons. The square edge, of piston seals. Binds and rolls/twist building tension, when we brake. As we release brakes/pedal, the piston seal returns to original shape, pulling piston/pads away from rotor. The single spring held on by the lower pin, pushing outward on pads. Is; anti rattle spring. Two is fine, but the one is all that's needed.

I've had some very difficult cone washer, where someone glued them in. It can be a trying job of pounding on a brass dowel.
This was day two of pounding on cone washers, found them glued in. I did more damage to my brass dowel, than I had in last 20 wheel bearing service.
I love this tool. Even glued in cone washer a breeze an fast.
If, wheel hub to hub flange face metal surface curled. Due to being pounded on, which should never be, I pound back and flat file. Making sure nothing prevents hub flange from seating flush on wheel hub.
Tip: Lay the tire/wheel face down on the ground. Set wheel hub/lugs in wheel. Works very well to hold the hub, as you break free rotor bolts and when you torque them back down.
I use the Slee spindle lube tool. To lube axle needle bearing & brass bushing. Provide no contamination in the axle in the spindle. Which contamination/water entry, happens a lot when grease cap reused. When I've not pull knuckle or FDS (AKA CV).
Axle needle bearing & bushing are required to be lubed every 30K miles, as are wheel bearings.
When knuckle off, I just pack axle needle bearing & brass bushing, with grease by hand.
FSM, states: hub flange (HF) nuts as non reusable. New HF nuts threads are sealed. If threads of HF nuts, not stretched/loose. I reuse them, with some blue on the threads. The 24ft-lbf torque, need not be reduced for the lubed threads. Since torque spec, takes into consideration already.
Snap ring should never be reused. They expand each time we install and removing. This result in loose fit, which damages snap ring and snap rings axle groove.
Loose snap ring ride on edge, and often pop off axle.
They also enlarge axle groove, pushing splines upward and round the axle groove. Then axle groove then, can no longer retain the snap ring. Which will also result in hub flange, getting hung up on axle. We then need to file down curled axle splines, to remove hub flange.
Setting new snap ring to hub flange gap, to under .20mm. Insure a few things; One, being that FDS outer seal, pulls into knuckles rear seal as designed. Two, insure we don't get water entry passed these (good) seals.
This was my first axle puller tool, just toss together with stuff lying around. I pull axle, to seattle grease where FDS butts to the brass bushing in back of knuckle.
Settling grease, is very important. To, insure we get a true snap ring to hub flange gap. If not done, we struggle to install, even the thinnest snap ring (1.8mm). As we drive, the grease settles. We then, end up with a snap ring to hub flange gap, in excesses of design limitation. Axle will move in and out of hub flange, past design limitation. Resulting in sawing action wearing down splines of axle, pound at axle groove expanding it which increases gap, and excessive gap between knuckle seal to FSD outer axle seal.
Setting snap ring gap. Series 100 Toyota Land Cruiser 6 of 6
Used a "D" snap ring which is 2.4mm, factory stock is 2.2mm. Very important to settle grease at back of knuckle between axle brass bushing and front drive sh...
www.youtube.com
Here's the axle puller I now use.
The 100 series has two size front brake pad shim kits. In 2003, 100 series were fitted with larger pistons, in the front calipers. Thus the two sizes of shim kits. The 03-up has wider clips on outer shim to fit the large pistons. When we put the 03-07 shim on 98-02 caliper, they're very tight. So tight a fit, we need to bend the clips. Just the opposite when 98-02 shims shims, placed on 03-07 calipers.
Tip: For improved braking in the 89-02, install the 03-07 front calipers.
The shims tie the pads to pistons. The square edge, of piston seals. Binds and rolls/twist building tension, when we brake. As we release brakes/pedal, the piston seal returns to original shape, pulling piston/pads away from rotor. The single spring held on by the lower pin, pushing outward on pads. Is; anti rattle spring. Two is fine, but the one is all that's needed.
Last edited:
- Thread starter
- #4
Good job timmy. Thanks for sharing.
I've had some very difficult cone washer, where someone glued them in. It can be a trying job of pounding on a brass dowel.
This was day two of pounding on cone washers, found them glued in. I did more damage to my brass dowel, than I had in last 20 wheel bearing service.
I love this tool. Even glued in cone washer a breeze an fast.
If, wheel hub to hub flange face metal surface curled. Due to being pounded on, which should never be, I pound back and flat file. Making sure nothing prevents hub flange from seating flush on wheel hub.
View attachment 3784729
Tip: Lay the tire/wheel face down on the ground. Set wheel hub/lugs in wheel. Works very well to hold the hub, as you break free rotor bolts and when you torque them back down.
View attachment 3784704
I use the Slee spindle lube tool. To lube axle needle bearing & brass bushing. Provide no contamination in the axle in the spindle. Which contamination/water entry, happens a lot when grease cap reused. When I've not pull knuckle or FDS (AKA CV).
Axle needle bearing & bushing are required to be lubed every 30K miles, as are wheel bearings.
View attachment 3784755
When knuckle off, I just pack with grease by hand.
View attachment 3784764
View attachment 3784765
FSM, states: hub flange (HF) nuts as non reusable. New HF nuts threads are sealed. If threads of HF nuts, not stretched/loose. I reuse them, with some blue on the threads. The 24ft-lbf torque, need not be reduced for the lubed threads. Since torque spec, takes into consideration already.
View attachment 3784708
Snap ring should never be reused. They expand each time we install and removing. This result in loose fit, which damages snap ring and snap rings axle groove.
Loose snap ring ride on edge, and often pop off axle.
View attachment 3784760
They also enlarge axle groove, pushing splines upward and round the axle groove. Then axle groove can not retain snap ring. Which will also result in hub flange, getting hung up, was we work to remove it from axle of FDS.
View attachment 3784762
Setting new gap to under .20mm. Insure a few things. One being that FDS outer seal, pulls into knuckles rear seal as designed. To insure we don't get water entry passed good seals.
This was my first axle puller, just toss together with stuff lying around. I pull axle, to seattle grease where FDS butts to the brass bushing in back of knuckle. W Seattleing of grease, is so, a ture snap ring to hub flange gap can be measured.
Setting snap ring gap. Series 100 Toyota Land Cruiser 6 of 6
Used a "D" snap ring which is 2.4mm, factory stock is 2.2mm. Very important to settle grease at back of knuckle between axle brass bushing and front drive sh...
Here's the axle puller I now use.
View attachment 3784753
The 100 series has two size front brake pad shim kits. In 2003, 100 series were fitted with larger pistons, in the front calipers. Thus the two sizes of shim kits. The 03-up has wider clips on outer shim to fit the large pistons. When we put the 03-07 shim on 98-02 caliper, they're very tight. So tight a fit, we need to bend the clips. Just the opposite when 98-02 shims shims, placed on 03-07 calipers.
Tip for improved braking in the 89-02, install the 03-07 front calipers.
The shims tie the pads to pistons. The square edge, of piston seals. Binds and rolls/twist building tension, when we brake. As we release brakes/pedal, the piston seal returns to original shape, pulling piston/pads away from rotor. The single spring held on by the lower pin, pushing outward on pads. Is; anti rattle spring. Two is fine, but the one is all that's needed.
View attachment 3784767
Now that's a comment!
very thorough thanks for posting!
my $.02 on the wheel bearing torque. Don't worry about fish scales and torque specs. While you have access to the bearing preload nut, mount the wheel and tire with a few lug nuts. Grab the tire at 12 and 6 o'clock and wiggle. Torque the nut until there is little to no play.
I've found the fish scale method isn't quite tight enough if you have oversized tires.
I recently did a full brake job on the rear, but pads only on the front, this video is by far the best for thorough walkthrough regarding front rotors, thank you very much!
From your experience, if I invest in a new set of sockets 10-24mm for basic maintenance, should I get shallow or deeps?
From your experience, if I invest in a new set of sockets 10-24mm for basic maintenance, should I get shallow or deeps?
- Thread starter
- #7
You really need both standard and deep if you're going to turn wrenches. There's lots of affordable socket sets on Amazon. I like Gear Wrench, but there's lots of others that are good and affordable.I recently did a full brake job on the rear, but pads only on the front, this video is by far the best for thorough walkthrough regarding front rotors, thank you very much!
From your experience, if I invest in a new set of sockets 10-24mm for basic maintenance, should I get shallow or deeps?
- Thread starter
- #8
I used the fish scale on my 85 4runner that has 37" tires to set the wheel bearing and trunion bearing preloads and all good.very thorough thanks for posting!
my $.02 on the wheel bearing torque. Don't worry about fish scales and torque specs. While you have access to the bearing preload nut, mount the wheel and tire with a few lug nuts. Grab the tire at 12 and 6 o'clock and wiggle. Torque the nut until there is little to no play.
I've found the fish scale method isn't quite tight enough if you have oversized tires.
I used the fish scale on my 85 4runner that has 37" tires to set the wheel bearing and trunion bearing preloads and all good.
Oh yeah sorry I didn’t mean it would hurt anything to use a fish scale, just that it wasn’t always necessary.
2001LC
SILVER Star
Yeah, I'm known, for being long-winded and detail oriented.Now that's a comment!
Wheel bearings, is what I first cut my teeth on the 100 series ~20 years ago. Front brakes go hand & hand with them.
Personally, I like too flush brake system fluid with only Toyota brake fluid, pre pad/rotor service. Then bleed afterward.
Flushing brake master, accumulator, brake lines and calipers.
Note: The 100 series FSM, depending on year. Has two different recommendation, when we press piston into caliper. First is a very bad practice, second is correct:
1) Remove small amount of fluid from brake master reservoir. Then press piston of caliper in. Bad practice! This is no longer recommended. It was a holdover from/for earlier FSM w/out ABS system. This can dislodge and push gunk into valves of ABS unit and master.
2) Open bleeder, then press piston into caliper. Best practice!
Our brake master need some consideration, whenever working on brakes.
Which I've also done a ton of work, on our brake masters. I spent lot of money and time. Gathering, failed brake master from around the country. Just so I could dissect and learn, why they fail.
I created a thread. In my humble attempt, to help others understand; Why they fail, how to care for them and how to grade chance of a premature failure sudden brake failure..
Brakes ...... Overdue write-up.
First and foremost: Brakes should only be worked by those, with high level of mechanical abilities and experienced with brake systems. With the age of all 100 series today, in our aging fleet. Any issue, with brake master assembly. IMHO, best and safest course of action. Have the whole brake...
 forum.ih8mud.com
I'm a tool junky. I now have an, OTV brake lathe. Which is my biggest and most expensive tool, that I have. It's takes up a bit of room, in my very overcrowded shop. But when I need it, it is so sweet.
It's primarily used for our, front rotor disk. It not only correct run out, turning disk to vehicle. It also correct parallelism (variation in thickness of inner and outer disk surface), one of the most overlooked when checking run out.
This was my Procut 9 OTV on a lowboy trolley (Jack-stand height). I'm now working with a Procut 9.2.
I can't wait, to see a rear brake pad & rotor video from you.
It's the rears brakes, I find most issue from improper service. Mostly from the slide pins not being properly grease and their boots replaced. Also, one of my pet peeves is bleeder caps. Missing rear bleeders caps, is where I see the most issue. These little rubber bleeder cap, when missing. Can damage caliper to point they'll need replacing.
Similar threads
- Replies
- 0
- Views
- 209
- Replies
- 5
- Views
- 711
Users who are viewing this thread
Total: 1 (members: 0, guests: 1)