
Did you take Hwy 56?
-
North American Clubhouses - East RegionCA.ON- SOTEC CA.ON- Upper Canada Land Cruisers CA.QC- Club TORQ CA.QC- Quebec Cruisers AL- DixieLand Cruisers AL- Hot South Cruisers FL- Florida Land Cruiser Association FL- Northwest Florida Toyota 4WD FL- Tampa Bay Land Cruiser Association GA- Pavement Pounders GA- Georgia Cruisers GA/FL/AL- Red Hills Land Cruiser Club GA- YOTA IL- Windy City Land Cruisers IN- Hoosier Cruisers IN- Indiana Land Cruisers KY- Kentucky Landcruiser MA/NH- Yankee Toys MI- Lake Michigan Land Cruisers MS- CottonLand Cruisers NC- Olde North State Cruisers NJ- Garden State Land Cruisers NY/CT/MA- FJNortheasters NY- Gotham City Land Cruisers OH- The Buckeye Birfield Syndicate PA- Keystone Cruisers PA- Steel City Land Cruiser Club SC: Land Cruisers: Charleston SC- Palmetto State Land Cruiser Association SC- Upstate Cruisers SC- Swamp Fox Land Cruisers SC- Low Country Land Cruisers TN- Appalachia Cruisers TN- Bluff City Cruisers TN- STLCA VA- Bay to Blue Ridge Cruisers VA- COVA CRUISERS VA/DC/MD- Capital Land Cruiser Club VA/NC- Mid-Atlantic TLCA VA- Star City Land Cruisers VT/NH/MA/ME Acadian Overlanders WI- Land Cruiser Legends WV- Mountaineer Cruisers
-
North American Clubhouses - Central RegionCA.AB- Oil Country Cruisers CA.AB- Rocky Mountain Land Cruiser Association CA.AB- Toyota Ghost Wheelers AR- Razorback Land Cruisers AR/MO- Ozark Mountain Cruisers CO- BookCliff Cruisers CO- Colorado Land Cruisers CO- Derailed Cruisers CO- Rising Sun 4WD Club CO/WY- Horsetooth 4 Wheelers Cruiser Club IA- Tall Corn Cruisers KS/MO- Tornado Alley Cruisers LA- Bayou State Land Cruisers LA- Louisiana Land Krewesers MO- Gateway Cruisers MT- 406 Cruisers MT- Big Sky Cruisers NE- Flat Land Cruisers NM- High Desert Cruisers OK- Green Country Cruisers SD- Dakota Territory Cruisers TX- Alamo City Land Cruisers TX- Bayou City Land Cruisers TX- Lone Star Land Cruisers TX- Lone Star Land Cruisers - Austin Chapter TX- The White Trash of the Elwood Chapter TX- Toyota Trail Riders
-
North American Clubhouses - West RegionCA.BC- Coastal Cruisers CA.BC- Okanagan-Similkameen Land Cruisers CA.BC- Peace Canyon Toyota Swamp Donkeys CA.BC- Calgary Chapter: Swamp Donkeys
CA.BC- Vancouver Island Cruisers AZ- Copper State Cruisers CA- Beach-n-Toys CA- Central Coast Land Cruisers CA- Central Valley Crawlers CA- Gold Country Cruisers CA- Inland Empire Cruisers CA- L.A. County Trailcrew CA- Mountain Transit Authority CA- Pacific Mountain Cruisers CA- San Diego Cruisers CA - Santa Cruz Land Cruisers CA- SoCal 80's CA- Southern California Land Cruisers CA- Toyotally Awesome Cruisers HI- Hawaiian Island Land Cruisers ID- Treasure Valley Land Cruisers NV- Battle Born Cruisers of Northern Nevada NV- Southern Nevada Land Cruisers OR/CA- Jefferson State Cruisers OR- Cascade Cruisers OR- Central Oregon Cruisers OR- Portland Metro Cruisers UT- Red Rock Cruiser Club UT- Wasatch Cruisers WA- Central Washington Cruisers WA- North Sound Cruisers WA- South Sound Cruisers WA- Spokane Land Cruisers
Navigation
Install the app
How to install the app on iOS
Follow along with the video below to see how to install our site as a web app on your home screen.
Note: This feature may not be available in some browsers.
More options
Style variation
You are using an out of date browser. It may not display this or other websites correctly.
You should upgrade or use an alternative browser.
You should upgrade or use an alternative browser.
Bigwapiti's 2011 Tundra build...'Big Nambe'
- Thread starter bigwapitijohnny
- Start date
This site may earn a commission from merchant affiliate
links, including eBay, Amazon, Skimlinks, and others.
- Thread starter
- #62
Did you take Hwy 56?
Took Hwy 54...Real nice 2 lane with wide shoulders. Shaved 2 hours off taking the 'hypotenuse' instead of the bottom two legs through OKC / Amarillo...

Regards,
BWJ
I remember taking highway 54 years ago in a snowstorm the week of spring break. Passed two snowplows that had slid off the road and I recall laughing so hard. It was not until after I hit a snowbank on the road taller than the hood I realized that without snowplows, the roads are hard to get through. The snow filled the engine bay and stopped the fan, which snapped the fan belt. Oh good times.
- Thread starter
- #64
Ah yes, I remember when...
I drove my 3rd generation 4runner back from albq. one time. There was an ice storm that hit Amarillo / OKC...closed I-40, but 54 was open. I remember that the roads were choppy from all the ice and snowpack. It took me 4 hours to go 50 miles because of the snow and all the semis trying to avoid I-40...I did not require any coffee during that trip, it was the most harrowing road trip of my life.
Regards,
BWJ
I tried taking 50 back from Colorado last Saturday when I-70 was closed. Missed a turn in Lamar, CO. We were counting down the miles to the Kansas border when we saw welcome to Oklahoma. The weather was nasty with occasional white out conditions. Can't say I enjoyed the ride. Turned a 12 hour drive into over 17.


These pictures were after we had thawed out a bit.
Sent from some technology I haven't figured out how to use yet.


These pictures were after we had thawed out a bit.
Sent from some technology I haven't figured out how to use yet.
That's gnarly! Glad you kept it on the road!
- Thread starter
- #68
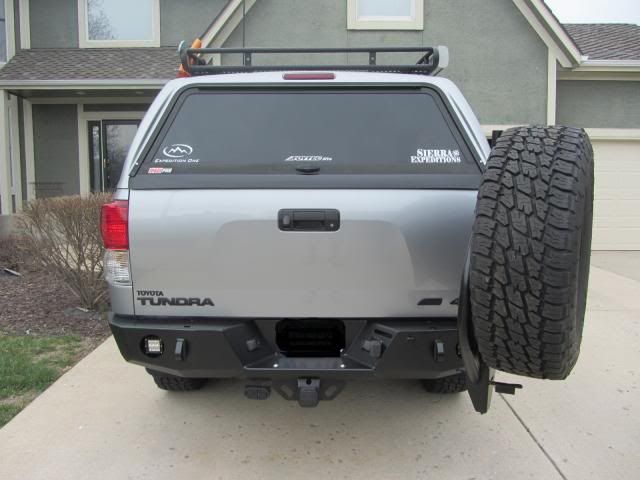
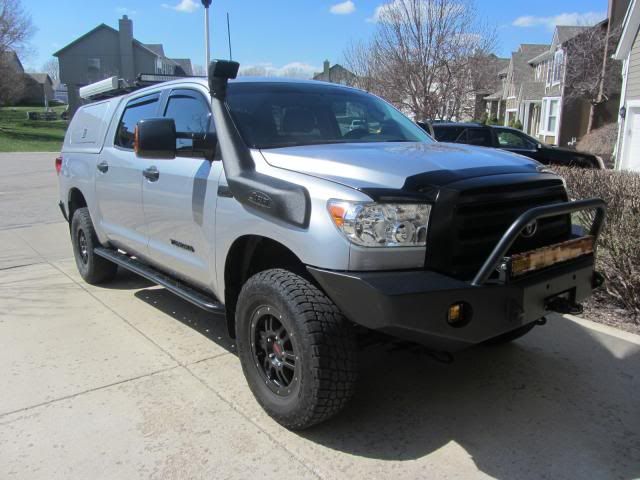
EXO bumper / OBA / Snorkel are on...
All,
Just got my rig back from Atomic Fabworks on Friday. I had the EXO bumper installed following completion of powder coating at RML powdercoating. During the trial period, my bumper rusted from the freak snow storm + KS salt. I had to hit it with naval jelly and WD-40 Specialist rust inhibitor to prevent the surface rust. I was surprised how fast surface rust builds. It took two days for it the turn a lovely matte burnt orange. In retrospect, I should have sprayed the inhibitor sooner, but live and learn. My next bumper on my next rig will be done differently :ylsmoke:...
RML premier powder coating has this new dustless hydro-blasting process available. It is an alternative to traditional sand blasting. My understanding of this process is that it enables the blaster more control of the media and pitting of the blasted surface is decreased dramatically. It consists of water, tiny glass particles and a rust inhibitor. The glass disintegrates when it hits the surface. The end result is a surface smoother and more accepting fo the powder coat. According to RML, it is far more efficient, and is approved by all major paint manufacturers. My bumper looks like a fine mirrored surface. I recommend this process highly. If you are not local, I recommend you ask your powder coater about it. It is the newest process available, and RML is one of the first in the country to implement it.

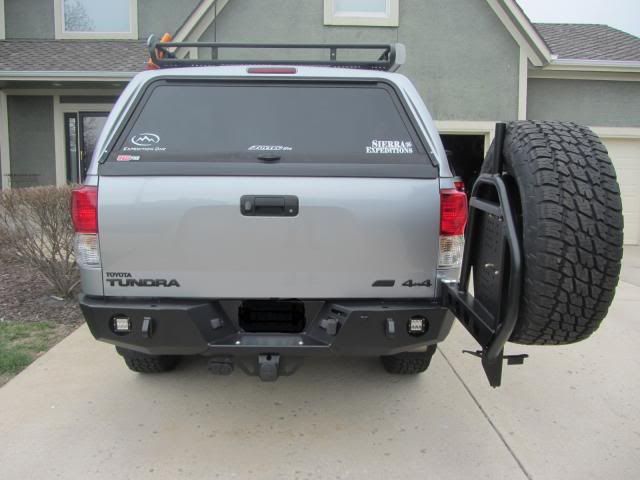
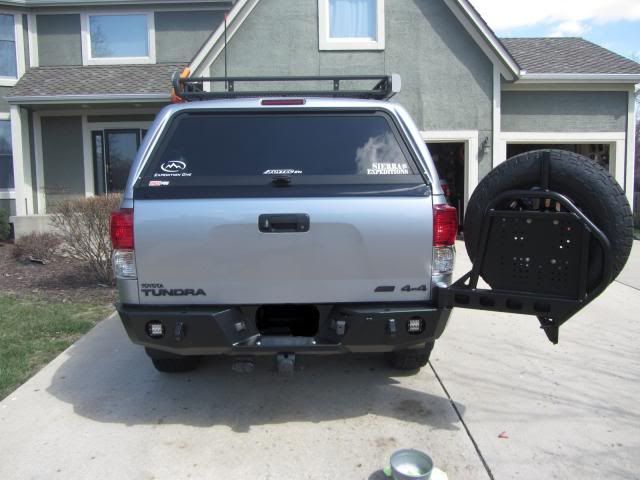
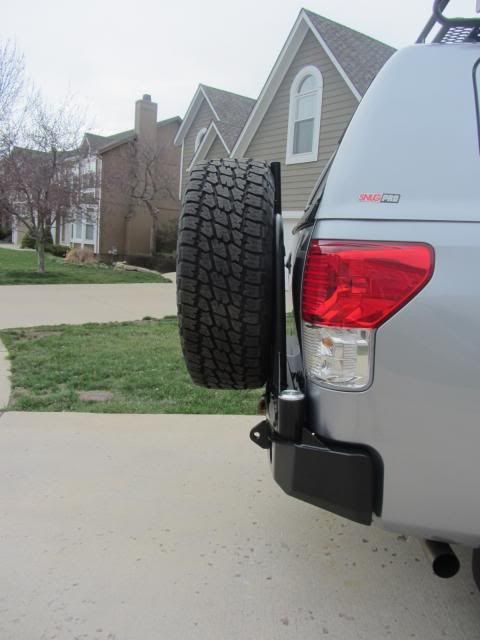
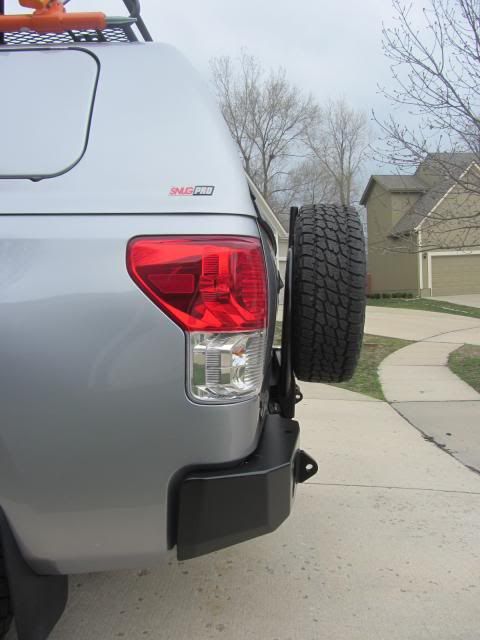
I had atomic tweak the EXO bumper before they installed it. Specifically, I had them weld a stop, a catch system (that would allow the tire carrier to be 'locked' in several positions), and a mount for my Dually D2 light stand. I wish I had done this for my Sherpa II trailer, however, I did not have any experience with tire carriers before my trailer build. Anyway, I wanted three positions available: 1) locked so that I could leave the tailgate up to gain access to the back with just the window open 2) 90[SUP].[/SUP] for the tailgate to fold down 3) open all the way without having the spare ding my tail light. The locking pin is a slick setup. It consists of a spring loaded pin welded to an L handle. This pin will pop down into one of the three holes in the locking plate.


I wanted to wait on putting a pic of the latching mechanism of the EXO bumper. As I said before, this is an engineering marvel, and props goes out to EXO for fabbing this up for me. This was a one-off system that the head fabricator (Robert) had thought up and developed. I'm glad that I waited. Knowing what I know now, if you are thinking of buying this bumper with tire carrier, DO IT. To my untrained eye, it looks complicated. Yet to every fabricator/mechanic that has seen this latch remarked at the ingenuity required to do this. I believe the bar has been raised for rear custom bumpers with a spare tire carrier. I will put this latch up against any other fabricator out there doing this ~ period.

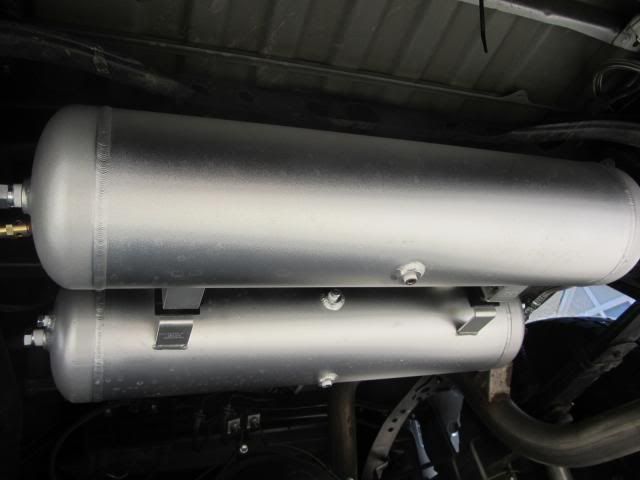
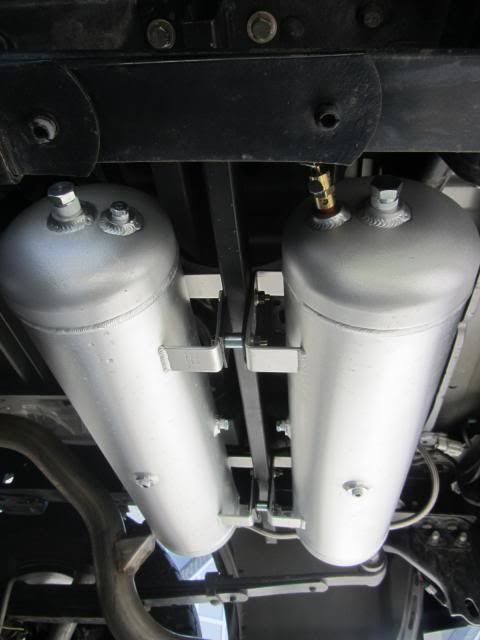
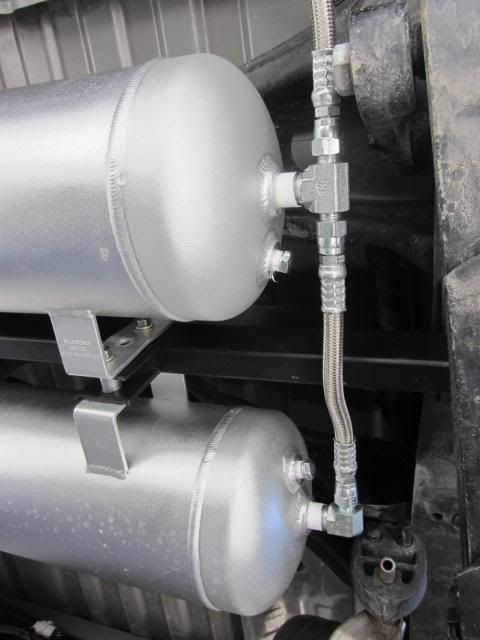
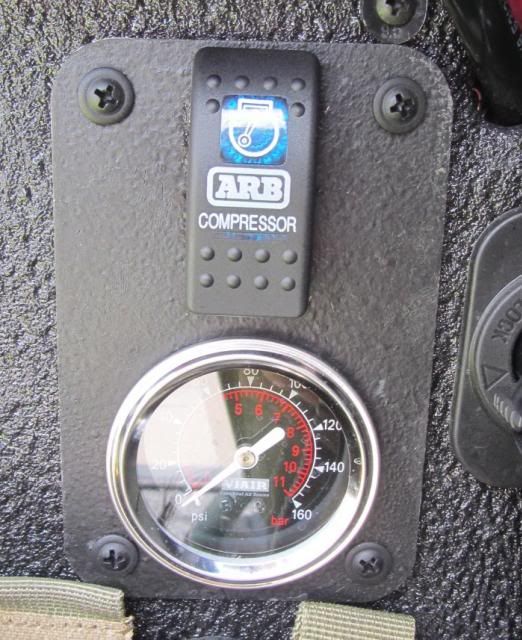
OBA: My wife bought me the ARB twin compressor (CKMTA12) for my birthday :wings: I am a blessed man. I coupled this with two 5 gallon anodized aluminum tanks. These were mounted in the spare compartment under the bed. I decided to go with the stainless steel braided hose for the entire system. After using this yesterday, I am surprised at how hot the hoses get. Anyway, Atomic fabbed up a custom bracket for the mounting and plumbed the whole system. They did a great job as usual.


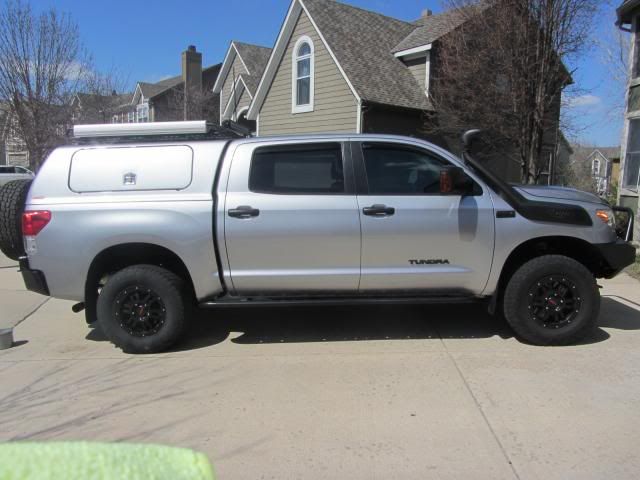
Snorkel: I am a big fan of snorkels. I had one on my 3 gen 4runner and I found a screaming deal on one for the Tundra. I acquired it from Brian Jowett of Jowett engineering. THANKS BRIAN! This snorkel is made for the 200 series Land Cruiser, but, it can be made to fit the Tundra as well. Since not all Tundras are the same, we had to make a trip to the hardware store for some additional fittings. Finally, we got it to work. I can now participate in the Central Overland trips in Spring ~ High water mark + Yacht club...Many, many props out to Atomic for helping me out with these projects...Class guys that treated my rig like one of their own. Highly recommend them. Here are some eye candy pics of the snorkel and bumper. Enjoy!


Next mod in play ~ OME CS055R leaf springs + Air Lift Loadlifter 5000 kit...
Regards,
BWJ
All,
Just got my rig back from Atomic Fabworks on Friday. I had the EXO bumper installed following completion of powder coating at RML powdercoating. During the trial period, my bumper rusted from the freak snow storm + KS salt. I had to hit it with naval jelly and WD-40 Specialist rust inhibitor to prevent the surface rust. I was surprised how fast surface rust builds. It took two days for it the turn a lovely matte burnt orange. In retrospect, I should have sprayed the inhibitor sooner, but live and learn. My next bumper on my next rig will be done differently :ylsmoke:...
RML premier powder coating has this new dustless hydro-blasting process available. It is an alternative to traditional sand blasting. My understanding of this process is that it enables the blaster more control of the media and pitting of the blasted surface is decreased dramatically. It consists of water, tiny glass particles and a rust inhibitor. The glass disintegrates when it hits the surface. The end result is a surface smoother and more accepting fo the powder coat. According to RML, it is far more efficient, and is approved by all major paint manufacturers. My bumper looks like a fine mirrored surface. I recommend this process highly. If you are not local, I recommend you ask your powder coater about it. It is the newest process available, and RML is one of the first in the country to implement it.
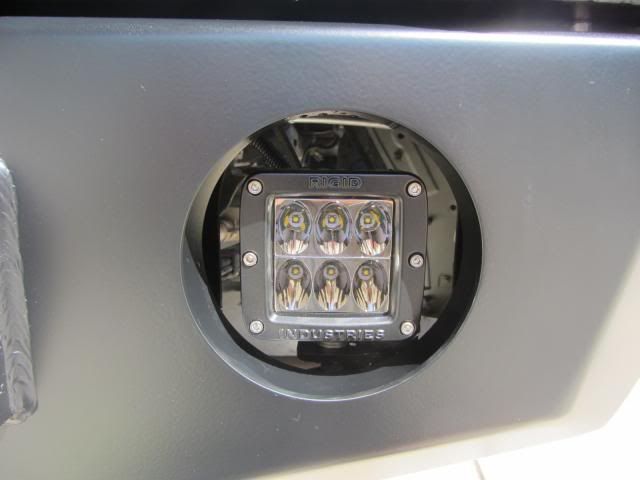
I had atomic tweak the EXO bumper before they installed it. Specifically, I had them weld a stop, a catch system (that would allow the tire carrier to be 'locked' in several positions), and a mount for my Dually D2 light stand. I wish I had done this for my Sherpa II trailer, however, I did not have any experience with tire carriers before my trailer build. Anyway, I wanted three positions available: 1) locked so that I could leave the tailgate up to gain access to the back with just the window open 2) 90[SUP].[/SUP] for the tailgate to fold down 3) open all the way without having the spare ding my tail light. The locking pin is a slick setup. It consists of a spring loaded pin welded to an L handle. This pin will pop down into one of the three holes in the locking plate.
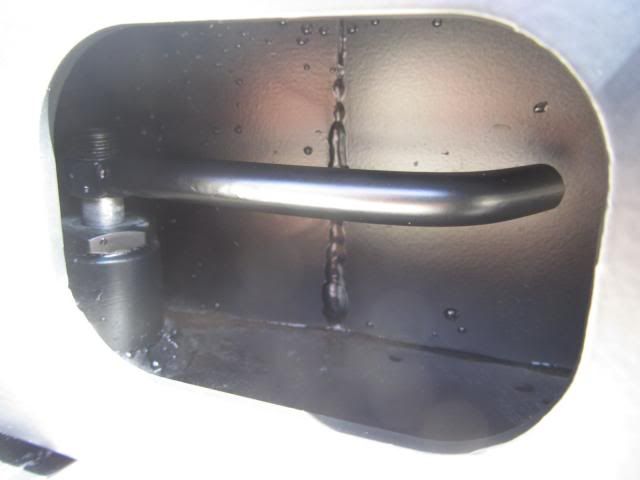
I wanted to wait on putting a pic of the latching mechanism of the EXO bumper. As I said before, this is an engineering marvel, and props goes out to EXO for fabbing this up for me. This was a one-off system that the head fabricator (Robert) had thought up and developed. I'm glad that I waited. Knowing what I know now, if you are thinking of buying this bumper with tire carrier, DO IT. To my untrained eye, it looks complicated. Yet to every fabricator/mechanic that has seen this latch remarked at the ingenuity required to do this. I believe the bar has been raised for rear custom bumpers with a spare tire carrier. I will put this latch up against any other fabricator out there doing this ~ period.

OBA: My wife bought me the ARB twin compressor (CKMTA12) for my birthday :wings: I am a blessed man. I coupled this with two 5 gallon anodized aluminum tanks. These were mounted in the spare compartment under the bed. I decided to go with the stainless steel braided hose for the entire system. After using this yesterday, I am surprised at how hot the hoses get. Anyway, Atomic fabbed up a custom bracket for the mounting and plumbed the whole system. They did a great job as usual.
Snorkel: I am a big fan of snorkels. I had one on my 3 gen 4runner and I found a screaming deal on one for the Tundra. I acquired it from Brian Jowett of Jowett engineering. THANKS BRIAN! This snorkel is made for the 200 series Land Cruiser, but, it can be made to fit the Tundra as well. Since not all Tundras are the same, we had to make a trip to the hardware store for some additional fittings. Finally, we got it to work. I can now participate in the Central Overland trips in Spring ~ High water mark + Yacht club...Many, many props out to Atomic for helping me out with these projects...Class guys that treated my rig like one of their own. Highly recommend them. Here are some eye candy pics of the snorkel and bumper. Enjoy!
Next mod in play ~ OME CS055R leaf springs + Air Lift Loadlifter 5000 kit...
Regards,
BWJ
- Thread starter
- #69
Plano AW case is on...
All,

I have been quite busy in the off-season with various other projects, however, the modding bug is still present in my system...Recently, I cam across a great deal on an all-weather gun case at my local Wal-Mart. This is the bigger brother of the double pistol case that I got at the Bass Pro shops catalog outlet several years ago. It is molded in a material that is not as robust as a Pelican, however, my recovery gear never complained so I bought case. It was $ 69 + tax. There are several nice features that include the following: pressure relief valve, a sealed gaskets, pick and pluck foam and dual lockable hinges. I chose to mount this case in my Baja Rack and I bolted it down with 5 u-clamps. The holes are sealed with Pell door / window flashing tape. I will have my recovery gear more accessible if the tire carrier / tailgate were to become blocked.
Here is the original case with my recovery gear in it.

I was able to reuse the picked foam from the double pistol case without any issues. The case is big enough for my synthetic rope extension, my tree saver and snatching ropes. The sesamee locks tuck right into the case itself...


Enjoy!
Regards,
BWJ
Cool stuff, BWJ - Good to see you on the road the other day, too!
Cool stuff, BWJ - Good to see you on the road the other day, too!
Nice rig! I think I see you on 151st from time to time.
- Thread starter
- #72
All,
I just got through with installing my 8" Bamuffler system from Keith Carty and Dirty Deeds industries. Keith makes these exhaust systems by hand, and these are considered the gold standard in Toyota Tundra circles. I will not post up drone / no drone videos because I believe this to be redundant. Keith has been VERY helpful is deciding what system to get, and he was spot on...I was looking for a 'Wolf in sheep's clothing', and the 8" system, with the Helmholtz resonator, was just the ticket. I was fortunate enough to get in my order when he was ahead of schedule. Got my system 1.5 weeks ahead of time. UPS dropped off this 'mummified body of sorts' on my doorstep 1 week ago...wife and kids were concerned about what the UPS man delivered...

I have NEVER seen a package this carefully wrapped ever. His packing tape bill must be horrendous. It took about an act of Congress to get this system unpacked...As you can see, the weld beads are like a stack of quarters. This thing is all beef with everything made of stainless steel. I opted for the "Cleveland special 2.0" due to the heavily salted Winter roads in the Midwest.


The install was not TOO bad. I am not mechanically inclined at all, however, this was pretty straight forward. I am not going to share how long it took though...") The tough part of my install was the rusted / seized bolts. Nothing that my FUBAR and breaker bar couldn't handle
The tough part of my install was the rusted / seized bolts. Nothing that my FUBAR and breaker bar couldn't handle  . The system is literally 'bolt on' with no need for my big hammer to persuade things. Hangers were in the perfect position...


I decided to hold off on the Helmholtz resonator for a couple of days just to see how the drone was. In my opinion, the drone was TOO much for me, and I was starting to have a little buyer's remorse.
Yeah, I'm too old and it was too loud. Following a quick call to Keith, he reassured me that the Helmholtz will make it all good again. I sealed the flanges of the resonator with Permatex Ultra Copper RTV sealant, and it fit like a glove. Following my install of the resonator, the drone in the cab was just like stock, if not better. I called Keith to congratulate him on being a genius and that the 8" system was the right one for me...

I have since installed a Hypertech interceptor (HTI) tuner as well. My Winter mpgs numbers since the additions are VERY good. During the winter prior to the additions, I would average 11.4 - 11.8 mpgs. With the HTI and the Bamuffler system, I'm getting 13.4 mpgs...Better mileage + sounds like a beast = happy, happy, happy
Regards,
BWJ
I just got through with installing my 8" Bamuffler system from Keith Carty and Dirty Deeds industries. Keith makes these exhaust systems by hand, and these are considered the gold standard in Toyota Tundra circles. I will not post up drone / no drone videos because I believe this to be redundant. Keith has been VERY helpful is deciding what system to get, and he was spot on...I was looking for a 'Wolf in sheep's clothing', and the 8" system, with the Helmholtz resonator, was just the ticket. I was fortunate enough to get in my order when he was ahead of schedule. Got my system 1.5 weeks ahead of time. UPS dropped off this 'mummified body of sorts' on my doorstep 1 week ago...wife and kids were concerned about what the UPS man delivered...

I have NEVER seen a package this carefully wrapped ever. His packing tape bill must be horrendous. It took about an act of Congress to get this system unpacked...As you can see, the weld beads are like a stack of quarters. This thing is all beef with everything made of stainless steel. I opted for the "Cleveland special 2.0" due to the heavily salted Winter roads in the Midwest.


The install was not TOO bad. I am not mechanically inclined at all, however, this was pretty straight forward. I am not going to share how long it took though...
The tough part of my install was the rusted / seized bolts. Nothing that my FUBAR and breaker bar couldn't handle . The system is literally 'bolt on' with no need for my big hammer to persuade things. Hangers were in the perfect position...

I decided to hold off on the Helmholtz resonator for a couple of days just to see how the drone was. In my opinion, the drone was TOO much for me, and I was starting to have a little buyer's remorse.
Yeah, I'm too old and it was too loud. Following a quick call to Keith, he reassured me that the Helmholtz will make it all good again. I sealed the flanges of the resonator with Permatex Ultra Copper RTV sealant, and it fit like a glove. Following my install of the resonator, the drone in the cab was just like stock, if not better. I called Keith to congratulate him on being a genius and that the 8" system was the right one for me...

I have since installed a Hypertech interceptor (HTI) tuner as well. My Winter mpgs numbers since the additions are VERY good. During the winter prior to the additions, I would average 11.4 - 11.8 mpgs. With the HTI and the Bamuffler system, I'm getting 13.4 mpgs...Better mileage + sounds like a beast = happy, happy, happy
Regards,
BWJ
- Thread starter
- #73
All,
I had noticed awhile back that my rig was getting heavier as the armamentarium grew. I could notice a distinct 'sag' from the side shot. Driveability has never been an issue ~ Tundra has been rock solid. However, I am getting to the point of asking myself "What do I truly need?". I can tell you that this question is leading me down a path that I have never really considered or thought of too much. Do I REALLY need a cant hook AND felling lever? Do I REALLY need 2x 5 gallon air tanks? Hmmmmmmm. To be honest, I guess everyone goes through this simplification process at one time or another. There is something to be said about intellectual and armamentarial simplification...Anyways, onto the pics.
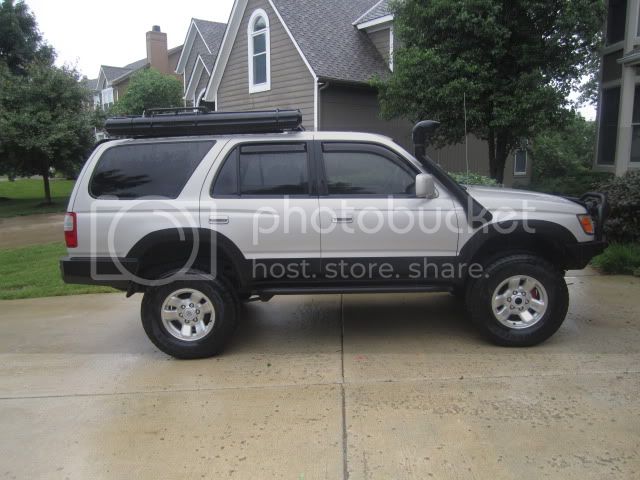
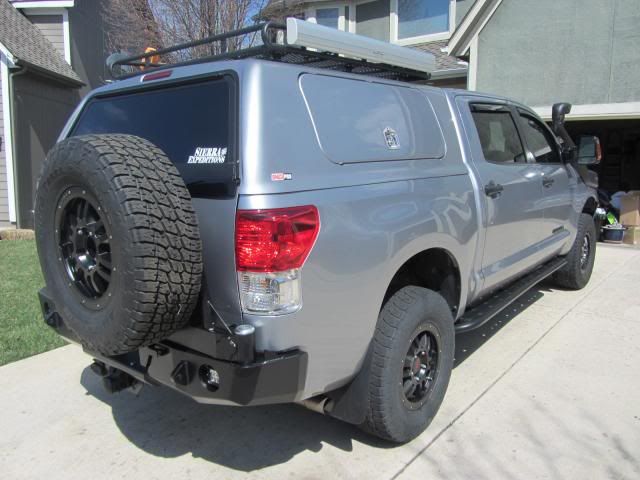
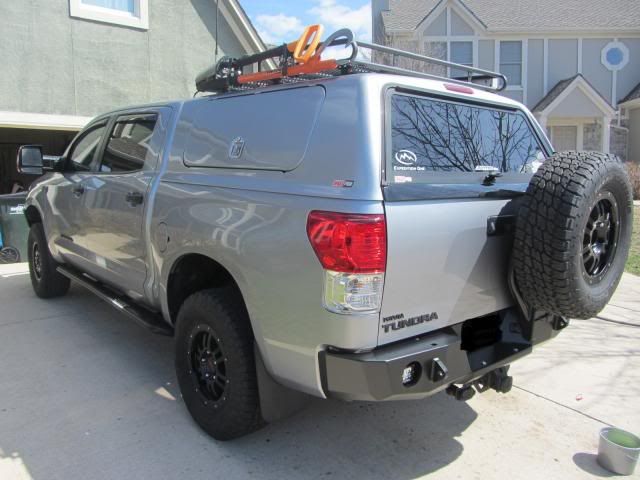
Here she is several months ago. Notice that she is a tad below level in the rear, kind of a 'California' rake.

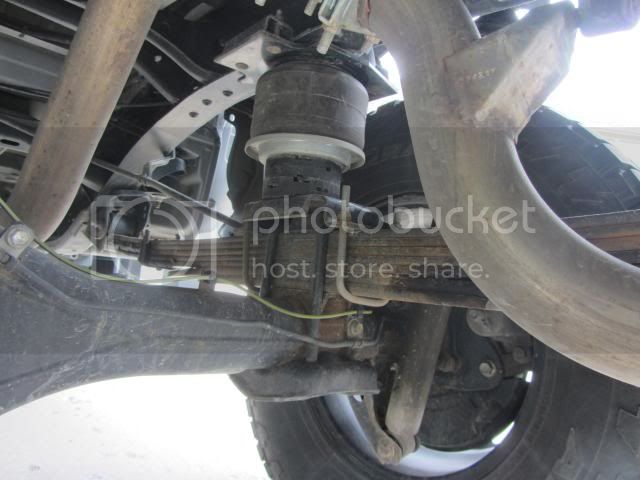
The problem is more noticeable from underneath the rig. Even with 2" rear shackles + 1" Deaver add-a-leafs, I could see that the original leaf springs were not getting the job done. Notice the first spring is inverting and the second is flat...Yikes.


I made a quick call and sent a photo to Wil at Sierra Expeditions. He recommended OME Dakar HD leaf springs with the add-a-leafs. I have had these for quite sometime now, and I here are my thoughts. The ride is smooth. Again, more of a supple feel when going over bumps. That being said, she is heavy. I took my rig over the Continental divide last summer, and it did just fine. I never had an issue at all. First pic is coming into the Great Sand dune after Medano pass. Second pic is having lunch at the Alpine tunnel...


One issue that I am having is the leafs squeak. It is awful. I have since contacted arbUSA about this issue, and they recommended that I place marine grade grease in between the leafs. I tried conventional grease, dry graphite lube, etc...all to no avail. I used one whole tube of this stuff, and it seems to be working so far. A slight squeak is detectable, but it seems to be improved markedly.


Now, I can see that the leafs issue is better than before and my sag is eliminated.

BEFORE
AFTER

I am looking at new ways to lighten the weight and simplify. I am realizing that I really don't need to carry the kitchen sink. Stay tuned...
Regards,
BWJ
I had noticed awhile back that my rig was getting heavier as the armamentarium grew. I could notice a distinct 'sag' from the side shot. Driveability has never been an issue ~ Tundra has been rock solid. However, I am getting to the point of asking myself "What do I truly need?". I can tell you that this question is leading me down a path that I have never really considered or thought of too much. Do I REALLY need a cant hook AND felling lever? Do I REALLY need 2x 5 gallon air tanks? Hmmmmmmm. To be honest, I guess everyone goes through this simplification process at one time or another. There is something to be said about intellectual and armamentarial simplification...Anyways, onto the pics.
Here she is several months ago. Notice that she is a tad below level in the rear, kind of a 'California' rake.

The problem is more noticeable from underneath the rig. Even with 2" rear shackles + 1" Deaver add-a-leafs, I could see that the original leaf springs were not getting the job done. Notice the first spring is inverting and the second is flat...Yikes.


I made a quick call and sent a photo to Wil at Sierra Expeditions. He recommended OME Dakar HD leaf springs with the add-a-leafs. I have had these for quite sometime now, and I here are my thoughts. The ride is smooth. Again, more of a supple feel when going over bumps. That being said, she is heavy. I took my rig over the Continental divide last summer, and it did just fine. I never had an issue at all. First pic is coming into the Great Sand dune after Medano pass. Second pic is having lunch at the Alpine tunnel...


One issue that I am having is the leafs squeak. It is awful. I have since contacted arbUSA about this issue, and they recommended that I place marine grade grease in between the leafs. I tried conventional grease, dry graphite lube, etc...all to no avail. I used one whole tube of this stuff, and it seems to be working so far. A slight squeak is detectable, but it seems to be improved markedly.


Now, I can see that the leafs issue is better than before and my sag is eliminated.


BEFORE
AFTER

I am looking at new ways to lighten the weight and simplify. I am realizing that I really don't need to carry the kitchen sink. Stay tuned...
Regards,
BWJ
- Thread starter
- #74
All,
Sorry I have not had a chance to update my rig for awhile...I have been busy with Royals postseason baseball and life in general. Anyways, here are some updates on my rig.
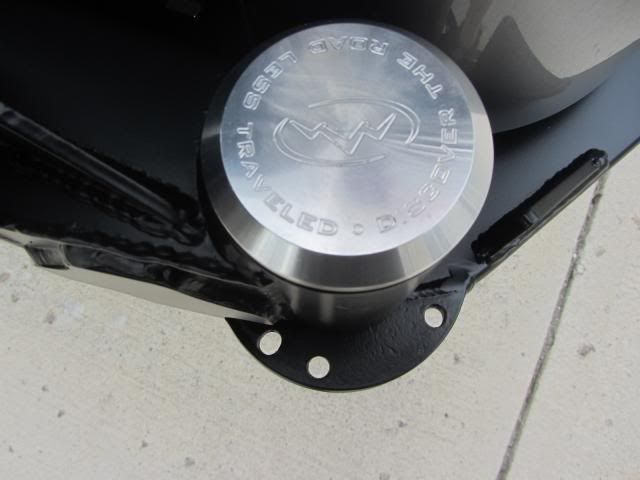
Daystar airbag cradles - I was concerned that the lift that I had was a little too tall for my airbags. I currently have Old Man Emu HD leaf springs and an OME add-a-leaf + coachbuilder 2" shackles. This combination works well, however, I was concerned with my Airlift loadlifter bags being too taught. I could have added another 1" spacer disc, however, I was growing concerned with the taughtness of my bag without any articulation. Here is a pic of my bag with the truck sitting in the driveway.
These cradles will allow for articulation due to not requiring the bag to be affixed at both ends. These fit the diameter of my Airlift bags and I went with it. Here it is now...

ARB Old Man Emu greasable shackles and pins - My leaf springs SQUEAK like a banshee. I have tried everything from pieces of pond lining in between to graphite spray...This issue was driving me crazy. I have been in contact with ARB for over a year to troubleshoot this issue. I must say that they have been exceptional in trying to resolve this for me. I noticed this issue even after adding Coachbuilder 2" shackles and his full bushing kit. ARB recently sent me a greasable pin / shackle kit that they just released. They only problem is I had to replace the 2" shackles from Coachbuilder to do it. I figure since I am in over $400 in labor in trying to resolve this issue, I would give it a go ~ SORRY COACH. These pins are hollow and have a threaded greasable zerk on one end. ARB recommended that I use a lithium based marine grease. I am happy to report that the squeak is no longer there without having to turn up my stereo...I'll keep you all updated on this issue. Here are some eye candy pics. Shackles aren't as beefy as Coach's, but they are serviceable at the moment...


ICON Vehicle Dynamics 2.5" piggyback shocks - I got a screaming deal on a pair of these directly from ICON. With my constant load, I have decided to address this by upgrading as much of the suspension as possible. I feel that the 2.5" diameter is better able to handle anything that I drive my truck over ~ peace of mind is a beautiful thing. Depending on how the new drawer project leads, I'm probably going to have to accept that my rig is going to be heavy...We will see though.

You can see the difference between my 2" Bilstein 5100 series shock on the right with the ICON 2.5" on the left.


Initial observation is that these are a different ride than that of the Billies. They seem more supple and my wheels seem to be contacting the road even more. I'll get back to you as I get some miles with these. Here are some parting shots of the shocks ~ ENJOY!


Happy Thanksgiving!
Regards,
BWJ
Sorry I have not had a chance to update my rig for awhile...I have been busy with Royals postseason baseball and life in general. Anyways, here are some updates on my rig.
Daystar airbag cradles - I was concerned that the lift that I had was a little too tall for my airbags. I currently have Old Man Emu HD leaf springs and an OME add-a-leaf + coachbuilder 2" shackles. This combination works well, however, I was concerned with my Airlift loadlifter bags being too taught. I could have added another 1" spacer disc, however, I was growing concerned with the taughtness of my bag without any articulation. Here is a pic of my bag with the truck sitting in the driveway.
These cradles will allow for articulation due to not requiring the bag to be affixed at both ends. These fit the diameter of my Airlift bags and I went with it. Here it is now...
ARB Old Man Emu greasable shackles and pins - My leaf springs SQUEAK like a banshee. I have tried everything from pieces of pond lining in between to graphite spray...This issue was driving me crazy. I have been in contact with ARB for over a year to troubleshoot this issue. I must say that they have been exceptional in trying to resolve this for me. I noticed this issue even after adding Coachbuilder 2" shackles and his full bushing kit. ARB recently sent me a greasable pin / shackle kit that they just released. They only problem is I had to replace the 2" shackles from Coachbuilder to do it. I figure since I am in over $400 in labor in trying to resolve this issue, I would give it a go ~ SORRY COACH. These pins are hollow and have a threaded greasable zerk on one end. ARB recommended that I use a lithium based marine grease. I am happy to report that the squeak is no longer there without having to turn up my stereo...I'll keep you all updated on this issue. Here are some eye candy pics. Shackles aren't as beefy as Coach's, but they are serviceable at the moment...
ICON Vehicle Dynamics 2.5" piggyback shocks - I got a screaming deal on a pair of these directly from ICON. With my constant load, I have decided to address this by upgrading as much of the suspension as possible. I feel that the 2.5" diameter is better able to handle anything that I drive my truck over ~ peace of mind is a beautiful thing. Depending on how the new drawer project leads, I'm probably going to have to accept that my rig is going to be heavy...We will see though.
You can see the difference between my 2" Bilstein 5100 series shock on the right with the ICON 2.5" on the left.
Initial observation is that these are a different ride than that of the Billies. They seem more supple and my wheels seem to be contacting the road even more. I'll get back to you as I get some miles with these. Here are some parting shots of the shocks ~ ENJOY!
Happy Thanksgiving!
Regards,
BWJ
Last edited:
Awesome, Jon.
I pose this question to anyone: Is there a nicer Tundra in the world?")
I pose this question to anyone: Is there a nicer Tundra in the world?
Forgot to take a picture, but pretty sure I saw this rig at Mid America Nazerrene this weekend at CYT show the kids were in.