Bigwapiti's 2011 Tundra build...'Big Nambe' (1 Viewer)

This site may earn a commission from merchant affiliate
links, including eBay, Amazon, Skimlinks, and others.

Night shots of lights...

All,

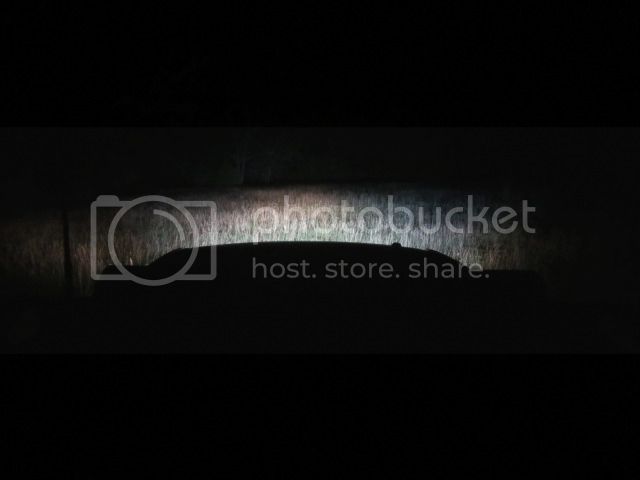
Here is my attempt at some night shots for the lights. Please note that these shots are 'dimmer' due to the limitations of my camera at night. I tried to 'standardize' the shots the best that I could. I took these earlier this year. The grass is about knee high in places and the treeline is about 150 yards away...

Driver

IMG_0586.jpg


Overhead

IMG_0582.jpg


Driver with headlights only

IMG_0589.jpg


Overhead with headlights only

IMG_0594.jpg


Driver with headlights + Rigid Industries Dually D2 fogs

IMG_0596.jpg


Overhead with headlights + Rigid Industries Dually D2 fogs

IMG_0601.jpg


Driver with headlights + Dually D2 fogs + Fyrlyts

IMG_0602.jpg


Overhead with headlights + Dually D2 fogs + Fyrlyts

IMG_0607.jpg


Driver with headlights + Dually D2 fogs + Fyrlyts + Rigid Industries 40" light bar
**You might be able to see the reflective nature of the LED light on this shot. We had a campfire close by and the wind blew some of the smoke into the beam of the light bar (1 o'clock position from the tree). I could not see the smoke from the headlights or Fyrlyts...


IMG_0609.jpg


Overhead with headlights + Dually D2 fogs + Fyrlyts + Rigid Industries 40" light bar.
**I have reflection on my roof, however, this is not an issue to me at all. I do lose a little light from the position of the light bar, however, I believe this to be minimal, and I don't have to deal with glare on the hood...


IMG_0619.jpg


Outside the driver's door

IMG_0614.jpg

My impressions so far...

1) The combination of halogen (headlight / Fyrlyt) and LED (Dually D2 fogs / 40" light bar) needs some getting used to. The halogen lights seem to 'penetrate' more into the trees and surroundings while the LED light seems to be more diffused as the objects get further away. I believe that either light technology will be suitable, you just have to get used to them...

2) LED light is more reflective. I believe this to be from the temperature of the light itself. When driving through rain, I could see the drops clearly and the direction that they are coming from. In a downpour, this may hinder visibility. Having said that, this issue can be minimized by the use of the clip on filters that Rigid offers. It is significantly better with the amber filters on. I have not tried the blue filters at this time though.

3) Fyrlyts are bright as well. I had these set on the 'flood' setting. These lights put out some heat, you can feel the heat standing 8-10 feet away. One issue with the Fyrlyt is that there is a small leak on one of them. Fyrlyt has addressed this issue and is sending me 2 pair of seals from a new manufacturer.

I am blessed to be able to have both technologies on my rig. I will never be in want for more lighting.

Regards,

BWJ
 
Atomic Fabworks fire extinguisher mount is on...

All,

In the relentless quest for efficiency, I now present to you the Atomic Fabworks fire extinguisher mount...Previously, I had my DD fire extinguishers attached with a combination of the factory mount + a Quikfist. Not anymore, Atomic has these little babies available. The design is simple and elegant. During a panic situation, I believe this will afford a quicker response than fiddling with the previous mounting system. Here is the scoop:

This bracket comes in two seperate pieces that pivot around a bolt on the bottom and is held in place with a t-handle pull pin on top. There are several slots / holes located along the bracket itself for plenty of mounting options.

IMG_0561.jpg


IMG_0559.jpg


IMG_0563.jpg


I chose to mount the fire extinguisher with hose clamps, and I bolted the mount to my cabinet system.

IMG_0547.jpg


IMG_0549.jpg


IMG_0553.jpg


IMG_0558.jpg


All it takes is a quick pull of the T-handle and you are ready to go. I have two mounts, one in the truck and one on the Sherpa II. Enjoy!

Regards,

BWJ
 
Last edited:
Overhead camp lights / locator project is done...

All,

I have completed another project for my camping armamentaria. I noticed a couple of times this year, I was in need of additional overhead lighting. Since I have the IBS dual battery system, I dove right in. I was able to acquire a lockable 12 plug / adapter from Marinco, and I had Atomic Fabworks install the plug in the passenger side cabinet. I went with a pair of Rigid Industries Dually D2s (diffused lens), as well as a 6' LED lighted whip for a camp locator. I have daytime pics only at this time. I'll post up some night pics when I get a chance. Onto the pics...

The basic setup is as follows: I went with a 4' / 8' retractable painter's pole. The base and mounting bracket were fabbed up at Atomic. The adjustable pole is 'locked' in with wire pin fasteners at the base and the light mounting bar. The whole system is able to break down significantly. The base can be 'driven over' for stability, however, I chose to mount this on the roof rack.

IMG_0636.jpg


IMG_0645.jpg

The coil cord was quite a problem since I could not locate exactly what I needed. I did not want to splice several short 'cobbled' sections together, rather, I was looking for a coil that was one piece. Cable science to the rescue. I ordered a 5 foot coiled cable that could stretch out to 30 feet if needed. The NCV182 is a 2 conductor / 18 gauge coil that can accomodate up to 300 volts if need be. Cable science offers this in any lenght that you need. Fabrication took 4 business days and it was shipped following completion. The coil is high quality. The rubberized coating appears very durable, and I am looing forward to many years of service. I recommend Cable Science highly.

IMG_0642.jpg

As mentioned earlier, the lights are Rigid Industries Dually D2s in a diffused pattern, and the whip is from Tribal Whips. Both lights are able to be unplugged when needed, and they are quite bright to say the least.

IMG_0639.jpg

I mounted the base on the Bajarack to gain as much height as possible. The total height of the Duallys are about 20 feet + the length of the whip. I have tied the pole with some heavy duty bungee straps, and they are hooked to the corners of the Bajarack.

IMG_0658.jpg


Untitled.jpg

I'm working on becoming more proficient at setup and teardown. I'll post night pics when I am able to. Enjoy!

Regards,

BWJ
 
Last edited:
Nice upgrades on the lighting and fire extinguisher, BWJ!
 
EXO rear bumper pics...

All,

I just got a pic from EXO of a rear tire carrier for the Tacoma. My rear tire carrier will be similar to this. I am particularly liking the modularity of this system. I'll have my choice between a rear tire / gas cans / Armstrong GMTK toolchest / custom winch extension + recovery case...Too many options at this point. It will consist of a single swing only. I cannot wait...

photo5.jpg


400880_10152073957030442_289402354_n.jpg

Happy New Year everyone!

Regards,

BWJ

Nice upgrades on the lighting and fire extinguisher, BWJ!

Thanks!

BWJ
 
That is awesome!!! What is the weight of that thing?
 
No doubt she is a heavy girl. I don't know how much it weighs. I am going to go with a single swing out versus the double...I'll find out the weight and post it up...

Regards,

BWJ
 
Ran into your tundra Monday in Gardner, admired it for a bit but didn't want to draw to much attention. I have a green 80 parked a few spots down while we ate at the downtown diner. you have an awesome truck man. keep it up
 
Ran into your tundra Monday in Gardner, admired it for a bit but didn't want to draw to much attention. I have a green 80 parked a few spots down while we ate at the downtown diner. you have an awesome truck man. keep it up

Next time, pull up a chair! Thanks for your kind words!

Regards,

BWJ
 
EXO project has begun...

All,

Earlier, I was given some pics, from EXO, of their dual carrier for the Taco. This setup is similar to the Tundra. Initially, it seemed too 'crowded' and overbuilt. Don't get me wrong, I believe the EXO carrier system to be one of the more stout offerings out there, but to my eye, I am glad that the overall width of the Tundra is wider and stretch things out a bit.


I was wanting a modular approach, where I could have options in terms of choosing armamentaria. I feel as though a dedicated tire carrier would be one dimensional. EXO seemed to have understood this in their design. With the use of a grid configuration, There are many ways I can utilize this mount.


My initial concern is with the back-up camera / shroud. I have sent them a pic, with measurements, of what I needed to clear the factory back-up camera. I have grown to really appreciate this option ~ call me spoiled. I find it a major time saver when hooking up the trailer. In addition, it provides an added measure of safety when backing up with kiddos everywhere...My preference is to maintain the location of the camera, however, if I have to move it, so be it...Here are some initial pics of the EXO bumper for the Tundra. Yes, this is mine.


I did not want to go with dual carriers at this time. I feel as though the single is going to be fine for me. It will require some thought on what I end up with ~ good problems to have at this point. Needs are Hi-lift jack, pelican case with recovery gear, the Armstrong GMTK toolkit, or a Rotopax cell. Options, options, options. That is what I like to have.


Here is the Taco and Tundra pic for comparison...


Taco


Tundra

Also, I have decided to take the Rigid industries Dually D2 off the Baja Rack and I will place 2 D2s in the supplied light mounts. I found the Dually D2 with the diffused pattern to wash out when placed low, and I prefer a more directional beam when backing up. It is perfect for overhead lighting, but not for backing up. I'll see when I get the rig set up.

BEEF, IT'S WHATS FOR DINNER...

Regards,

BWJ
 
EXO bumper is shipped...

All,

I just got some pics of the bumper and the latching system. This process has taken time, however, the end result is worth the wait. I am going to 'tweak' the carrier at Atomic fab, then to RML powdercoating, then installed. Tweaks will include a modular case rack ~ pelican with recovery gear, a swing down table and a rotopax. Also, I'm going to fab up a locking pin system so I can lock the tire carrier at various open positions. I'll have to see when it gets here...

EXO fabbed up a custom latch system. Originally, the latching system on their ExPo Tundra was electric, and was riddled with problems. So this is their solution. From what I understand, it is mechanical and far more reliable. I'll be the judge of that. Here are the pics...**not the most focused pics in the world** I'll get better pics when its mocked up on my rig.

129_1108_09towering_tundraopen_bed_area_zpsda61e00f.jpg


latch_zpsd066ec8f.jpg


latch2_zps8d41b7a5.jpg


latch3_zps00cbe2cc.jpg


latch6_zps30e03583.jpg

Regards,

BWJ
 
Looks stout.
 
EXO bumper is on...Mock up

All,

Here she is. I just got back from Atomic Fabworks and I have the bumper on in raw metal. Why? Well I wanted to have the bumper on my rig for a short amount of time to work out any 'bugs' that might exist. All in all, EXO makes an exceptional product, and I am VERY pleased with the results. I have waited patiently for 10 months now, and if I had to do it again, I would without hesitation. I would rather wait and get it done right, than get a product that was rushed to make a deadline.
A special shout out to the guys at Atomic Fabworks (Steve, Brandon and Kelly). They have exceeded my expectations once again. They really care about the installation ~ even down to the smallest details. They had the insight and expertise to avoid issues that I did not even think existed. That comes with experience and care...By the way, Atomic's race team placed 2nd overall (barely edged out of 1st) in the King of Hammer's stock UTV class. Not only do they work hard, they play hard as well. Congrats to them all.

Now back to the topic at hand. Every aspect of this bumper reflects quality, engineering and artistry in one stout package. It is overbuilt ~ PERIOD. What I appreciate are the simple lines, however, don't let that fool you. This bumper and swing out are BEEFY and I have no hesitation in winching with these bumpers on. They are that strong.

IMG_0686_zpsa6b8132d.jpg

After the process of replacing my stock 'bumpers', I would like to offer a word of caution. The OEM bumpers that are on your rigs currently are WOEFULLY inadequate. I did not realize how thin the metal was that make up the OEM bumpers. It is all for cosmetics and having the ability to crumple at the first sign of resistance. Deer vs. Tundra OEM bumpers; the Tundra would win, however, you will have a TON of damage depending on the size of the deer...Just sayin'. The rear tow hitch is the only thing in the way between your family, frame and the rear ender...Yikes. Not anymore in my house.

IMG_0459.jpg


IMG_0659_zps329c094c.jpg

I chose to go with the single swing out because one is plenty for me. I like the utility of the single and it keeps the spare within close reach. I didn't snap any pics of the the bumper on the pallet. I was too excited to get this thing on and ready to go. Anyway, onto the pics...

IMG_0663_zps5ee3cdc4.jpg


IMG_0661_zpsa21a8596.jpg

As with any install, we had to shim and tweak a bit. I don't think that this is avoidable. The tolerances of this bumper were as tight as a one-off custom job. I ought to know, I had custom bumpers installed on my previous rig that took 9 weeks to fabricate and install. I think that EXO's ability to maintain their tolerances while doing custom work is one of a kind. Don't let the fact that these are 'mass produced' scare you off. They are that good...

One concern that I had was the obstruction of the back-up camera with the spare tire. My tire is a 295/75 r17 (33") and I did not know how this was going to interfere with the camera. I will admit that I am SPOILED with this piece of technology ~ especially when I'm hooking up my SHERPA II. Here is a picture of my rear view camera. Not too bad in my opinion.

IMG_0670_zps7b09d90d.jpg

Finally, here are some driveway pics...

IMG_0672_zps25e8ec7f.jpg


IMG_0676_zpsad58f3ad.jpg


IMG_0674_zpsbaf1d2c7.jpg


IMG_0681_zps4dc8a2fe.jpg


IMG_0680_zps932370be.jpg


IMG_0691_zpsce17c778.jpg


IMG_0694_zps5b095300.jpg


IMG_0684_zps938964fc.jpg


IMG_0688_zps65776de4.jpg

Prior to the trip to the powder coater, I will be having Atomic fab up a fold down table and a locking pin system that will prop the carrier at various open angles. As usual, I will post up pics when I get them.

I'll post up the post powder coat pics in a few weeks. After that: On board air / Camp, camp, camp...

Regards,

BWJ
 
Well done sir. :cheers:
 
New bumper looks great!
 
MPGs report...

All,

I just returned from a trip to Albuquerque, New Mexico. I drove 1500+ miles, and the Tundra did GREAT. I was curious to see what my rig was going to do mpgwise with the rear bumper on + spare. *Caveat ~ I've got 33" with 3" of lift + shell + cabinets + ethanol blended gasoline (I could not locate stations that served ethanol-free fuel).

Heading out I averaged 14.6 mpgs...:D My 4runner averaged about 14.2 on the highway ~ I am beyond thrilled with this performance. I returned home towing a 5'x8' enclosed Uhaul trailer that weighed 3750 lbs + cargo, and I averaged 12.7 mpgs. Knowing that my Sherpa II is 1,800 lbs fully loaded, I suspect that my performance will be better than 12.7. Needless to say, I am very pleased with the performance. Comfort, power, room all in one package...

Next week, Rear bumper goes to the powder coater. OBA gets installed. Foxwing awning gets installed on the Sherpa II. Then camp, camp, camp...:steer:

Regards,

BWJ
 
What was your speed on the interstate to get those mpg #'s?
 
What was your speed on the interstate to get those mpg #'s?

I tried to keep it at 70 mph...but I had to slow down to 35 going through the towns of Pratt, Liberal, Guymon, Dalhart...

Regards,

BWJ
 

Users who are viewing this thread

Back
Top Bottom