
What's the name of this site again? Oh yeah.
So I was out last weekend having fun in the mud

And yeah, I knew I was going to pay for it... usually it just means a lot of time with the pressure washer. But on the way home, the dash lights up like a freaking christmas tree - once when on the on-ramp - around 2K RPM, lights come on. Battery meter (I have a secondary one in my +12V plugs) tells me the dirty details. It goes away. Then about 1/4 mile later, it comes back and doesn't go away. A quick check finds nothing... long story short, my brushes are toast on the alternator.
There have been a few threads on fixing this issue, but none of them seem to dig all the way into the alternator. I needed to due to the mud intrusion, and it's really not that much more work to take the whole thing apart and clean if you've spent the time getting it out of the truck. So thanks to the other threads out there that detail replacing the bushes (like https://forum.ih8mud.com/80-series-tech/592472-alternator-brush-replacement.html ).
Step 1 - remove the battery and battery box.
Step 2 - remove the 3 screws that hold the power steering resiovor in
Step 3 - loosen up the alternator lock bolt and the pivot bolt.

(Couldn't really get a shot of the lock bolt, but you should be able to figure that out!)
Step 4 - move the alternator so you can get the drive belts off
Step 5 - Remove the +12v wire and the plug on the back. If you're lucky, yours won't break like mine did Arrow is pointing in the direction of the plug, you can find it.

Step 6: Remove the lock bolt and pivot bolt. The alternator will now be yours to try and figure out how to maneuver out of the area... it's a little tricky. The other tricky part is the plastic bit that holds the cables on the side of the alternator. I ended up using some needle nose pliers on it to pull it out.

Step 7: Now you've done the worst part. The next bad part doesn't come until you put it back in! This is where most people stop. But when your alternator looks like mine, you keep going:

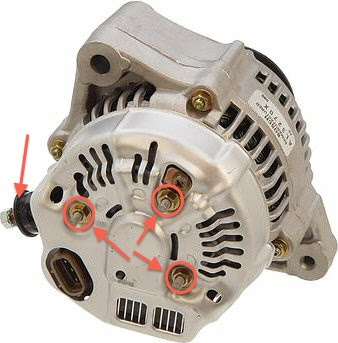
Here's a picture of another alternator - mine was so nasty you couldn't even see some of the screws! You need to remove the three 7mm or 8mm (can't remember) bolts on the back, then the 12mm nut below where the +12V wire went. Also remove the black plastic guide under the 12mm nut:
The back might need a little coaxing to come off. But once you have those bolts and plastic bits off, it'll come free.
Step 8: Now you're where the brushes are. Take off all the bolts (I missed marking one on the brush holder this image and I'm too lazy to fix it right now) for the brush holder, regulator (part that connected to the plug you removed) and whatnot. The arrows point to the nuts that hold on the leads from the windings, remove those as well.

So once the back cover is off, remove the two bolts if you want to just change the brushes, and you're done. For me, I took mine out, banged it on the ground a couple of times, and a bunch of carbon came out. The brushes then popped back up a bit, and I'm pretty sure that was my problem.

You can note mine doesn't even measure 7/64. A little shy of what a new one looks like:

This is part # 27370-75060 if you're shopping about now... but more on all this later.
Regulator and bushes off:

Step 9: Once you take off the conductor part (or whatever that is), you can see the rubber insulators for the winding leads. Remove these. Be careful with the leads - they're kinda thick copper, but if you break them, you're screwed.

Step 10: Flip that sucker over and remove the pulley. Hint: impact is your friend here!

Step 11: Now the whole assembly will come apart. Tap the pulley end on some wood or something to help separate the case.


Now, get out that electrical component cleaner and clean, clean, clean!
Once you've got it all nice and purdy, you can put it back together again. Reassembly is the reverse of assembly.
After I got mine back to the brush part, I decided I was going to get it tested. So I put the OLD brushes back in, and took the new ones with me, and headed to the local autoparts store. I thought they were going to be able to tell me output, but alas, they could only tell me if it was working or not. It tested just fine on the bench. So I took it home and changed out the brushes for the new one.
By the by, getting the alternator back in is fun, too. Mine didn't want to cooperate at all, and it took a few minutes of coaxing to get the pivot bolt back in. Then fiddle around with the lock bolt, tension up the belts properly, reconnect all the cables and you're good to go.
So I was out last weekend having fun in the mud
And yeah, I knew I was going to pay for it... usually it just means a lot of time with the pressure washer. But on the way home, the dash lights up like a freaking christmas tree - once when on the on-ramp - around 2K RPM, lights come on. Battery meter (I have a secondary one in my +12V plugs) tells me the dirty details. It goes away. Then about 1/4 mile later, it comes back and doesn't go away. A quick check finds nothing... long story short, my brushes are toast on the alternator.
There have been a few threads on fixing this issue, but none of them seem to dig all the way into the alternator. I needed to due to the mud intrusion, and it's really not that much more work to take the whole thing apart and clean if you've spent the time getting it out of the truck. So thanks to the other threads out there that detail replacing the bushes (like https://forum.ih8mud.com/80-series-tech/592472-alternator-brush-replacement.html ).
Step 1 - remove the battery and battery box.
Step 2 - remove the 3 screws that hold the power steering resiovor in
Step 3 - loosen up the alternator lock bolt and the pivot bolt.
(Couldn't really get a shot of the lock bolt, but you should be able to figure that out!)
Step 4 - move the alternator so you can get the drive belts off
Step 5 - Remove the +12v wire and the plug on the back. If you're lucky, yours won't break like mine did
Arrow is pointing in the direction of the plug, you can find it.
Step 6: Remove the lock bolt and pivot bolt. The alternator will now be yours to try and figure out how to maneuver out of the area... it's a little tricky. The other tricky part is the plastic bit that holds the cables on the side of the alternator. I ended up using some needle nose pliers on it to pull it out.
Step 7: Now you've done the worst part. The next bad part doesn't come until you put it back in! This is where most people stop. But when your alternator looks like mine, you keep going:
Here's a picture of another alternator - mine was so nasty you couldn't even see some of the screws! You need to remove the three 7mm or 8mm (can't remember) bolts on the back, then the 12mm nut below where the +12V wire went. Also remove the black plastic guide under the 12mm nut:
The back might need a little coaxing to come off. But once you have those bolts and plastic bits off, it'll come free.
Step 8: Now you're where the brushes are. Take off all the bolts (I missed marking one on the brush holder this image and I'm too lazy to fix it right now) for the brush holder, regulator (part that connected to the plug you removed) and whatnot. The arrows point to the nuts that hold on the leads from the windings, remove those as well.
So once the back cover is off, remove the two bolts if you want to just change the brushes, and you're done. For me, I took mine out, banged it on the ground a couple of times, and a bunch of carbon came out. The brushes then popped back up a bit, and I'm pretty sure that was my problem.
You can note mine doesn't even measure 7/64. A little shy of what a new one looks like:
This is part # 27370-75060 if you're shopping about now... but more on all this later.
Regulator and bushes off:
Step 9: Once you take off the conductor part (or whatever that is), you can see the rubber insulators for the winding leads. Remove these. Be careful with the leads - they're kinda thick copper, but if you break them, you're screwed.
Step 10: Flip that sucker over and remove the pulley. Hint: impact is your friend here!
Step 11: Now the whole assembly will come apart. Tap the pulley end on some wood or something to help separate the case.
Now, get out that electrical component cleaner and clean, clean, clean!
Once you've got it all nice and purdy, you can put it back together again. Reassembly is the reverse of assembly.
After I got mine back to the brush part, I decided I was going to get it tested. So I put the OLD brushes back in, and took the new ones with me, and headed to the local autoparts store. I thought they were going to be able to tell me output, but alas, they could only tell me if it was working or not. It tested just fine on the bench. So I took it home and changed out the brushes for the new one.
By the by, getting the alternator back in is fun, too. Mine didn't want to cooperate at all, and it took a few minutes of coaxing to get the pivot bolt back in. Then fiddle around with the lock bolt, tension up the belts properly, reconnect all the cables and you're good to go.
Last edited:
")
 Not not just a Miller this time. A real one like Three Philosophers or Chimay.