Aftermarket Backup Camera wiring *install* (1 Viewer)

This site may earn a commission from merchant affiliate
links, including eBay, Amazon, Skimlinks, and others.

gregnash

Anal Retentive Analyst
Joined
Nov 3, 2011
Threads
176
Messages
12,368
Location
Carson City, NV
So thought I would throw this out there. I know that there have been a few threads on installing the camera that is more focused on location, and a couple guys that have shown where to grab the reverse wire for triggering the camera. But what I haven't seen is how people are running the wiring?

How is everyone running the camera wiring from the inside?
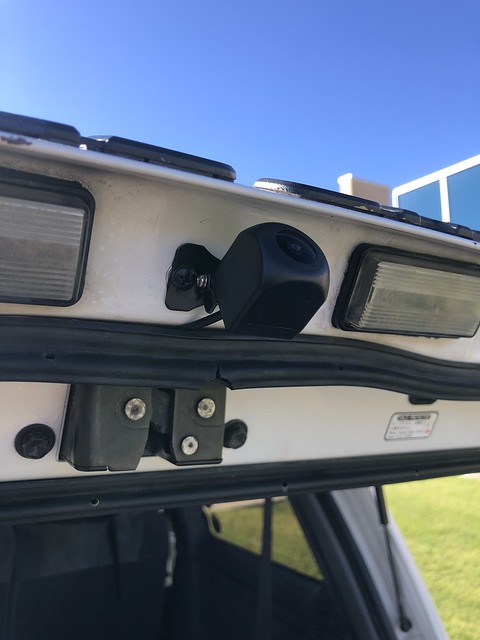
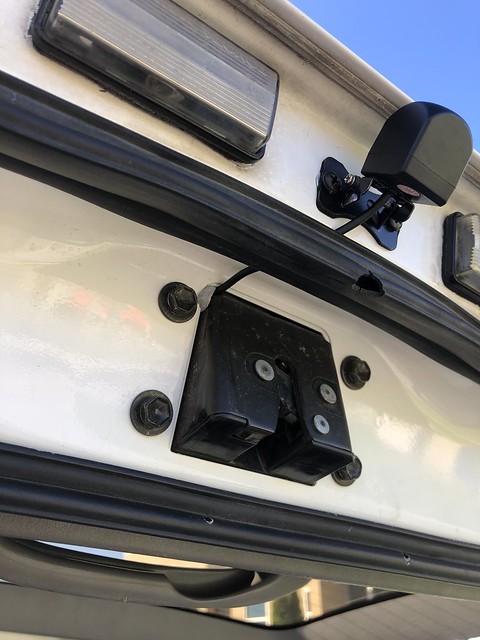
I did the install with the camera on the upper tailgate. I loosened the latch mechanism and then routed the wires in through the gap that was present, enlarging one corner to allow for the wire to easily slip in there, then buttoned everything back up. I also installed a couple rivnutz to allow for easier installation.

I will run the wire around the glass and through the grommet with the rest of the wiring to get under the headliner but from there, where should I go? there is a power wire there to grab power from the reverse lights, so I will likely have to run a LONGER wire extension to grab that power, but that shouldn't be too hard with everything else.

Untitled by Greg Fisicaro, on Flickr

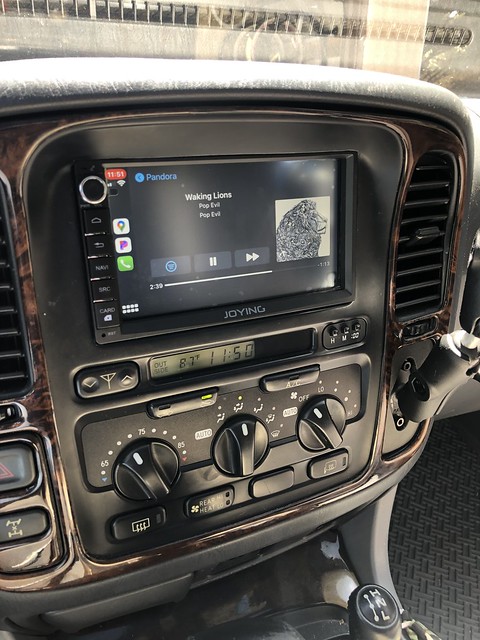
Here is the headunit installed, JOYING Auto 7" universal, with their AHD backup camera.
Untitled by Greg Fisicaro, on Flickr
 
Mine runs along the drivers side roof side/trim where the handlebars bolt onto. Comes down on the a-pillar (under the trim that is) and goes to the headunit. The hardest part is getting the cable (especially with the rca connector) through the rubber grommet thingy that connects the upper tail gate and already houses a huge harness.

The reverse signal is tapped off the left reversing light easily (two screws & remove light housing) and the power for the camera is tapped off from the cigarette lighter wiring in the left c pillar.
See think mine is a bit different as it has the power signal wire near the camera but the wire to trigger the camera is off the headunit.
 
I tapped the trigger and power wire from the DS reverse bulb wiring. I ran the RCA and trigger wire through the stock wire harness at the bottom of the lower tailgate to the DS rear quarter panel. Cables run along the metal floorboard up to the center console in the back of it, then routed to stereo. You never see the cables anywhere.
 
I tapped the trigger and power wire from the DS reverse bulb wiring. I ran the RCA and trigger wire through the stock wire harness at the bottom of the lower tailgate to the DS rear quarter panel. Cables run along the metal floorboard up to the center console in the back of it, then routed to stereo. You never see the cables anywhere.
So you had your camera around the license plate? Not on the upper tailgate.
 
Correctamundo. Easier wire routing for starters
 
Correctamundo. Easier wire routing for starters
Yeah I get that... Almost went that way but figured with it on the upper gate it would be more protected from the elements and other things (like my dogs jumping out the back before I drop lower gate). Half dozen of one, six of another.
 
I added one of these cameras to my license plate screws and drilled a hole into the lower hatch and tapped directly into the reverse lamp for power.
Amazon product ASIN B07YBRLKPX
And then instead of running a physical wire, I just used a wireless connection. Although if I had to d it all over again - I would definitely use a physical wire and use a relay for actual power.
 
So for power to the camera (not trigger) are you guys tapping into a brake wire or reverse wire? I see both being referenced.
 
Reverse wire. Brake wire will make your reverse camera to come on everytime you touch your brake pedal!

There is also a wire coming out of the ECU under the glove compartment that has 12v current when you select reverse in case you want to tap it there. I do recommend using the reverse lamp (right there in the lower hatch!) for just the trigger. Use that trigger to close the relay which should have it's own fused power. That way you won't be taxing the reverse lamp harness too much.

Or you can just use the power from the reverse lamp harness to power the camera - plenty of ppl do that too!
 
Well I am a f#$%ing idiot.
Got everything nicely routed, was routing along lines that already existed under the upper glass trim piece and got to the grommet for the wiring. Sweet, punch a hole in one end (part on the upper gate) to fish wires through, then pop the grommet on the body/roof out.

Get the power wires for the camera routed through first, Mind you I had gone through and tested everything to ensure the camera worked, just temporary connections. Everything worked BEAUTIFULLY!!! So stoked, and apparently got ahead of myself.

Get to trying to pull the RCA video wire through and it gets stuck halfway through the tubing. So what do I do, the intelligent thing of trying to MUSCLE it out. This resulted in my ripping the RCA tip off with maybe an inch of wire. However, not a simple splice these wires are like 30 gauge, maybe 5 strands and there is three of them attached.

So just had to order ANOTHER camera for $25...:bang::bang::bang:
Can't even blame it on liquid skill enhancing beverages, just was being dumb! *sigh*
 
I've outdone you actually. After routing everything to the headunit, during testing the HU slipped off its balance point on the tranny lever and yanked on the camera to HU RCA connection. The center of the camera RCA plug broke off in the HU RCA receptacle. The ONLY fix was to wire strip and hard connect. I was so panicked I was actually too flustered to offer up my symphony of creative f-bombs.
 
Told you that's the hardest part.. I'd be happy though that the RCA connector has ripped off, as this way it is super easy to feed the cable through. I'd just grab a $2 rca to rca cable from a random store, cut off the connector with some cable left and solder the cables together (after pulling the original cable through everything and when it is already near the headunit).

1592375455217.png
 
Told you that's the hardest part.. I'd be happy though that the RCA connector has ripped off, as this way it is super easy to feed the cable through. I'd just grab a $2 rca to rca cable from a random store, cut off the connector with some cable left and solder the cables together (after pulling the original cable through everything and when it is already near the headunit).

View attachment 2342637
I’ve never pulled apart an RCA cable to see what’s inside. How difficult is it to re-connect a new RCA connector if you cut one off? I’m wondering if rather than risk pulling off the RCA connector or struggling to route it through the grommets if I’d be better off preemptively cutting the RCA off leaving a couple inches or more for stripping later, route the wire all the way to its final destination, then strip The camera wire and the connector pig tail I cut off earlier and solder them back together close to the head unit... it would be so much easier fishing that wire through without any connector.

I was planning on mounting it on the upper tail gate similar to how the OEM camera for the ‘03-07 nav equipped LCs were set, but I may do a closer examination and see if a license plate surround is easier to wire up. I don’t think it will make a material difference for field of view.
 
I use these for very small wires like rca. They work great. I couldn't or wouldn't bother soldering that small stuff.

61ztfFF8hgL._AC_SL1000_.jpg
 
it’s not that hard to resolder the two wires together (if you have some wire left upstream the rca plug). Just strip the wire back, there should be a core and a shielding. Connect the cores together and the shieldings together and that’s it. It’s not as easy as when there are two wires running parallel together (instead of the core + shielding), but it is still easily doable
 
I’ve never pulled apart an RCA cable to see what’s inside. How difficult is it to re-connect a new RCA connector if you cut one off? I’m wondering if rather than risk pulling off the RCA connector or struggling to route it through the grommets if I’d be better off preemptively cutting the RCA off leaving a couple inches or more for stripping later, route the wire all the way to its final destination, then strip The camera wire and the connector pig tail I cut off earlier and solder them back together close to the head unit... it would be so much easier fishing that wire through without any connector.

I was planning on mounting it on the upper tail gate similar to how the OEM camera for the ‘03-07 nav equipped LCs were set, but I may do a closer examination and see if a license plate surround is easier to wire up. I don’t think it will make a material difference for field of view.
If you follow the OEM wire loom via the bottom tailgate section, the loom protector comes apart like a clamshell so you don't have to push/pull wires through it (both pieces). The rubber boot seal at the rear quarter panel slides along the plastic, so you don't have to manipulate the RCA connector through the right angle pinch point. It's so much simpler using the lower tailgate.

I should have done a write-up or vid, but I'm probably too selfish and just want to get the tasks finished.
 
Told you that's the hardest part.. I'd be happy though that the RCA connector has ripped off, as this way it is super easy to feed the cable through. I'd just grab a $2 rca to rca cable from a random store, cut off the connector with some cable left and solder the cables together (after pulling the original cable through everything and when it is already near the headunit).

View attachment 2342637
Yeah that is what I was hoping to do however the lines were so thin that literally I had nothing to strip the jacket off them. Trying to do it old school with my teeth or nails only broke the wire (again that is how thing this stuff is).
So while not the best solution, ordering a new camera was relatively cheap at $25.

it’s not that hard to resolder the two wires together (if you have some wire left upstream the rca plug). Just strip the wire back, there should be a core and a shielding. Connect the cores together and the shieldings together and that’s it. It’s not as easy as when there are two wires running parallel together (instead of the core + shielding), but it is still easily doable

Exactly and I have a nice soldering iron that I have used on occasion for other repairs. Bad part was that there was maybe 2" of line behind the RCA plug, if that to work with. This one was odd as I am used to seeing RCA line that is a jacketed center piece with shielding wire around it. However, the one that got destroyed was three lines, all jacketed (yellow, black, red... like a component RCA set) that were in the main jacket. Main jacket was all of like 14ga wire jacket, so that should tell you how small it is, plus there was no shielding around it.
 
I've outdone you actually. After routing everything to the headunit, during testing the HU slipped off its balance point on the tranny lever and yanked on the camera to HU RCA connection. The center of the camera RCA plug broke off in the HU RCA receptacle. The ONLY fix was to wire strip and hard connect. I was so panicked I was actually too flustered to offer up my symphony of creative f-bombs.
LOL... yeah I have done something similar and busted the inner probe before. Never tried to fix/build my own RCA cables but there is some good info on how to do it on reddit. I thought this may be a simple case of splicing in new line, even had some old component RCAs from god-knows what laying around that I was going to use to splice in. No dice...

So I guess moral of the story, the boot that is used to loom the wires is rubberized, cut through part of it and be done with the "tight" section in the middle so you don't do like I did. Then wrap the cut with GOOD electrical tape afterwards. Replacement camera should ship in a couple days so maybe next week I will get to this. In the meantime I may go back through and run the power/ground wires that are used to trigger from the reverse light, so that is handled.
 
Alright just got shipping confirmation that new replacement camera should be here Monday. Going to attempt to wire everything through the loom again but this time I am going to split the boot in the middle section where it got hung up and was tightest. And THIS TIME I will STOP if it starts getting hung up instead of muscling it. LOL :bang:
 

Users who are viewing this thread

Back
Top Bottom