ABS light and rear axle questions?

This site may earn a commission from merchant affiliate
links, including eBay, Amazon, Skimlinks, and others.

Joined
Apr 9, 2017
Messages
2,378
Location
tejas
wondering if anyone can help me fix an issue but also learn a thing or two.
i did a rear axle job with new pads calipers and rotors (and lspv). i did use speed bleeders but have since tried them out per ricks advice.
i've re-bled the brakes with the ignitions off (hook up hose with end buried in a jar brake fluid, crack bleeder half open, then pump brake five times).
i'm going this works because this is what youtube told me to do.
next the plan is to turn on the ignition and re-bleed with the system on.
anyway i had mushy brakes in addition to an ABS light. but also the right rear was making a sort of as the wheel turns metel
on mettle grinding sound. it could have been pad on metal but i didn't like it much so i parked it.
so now i am troubleshooting the ABS light. but also right rear.
aside from rhe /noise/ when i first assembled this right rear axle the hub was not - or i guess the rotor was not fully seated so the brake caliper was not going on. eventually i wacked the hub with a leather mallet and it seemed to seat and the brake caliper seems to go on nicely. the bolts tried like 60 st lb so it's hard to imagine i would have assemble it incorrectly or askew.
right now i think i am seeing the edge of the caliper or maybe its one of those seating clips (?) digging into the rotor. like i definitely see some silver metallic dust but also a little poof of black dust came off when i removed the wheel (not sure what that was except old brake dust maybe).
anyway - aside from pushing this rear pad clip fully back is there anything i need to check here?
there is NO brake fluid loss and i am kind of zeroing in on some kind of rotor movement for my ABS error.
last wueseion is are these ABS sensors supposed to get some grease? i saw the FSM diagnostic seemed to mention something about ABS sensor grease?
am i missing anything before i button this up again and try it again?
oh, ebrake pads seem to be adjusted correctly but can i release the center differential somehow so i can rotate this one hub or do i need to jack up the right wheel to rotate this left hub? i think this wasn't an issue when i had all four sides on jack stands with the wheels off.
THANKS

IMG_2631.jpeg


IMG_2628.jpeg


IMG_2635.jpeg


IMG_2637.jpeg


IMG_2638.jpeg
 
so there looks like there is some growing on the inside face of the outside half of the caliper?
the BREKE PAD. seems like it is lined up with this inside face which seems a little weird.
so i am working if
A. the axle is t fully seated into the rear differential?
B. hub isn't fully seated into the axle? though it seems like it's bolted in fine so it must be?
C. the hub is not fully seating and it is hanging the axle up because the hub is catching agsinst something?
D. or maybe it is just that the rotor didn't fully seat when i booted the rear wheel on? so it was running slightly askew against the property bolted in caliper?

IMG_2647.jpeg


IMG_2648.jpeg


IMG_2649.jpeg


IMG_2650.jpeg


IMG_2651.jpeg
 
so is this rear caliper casting supposed to basically be bearing on the rotor surface?
i went ahead and made some spacers and put some washers on to bolt the rotor to the hub and it seems to me like this caliper is too tight to this side of the rotor.
but short of the caliper itself being dished to the right hand side or the cast metal mounting it gets booted to being dished to the right - or the axle hub assembly itself being dished to the right i can't see what's going on.
i feel like i should have more space here?
and anyway i think it is bearing against the rotor in places as the rotor turns?

IMG_2659.jpeg


IMG_2665.jpeg


IMG_2664.jpeg


IMG_2673.jpeg


IMG_2678.jpeg
 
so i made some spacers and took some washers and bolted the rotor in tightly.
the caliper is still too tight to the rotor. i don't get it.
the calipers are all OEM. they came in toyota boxes from a toyota dealer. i did see the ones that came off are marked L and R but you can't accidentally swap these side to side if you wanted to i don't think since they are handed.
i also saw that the bleed screw is on the bottom for the one that came off. this makes things very confusing but again i don't think you can mix up sides with calipers.
anyway all i can think of is to pull the hub and axle assemble - not sure if i have to remove the hub to do this - and to gently mash the axle into the diff to make sure it is fully seated?
i don't have rear lockers so i don't think there should be anything tricky back there. but can the axle get hung up "proud" of where it should mesh in the diff and throw the location of the rotor off?
short of that i think i will put two thin washers between the caliper mount casting and the caliper?(!)

IMG_2672.jpeg


IMG_2676.jpeg


IMG_2683.jpeg


IMG_2686.jpeg


IMG_2679.jpeg
 
Make sure the parking brake shoes aren't keeping the rotor from seating all the way. Rear calipers will be close but should never touch the rotor. Or the hub/rear bearing is not installed correctly in some way.
 
Make sure the parking brake shoes aren't keeping the rotor from seating all the way. Rear calipers will be close but should never touch the rotor. Or the hub/rear bearing is not installed correctly in some way.
i see. thanks a lot for this.
i can revisit races and bearings i guess. i didn't think of that.
a couple follow ups please CD?
should i be "making sure" the cake is "seated" into the diff in some way? like it's not locked but i saw some caution at some point to make sure the rear diff wasn't locked but this doesn't apply i don't think. but should i give it a good whack at some point to make sure it is seated in some way? can i do this with it assemble like it is?
also dumb question maybe but how to i get the axle on left side to rotate? right now it is up off the ground on the left hand rear only. and it wants to turn the driveshaft. do i get right rear off the ground to rotate left rear? for some reason i am not tracking this?
also how do i make sure the e brake assembly is not holding it up? i rotate it and listen for a noise or scraping i guess?
also the dust cover is naturally dished out in the rear like here?
i guess i need to open the left rear to look at it...

IMG_2663.jpeg


IMG_2661.jpeg


IMG_2659.jpeg


IMG_2662.jpeg


IMG_2679.jpeg
 
Something doesn't look right, in one of the photos above there appears to just be one brake pad installed into the caliper,
or did you install the other pad after this photo was taken?

The caliper should not contact the rotor surface and custom spacers should not be required.

Missing brake pad 2.jpg
 
hey gents.
so i somehow managed to have my calipers on the wrong sides. i laid it all out but its hot down here and somehow i imagined they were "handed" in the sense that they could only go on one side.
i have fixed that but the problem remains.
what is m seeing is that @CruiserDave was right in that something is going on in the hub.
i have broken down the left side so i can see that the ABS sensor is about 1.15mm off of the ABS teeth in the rotor.
on the left side (the problem side) it is much more than this. more like 3-3.5mm.
so now i am down to the hub and i (personally) am inside trying to see if i can remember what i have going on here.
there IS some kind of hydraulic resistance being created by the wheel bearing grease on the spindle and inside the hub. so i wiped down the spindle to lower this a bit and i can see it is not seating far enough in.
so it seems to me i have this rubber lipped seal at the inside face of the hub? then under that - this is a bearing? is so it is NOT turning.
then it seems to me the inside edge of the bearing (GREEN ARROW) is what seats up against the end of the spindle (BLUE ARROW)?
if so i think this bearing is not seated far enough inward - even though i checked the RACE and the race /seems/ to me to be fully seated against the lip in the casting. also i was kind of really diligent about the races.
so i am guessing somehow that - well i can't quite figure what is going on.
but the hub is too far out by about 2-3mm. and the bearing doesn't seem to be spinning.
it's NOT the seal with the rubber lip in it not being driven in far enough that is keeping it too far outward is it?
i'm going to order a new seal and a new bearing and see what you guys think?

IMG_2743.jpeg


IMG_2737.jpeg


IMG_2742.jpeg


IMG_2747.jpeg


IMG_2750.jpeg
 
Something doesn't look right, in one of the photos above there appears to just be one brake pad installed into the caliper,
or did you install the other pad after this photo was taken?

The caliper should not contact the rotor surface and custom spacers should not be required.

View attachment 3707846
sorry about that. it's been confusing but it's interesting to take it apart again.
to be totally honest i was still having a hard time understanding that the hub is held in by that bolted on spindle with the funky lock nut. then the axle is bolted to the hub which is how it is held in.
for some reason i kept thinking that maybe the axle was being held out and this was pushing the hub out.
but now i can see something in the hub and race and bearing and rubber lip seal is keeping the hub - and the rotor too far out.
so the BLUE is the outer pad and GREEN is the inner pad. and i can see now the outer pad is pushed all the way into the piston so it is fully seated inside the carrier. whereas the GREEN inner pad is fully outward.
so it's the rotor grinding just a tad against the inside face of the outer half of the carrier.
and somehow i need to get the hub in further to get the rotor in the proper place.

IMG_2751.jpeg
 
If the bearing races are not fully seated or cockeyed that might explain the issue, or if the inner hub seal is not fully seated.
IME sometimes it takes a bit of arm force, wiggle/rotate/push-wiggle/rotate/push, to get the hub seated all the way in.

On a separate issue (FWIW) the spindle in the photo above appears to have a deep wear groove where the inner hub seal rides which means the new inner hub seal may not seal as well as it should, but also the wear groove will continue to get deeper using a standard design hub seal.

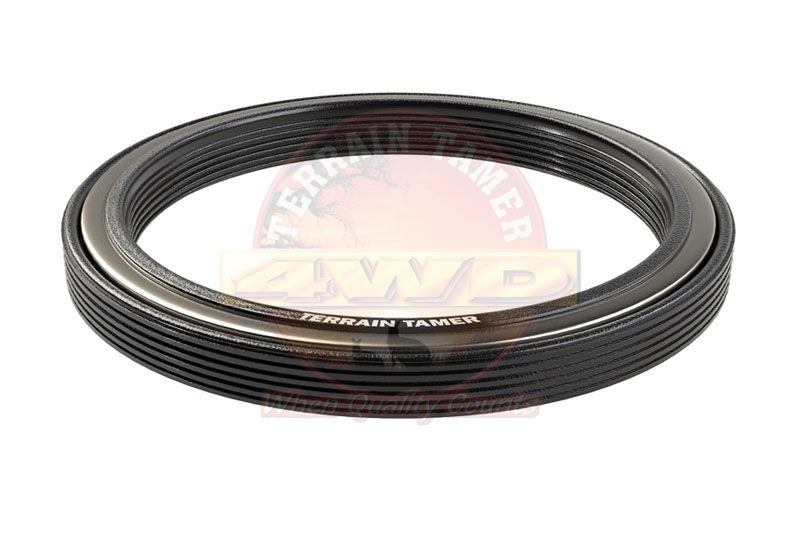
One option is to install Terrain Tamer HD hub seals which are a cassette type of seal that rotates internally instead of on the spindle


You can find them from Terrain Tamer (Australia) or from @orangefj45 in the US.


I installed a set of these on a 97 80 Series and no issues 7000 miles later.
 
Last edited:
If the bearing races are not fully seated or cockeyed that might explain the issue, or if the inner hub seal is not fully seated.
IME sometimes it takes a bit of arm force, wiggle/rotate/push-wiggle/rotate/push, to get the hub seated all the way in.

On a separate issue (FWIW) the spindle in the photo above appears to have a deep wear groove where the inner hub seal rides which means the new inner hub seal may not seal as well as it should, but also the wear groove will continue to get deeper using a standard design hub seal.

One option is to install Terrain Tamer HD hub seals which are a cassette type of seal that rotates internally instead of on the spindle


You can find them from Terrain Tamer (Australia) or from @orangefj45 in the US.


I installed a set of these on a 97 80 Series and no issues 7000 miles later.

Great option and we have these seals in stock. We’ve installed them on multiple customers’ vehicles and sold a number to fellow mudders and cruiser owners across the US.

Happy to help!

Georg @ Valley Hybrids @ Cruiser Brothers
Shop 209-475-8808
Sales@valleyhybrids.com
 
If the bearing races are not fully seated or cockeyed that might explain the issue, or if the inner hub seal is not fully seated.
IME sometimes it takes a bit of arm force, wiggle/rotate/push-wiggle/rotate/push, to get the hub seated all the way in.

On a separate issue (FWIW) the spindle in the photo above appears to have a deep wear groove where the inner hub seal rides which means the new inner hub seal may not seal as well as it should, but also the wear groove will continue to get deeper using a standard design hub seal.

One option is to install Terrain Tamer HD hub seals which are a cassette type of seal that rotates internally instead of on the spindle


You can find them from Terrain Tamer (Australia) or from @orangefj45 in the US.


I installed a set of these on a 97 80 Series and no issues 7000 miles later.

can you give me an arrow to the wear please?
but also i am having a hard time with this.
there IS some like hydraulic resistance created from the grease on the spindle and the packed grease inside the hub. originally i thought this could be "pushed out of the way" but the more i am in there the more it seemed to be a problem.
so i wiped down the spindle and tried to reseat. but it is still off of the sensor and it needs to be a full millimeter and a half or two closer.
-> i could open up the Right side and swap hubs and see do that helps. or i could tear into the hub now which means pulling the seal.
since the bearing is not rotating this seems like the play.
but i don't understand - well why eluding the bearing be rotating? it's sitting too high because the race is not fully driven? then the seek comes down on top of it and it gets mashed up against the bearing when i torque the lug nuts on? then it can't spin?
or the race is driven properly and it went in cocked sideways and it got hung up somehow?
anyway i had a lug stud/nut not want to come off then i pulled it all apart first time. i tried to clean that one up. this time i had two lug studs really give me problems on the right side. i had to get a 1/2" breaker bar with an extender on it so i think i am pushing my luck at this point.
can i get all new lug nuts and leave the studs in? can i add some antiseize or something?
i am going to order stuff i am just wondering if i need to put them in now...
also it would be kind of nice to know what this height is supposed to be...

IMG_2758.jpeg
 
The apparent wear groove in the spindle (see photo) is a minor issue, just something that was visible in your photos, it should not prevent you from installing
the hub all the way onto the spindle.


Starting from the beginning: did you replace the hub bearings and races or did you just clean and repack the original bearings with grease?

Rear axle spindle groove 2.jpg
 
Make sure the parking brake shoes aren't keeping the rotor from seating all the way. Rear calipers will be close but should never touch the rotor. Or the hub/rear bearing is not installed correctly in some way.
hey man. also @Kernal
really appreciate the eyeballs and the help here.
turns out i didn't seat the inner wheel bearing race. then the seal went on top and actually prevented it from spinning. so two good things to verify next time apparently.
i'm not totally sure what happened but i think i was using old races to drive the new ones and i believe the other side of this hub is deep so you sort of have to stack three races upside down and right side up in a specific order. to drive it deep enough. and i guess by the time i got flipping them around i got distracted and didn't drive this one far enough.
anyway the depth from top of race to top of hub is exactly the height of the old race so if you drop the old one in you'll know it's fully driven when the old one is flush with the tip of the hub (which you can see here).
the one benefit (aside from working outside in 100 degree heat again) is that the front hub makes a lot more sense now.
to be honest i still had a hard time understanding how it all held together even after pulling it apart and re-assembling.
anyway with the help i got it sorted and got a new seal coming in tomorrow.

IMG_2828.jpeg


IMG_2838.jpeg


IMG_2836.jpeg


IMG_2837.jpeg


IMG_2830.jpeg
 
The apparent wear groove in the spindle (see photo) is a minor issue, just something that was visible in your photos, it should not prevent you from installing
the hub all the way onto the spindle.


Starting from the beginning: did you replace the hub bearings and races or did you just clean and repack the original bearings with grease?

View attachment 3708477
hey kernal.
thanks for the help.
i did new bearings and races because i was "already in there". honestly they looked great as they were but its kind of hard to tell i guess and when its a new to you repair i guess you just kind of follow the steps.
if i had to do it again and i understood the repair going on i would have probably just left the old ones in now that i think about it.
anyway it turns out i didn't fully seat the inner race on this side. it was out by like 2.5mm.
THANKS
 
I don't think left and right have to be the same, but there is a minimum thickness spec in the FSM. If you are going that far then buy new.
 
IME I wouldn't bother to turn those rotors assuming they aren't warped or too thin, run a wire wheel then sand them a bit to give the new pads something to bite into.

FWIW I've replaced pads many times on rotors which often had some grooves, the new pads just wore the rotors down flat again.

Not to mention that the cost of turning rotors these days is about half the cost of new rotors (used to be $5-10 to turn a rotor, now ~$40 each out the door in my area). IMHO the choices are either replace the rotors with new OEM (because it's all apart and not waste money on turning the rotors) or just slap on new pads and run those rotors for another 100,000+ miles.
 
Back
Top Bottom